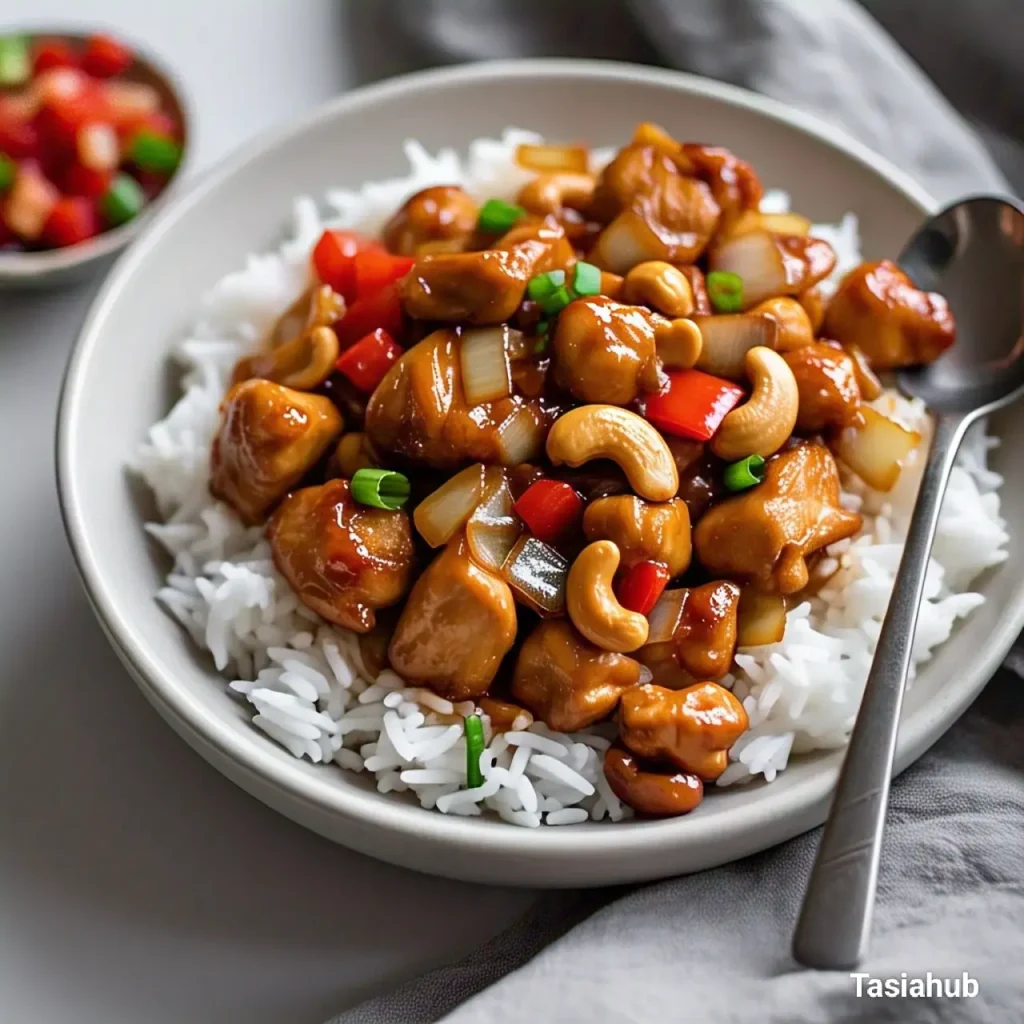
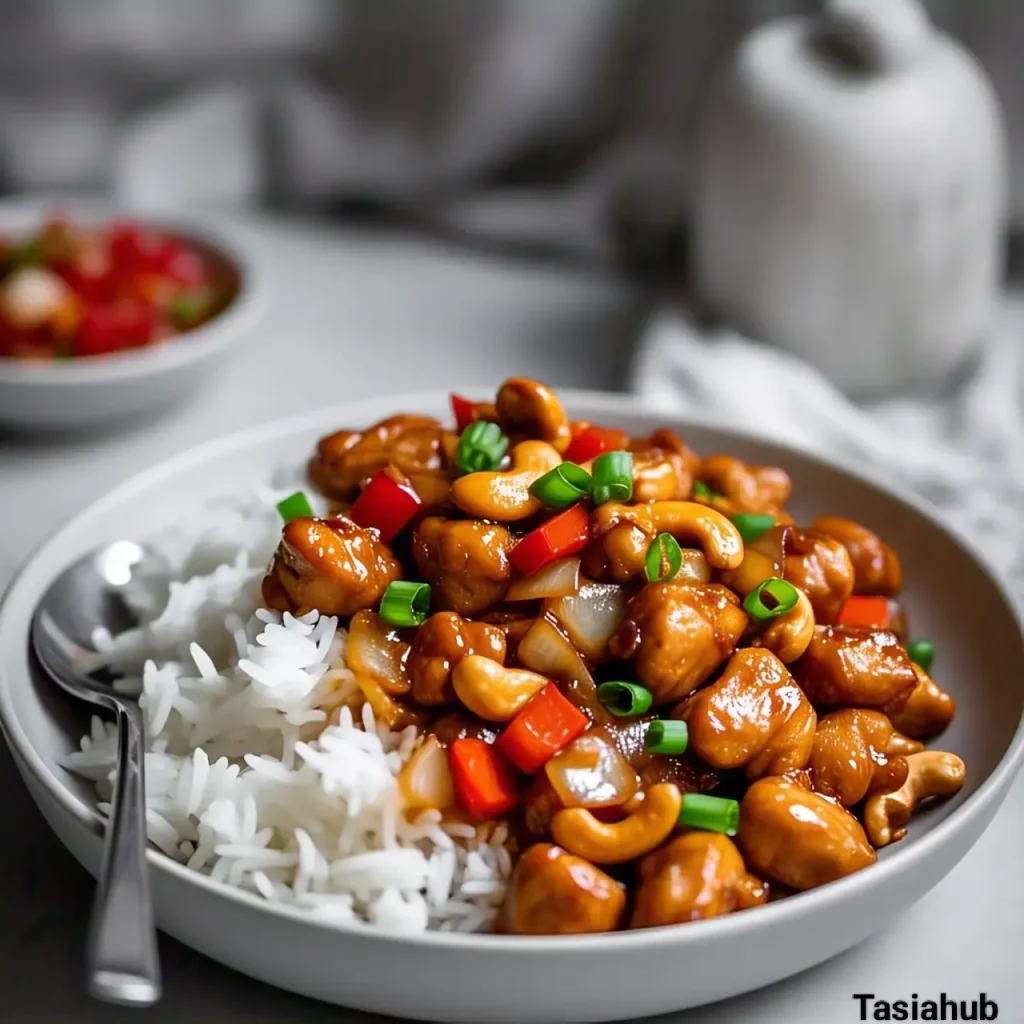
Cashew Chicken Stir Fry

A Delicious and Easy Stir-Fry
What makes cashew chicken so special is its simplicity. You don’t need fancy ingredients or hours in the kitchen to create something that tastes like takeout. With a handful of pantry staples and fresh ingredients, you can whip up a restaurant-quality dish in under 30 minutes. Whether you’re cooking for your family, meal prepping for the week, or just craving a cozy dinner, this dish is a fantastic choice.
One of the things I love most about cashew chicken is its versatility. You can adjust the flavors to suit your taste, make it as spicy or mild as you like, and even swap out ingredients based on what you have. It’s also a great way to sneak in some extra veggies, making it a well-rounded meal. Plus, the combination of tender chicken and crunchy cashews makes every bite exciting!
This dish fits perfectly into a busy routine. It’s quick enough for a weeknight meal but delicious enough to serve when you have guests. Paired with steamed rice or noodles, cashew chicken is a satisfying, wholesome meal that you’ll want to make again and again.
About Cashew Chicken
Cashew chicken is a stir-fry dish that combines bite-sized pieces of chicken with crunchy cashews, all coated in a rich, savory sauce. The sauce usually includes a mix of soy sauce, garlic, ginger, and a touch of sweetness, giving it a well-balanced flavor. Some versions add hoisin sauce or oyster sauce for extra depth, while others keep it simple with just a few ingredients.
This dish differs from other chicken stir-fries, like Kung Pao Chicken or General Tso’s Chicken, in a few ways. Unlike Kung Pao Chicken, which has a spicy kick from dried chilies and a tangy, slightly sour sauce, cashew chicken is milder and more nutty.
General Tso’s Chicken, on the other hand, is deep-fried and coated in a sticky, sweet sauce, while cashew chicken is stir-fried for a lighter, fresher taste.
Why You’ll Love It
- Quick & Easy – You can make cashew chicken in under 30 minutes, making it perfect for busy weeknights when you need a fast but delicious meal.
- Better Than Takeout – It has all the bold flavors of restaurant-style cashew chicken but with fresher ingredients and no mystery additives.
- Customizable – You can adjust the spice level, add extra veggies, or swap out ingredients to fit your taste or dietary needs.
- Family-Friendly – Even picky eaters love the combination of tender chicken, crunchy cashews, and a slightly sweet sauce.
- Great for Meal Prep – This dish stores well in the fridge and reheats beautifully, making it a fantastic option for lunches or leftovers.
Ingredients
For the Chicken
- 1 lb boneless, skinless chicken breast (or thighs), cut into bite-sized pieces
- 2 tbsp cornstarch (for coating)
- 2 tbsp vegetable oil (for frying)
For the Sauce
- ¼ cup soy sauce
- 1 tbsp oyster sauce (optional but adds great depth)
- 1 tbsp hoisin sauce
- 1 tbsp rice vinegar
- 1 tbsp honey or brown sugar
- ½ cup chicken broth or water
- 1 tsp sesame oil
- 1 tbsp cornstarch (mixed with 2 tbsp water to thicken)
For the Stir-Fry
- ½ cup unsalted cashews
- 1 small onion, chopped
- 1 bell pepper (any color), diced
- 2 cloves garlic, minced
- 1 tsp fresh ginger, grated
- 2 green onions, sliced (for garnish)
- ½ tsp red pepper flakes (optional, for spice)
For Serving
- Steamed white or brown rice
- Sesame seeds (optional, for garnish)
Ingredient Notes
- Chicken Choice – Chicken thighs will give you a juicier texture, while chicken breast is leaner. Both work well, so pick your favorite!
- Cashews – I like using unsalted cashews so I can control the salt level in the dish. If you only have salted ones, just adjust the soy sauce accordingly.
- Oyster & Hoisin Sauce – These add a deep umami flavor, but if you don’t have them, you can still make a tasty version using just soy sauce and a little extra honey.
- Cornstarch Coating – Tossing the chicken in cornstarch helps it brown nicely and gives it a slight crispness, just like restaurant-style stir-fries.
- Veggie Swaps – Feel free to add broccoli, snap peas, or zucchini for extra color and nutrition. This dish is super flexible!
Kitchen Tools Needed
- Large Skillet or Wok – A wok is ideal for stir-frying because it heats evenly and cooks ingredients quickly, but a large nonstick or stainless steel skillet works great too.
- Cutting Board & Sharp Knife – For chopping the chicken, veggies, and cashews. A sharp knife makes prep work much easier!
- Mixing Bowls – You’ll need a few bowls to mix the sauce and coat the chicken in cornstarch.
- Tongs or Wooden Spoon – For stirring and tossing everything together without breaking up the ingredients.
- Measuring Cups & Spoons – Helps ensure you get the right balance of flavors in the sauce.
- Small Whisk or Fork – To mix the cornstarch slurry and prevent lumps.
- Rice Cooker (Optional) – If you’re serving cashew chicken with rice, a rice cooker makes it effortless. I love my Zojirushi rice cooker because it always gives me perfect, fluffy rice!
Cooking Instructions
Step 1: Prep the Chicken (5 minutes)
- Pat the chicken dry with a paper towel, then cut it into bite-sized pieces.
- In a bowl, toss the chicken with 2 tablespoons of cornstarch until evenly coated. This helps it get a light, crispy texture when cooked.
Pro Tip: Cornstarch not only helps with browning but also makes the sauce cling better to the chicken!
Step 2: Make the Sauce (2 minutes)
- In a small bowl, whisk together the soy sauce, oyster sauce, hoisin sauce, rice vinegar, honey, chicken broth, and sesame oil.
- In a separate small cup, mix 1 tablespoon of cornstarch with 2 tablespoons of water to create a slurry. Set both aside.
Pro Tip: Whisk the cornstarch slurry right before adding it to the sauce to prevent it from settling at the bottom.
Step 3: Cook the Chicken (6-8 minutes)
- Heat 2 tablespoons of vegetable oil in a large skillet or wok over medium-high heat.
- Add the chicken and cook for about 3–4 minutes on each side until golden brown and fully cooked. Transfer to a plate and set aside.
Don’t overcrowd the pan! Cooking in batches if needed ensures each piece gets a nice sear instead of steaming.
Step 4: Stir-fry the Veggies (3-4 minutes)
- In the same skillet, add a little more oil if needed, then toss in the onions, bell peppers, garlic, and ginger. Stir-fry for about 3 minutes until fragrant and slightly softened.
Step 5: Combine Everything (3-4 minutes)
- Return the cooked chicken to the skillet. Stir in the sauce and let everything simmer for 1–2 minutes.
- Pour in the cornstarch slurry and stir continuously for another minute until the sauce thickens and coats the chicken beautifully.
- Add the cashews and mix well.
Pro Tip: If you want a thinner sauce, add a splash of water or broth at this stage.
Step 6: Serve & Enjoy! (1-2 minutes)
- Remove from heat and garnish with sliced green onions and sesame seeds, if using.
- Serve hot over steamed rice or noodles and enjoy your homemade cashew chicken!
This dish tastes even better the next day, so don’t be afraid to make extra for leftovers!
Tips and Tricks for Success
- Toast the Cashews for Extra Flavor – If you have an extra minute, lightly toast the cashews in a dry pan before adding them to the stir-fry. This brings out their natural nuttiness and adds even more crunch!
- Don’t Skip the Cornstarch – Coating the chicken in cornstarch gives it that classic restaurant-style texture and helps the sauce stick beautifully.
- Prep Everything Before Cooking – Stir-fries cook fast! Chop your veggies, measure your ingredients, and have everything ready before turning on the stove.
- Adjust the Sweetness and Saltiness – If you like a sweeter sauce, add a bit more honey. For a saltier dish, increase the soy sauce slightly. Always taste as you go!
- Make It Spicy (or Not!) – Want some heat? Add red pepper flakes, a dash of Sriracha, or sliced chili peppers. Keeping it mild? Leave them out—it’s still delicious!
Ingredient Substitutions and Variations
- Chicken Alternatives – Swap the chicken for shrimp, tofu, or even thinly sliced beef for a different protein option.
- Vegetable Add-Ins – This dish works great with broccoli, snap peas, carrots, mushrooms, or zucchini. Just toss in whatever you have!
- Nut-Free Option – If you have a nut allergy, you can replace cashews with sunflower seeds or simply leave them out.
- Gluten-Free Version – Use tamari instead of soy sauce, and double-check that your oyster and hoisin sauces are gluten-free.
- Low-Carb/Keto-Friendly – Skip the cornstarch, use coconut aminos instead of soy sauce, and serve over cauliflower rice for a low-carb version.
This dish is super flexible, so don’t be afraid to make it your own!
Serving Suggestions
- Steamed Rice – The classic pairing! Fluffy white or brown rice soaks up the delicious sauce perfectly.
- Fried Rice – Turn it into a full takeout-style meal by serving it with homemade fried rice. The extra flavor and texture make it even better!
- Noodles – Toss cashew chicken with lo mein, ramen, or even spaghetti for a fun twist. I love using rice noodles for a light, chewy texture.
- Lettuce Wraps – For a low-carb option, serve the cashew chicken in crisp lettuce cups. It’s fresh, crunchy, and super satisfying!
- Side of Stir-Fried Veggies – A simple side of stir-fried bok choy, green beans, or snow peas adds extra nutrition and color to the plate.
Storage and Reheating Instructions
- Refrigeration: Store leftover cashew chicken in an airtight container in the fridge for up to 3 days. The flavors get even better as they sit!
- Freezing: While it’s best fresh, you can freeze it for up to 2 months. Just let it cool completely before storing it in a freezer-safe container.
- Reheating on the Stovetop: Warm it in a skillet over medium heat with a splash of water or chicken broth to loosen up the sauce. Stir occasionally until heated through.
- Reheating in the Microwave: Heat in 30-second intervals, stirring in between, until warmed. Adding a teaspoon of water helps keep the sauce from drying out.
I love making extra cashew chicken for meal prep! It tastes just as good (if not better) the next day and a quick reheat makes for an easy, stress-free lunch.
Frequently Asked Questions
Can I use roasted cashews instead of raw?
Yes! Roasted cashews add extra crunch and flavor. Just make sure they’re unsalted, or adjust the soy sauce so your dish doesn’t turn out too salty.
What can I use instead of cornstarch?
You can swap cornstarch for arrowroot powder or tapioca starch for a similar thickening effect. If you don’t have any, the sauce will still taste great—just slightly thinner.
How do I make this dish spicier?
Add red pepper flakes, Sriracha, or a dash of chili oil to the sauce. You can also stir-fry some sliced chili peppers with the veggies for extra heat!
Can I make cashew chicken ahead of time?
Absolutely! The flavors develop even more when stored overnight. Just keep it in an airtight container in the fridge and reheat when ready to serve.
What’s the best way to keep chicken tender?
Cooking it over medium-high heat and not overcooking it is key! Also, using chicken thighs instead of breasts will give you a juicier result.
Can I make this without soy sauce?
Yes! Try using coconut aminos for a soy-free option, or mix a little Worcestershire sauce with water for a similar umami effect.
I’d love to hear how your cashew chicken turns out! Did you add extra veggies? Try a new twist? Let me know in the comments! And if you snap a photo, tag me on social media—I love seeing your delicious creations! Happy cooking!
Don’t forget to share your photos on Instagram and tag me (@tasiahub_) or use the hashtag (#tasiahub). I’d love to see your creations!

Cashew Chicken Stir Fry
Equipment
- Large Skillet or Wok
- Cutting board & sharp knife
- Mixing Bowls
- Tongs or wooden spoon
- Measuring Cups & Spoons
- Small whisk or fork
- Rice Cooker (Optional)
Ingredients
For the Chicken
- 1 lb boneless skinless chicken breast (or thighs), cut into bite-sized pieces
- 2 tbsp cornstarch for coating
- 2 tbsp vegetable oil for frying
For the Sauce
- ¼ cup soy sauce
- 1 tbsp oyster sauce optional but adds great depth
- 1 tbsp hoisin sauce
- 1 tbsp rice vinegar
- 1 tbsp honey or brown sugar
- ½ cup chicken broth or water
- 1 tsp sesame oil
- 1 tbsp cornstarch mixed with 2 tbsp water to thicken
For the Stir-Fry
- ½ cup unsalted cashews
- 1 small onion chopped
- 1 bell pepper any color, diced
- 2 cloves garlic minced
- 1 tsp fresh ginger grated
- 2 green onions sliced (for garnish)
- ½ tsp red pepper flakes optional, for spice
For Serving
- Steamed white or brown rice
- Sesame seeds optional, for garnish
Instructions
Step 1: Prep the Chicken (5 minutes)
- Pat the chicken dry with a paper towel, then cut it into bite-sized pieces.
- In a bowl, toss the chicken with 2 tablespoons of cornstarch until evenly coated. This helps it get a light, crispy texture when cooked.
- Pro Tip: Cornstarch not only helps with browning but also makes the sauce cling better to the chicken!
Step 2: Make the Sauce (2 minutes)
- In a small bowl, whisk together the soy sauce, oyster sauce, hoisin sauce, rice vinegar, honey, chicken broth, and sesame oil.
- In a separate small cup, mix 1 tablespoon of cornstarch with 2 tablespoons of water to create a slurry. Set both aside.
- Pro Tip: Whisk the cornstarch slurry right before adding it to the sauce to prevent it from settling at the bottom.
Step 3: Cook the Chicken (6-8 minutes)
- Heat 2 tablespoons of vegetable oil in a large skillet or wok over medium-high heat.
- Add the chicken and cook for about 3–4 minutes on each side until golden brown and fully cooked. Transfer to a plate and set aside.
- Don’t overcrowd the pan! Cooking in batches if needed ensures each piece gets a nice sear instead of steaming.
Step 4: Stir-Fry the Veggies (3-4 minutes)
- In the same skillet, add a little more oil if needed, then toss in the onions, bell peppers, garlic, and ginger. Stir-fry for about 3 minutes until fragrant and slightly softened.
Step 5: Combine Everything (3-4 minutes)
- Return the cooked chicken to the skillet. Stir in the sauce and let everything simmer for 1–2 minutes.
- Pour in the cornstarch slurry and stir continuously for another minute until the sauce thickens and coats the chicken beautifully.
- Add the cashews and mix well.
- Pro Tip: If you want a thinner sauce, add a splash of water or broth at this stage.
Step 6: Serve & Enjoy! (1-2 minutes)
- Remove from heat and garnish with sliced green onions and sesame seeds, if using.
- Serve hot over steamed rice or noodles and enjoy your homemade cashew chicken!
- This dish tastes even better the next day, so don’t be afraid to make extra for leftovers!
Notes
Estimated Nutritional Value (Per Serving)
- Calories: ~400-450 kcal
- Protein: ~30g
- Carbohydrates: ~25g
- Fat: ~20g
- Sodium: ~800-1000mg (varies based on soy sauce and added salt)
- Fiber: ~2-3g
The nutritional information on this website is only an estimate and is provided for convenience and as a courtesy only. The accuracy of the nutritional information for any recipe on this site is not guaranteed. It should not be used as a substitute for a professional nutritionist’s advice.