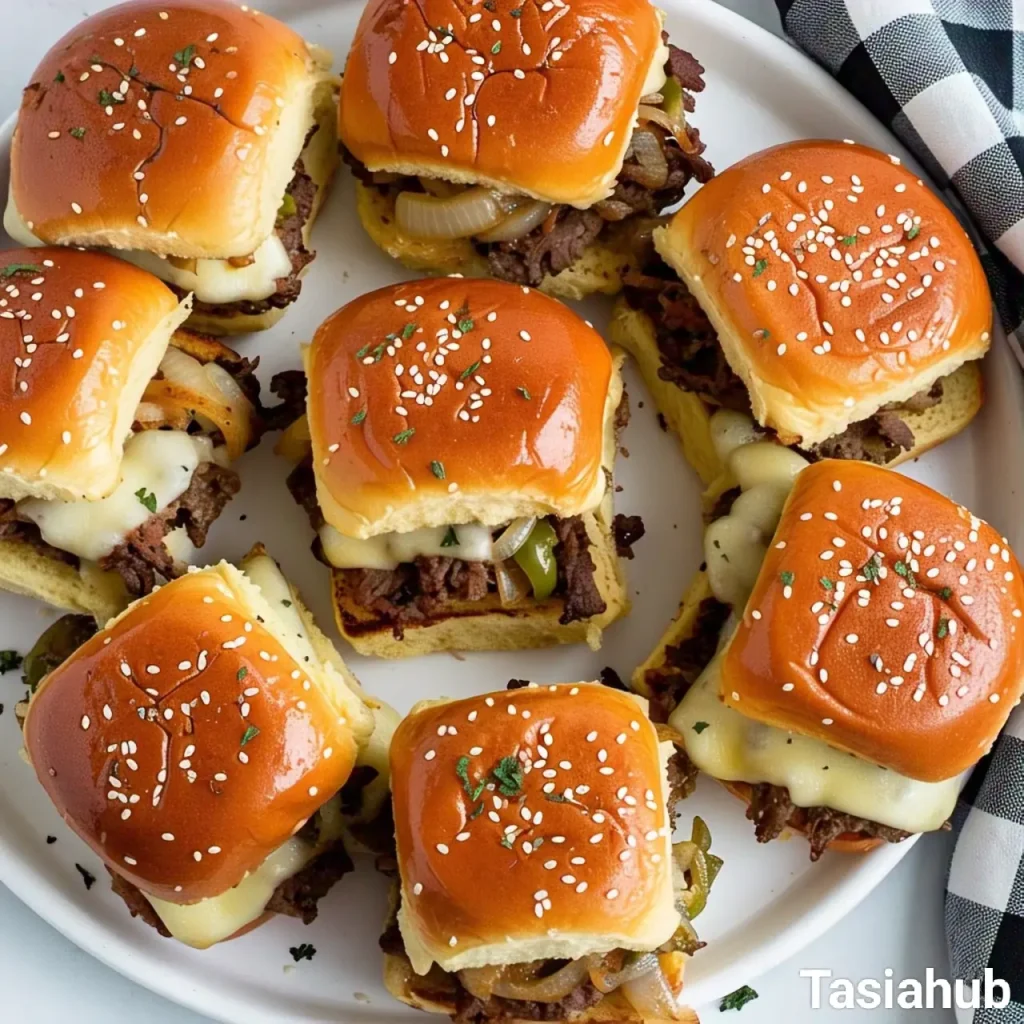
Philly Cheesesteak Sliders

If you love cheesesteaks but don’t want to commit to a huge sandwich, Philly cheesesteak sliders are the perfect solution! These little sandwiches pack all the delicious flavors of a classic Philly cheesesteak—tender beef, melted cheese, and caramelized onions—into a soft, buttery slider bun. They’re easy to make and even easier to eat!
Whether you’re hosting a game day party, planning a family dinner, or just craving something warm and cheesy, these sliders are a must-try. They come together quickly and are baked to perfection, making them a great option for busy weeknights. Plus, they’re great for sharing!
This post contains affiliate links and I may earn a small commission when you click on the link at no additional cost to you. As an Amazon Affiliate, I earn from qualifying purchases, thank you.
The best part? You don’t need a grill or a fancy cheesesteak stand to enjoy them. With just a few simple ingredients and a baking dish, you can bring all the flavors of a Philly cheesesteak straight to your kitchen. Get ready to impress your family and friends with this tasty, melty, and super-satisfying recipe!
Why You’ll Love This Recipe
- Easy to Make – No need to grill or sear steaks for hours. This recipe comes together in about 30 minutes!
- Perfect for Sharing – These mini sandwiches are great for parties, gatherings, or a fun family meal.
- Customizable – Want to add mushrooms, peppers, or spicy mayo? Go for it!
- Make-Ahead Friendly – You can prepare the filling in advance and assemble the sliders right before baking.
Ingredients
For the Meat Filling
- 1 lb (450g) thinly sliced beef (ribeye is best, but sirloin or shaved beef also work)
- 1 tablespoon olive oil
- 1 medium onion, sliced
- 1 bell pepper, sliced (optional)
- 1 teaspoon garlic powder
- 1 teaspoon Worcestershire sauce
- ½ teaspoon salt
- ½ teaspoon black pepper
For the Sliders
- 12 slider rolls (Hawaiian rolls work great!)
- 6 slices provolone cheese (or mozzarella)
- 2 tablespoons butter, melted
- ½ teaspoon garlic powder
- ½ teaspoon dried parsley (optional)
- 1 teaspoon sesame seeds (optional, for topping)
Kitchen Tools Needed
Before you start cooking, gather these kitchen tools to make the process smooth and easy:
- Large skillet – For cooking the beef, onions, and peppers.
- Cutting board and knife – To slice the onions, peppers, and beef (if not pre-sliced).
- Baking dish (9×13 inch or similar size) – To assemble and bake the sliders.
- Small bowl – For mixing the garlic butter topping.
- Brush or spoon – To spread the melted butter on top of the rolls.
- Aluminum foil – To cover the sliders while baking to keep them soft and melty.
Instructions
Step 1: Cook the Meat and Veggies
- Heat 1 tablespoon of olive oil in a large skillet over medium heat.
- Add sliced onions and bell peppers (if using) and cook for about 3-4 minutes until softened.
- Add the thinly sliced beef, garlic powder, Worcestershire sauce, salt, and pepper. Cook for another 5-7 minutes, stirring occasionally, until the beef is browned and cooked through. Remove from heat.
Step 2: Prepare the Sliders
- Preheat your oven to 350°F (175°C).
- Slice the slider rolls in half, keeping them connected, and place the bottom half in a greased baking dish.
- Lay half of the cheese slices over the bottom rolls.
- Spread the cooked beef mixture evenly over the cheese.
- Add the remaining cheese slices on top.
- Place the top half of the rolls over everything.
Step 3: Add Garlic Butter & Bake
- In a small bowl, mix melted butter, garlic powder, and dried parsley.
- Brush the butter mixture over the top of the rolls and sprinkle with sesame seeds (if using).
- Cover the dish with aluminum foil and bake for 15 minutes.
- Remove the foil and bake for another 5 minutes, or until the tops are golden brown and the cheese is melted.
Step 4: Serve & Enjoy!
- Remove from the oven and let them cool for a couple of minutes.
- Use a knife to separate the sliders, and serve warm.
Tips and Tricks for Success
- Use the right beef – Thinly sliced ribeye is the best choice for authentic Philly cheesesteak flavor, but sirloin or shaved beef works well too.
- Melt the cheese properly – Covering the sliders with foil while baking helps the cheese melt evenly without burning the tops.
- Don’t skip the garlic butter! – It adds extra flavor and makes the sliders taste even better.
- Make ahead option – You can cook the beef mixture ahead of time and store it in the fridge. Just reheat and assemble the sliders when ready to bake.
- Customize it – Add mushrooms, spicy mayo, or swap provolone for cheddar or Swiss cheese for a different twist!
Now you’re ready to make these delicious Philly cheesesteak sliders! Whether for a party, a family meal, or a snack, they’re sure to be a hit. Try them out and enjoy every cheesy, savory bite!
Ingredient Substitutions and Variations
Want to switch things up? Here are some easy substitutions and variations to make this recipe fit your taste or dietary needs:
Ingredient Substitutions
- Beef Substitute – If you don’t have ribeye or sirloin, you can use ground beef, deli roast beef, or even shredded rotisserie chicken for a different twist.
- Cheese Options – Provolone is classic, but you can swap it for mozzarella, Swiss, cheddar, or even Pepper Jack for a little spice.
- Bread Alternatives – If you don’t have slider rolls, you can use dinner rolls, brioche buns, or even sliced baguette pieces.
Variations to Try
- Spicy Philly Sliders – Add sliced jalapeños or drizzle sriracha over the meat before adding the top buns.
- Mushroom Lovers’ Version – Add sautéed mushrooms to the filling for extra flavor.
- Garlic Butter Overload – Double the garlic butter mixture and brush some on the inside of the buns for even more richness.
- Low-Carb/Keto Option – Skip the buns and serve the Philly cheesesteak mixture over a bed of lettuce or in a low-carb tortilla.
Serving Suggestions
Philly cheesesteak sliders are great on their own, but they pair even better with some tasty sides! Here are a few ideas:
- Crispy French Fries – Classic and always a hit! Try seasoned or sweet potato fries.
- Onion Rings – Crunchy and perfect with a cheesy slider.
- Coleslaw – A refreshing, tangy contrast to the rich flavors.
- Side Salad – A light salad with ranch or vinaigrette balances out the meal.
- Potato Wedges – Baked or fried, they’re an excellent sidekick.
- Pickles – The acidity cuts through the richness and adds a nice crunch.
For a party, you can serve these sliders with a dipping sauce like cheese sauce, ranch, or garlic aioli!

Storage and Reheating Instructions
Storing Leftovers
If you have leftover sliders (which is rare because they’re so good!), store them properly:
- Refrigerator: Place the sliders in an airtight container and store them in the fridge for up to 3 days.
- Freezer: Wrap individual sliders in plastic wrap and place them in a freezer-safe bag. They’ll stay good for up to 2 months.
Reheating Instructions
- Oven (Best Method): Preheat to 350°F (175°C), cover sliders with foil, and bake for 10 minutes (or 15 if frozen). This keeps them soft and melty.
- Microwave (Quickest): Heat sliders on a microwave-safe plate for 30-45 seconds. Be careful not to overheat, or the bread may become chewy.
- Air Fryer: Heat at 300°F (150°C) for 3-5 minutes for a slightly crispier texture.
FAQ
1. Can I make these ahead of time?
Yes! You can cook the beef mixture ahead of time and store it in the fridge for up to 2 days. When ready to serve, assemble the sliders and bake as directed.
2. What’s the best meat for Philly cheesesteak sliders?
Ribeye is the best option because it’s tender and flavorful. However, sirloin, flank steak, or even deli roast beef can work in a pinch.
3. Can I use a different type of bread?
Absolutely! If you don’t have slider rolls, you can use dinner rolls, brioche buns, or even small hoagie rolls.
4. How do I keep the sliders from getting soggy?
Make sure not to overload them with too much filling or sauce. Also, baking them uncovered for the last few minutes helps crisp up the tops.
5. Can I make these without an oven?
Yes! You can assemble the sliders and heat them in a covered skillet over low heat until the cheese melts.
These Philly cheesesteak sliders are packed with flavor and perfect for any occasion. Whether you’re making them for a party, a cozy dinner, or meal prepping for the week, they’re sure to be a hit. Try them out and let me know how they turn out!
Don’t forget to share your photos on Instagram and tag me @tasiahub. I’d love to see your creations!

Philly Cheesesteak Sliders
Equipment
- Large skillet
- Cutting Board and Knife
- Baking dish (9×13 inch or similar size)
- Small bowl
- Brush or spoon
- Aluminum Foil
Ingredients
For the Meat Filling
- 1 lb 450g thinly sliced beef (ribeye is best, but sirloin or shaved beef also work)
- 1 tablespoon olive oil
- 1 medium onion sliced
- 1 bell pepper sliced (optional)
- 1 teaspoon garlic powder
- 1 teaspoon Worcestershire sauce
- ½ teaspoon salt
- ½ teaspoon black pepper
For the Sliders
- 12 slider rolls Hawaiian rolls work great!
- 6 slices provolone cheese or mozzarella
- 2 tablespoons butter melted
- ½ teaspoon garlic powder
- ½ teaspoon dried parsley optional
- 1 teaspoon sesame seeds optional, for topping
Instructions
Step 1: Cook the Meat and Veggies
- Heat 1 tablespoon of olive oil in a large skillet over medium heat.
- Add sliced onions and bell peppers (if using) and cook for about 3-4 minutes until softened.
- Add the thinly sliced beef, garlic powder, Worcestershire sauce, salt, and pepper. Cook for another 5-7 minutes, stirring occasionally, until the beef is browned and cooked through. Remove from heat.
Step 2: Prepare the Sliders
- Preheat your oven to 350°F (175°C).
- Slice the slider rolls in half, keeping them connected, and place the bottom half in a greased baking dish.
- Lay half of the cheese slices over the bottom rolls.
- Spread the cooked beef mixture evenly over the cheese.
- Add the remaining cheese slices on top.
- Place the top half of the rolls over everything.
Step 3: Add Garlic Butter & Bake
- In a small bowl, mix melted butter, garlic powder, and dried parsley.
- Brush the butter mixture over the top of the rolls and sprinkle with sesame seeds (if using).
- Cover the dish with aluminum foil and bake for 15 minutes.
- Remove the foil and bake for another 5 minutes, or until the tops are golden brown and the cheese is melted.
Step 4: Serve & Enjoy!
- Remove from the oven and let them cool for a couple of minutes.
- Use a knife to separate the sliders, and serve warm.
Notes
Nutritional Value (Per Slider – Approximate)
- Calories: ~280
- Protein: ~14g
- Carbohydrates: ~23g
- Fats: ~14g
- Saturated Fat: ~7g
- Cholesterol: ~35mg
- Sodium: ~400mg
- Use leaner meat like turkey or chicken.
- Choose low-fat cheese or reduce the cheese quantity.
- Opt for whole wheat rolls instead of white slider buns.
The nutritional information on this website is only an estimate and is provided for convenience and as a courtesy only. The accuracy of the nutritional information for any recipe on this site is not guaranteed. It should not be used as a substitute for a professional nutritionist’s advice.