Best Rotisserie Chicken Recipe

There’s nothing quite like the smell of freshly cooked rotisserie chicken filling your kitchen. It’s juicy, flavorful, and perfectly seasoned, making it a favorite for busy families and food lovers alike. Whether you buy one from the store or make your own at home, rotisserie chicken is one of the easiest ways to enjoy a delicious and satisfying meal with minimal effort.
What makes this dish so special? First, it’s incredibly convenient. If you grab a store-bought rotisserie chicken, you have an instant main course that pairs well with almost any side dish.
If you choose to make it at home, you’ll get that golden, crispy skin and juicy meat that feels like a restaurant-quality meal right from your oven. Plus, it’s budget-friendly—one chicken can feed a family, with leftovers for future meals!
Rotisserie chicken works for a quick weeknight dinner when I don’t feel like spending hours in the kitchen. It’s also great for meal prep—you can shred the leftovers and use them in salads, sandwiches, soups, or even tacos.
It’s one of those go-to dishes that always comes in handy, whether you’re cooking for one, feeding a crowd, or just need something easy and delicious.
So, if you’re looking for a simple yet mouthwatering way to enjoy chicken, this recipe is for you! You’ll get juicy, tender meat with a beautifully seasoned, crispy skin—all with minimal effort. Let’s get started!
About Rotisserie Chicken
Rotisserie chicken is a whole chicken that’s seasoned, slow-roasted, and cooked evenly on a rotating spit or in the oven. This cooking method ensures that the chicken stays juicy and tender while developing a beautifully crispy, golden-brown skin. It’s a staple in grocery stores, but making it at home allows you to control the flavors and ingredients.
Unlike regular roasted chicken, rotisserie chicken is cooked with continuous rotation, allowing the fat to self-baste the meat. This results in an incredibly moist texture that’s hard to achieve with standard roasting methods. It also differs from fried or grilled chicken because it has a rich, herby flavor without needing a lot of added oil or breading.
Why You’ll Love It
- Super Easy to Make – Whether you buy it ready-made or cook it yourself, rotisserie chicken requires little effort. Just season, roast, and let the magic happen!
- Packed with Flavor – The slow-roasting process locks in juices and enhances the natural taste of the chicken while giving the skin a perfectly crispy finish.
- Budget-Friendly – A whole chicken is usually more affordable than buying separate cuts, and it stretches across multiple meals.
- Perfect for Meal Prep – Leftover rotisserie chicken is a lifesaver! Use it in sandwiches, salads, soups, casseroles, and more throughout the week.
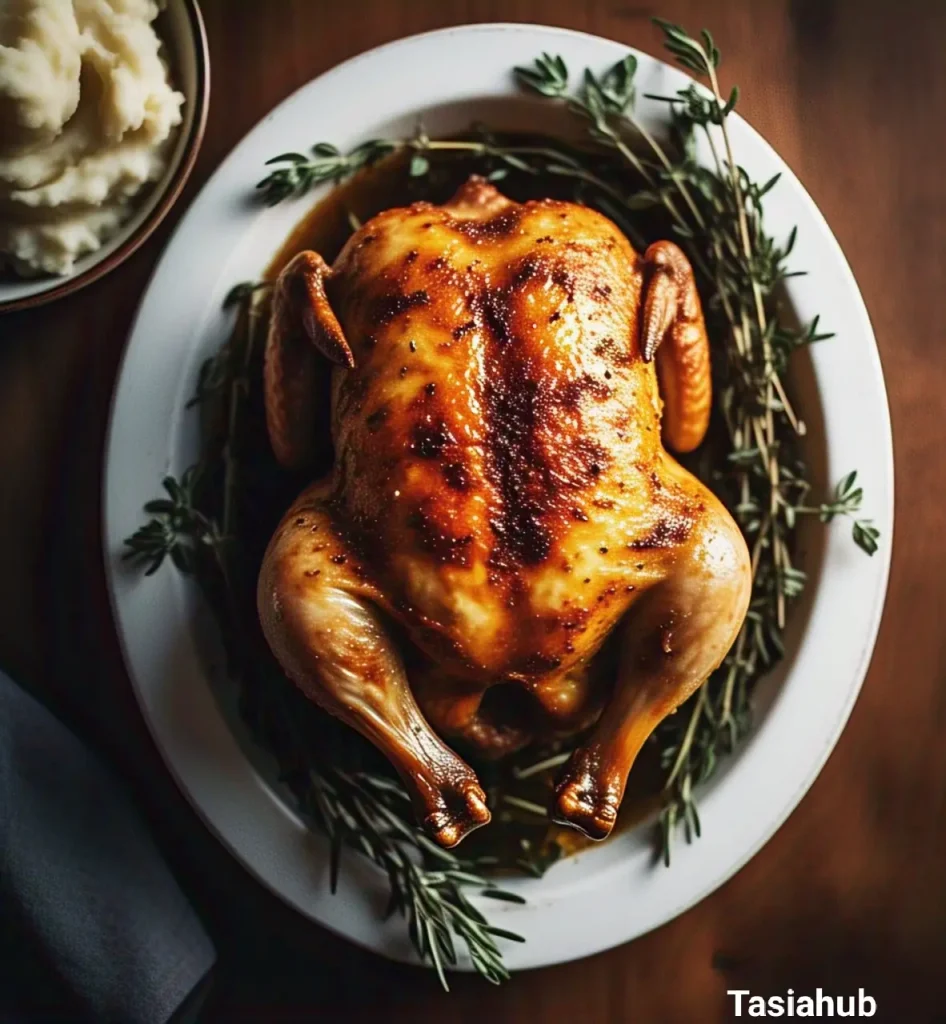
- Kid and Family-Friendly – It’s a meal that everyone enjoys, even picky eaters. Plus, you can serve it with their favorite sides like mashed potatoes, rice, or veggies.
Ingredients
- For the Chicken:
- 1 whole chicken (about 4-5 lbs)
- 2 tbsp olive oil or melted butter
- 1 tbsp salt
- 1 tsp black pepper
- 1 tsp garlic powder
- 1 tsp onion powder
- 1 tsp paprika (for color and flavor)
- 1 tsp dried thyme or rosemary (optional)
- ½ tsp cayenne pepper (optional, for a little heat)
- For the Cavity (Optional, for Extra Flavor):
- 1 lemon, halved
- 4 cloves garlic, smashed
- 1 small onion, quartered
Ingredient Notes
- Oil vs. Butter: Olive oil gives a crispier skin, while butter adds extra richness. I sometimes mix both for the best of both worlds!
- Paprika for Color: This helps create that classic golden-brown skin. If you want a smoky touch, use smoked paprika.
- Stuffing the Chicken: Adding lemon, garlic, and onion inside the cavity infuses extra flavor, but you can skip this if you’re in a hurry.
- Salt Matters: A good sprinkle of salt helps draw out moisture from the skin, making it crisp up beautifully. Don’t be shy about it!
Kitchen Tools Needed
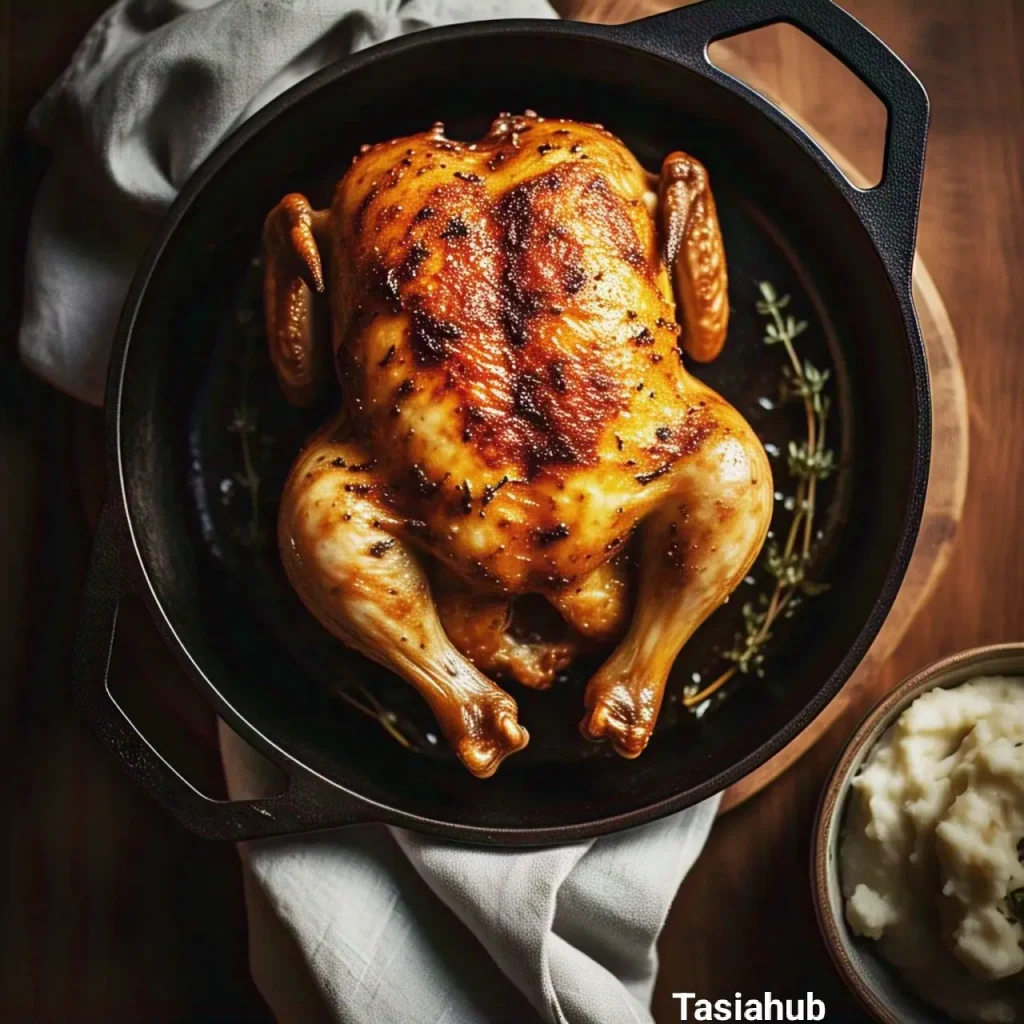
- Roasting Pan or Cast-Iron Skillet – Holds the chicken while it roasts and catches all the flavorful juices.
- Kitchen Twine – Helps tie the legs together for even cooking (if you don’t have it, no worries—it’s optional!).
- Meat Thermometer – Ensures the chicken is cooked to perfection (165°F in the thickest part of the thigh). I highly recommend using one to avoid guesswork!
- Basting Brush (Optional) – Makes it easy to spread butter or oil over the skin for extra crispiness.
- Sharp Knife or Kitchen Shears – For carving the chicken once it’s done. A good-quality knife makes slicing effortless!
- Cutting Board – Preferably one with a groove to catch any juices when carving.
I love using a cast-iron skillet because it holds heat well and helps crisp up the skin beautifully. If you don’t have one, a regular roasting pan works just fine!
Instructions
- Preheat the Oven – Set your oven to 375°F (190°C). If you want extra crispy skin, you can start at 425°F (220°C) for the first 15 minutes, then lower the temperature.
- Prepare the Chicken – Pat the chicken dry with paper towels. This step is important because removing moisture helps the skin crisp up beautifully!
- Season the Chicken – Rub olive oil or melted butter all over the chicken, making sure to coat it evenly. Then, sprinkle the seasoning mix (salt, pepper, garlic powder, onion powder, paprika, thyme, and cayenne) all over. Don’t forget to season inside the cavity too! Pro Tip: For extra flavor, carefully loosen the skin over the breast and rub some seasoning underneath. This keeps the meat juicy and flavorful!
- Stuff the Cavity (Optional) – Place the halved lemon, smashed garlic, and quartered onion inside the chicken. This adds a subtle aroma and moisture while cooking.
- Truss the Chicken (Optional) – If you have kitchen twine, tie the legs together and tuck the wings under the body. This helps the chicken cook evenly and look more presentable!
- Roast the Chicken – Place the chicken breast-side up in a roasting pan or cast-iron skillet. Roast for 1 hour 15 minutes to 1 hour 30 minutes, depending on the size of your chicken.
- If you started at 425°F (220°C), lower the temperature to 375°F (190°C) after 15 minutes.
- Baste the chicken with its juices every 30 minutes to keep it moist and flavorful.
- Check for Doneness – Use a meat thermometer to check the thickest part of the thigh (without touching the bone). It should read 165°F (74°C). If you don’t have a thermometer, pierce the thigh—if the juices run clear, it’s done!
- Rest Before Carving – Remove the chicken from the oven and let it rest for 10-15 minutes. This allows the juices to redistribute, keeping the meat tender and juicy. Pro Tip: Cover the chicken loosely with foil while resting to keep it warm.
- Carve and Serve – Use a sharp knife to cut the chicken into pieces, and serve it with your favorite sides! Don’t forget to save the bones for homemade chicken broth.
Now, enjoy your juicy, flavorful rotisserie chicken!
Tips and Tricks for Success
- Dry the Chicken Well – Moisture is the enemy of crispy skin! Patting the chicken dry before seasoning helps it roast beautifully.
- Don’t Skip the Resting Time – Letting the chicken rest after roasting keeps it juicy. If you cut into it too soon, all the flavorful juices will run out!
- Use a Meat Thermometer – The best way to avoid dry chicken is to check the temperature. No guessing—just perfectly cooked meat every time!
- Baste for Extra Flavor – Spoon the pan juices over the chicken every 30 minutes to keep it moist and delicious.
- Want Crispy Skin? – Start roasting at a higher temperature (425°F/220°C) for 15 minutes before lowering it. This trick gives you that perfect golden-brown finish!
Ingredient Substitutions and Variations
- No Olive Oil? – Melted butter or avocado oil works just as well for coating the skin.
- Spice It Up! – Swap paprika for smoked paprika, add chili powder, or mix in some Cajun seasoning for a bolder flavor.
- Herb Lovers – Fresh rosemary, thyme, or sage can be tucked under the skin or inside the cavity for an extra aromatic touch.
- Lemon-Free Option – Use an apple or an extra onion inside the cavity for natural sweetness.
- Garlic Butter Upgrade – Mix minced garlic into the melted butter before rubbing it on the chicken for an even richer taste!
Want to experiment? Try different spice blends like Italian seasoning, taco seasoning, or even a honey glaze for a fun twist!
Serving Suggestions
- Classic Comfort Meal – Serve with mashed potatoes and roasted vegetables for a hearty, satisfying dinner.
- Light and Fresh – Pair with a crisp green salad and a side of quinoa or rice for a balanced, healthy meal.
- Chicken Sandwiches – Shred the meat and use it in sandwiches or wraps with lettuce, tomatoes, and a creamy dressing. So good for lunch!
- Taco Night – Use the leftover chicken for tacos with avocado, salsa, and a squeeze of lime. It’s an easy and delicious way to mix things up!
- Homemade Chicken Soup – Simmer leftover chicken with broth, carrots, and noodles for a comforting soup that’s perfect for chilly days.
Storage and Reheating Instructions
- Refrigeration: Store leftover chicken in an airtight container in the fridge for up to 4 days. I like to keep the bones for making homemade broth later!
- Freezing: Shred or chop the chicken before freezing in a zip-top bag or container. It stays fresh for up to 3 months and is great for quick meals.
- Reheating:
- Oven: Warm at 350°F (175°C) for about 10-15 minutes to keep the skin crispy. Cover with foil to prevent drying out.
- Microwave: Heat in short bursts with a splash of broth or water to prevent dryness.
- Stovetop: Sauté shredded chicken with a little butter or olive oil for a quick, flavorful reheat.
Pro Tip: If the chicken seems dry after reheating, add a little chicken broth or melted butter to bring back the juiciness!
Frequently Asked Questions
Can I make rotisserie chicken without a rotisserie oven?
Yes! You can roast it in a regular oven using a roasting pan or cast-iron skillet. Just baste it occasionally to keep it juicy.
How do I get the skin extra crispy?
Pat the chicken dry before seasoning, use a high roasting temperature for the first 15 minutes, and don’t skip the oil or butter rub!
What’s the best way to season rotisserie chicken?
A mix of salt, garlic powder, paprika, and herbs works great, but you can experiment with different spice blends like Cajun, lemon pepper, or Italian seasoning.
Can I cook this in an air fryer?
Yes! If your air fryer is big enough, cook it at 375°F (190°C) for about 50-60 minutes, flipping it halfway through.
How do I keep leftovers from drying out?
Store in an airtight container, and add a little chicken broth when reheating to keep it moist.
What can I do with leftover bones?
Don’t throw them out! Simmer them with water, onions, and herbs to make a rich homemade chicken broth.
I’d love to hear how your rotisserie chicken turns out! Did you try any fun spice variations? Let me know in the comments! If you loved this recipe, don’t forget to share it with friends or pin it for later. Happy cooking!
Don’t forget to share your photos on Instagram and tag me (@tasiahub_) or use the hashtag (#tasiahub). I’d love to see your creations!

Easy Rotisserie Chicken Recipe
Equipment
- Roasting Pan or Cast-Iron Skillet
- Kitchen twine
- Meat Thermometer
- Basting Brush (Optional)
- Sharp Knife or Kitchen Shears
- Cutting board
Ingredients
For the Chicken:
- 1 whole chicken about 4-5 lbs
- 2 tbsp olive oil or melted butter
- 1 tbsp salt
- 1 tsp black pepper
- 1 tsp garlic powder
- 1 tsp onion powder
- 1 tsp paprika for color and flavor
- 1 tsp dried thyme or rosemary optional
- ½ tsp cayenne pepper optional, for a little heat
For the Cavity (Optional, for Extra Flavor):
- 1 lemon halved
- 4 garlic cloves smashed
- 1 small onion quartered
Instructions
- Preheat the Oven – Set your oven to 375°F (190°C). If you want extra crispy skin, you can start at 425°F (220°C) for the first 15 minutes, then lower the temperature.
- Prepare the Chicken – Pat the chicken dry with paper towels. This step is important because removing moisture helps the skin crisp up beautifully!
- Season the Chicken – Rub olive oil or melted butter all over the chicken, making sure to coat it evenly. Then, sprinkle the seasoning mix (salt, pepper, garlic powder, onion powder, paprika, thyme, and cayenne) all over. Don’t forget to season inside the cavity too!
- Pro Tip: For extra flavor, carefully loosen the skin over the breast and rub some seasoning underneath. This keeps the meat juicy and flavorful!
- Stuff the Cavity (Optional) – Place the halved lemon, smashed garlic, and quartered onion inside the chicken. This adds a subtle aroma and moisture while cooking.
- Truss the Chicken (Optional) – If you have kitchen twine, tie the legs together and tuck the wings under the body. This helps the chicken cook evenly and look more presentable!
- Roast the Chicken – Place the chicken breast-side up in a roasting pan or cast-iron skillet. Roast for 1 hour 15 minutes to 1 hour 30 minutes, depending on the size of your chicken.
- If you started at 425°F (220°C), lower the temperature to 375°F (190°C) after 15 minutes.
- Baste the chicken with its own juices every 30 minutes to keep it moist and flavorful.
- Check for Doneness – Use a meat thermometer to check the thickest part of the thigh (without touching the bone). It should read 165°F (74°C). If you don’t have a thermometer, pierce the thigh—if the juices run clear, it’s done!
- Rest Before Carving – Remove the chicken from the oven and let it rest for 10-15 minutes. This allows the juices to redistribute, keeping the meat tender and juicy.
- Pro Tip: Cover the chicken loosely with foil while resting to keep it warm.
- Carve and Serve – Use a sharp knife to cut the chicken into pieces and serve with your favorite sides! Don’t forget to save the bones for homemade chicken broth.
Notes
Nutritional Value (Per Serving, Approximate)
- Calories: 300-350 kcal
- Protein: 35g
- Fat: 18g
- Carbohydrates: 1g (mostly from seasoning)
- Sodium: Varies based on seasoning
The nutritional information on this website is only an estimate and is provided for convenience and as a courtesy only. The accuracy of the nutritional information for any recipe on this site is not guaranteed. It should not be used as a substitute for a professional nutritionist’s advice.