Smothered Chicken and Rice
Smothered chicken and rice is one of those heartwarming meals that instantly reminds you of cozy dinners, family gatherings, and the kind of comfort only a home-cooked meal can bring. It’s rich, savory, and deeply flavorful—basically, everything you want when you’re craving something hearty and satisfying. Think tender, seasoned chicken slowly simmered in a luscious gravy, served over fluffy, buttery rice that soaks up every last bit of sauce. It’s not fancy food, but it’s food that feels like a hug on a plate.
This dish is a Southern favorite for good reason. It’s simple, made with pantry staples, and doesn’t require a lot of complicated steps. Yet, despite its simplicity, the flavor is anything but basic. Every bite is packed with well-seasoned goodness—from the seared chicken thighs to the creamy, peppery gravy and the comforting rice underneath. It’s the kind of meal that feels like it took all day, even though it’s actually weeknight-friendly.
What really makes smothered chicken and rice special is how customizable it is. Some versions include onions, bell peppers, or even mushrooms to add depth, while others keep it classic with just garlic, broth, and a good sprinkle of seasoning. You can make it with white rice, brown rice, or even cauliflower rice if you’re looking for a lighter option. And while bone-in, skin-on chicken thighs are the traditional choice, you can use boneless or even breasts if that’s what you have on hand.
Whether you’re cooking for your family, meal prepping for the week, or just making yourself something cozy after a long day, this dish delivers every single time. It’s satisfying, soul-warming, and guaranteed to have you going back for seconds.
Why You’ll Love It
- Ultimate Comfort Food: This dish brings together juicy chicken, savory gravy, and fluffy rice for a soul-soothing meal that’s both filling and flavorful.
- Simple Ingredients, Big Flavor: You don’t need anything fancy—just a few pantry staples, some seasoning, and a little time to create something that tastes like it came from a restaurant.
- One-Pan Wonder: Everything comes together in one skillet or Dutch oven, which means fewer dishes and more time to relax after dinner.
- Customizable to Your Taste: Add veggies like mushrooms, peppers, or spinach, or swap in different cuts of chicken—this recipe adapts easily to what you have on hand.
- Great for Leftovers: The flavors deepen as it sits, so leftovers the next day taste even better—perfect for meal prep or quick lunches.
Ingredient List
For the Chicken and Gravy
- 6 bone-in, skin-on chicken thighs
- 1 ½ teaspoons salt
- 1 teaspoon black pepper
- 1 teaspoon paprika
- ½ teaspoon garlic powder
- ½ teaspoon onion powder
- 2 tablespoons olive oil
- 1 medium onion, finely chopped
- 3 cloves garlic, minced
- 2 tablespoons all-purpose flour
- 2 cups chicken broth
- ½ cup heavy cream (optional, for extra richness)
- 1 teaspoon dried thyme (or 1 tablespoon fresh)
- ½ teaspoon crushed red pepper flakes (optional)
For the Rice
- 1 ½ cups long grain white rice
- 3 cups water or chicken broth
- 1 tablespoon butter
- Pinch of salt
Ingredient Notes
- Chicken thighs: Bone-in, skin-on gives the most flavor and keeps the meat juicy. You can use boneless, but reduce the cook time slightly.
- Seasonings: The combo of paprika, garlic powder, and onion powder creates a flavorful base—don’t skimp!
- Flour: Helps thicken the gravy; cook it for a minute or two to get rid of the raw taste.
- Chicken broth: I recommend using low sodium so you can control the salt levels. I usually go with Better Than Bouillon for rich flavor.
- Heavy cream: Optional but adds a luxurious, creamy finish to the gravy—especially good for a more indulgent version.
- Rice: Long grain white rice works best here because it stays fluffy. Jasmine or basmati are great too for added aroma.
Kitchen Equipment Needed
- Large Skillet or Dutch Oven: For browning the chicken and simmering the gravy. I love using my enameled cast iron Dutch oven—it holds heat beautifully and adds a cozy vibe to cooking.
- Medium Saucepan: To cook the rice separately while the chicken simmers. A nonstick pot works great for easy cleanup.
- Tongs: Perfect for flipping the chicken without tearing the skin.
- Wooden Spoon or Silicone Spatula: For stirring the gravy and scraping up all those flavorful browned bits from the pan.
- Measuring Spoons and Cups: Essential for getting the seasoning and liquid ratios just right.
Instructions
1. Prep and Season the Chicken
- Pat the chicken dry:
Use paper towels to remove excess moisture from the chicken thighs. This helps them brown nicely. - Season both sides:
In a small bowl, mix salt, pepper, paprika, garlic powder, and onion powder. Rub the spice blend evenly over all sides of the chicken. Pro Tip: Let the seasoned chicken sit at room temperature for about 15 minutes—this helps it cook more evenly and soak up flavor.
2. Brown the Chicken
- Heat the oil:
In a large skillet or Dutch oven, heat olive oil over medium-high heat. - Sear the chicken (skin-side down first):
Add the chicken thighs skin-side down and cook undisturbed for 5–6 minutes, or until the skin is golden brown and crisp. - Flip and sear the other side:
Cook for another 4–5 minutes. Remove chicken from the pan and set aside (it won’t be fully cooked yet). Pro Tip: Don’t overcrowd the pan—work in batches if needed so the chicken browns instead of steams.
3. Build the Gravy Base
- Sauté the onions:
In the same pan (don’t clean it!), add chopped onions and sauté for 3–4 minutes until soft and golden. - Add garlic:
Stir in minced garlic and cook for 30 seconds until fragrant. - Sprinkle in flour:
Add the flour and stir well to coat the onions and garlic. Cook for 1–2 minutes to get rid of the raw flour taste. Pro Tip: Stir constantly while adding flour to prevent clumping and ensure a smooth gravy base.
4. Make the Gravy
- Pour in the broth:
Slowly whisk in chicken broth to deglaze the pan, scraping up the flavorful bits stuck to the bottom. - Add seasoning and cream:
Stir in dried thyme, crushed red pepper flakes (if using), and heavy cream. Let it simmer for 2–3 minutes until slightly thickened. Pro Tip: Whisk continuously as you add the broth and cream for a lump-free, silky gravy.
5. Simmer the Chicken
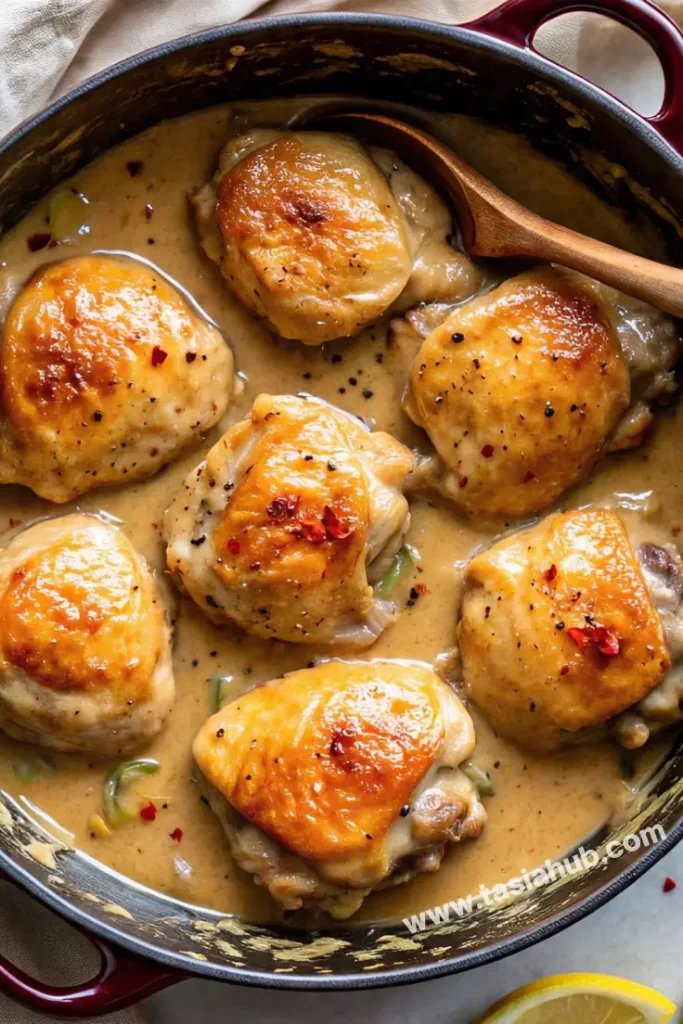
- Return the chicken to the pan:
Nestle the seared thighs back into the gravy, skin-side up. - Cover and simmer:
Reduce heat to low, cover, and simmer for 25–30 minutes, or until the chicken is fully cooked and tender (internal temp should hit 165°F/74°C). - Uncover to thicken (optional):
For thicker gravy, uncover the pan and simmer for an extra 5–10 minutes.
6. Cook the Rice
- Boil the water or broth:
In a medium saucepan, bring 3 cups of water or broth to a boil. - Add rice, butter, and salt:
Stir in rice, butter, and a pinch of salt. Reduce heat to low, cover tightly, and simmer for 15–18 minutes, or until the rice is tender and liquid is absorbed. - Fluff and rest:
Remove from heat and let it sit, covered, for 5 minutes. Fluff with a fork before serving.
7. Put It All Together
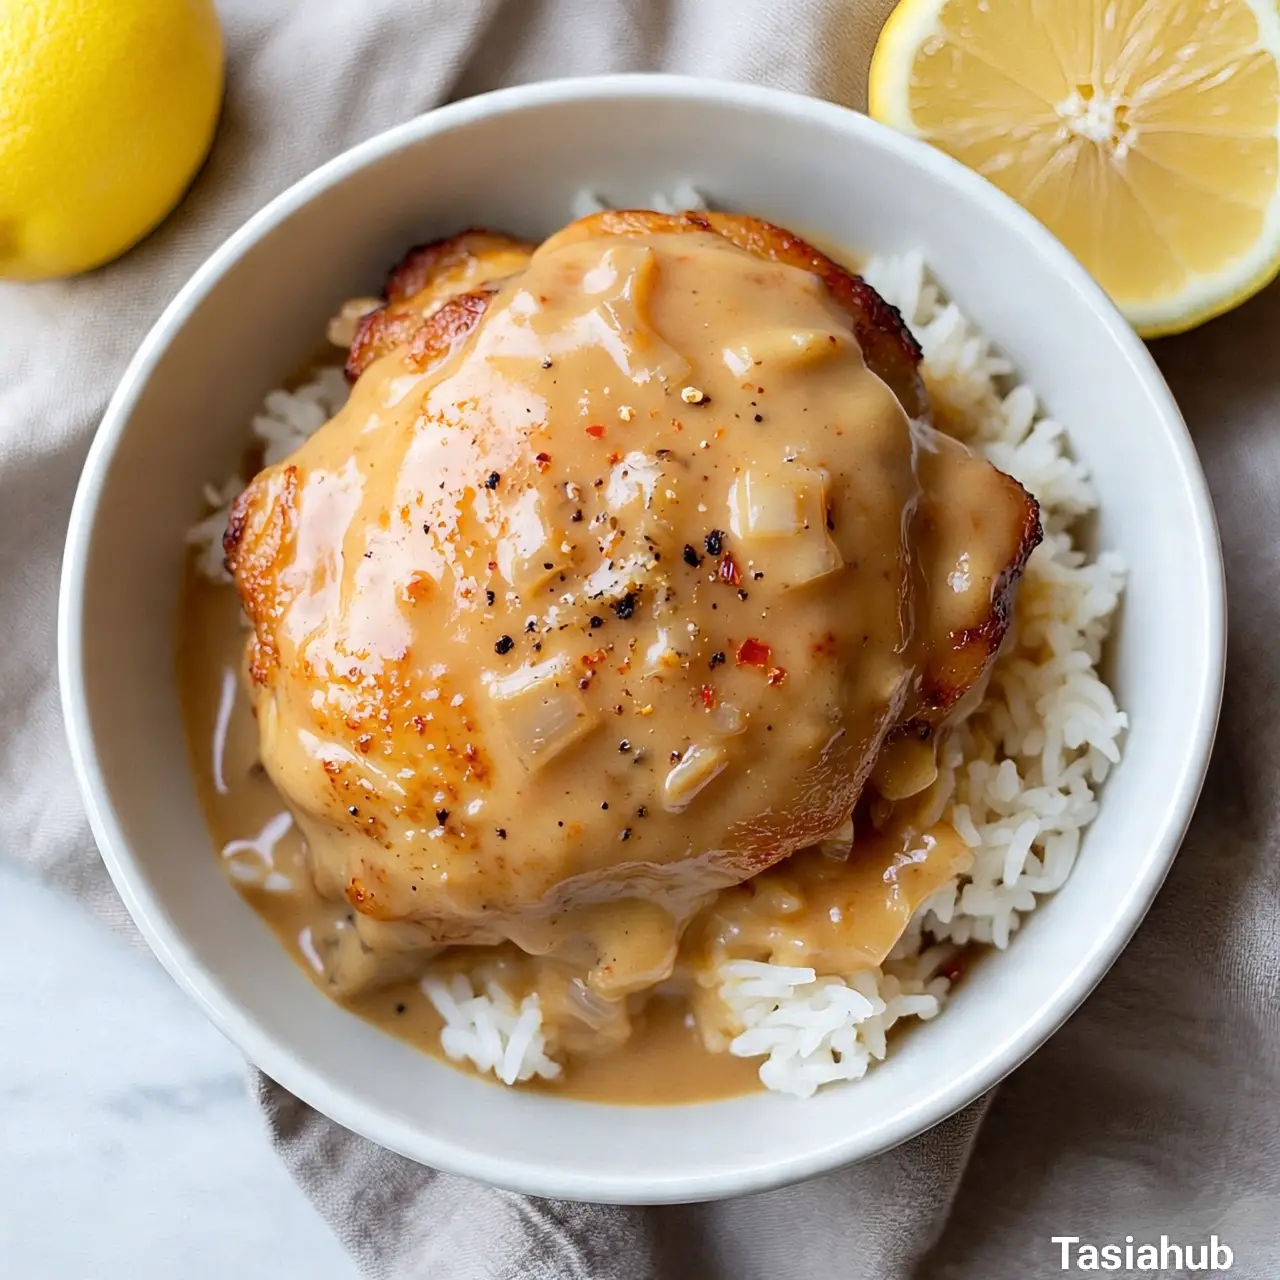
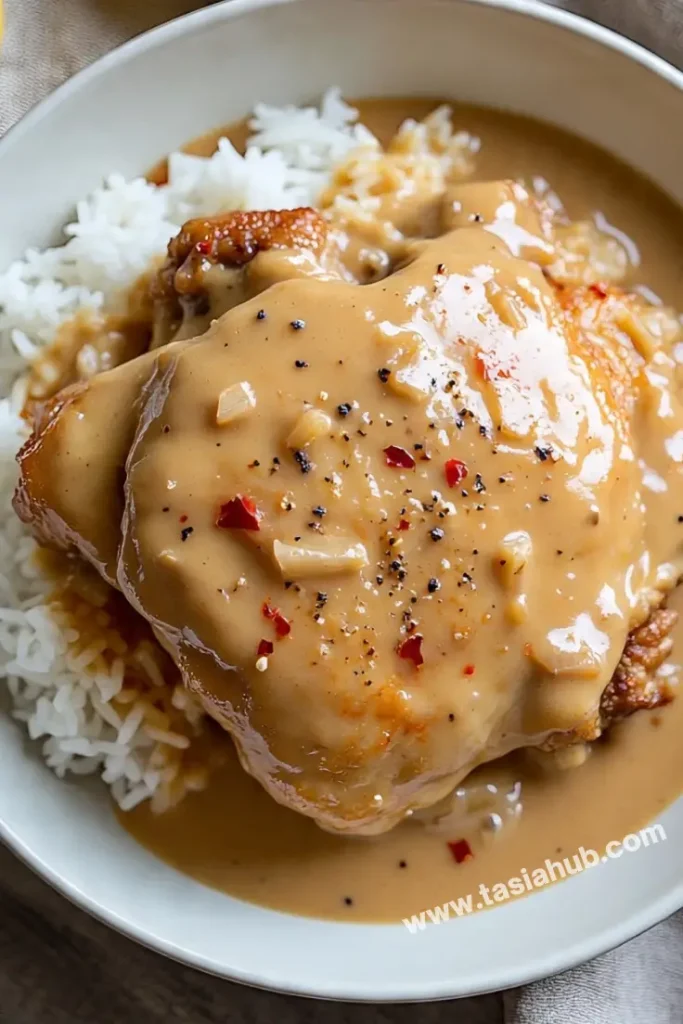
- Serve generously:
Spoon the warm rice onto plates or into bowls, then top with a juicy chicken thigh and a ladle of that creamy, savory gravy. - Garnish (optional):
Sprinkle with chopped parsley or a few cracks of black pepper for a pop of color and extra flavor.
Tips and Tricks for Success
- Don’t rush the sear: Getting that golden-brown crust on the chicken adds tons of flavor to both the meat and the gravy. Let the chicken sit undisturbed while browning.
- Use a good-quality broth: Since the gravy is a major part of the dish, using flavorful chicken broth (like homemade or Better Than Bouillon) really makes a difference.
- Simmer gently: Once the chicken is in the gravy, keep the heat low and steady. A gentle simmer keeps the chicken tender and prevents the gravy from breaking.
- Taste as you go: The saltiness of your broth can vary, so taste the gravy before serving and adjust the seasoning if needed.
- Make it ahead: This dish reheats beautifully. In fact, the flavors deepen overnight—making it a great meal prep or next-day dinner option.
Ingredient Substitutions and Variations
- Chicken cuts: Swap thighs for drumsticks, bone-in breasts, or boneless chicken if you prefer—just adjust the cook time as needed.
- Creamy vs. classic: Skip the heavy cream if you want a more traditional, broth-based gravy—or add more for a richer, creamier version.
- Herb switch-up: Use rosemary or sage in place of thyme for a different flavor profile.
- Spicy kick: Add cayenne or a dash of hot sauce to the gravy for extra heat.
- Veggie boost: Toss in chopped mushrooms, bell peppers, or spinach with the onions for extra texture and nutrition.
- Low-carb version: Serve over cauliflower rice or mashed cauliflower instead of regular rice to keep it lighter.
Serving Suggestions
- Over rice (of course!): Fluffy white or jasmine rice is the classic pairing—perfect for soaking up all that rich, savory gravy.
- With mashed potatoes: For an ultra-comforting twist, serve the smothered chicken over creamy mashed potatoes. It’s indulgent but so worth it.
- Alongside roasted veggies: I love pairing this with roasted carrots, green beans, or Brussels sprouts. The slight sweetness from the veggies balances the savory gravy.
- Add a fresh salad: A simple side salad with vinaigrette (think mixed greens or arugula) adds a crisp, refreshing contrast to the creamy richness of the dish.
- Buttered corn or peas: For a family-friendly side that’s quick and easy, steamed corn or sweet peas work beautifully and keep the plate colorful.
Storage and Reheating Instructions
- To store: Let leftovers cool completely, then transfer the chicken and gravy to an airtight container. Store rice separately if possible to keep texture. Refrigerate for up to 4 days.
- To freeze: You can freeze the chicken and gravy in a freezer-safe container for up to 2 months. Rice can also be frozen separately, though it may get slightly softer when reheated.
- To reheat on the stove: Warm the chicken and gravy gently in a covered skillet over medium-low heat until heated through. Add a splash of broth or water if the gravy thickens too much.
- To reheat in the microwave: Place chicken and gravy in a microwave-safe dish, cover with a damp paper towel, and heat in 1-minute bursts until hot.
- Rice reheating tip: Add a splash of water to the rice before reheating to keep it from drying out. Fluff with a fork once hot.
Frequently Asked Questions
Can I use boneless chicken for this recipe?
Yes, absolutely! Boneless thighs or breasts work fine—just reduce the simmering time to avoid overcooking. Keep an eye on them so they stay juicy and tender.
What if I don’t have heavy cream?
No worries! You can use whole milk, half-and-half, or even leave it out completely. The gravy will still be delicious, just a little less creamy.
How do I know when the chicken is done?
The safest way is to use a meat thermometer—the internal temperature should reach 165°F (74°C). The meat should also be fork-tender and pull away from the bone easily.
Can I make this dish ahead of time?
Yes! This is a great make-ahead meal. It actually tastes even better the next day after the flavors have had time to develop. Just store it properly and reheat gently.
What’s the best rice to use?
Long grain white rice works best here because it stays fluffy and doesn’t get sticky. Jasmine or basmati are great flavorful options too.
Is this dish spicy?
Not by default! The red pepper flakes add just a hint of heat, but you can leave them out or add more if you want to turn it up a notch.
Did you try this recipe? Let me know in the comments how it turned out!
Don’t forget to share your photos on Instagram and tag me @tasiahub_ or use the hashtag #tasiahub. I’d love to see your creations!

Smothered Chicken and Rice
Equipment
- Large Skillet or Dutch Oven
- Medium saucepan
- Tongs
- Wooden Spoon or Silicone Spatula
- Measuring Spoons and Cups
Ingredients
For the Chicken and Gravy
- 6 bone-in skin-on chicken thighs
- 1 ½ teaspoons salt
- 1 teaspoon black pepper
- 1 teaspoon paprika
- ½ teaspoon garlic powder
- ½ teaspoon onion powder
- 2 tablespoons olive oil
- 1 medium onion finely chopped
- 3 cloves garlic minced
- 2 tablespoons all-purpose flour
- 2 cups chicken broth
- ½ cup heavy cream optional, for extra richness
- 1 teaspoon dried thyme or 1 tablespoon fresh
- ½ teaspoon crushed red pepper flakes optional
For the Rice
- 1 ½ cups long grain white rice
- 3 cups water or chicken broth
- 1 tablespoon butter
- Pinch of salt
Instructions
Prep and Season the Chicken
- Use paper towels to remove excess moisture from the chicken thighs. This helps them brown nicely.
- In a small bowl, mix salt, pepper, paprika, garlic powder, and onion powder. Rub the spice blend evenly over all sides of the chicken.
- Pro Tip: Let the seasoned chicken sit at room temperature for about 15 minutes—this helps it cook more evenly and soak up flavor.
Brown the Chicken
- In a large skillet or Dutch oven, heat olive oil over medium-high heat.
- Add the chicken thighs skin-side down and cook undisturbed for 5–6 minutes, or until the skin is golden brown and crisp.
- Cook for another 4–5 minutes. Remove chicken from the pan and set aside (it won’t be fully cooked yet).
- Pro Tip: Don’t overcrowd the pan—work in batches if needed so the chicken browns instead of steams.
Build the Gravy Base
- In the same pan (don’t clean it!), add chopped onions and sauté for 3–4 minutes until soft and golden.
- Stir in minced garlic and cook for 30 seconds until fragrant.
- Add the flour and stir well to coat the onions and garlic. Cook for 1–2 minutes to get rid of the raw flour taste.
- Pro Tip: Stir constantly while adding flour to prevent clumping and ensure a smooth gravy base.
Make the Gravy
- Slowly whisk in chicken broth to deglaze the pan, scraping up the flavorful bits stuck to the bottom.
- Stir in dried thyme, crushed red pepper flakes (if using), and heavy cream. Let it simmer for 2–3 minutes until slightly thickened.
- Pro Tip: Whisk continuously as you add the broth and cream for a lump-free, silky gravy.
Simmer the Chicken
- Nestle the seared thighs back into the gravy, skin-side up.
- Reduce heat to low, cover, and simmer for 25–30 minutes, or until the chicken is fully cooked and tender (internal temp should hit 165°F/74°C).
Uncover to thicken (optional):
- For thicker gravy, uncover the pan and simmer for an extra 5–10 minutes.
Cook the Rice
- In a medium saucepan, bring 3 cups of water or broth to a boil.
- Stir in rice, butter, and a pinch of salt. Reduce heat to low, cover tightly, and simmer for 15–18 minutes, or until the rice is tender and liquid is absorbed.
- Remove from heat and let it sit, covered, for 5 minutes. Fluff with a fork before serving.
Put It All Together
- Spoon the warm rice onto plates or into bowls, then top with a juicy chicken thigh and a ladle of that creamy, savory gravy.
Garnish (optional):
- Sprinkle with chopped parsley or a few cracks of black pepper for a pop of color and extra flavor.
Notes
Nutritional Value (per serving, approx.)
- Calories: ~550–650 kcal
- Protein: ~30g
- Carbohydrates: ~35g
- Fat: ~35g
- Fiber: ~2g
- Sodium: ~700mg