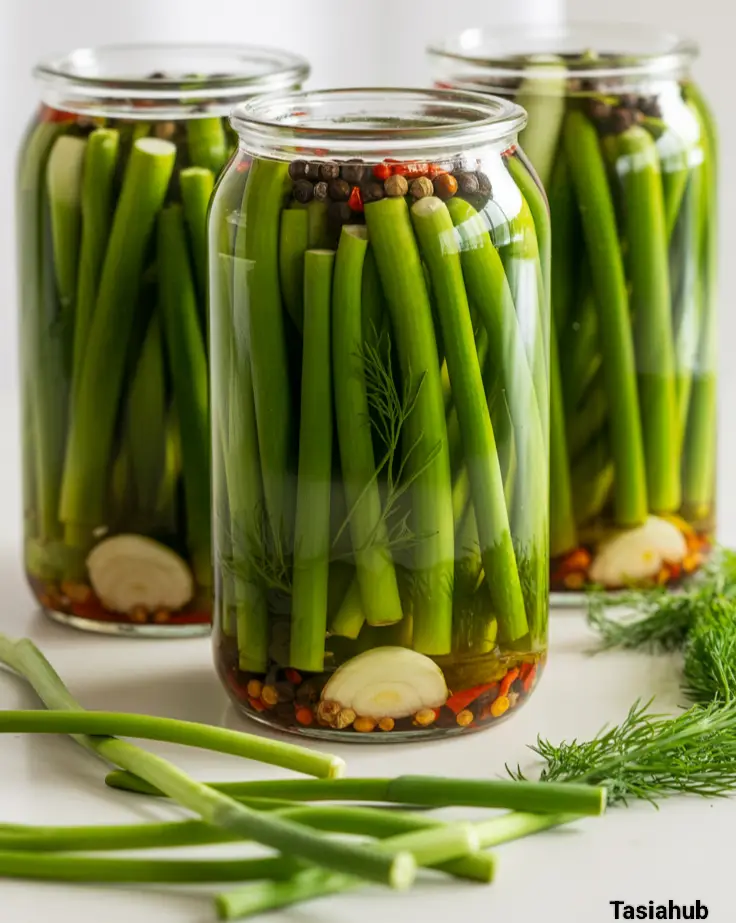
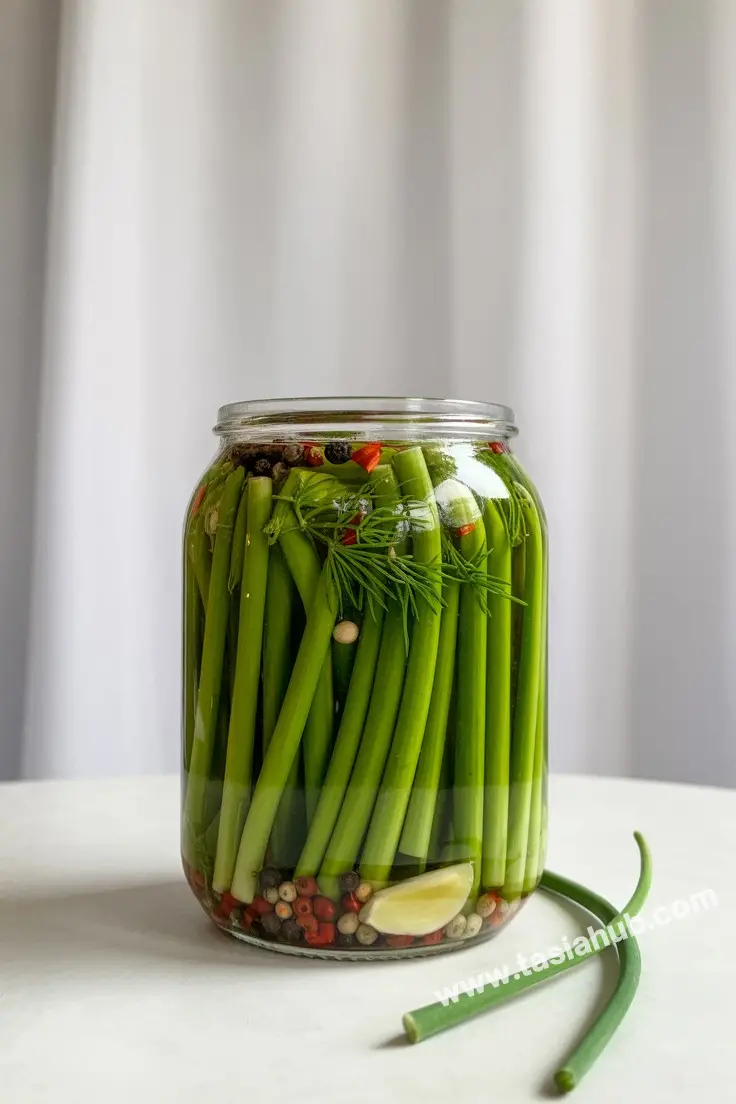
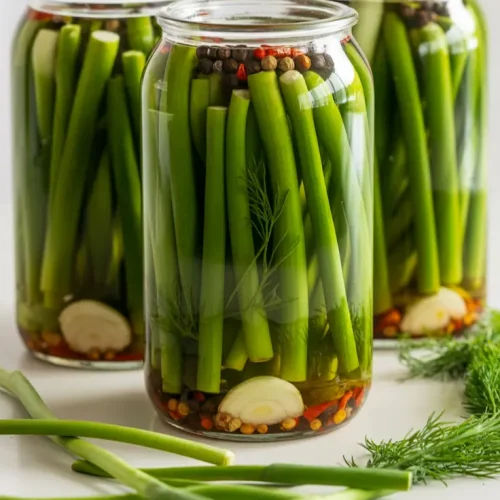
Pickled Garlic Scapes
If you’ve never tried pickled garlic scapes, you’re in for a treat! Garlic scapes are those curly, green shoots that grow from garlic bulbs in late spring and early summer. They’re often overlooked but are packed with garlicky flavor and a hint of sweetness, making them perfect for pickling. Imagine the sharpness of garlic, mellowed and brightened by vinegar, with a satisfying crunch — that’s what pickled garlic scapes bring to the table.
Why pickle garlic scapes, you ask? For starters, they’re only available fresh for a short window, so pickling is a brilliant way to preserve their unique taste and texture beyond the season. Plus, pickling adds a tangy zing that pairs beautifully with everything from sandwiches and salads to cheese boards and grilled meats. They’re like little flavor bombs that can elevate simple meals effortlessly.
I love the way pickled garlic scapes add personality to dishes without overpowering them. They’re vibrant, crunchy, and just a little bit spicy, with a mild garlic bite that isn’t as intense as raw garlic but more interesting than plain pickles. If you enjoy experimenting in the kitchen or just want a new way to enjoy garlic’s fresh side, pickled garlic scapes are definitely worth trying.
Ready to add this zingy, crunchy delight to your pantry? Let me walk you through everything you need to know to make your own batch of pickled garlic scapes — easy, fun, and totally satisfying.
Why You’ll Love It
- Unique Flavor Boost: Pickled garlic scapes have a fresh, garlicky punch that’s milder than raw garlic but more complex than plain pickles. They add just the right amount of zing to any dish.
- Versatile Snack or Condiment: Whether you chop them into salads, serve them alongside cheese and charcuterie, toss them into sandwiches, or use them as a tangy topping on grilled meats, they work wonderfully in so many ways.
- Easy to Preserve: Garlic scapes are only available fresh for a short time each year. Pickling lets you enjoy their bright flavor all year long without worrying about them going bad.
- Crunchy and Refreshing: The pickling process keeps the scapes crisp and satisfying — a perfect contrast to softer foods or creamy dips.
- Great for Experimenting: If you love making your own pickles, pickled garlic scapes are a fun and slightly adventurous project that’s beginner-friendly but impressively flavorful.
Ingredient List
For the Pickled Garlic Scapes:
- 1 pound garlic scapes, trimmed and cut into pieces
- 1 cup white vinegar (or apple cider vinegar for a milder taste)
- 1 cup water
- 1 tablespoon kosher salt
- 1 tablespoon sugar
For the Flavor Boosters:
- 3-4 garlic cloves, sliced (optional, for extra garlic punch)
- 1 teaspoon black peppercorns
- 1 teaspoon red pepper flakes (optional, for a little heat)
- 2-3 sprigs fresh dill or 1 teaspoon dried dill (optional, for a fresh herbal note)
Ingredient Notes
- I always use kosher salt because it dissolves easily and doesn’t add any unwanted bitterness.
- Don’t skip the sugar — it balances the vinegar’s acidity and brings out the natural sweetness of the scapes.
- Using fresh garlic cloves adds depth, but it’s totally optional if you prefer a cleaner, lighter garlic flavor.
- Apple cider vinegar gives a softer, fruitier tang if you want something less sharp than white vinegar.
- Fresh dill adds a lovely herbal brightness, but dried works well if fresh isn’t available.
Kitchen Equipment Needed
- Mason jars or any glass jars with lids — for storing the pickled scapes safely and keeping them fresh. I love using wide-mouth jars because they’re easier to fill and clean.
- Saucepan — to heat the pickling brine until the salt and sugar dissolve.
- Tongs or a fork — to pack the garlic scapes tightly into the jars without bruising them.
- Measuring cups and spoons — for accurate vinegar, water, salt, and sugar measurements.
- Knife and cutting board — to trim and cut the garlic scapes and slice any additional garlic or herbs.
- Funnel (optional) — makes pouring the brine into jars cleaner and easier, especially with narrow-necked jars.
Instructions
Step 1: Prepare the Garlic Scapes
- Rinse the garlic scapes thoroughly under cold running water to remove any dirt or debris.
- Trim off the tough ends (usually about 1 inch from the bottom).
- Cut the scapes into pieces, making them easy to pack into jars and bite-sized for snacking.
- Pro tip: If your scapes are very curly, gently straighten them out before cutting — it helps pack them more efficiently into the jar.
Step 2: Sterilize Your Jars
- Wash your glass jars and lids with hot, soapy water.
- Rinse well and place the jars in a pot of boiling water for about 10 minutes to sterilize.
- Remove carefully and let them air dry on a clean towel.
- Pro tip: Sterilizing jars prevents unwanted bacteria and ensures your pickles stay fresh longer.
Step 3: Make the Pickling Brine
- In a saucepan, combine the vinegar, water, kosher salt, and sugar.
- Heat the mixture over medium heat, stirring occasionally until the salt and sugar are fully dissolved.
- Once dissolved, remove the brine from heat and let it cool slightly.
- Pro tip: Don’t let the brine boil vigorously — a gentle simmer is enough to dissolve ingredients without evaporating too much liquid.
Step 4: Pack the Jars
- Place sliced garlic cloves, peppercorns, red pepper flakes, and dill sprigs (if using) at the bottom of each jar.
- Tightly pack the cut garlic scapes into the jars, leaving about ½ inch of headspace at the top.
- Pro tip: Use tongs or a fork to avoid bruising the scapes and to pack them firmly for a better crunch.
Step 5: Add the Brine and Seal
- Using a funnel if needed, pour the warm (not hot) brine over the garlic scapes until they are fully submerged.
- Tap the jar gently on the counter to release any air bubbles. Add more brine if needed to cover everything.
- Wipe the jar rims clean and seal with lids tightly.
Step 6: Cool and Store
- Let the jars cool completely at room temperature.
- Once cooled, place the jars in the refrigerator.
- For best flavor, wait at least 3-5 days before eating, allowing the scapes to soak up all the tangy goodness.
- Pickled garlic scapes will keep in the fridge for up to 2 months.
Tips and Tricks for Success
- Use fresh, firm garlic scapes for the best crunch and flavor—avoid limp or yellowing ones.
- Trim the ends and cut the scapes uniformly to ensure even pickling.
- Don’t skip sterilizing jars; it helps keep your pickles safe and fresh longer.
- Pack the jars tightly but don’t crush the scapes to maintain their crisp texture.
- Let the pickled scapes sit for at least 3 days before tasting to develop full flavor.
- Store pickled scapes in the fridge—this recipe is quick pickling, not canning, so refrigeration is key.
- Use a clean utensil each time you remove pickled scapes to avoid contamination.
Ingredient Substitutions and Variations
- Vinegar: Swap white vinegar for apple cider vinegar or rice vinegar for a milder, fruitier tang.
- Salt: Use sea salt or pickling salt if you don’t have kosher salt, but avoid iodized table salt.
- Sweetener: Substitute sugar with honey, maple syrup, or agave syrup for a different sweetness profile.
- Spices: Add mustard seeds, coriander seeds, or bay leaves for extra flavor complexity.
- Herbs: Try fresh thyme, rosemary, or oregano instead of dill for a different herbal note.
- Heat: Increase or omit red pepper flakes depending on how spicy you like your pickles.
- Garlic: Skip the extra garlic cloves if you prefer a lighter garlic flavor or add roasted garlic for a sweeter twist.
Serving Suggestions
- Add chopped pickled garlic scapes to your favorite salad for a tangy, crunchy burst of flavor.
- Use them as a zesty topping on burgers, sandwiches, or tacos — they add a fresh garlic kick without overpowering.
- Chop and mix into cream cheese or hummus for a delicious dip or spread.
- I love serving pickled garlic scapes alongside grilled meats or roasted vegetables to brighten the whole meal.
- Toss them into pasta dishes just before serving for a punch of acidity and crunch that wakes up the flavors.

Storage and Reheating Instructions
- Store pickled garlic scapes in airtight jars or containers in the refrigerator.
- Keep them fully submerged in brine to maintain their crunch and prevent spoilage.
- They’ll stay fresh and tasty for up to 2 months when refrigerated properly.
- No reheating needed—these are best enjoyed cold or at room temperature as a crisp, tangy condiment.
- Always use a clean utensil to remove scapes to avoid introducing bacteria.
Frequently Asked Questions
What do garlic scapes taste like?
Garlic scapes have a fresh, mild garlic flavor with a hint of sweetness and a nice crunchy texture. They’re less intense than raw garlic cloves, making them perfect for pickling and snacking.
How long do pickled garlic scapes last?
When stored properly in the refrigerator, pickled garlic scapes stay fresh and tasty for up to 2 months. Just make sure they stay submerged in the brine!
Can I use other types of vinegar?
Absolutely! White vinegar is classic, but apple cider or rice vinegar work great too and give a milder, fruitier tang. Just keep the ratio of vinegar to water the same.
Do I have to sterilize the jars?
It’s highly recommended to sterilize your jars to prevent bacteria growth and extend shelf life. It’s an easy step that makes a big difference!
Can I make these without sugar?
You can skip or reduce the sugar, but it helps balance the vinegar’s acidity and brings out the scapes’ natural sweetness. If you prefer, try honey or maple syrup as alternatives.
Are pickled garlic scapes spicy?
They have a gentle garlic heat and a slight tang from the vinegar, but the optional red pepper flakes add real spice if you want it. Otherwise, they’re mild and approachable.
Did you try this recipe? Let me know in the comments how it turned out!
Don’t forget to share your photos on Instagram and tag me (@tasiahub_) or use the hashtag (#tasiahub). I’d love to see your creations!
Pickled Garlic Scapes
Equipment
- Mason jars or any glass jars with lids
- Saucepan
- Tongs or a Fork
- Measuring cups and spoons
- Knife and Cutting Board
- Funnel (optional)
Ingredients
For the Pickled Garlic Scapes:
- 1 pound garlic scapes trimmed and cut into pieces
- 1 cup white vinegar or apple cider vinegar for a milder taste
- 1 cup water
- 1 tablespoon kosher salt
- 1 tablespoon sugar
For the Flavor Boosters:
- 3-4 garlic cloves sliced (optional, for extra garlic punch)
- 1 teaspoon black peppercorns
- 1 teaspoon red pepper flakes optional, for a little heat
- 2-3 sprigs fresh dill or 1 teaspoon dried dill optional, for a fresh herbal note
Instructions
Step 1: Prepare the Garlic Scapes
- Rinse the garlic scapes thoroughly under cold running water to remove any dirt or debris.
- Trim off the tough ends (usually about 1 inch from the bottom).
- Cut the scapes into pieces, making them easy to pack into jars and bite-sized for snacking.
- Pro tip: If your scapes are very curly, gently straighten them out before cutting — it helps pack them more efficiently into the jar.
Step 2: Sterilize Your Jars
- Wash your glass jars and lids with hot, soapy water.
- Rinse well and place the jars in a pot of boiling water for about 10 minutes to sterilize.
- Remove carefully and let them air dry on a clean towel.
- Pro tip: Sterilizing jars prevents unwanted bacteria and ensures your pickles stay fresh longer.
Step 3: Make the Pickling Brine
- In a saucepan, combine the vinegar, water, kosher salt, and sugar.
- Heat the mixture over medium heat, stirring occasionally until the salt and sugar are fully dissolved.
- Once dissolved, remove the brine from heat and let it cool slightly.
- Pro tip: Don’t let the brine boil vigorously — a gentle simmer is enough to dissolve ingredients without evaporating too much liquid.
Step 4: Pack the Jars
- Place sliced garlic cloves, peppercorns, red pepper flakes, and dill sprigs (if using) at the bottom of each jar.
- Tightly pack the cut garlic scapes into the jars, leaving about ½ inch of headspace at the top.
- Pro tip: Use tongs or a fork to avoid bruising the scapes and to pack them firmly for a better crunch.
Step 5: Add the Brine and Seal
- Using a funnel if needed, pour the warm (not hot) brine over the garlic scapes until they are fully submerged.
- Tap the jar gently on the counter to release any air bubbles. Add more brine if needed to cover everything.
- Wipe the jar rims clean and seal with lids tightly.
Step 6: Cool and Store
- Let the jars cool completely at room temperature.
- Once cooled, place the jars in the refrigerator.
- For best flavor, wait at least 3-5 days before eating, allowing the scapes to soak up all the tangy goodness.
- Pickled garlic scapes will keep in the fridge for up to 2 months.
Notes
Nutritional Value (per ~2-tablespoon serving)
- Calories: ~10 kcal
- Carbohydrates: ~2g
- Sugars: ~1g
- Fat: 0g
- Protein: 0g
- Sodium: ~180mg
- Fiber: <1g