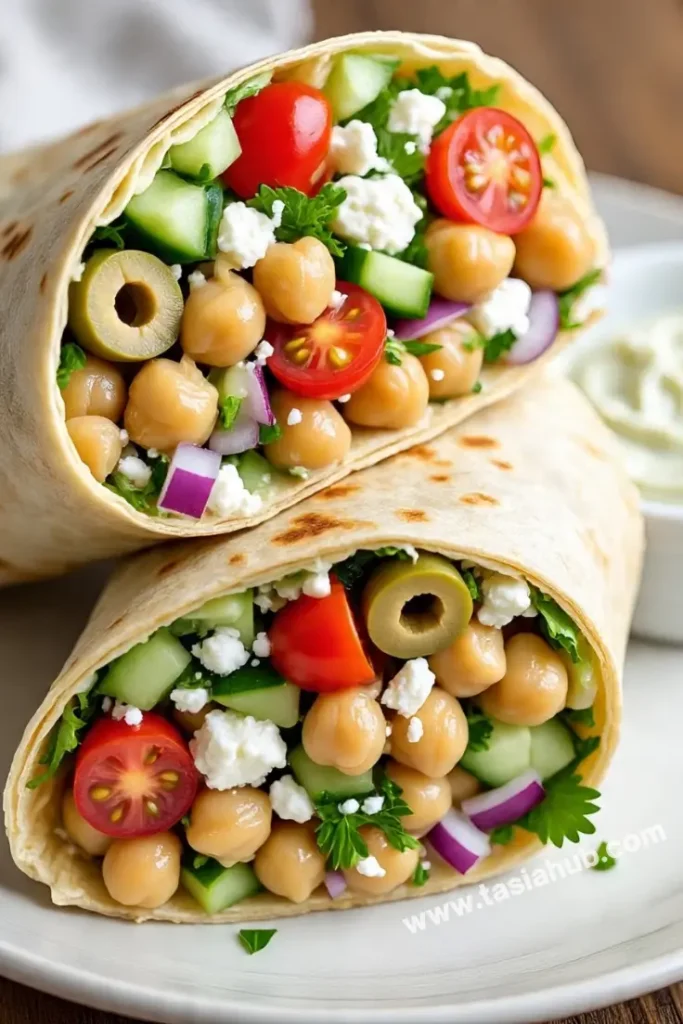
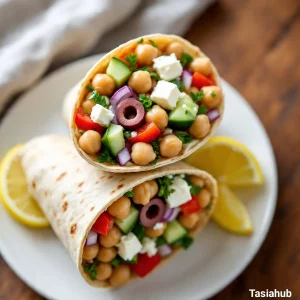
Greek Salad Wraps with Chickpeas

Looking for a fresh, easy lunch idea that’s both nourishing and satisfying? These Greek Salad Wraps with Chickpeas are the perfect fix. They’re everything you love about a Greek salad—crunchy cucumbers, juicy tomatoes, creamy feta, tangy olives—tucked into a soft wrap with hearty chickpeas for added protein and texture. Whether you’re trying to eat more plant-based meals or simply want something that feels light but filling, this wrap has you covered.
What makes this recipe so great is how low-effort it is, without sacrificing flavor. Chickpeas bring that “meaty” bite and pair beautifully with the bold Mediterranean ingredients. Plus, they’re budget-friendly and super easy to keep on hand. Toss everything together in a big bowl, drizzle with a quick homemade dressing, and you’re halfway to a delicious wrap. And if you’re meal prepping, this mix holds up beautifully in the fridge—just assemble wraps when you’re ready to eat.
These wraps are also super versatile. You can go classic with flour tortillas or switch things up with lettuce wraps or whole grain flatbreads. Add grilled chicken or shrimp if you’re not keeping it vegetarian, or swap feta for a dairy-free cheese if needed. Basically, once you get the base flavors in place, it’s yours to customize.
Great for work lunches, quick dinners, or even as part of a picnic spread, these Greek Salad Wraps check all the boxes: fresh, easy, flavorful, and satisfying. It’s like bringing a little bite of the Mediterranean into your everyday routine—no passport required.
Why You’ll Love It
- Fresh and Flavorful – Every bite is bursting with Mediterranean goodness: crisp veggies, zesty dressing, salty olives, and creamy feta. It’s a flavor combo that never gets old.
- Quick and Easy to Make – No need to spend hours in the kitchen. Just chop, toss, and wrap—it’s ready in under 20 minutes!
- Protein-Packed and Filling – Thanks to chickpeas, this vegetarian meal is surprisingly satisfying and will actually keep you full.
- Perfect for Meal Prep – Make the filling ahead of time and store it in the fridge. Assemble the wraps when you’re ready to eat for a no-fuss lunch or dinner.
- Totally Customizable – Add extras like grilled chicken, swap in different veggies, or try it in a bowl instead of a wrap. It’s flexible and easy to adapt to your taste.
Ingredient List
For the Chickpea Greek Salad Filling:
- 1 can (15 oz) chickpeas, drained and rinsed
- 1 cup cherry tomatoes, halved
- 1 cup cucumber, diced
- ½ red onion, thinly sliced
- ½ cup Kalamata olives, pitted and sliced
- ½ cup crumbled feta cheese
- 2 tablespoons fresh parsley, chopped
For the Dressing:
- 3 tablespoons olive oil
- 1 tablespoon red wine vinegar
- 1 teaspoon Dijon mustard
- ½ teaspoon dried oregano
- Salt and black pepper, to taste
For the Wraps:
- 4 large flour tortillas or flatbreads
- Optional: hummus or tzatziki for spreading
Ingredient Notes
- Chickpeas – I usually go with canned for convenience. Just rinse them well to get rid of the canned taste.
- Feta cheese – A block of feta in brine has the best flavor and texture compared to pre-crumbled.
- Kalamata olives – Their rich, tangy flavor adds a true Mediterranean vibe.
- Red onion – If you find raw onion too strong, soak the slices in cold water for 10 minutes to mellow them out.
- Olive oil – Use extra virgin olive oil for the dressing—it really enhances the overall flavor.
- Wraps – Any soft tortilla or flatbread will work, but something sturdy helps hold all the fillings together.
Kitchen Equipment Needed
- Cutting board & sharp knife – For chopping all the fresh veggies. I love using a large bamboo board for space and easy cleanup.
- Mixing bowl – A medium to large bowl works great for tossing the salad ingredients together.
- Small jar or whisk & bowl – To shake or whisk up the dressing quickly. I usually use a mason jar—less mess and easy to store extras.
- Can opener – For opening the chickpeas.
- Spoon or spatula – To gently mix everything without breaking up the chickpeas too much.
- Tongs or clean hands – Helpful for assembling the wraps neatly and evenly.
Instructions
Step 1: Prep the Veggies and Chickpeas
- Drain and rinse your can of chickpeas thoroughly under cold water. Let them sit in a strainer while you prep the rest.
- Halve the cherry tomatoes, dice the cucumber, and thinly slice the red onion.
- Slice the Kalamata olives and chop the fresh parsley.
- If your feta is in a block, crumble it now and set it aside.
Pro Tip: For a milder onion flavor, soak the sliced red onion in a bowl of cold water for 5–10 minutes, then drain and pat dry before adding.
Step 2: Make the Greek Dressing
- In a small bowl or jar, combine olive oil, red wine vinegar, Dijon mustard, dried oregano, salt, and pepper.
- Whisk until emulsified or shake well if using a jar.
Pro Tip: Whisk continuously while slowly adding the oil to help the dressing emulsify and stay blended longer.
Step 3: Mix the Salad Filling
- In a large mixing bowl, combine the chickpeas, cherry tomatoes, cucumber, red onion, olives, parsley, and feta.
- Pour the dressing over the top and gently toss everything until evenly coated.
Pro Tip: Don’t overmix—stir just enough to coat all the ingredients while keeping the feta and chickpeas intact.
Step 4: Warm the Wraps (Optional but Recommended)
- If your wraps or flatbreads are cold or stiff, warm them in a dry skillet over medium heat for about 20 seconds per side, or microwave for 10–15 seconds.
- This makes them more pliable and easier to fold without tearing.
Step 5: Assemble the Wraps
- Lay a warm tortilla flat on a plate or board.
- If using hummus or tzatziki, spread a thin layer in the center of the wrap.
- Spoon a generous amount of the chickpea salad filling into the center, leaving room at the edges for folding.
- Fold in the sides first, then roll from the bottom up to close tightly like a burrito.
Pro Tip: Don’t overfill—this makes it easier to wrap and helps keep everything in place when eating.
Step 6: Serve or Store
- Slice in half if desired and serve immediately.
- If meal prepping, store the filling separately in an airtight container in the fridge for up to 3–4 days. Assemble wraps fresh each time for the best texture.
Tips and Tricks for Success
- Dry your chickpeas well – After rinsing, let them sit or pat them dry with a paper towel. This keeps the wrap from getting soggy.
- Chop ingredients evenly – Similar-sized pieces help every bite taste balanced and make wrapping easier.
- Make ahead but keep separate – Store the salad filling and wraps separately until you’re ready to eat. This keeps everything fresh.
- Wrap tightly – Tuck the sides in, then roll firmly to avoid falling apart mid-bite. Warm wraps are easier to handle.
- Use parchment for on-the-go – Wrapping the finished product in parchment paper or foil makes it travel-friendly and mess-free.
Ingredient Substitutions and Variations
- No feta? – Try crumbled goat cheese, shredded mozzarella, or a dairy-free feta alternative.
- Swap chickpeas – Use white beans, grilled chicken, or even falafel for a different protein source.
- Add greens – Toss in chopped romaine, spinach, or arugula for extra crunch and color.
- Different wraps – Use whole wheat, spinach, or gluten-free tortillas—or try lettuce wraps for a low-carb version.
- Creamy upgrade – Add a dollop of tzatziki or a drizzle of tahini dressing to make it even more flavorful.
- More crunch? – Add bell peppers, shredded carrots, or a handful of sunflower seeds.
Serving Suggestions
- Wrap and go – These are perfect as a grab-and-go lunch. I often roll one up in parchment paper and toss it in my bag for errands or a workday lunch.
- With a side of chips or pita – Serve with crunchy pita chips or warm pita triangles for dipping into any leftover filling or hummus.
- As a picnic spread – Pack the wraps along with some olives, fresh fruit, and lemonade for a light and refreshing outdoor meal.
- Deconstructed in a bowl – Sometimes I skip the wrap and enjoy the filling over mixed greens or quinoa for a quick salad bowl.
- With soup on the side – I love pairing this with a light tomato or lentil soup—it turns it into a cozy, well-rounded dinner.

Storage and Reheating Instructions
- Store the filling separately – Keep the chickpea salad mix in an airtight container in the fridge for up to 4 days.
- Assemble wraps fresh – To avoid soggy wraps, don’t pre-roll them unless eating within a few hours.
- Wraps can be stored – If you need to store pre-assembled wraps, wrap them tightly in foil or parchment and store in the fridge for 1 day max.
- Reheat wraps gently – If you want a warm wrap, unwrap it and heat in a dry skillet for a minute or microwave for 15–20 seconds.
- Avoid freezing – The fresh veggies and feta don’t thaw well, so this recipe is best enjoyed fresh or refrigerated.
Frequently Asked Questions
Can I make these wraps ahead of time?
Yes, but for best texture, prep the filling in advance and assemble the wraps just before eating. Pre-made wraps can get soggy if they sit too long.
Are these wraps vegan?
They can be! Just swap out the feta cheese for a plant-based version or skip it altogether. The rest of the ingredients are naturally vegan.
What can I use instead of chickpeas?
White beans, black beans, or even lentils are great alternatives. You can also add grilled chicken or tofu for a different protein source.
How can I make this low-carb?
Skip the tortilla and serve the filling in lettuce wraps or over a bed of greens for a fresh, low-carb meal.
Can I use bottled dressing instead?
Absolutely! A good-quality Greek or Mediterranean-style vinaigrette works well if you’re short on time, though homemade adds a fresher flavor.
Do the leftovers stay fresh?
Yes! The salad filling holds up well for 3–4 days in the fridge. Just keep it in an airtight container and assemble your wraps fresh for each meal.
Did you try this recipe? Let me know in the comments how it turned out!
Don’t forget to share your photos on Instagram and tag me @tasiahub_ or use the hashtag #tasiahub. I’d love to see your creations!
Greek Salad Wraps with Chickpeas
Equipment
- Cutting board & sharp knife
- Mixing Bowl
- Small jar or whisk & bowl
- Can Opener
- Spoon or spatula
- Tongs or clean hands
Ingredients
For the Chickpea Greek Salad Filling:
- 1 can 15 oz chickpeas, drained and rinsed
- 1 cup cherry tomatoes halved
- 1 cup cucumber diced
- ½ red onion thinly sliced
- ½ cup Kalamata olives pitted and sliced
- ½ cup crumbled feta cheese
- 2 tablespoons fresh parsley chopped
For the Dressing:
- 3 tablespoons olive oil
- 1 tablespoon red wine vinegar
- 1 teaspoon Dijon mustard
- ½ teaspoon dried oregano
- Salt and black pepper to taste
For the Wraps:
- 4 large flour tortillas or flatbreads
- Optional: hummus or tzatziki for spreading
Instructions
Step 1: Prep the Veggies and Chickpeas
- Drain and rinse your can of chickpeas thoroughly under cold water. Let them sit in a strainer while you prep the rest.
- Halve the cherry tomatoes, dice the cucumber, and thinly slice the red onion.
- Slice the Kalamata olives and chop the fresh parsley.
- If your feta is in a block, crumble it now and set it aside.
- Pro Tip: For a milder onion flavor, soak the sliced red onion in a bowl of cold water for 5–10 minutes, then drain and pat dry before adding.
Step 2: Make the Greek Dressing
- In a small bowl or jar, combine olive oil, red wine vinegar, Dijon mustard, dried oregano, salt, and pepper.
- Whisk until emulsified or shake well if using a jar.
- Pro Tip: Whisk continuously while slowly adding the oil to help the dressing emulsify and stay blended longer.
Step 3: Mix the Salad Filling
- In a large mixing bowl, combine the chickpeas, cherry tomatoes, cucumber, red onion, olives, parsley, and feta.
- Pour the dressing over the top and gently toss everything until evenly coated.
- Pro Tip: Don’t overmix—stir just enough to coat all the ingredients while keeping the feta and chickpeas intact.
Step 4: Warm the Wraps (Optional but Recommended)
- If your wraps or flatbreads are cold or stiff, warm them in a dry skillet over medium heat for about 20 seconds per side, or microwave for 10–15 seconds.
- This makes them more pliable and easier to fold without tearing.
Step 5: Assemble the Wraps
- Lay a warm tortilla flat on a plate or board.
- If using hummus or tzatziki, spread a thin layer in the center of the wrap.
- Spoon a generous amount of the chickpea salad filling into the center, leaving room at the edges for folding.
- Fold in the sides first, then roll from the bottom up to close tightly like a burrito.
- Pro Tip: Don’t overfill—this makes it easier to wrap and helps keep everything in place when eating.
Step 6: Serve or Store
- Slice in half if desired and serve immediately.
- If meal prepping, store the filling separately in an airtight container in the fridge for up to 3–4 days. Assemble wraps fresh each time for the best texture.
Notes
Nutritional Value (Per Serving)
- Calories: ~350–400 kcal
- Protein: ~12–15g
- Carbohydrates: ~35–40g
- Fat: ~18–22g
- Fiber: ~8g
- Sugar: ~4g