White Bean Dip
What makes this white bean dip stand out is how comforting it is. It's not just any dip; it’s creamy, tangy, and filled with savory goodness that’ll have everyone coming back for more.
Equipment
- Blender or Food Processor
- Garlic Press
- Measuring Spoons and Cups
- Cutting board
- Serving bowl
Ingredients
For the White Bean Dip:
- 2 cups cooked white beans canned or freshly cooked
- 1/4 cup olive oil
- 2 cloves garlic minced
- 2 tbsp fresh lemon juice
- 1/2 tsp salt or to taste
- 1/4 tsp black pepper
- 1/2 tsp dried oregano
- 1/4 tsp paprika optional, for a little kick
- 2 tbsp fresh parsley chopped (optional, for garnish)
For Serving:
- Veggies carrot sticks, cucumber slices, bell peppers
- Pita chips or crackers
Instructions
Step 1: Prepare Your Ingredients
- Drain and rinse your white beans if you’re using canned beans. If you're using freshly cooked beans, make sure they’re cooled and drained.
- Mince the garlic — this step is super simple, but it really helps build flavor. I recommend using a garlic press if you have one, but a knife works just fine too.
- Chop your fresh parsley if you’re using it as a garnish later. This will give your dip a fresh, colorful pop when you're ready to serve it!
Step 2: Blend the Ingredients
- Add the white beans, olive oil, garlic, lemon juice, salt, pepper, oregano, and paprika to your blender or food processor.
- Pulse a few times to start breaking up the beans. Then, blend continuously until the dip is super smooth and creamy. You might need to scrape down the sides of the blender once or twice to make sure everything gets fully incorporated.
- Pro Tip: If you find the dip too thick, you can add a little more olive oil or water—just a teaspoon at a time — until it reaches your desired consistency. It should be smooth and spreadable, not too runny.
- Expect the dip to be thick and creamy at this stage. The color will be a light beige from the beans, and the texture should be velvety.
Step 3: Taste and Adjust
- Taste the dip and decide if you want more salt, pepper, or lemon juice. If you prefer a little more tang, squeeze in a bit more lemon. If you love garlic, feel free to add another clove!
- Blend again for a few seconds to mix in any adjustments.
- Pro Tip: Don’t be afraid to adjust the seasoning! A little extra salt can really bring out the flavors, and a dash more lemon juice can balance out the richness of the beans.
Step 4: Chill (Optional)
- If you have time, I recommend chilling the dip in the fridge for about 30 minutes before serving. This helps the flavors meld together and gives the dip a thicker consistency. If you’re in a rush, though, you can skip this step and dive right in!
Step 5: Serve and Enjoy
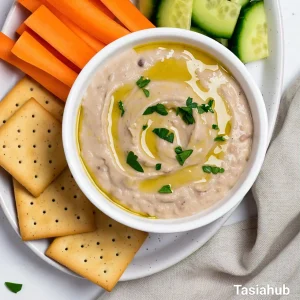
- Once the dip is ready, transfer it to a serving bowl. Sprinkle some fresh parsley on top for a pop of color and extra flavor. You can also add a light drizzle of olive oil for a touch of richness.
- Serve it with your favorite dippers — veggies, pita chips, or crackers — and enjoy!
- Pro Tip: If you're serving this at a party or gathering, you can even make it ahead of time and keep it covered in the fridge. It’ll stay fresh for about 3 days!
- Now, you’ve got yourself a simple, creamy, and flavorful white bean dip ready to share (or enjoy all on your own)!
Notes
Nutritional Value per Serving
- Calories: 120-140 kcal
- Protein: 4g
- Fat: 9g
- Carbohydrates: 12g
- Fiber: 3g
- Sugar: 1g
- Sodium: 150mg
- Cholesterol: 0mg
The nutritional information provided on this website is an estimate only and is intended for general guidance. We cannot guarantee its accuracy and recommend consulting a qualified healthcare professional or registered dietitian for personalized nutrition advice.