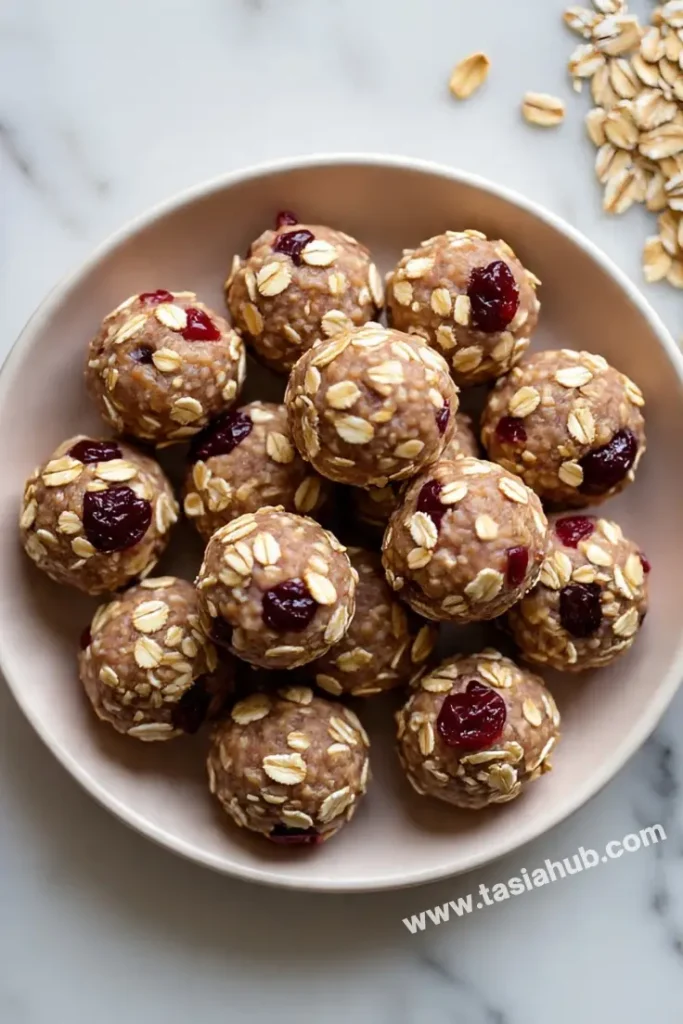
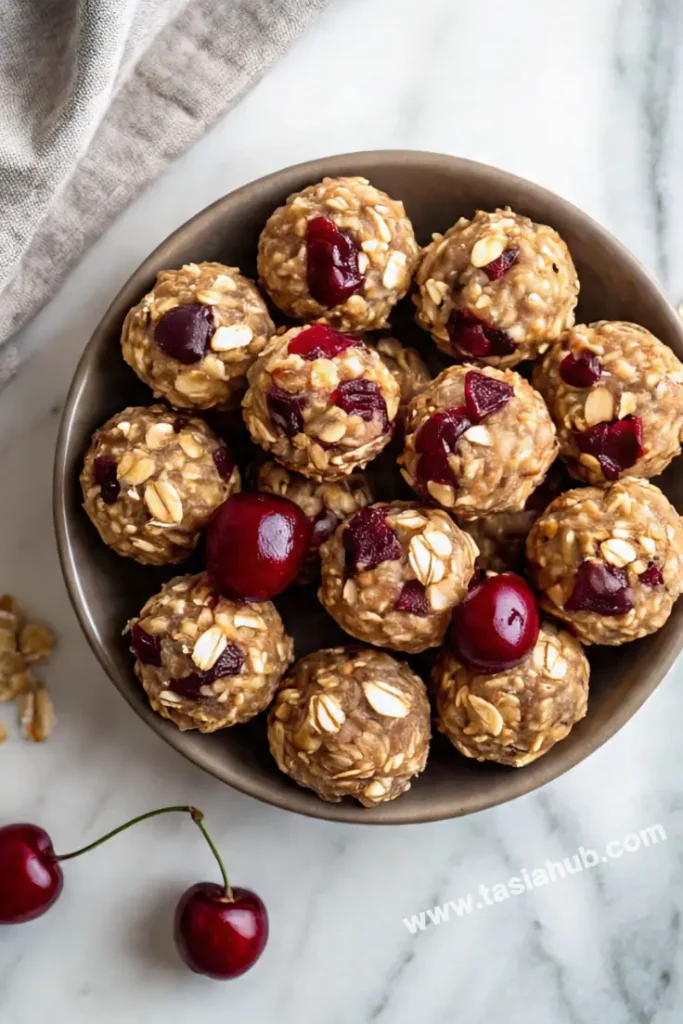
No Bake Dried Tart Cherry Energy Balls

Looking for a quick, satisfying snack that doesn’t require turning on the oven? These no bake dried tart cherry energy balls are the perfect solution. They’re naturally sweet, delightfully chewy, and packed with ingredients that actually make you feel good after eating them. Whether you’re heading to the gym, wrangling a busy workday, or just need a sweet fix that won’t leave you crashing later, these little bites have your back.
I first made a batch of these when I was trying to clear out some pantry odds and ends—half a jar of almond butter, a nearly-empty bag of oats, and some dried tart cherries I kept forgetting about. I wasn’t expecting much, but the flavor was so bold and satisfying that I immediately jotted down the measurements to make sure I could recreate it again (and again). The sweet-tart balance from the cherries is what makes them shine—they cut through the richness of the nut butter and give every bite a little pop.
What I love most is how customizable they are. You can swap ingredients depending on what you have—chia seeds for flax, peanut butter for almond butter, even drizzle some dark chocolate if you’re feeling fancy. And best of all, they come together in minutes with just a food processor or a sturdy spoon and some elbow grease.
If you’ve ever found yourself hovering around the fridge, searching for something that’s equal parts indulgent and nourishing, these cherry energy balls are it. They keep well, travel easily, and are a great make-ahead option for the week. Honestly, they taste like a treat, but fuel you like a power snack.
Why You’ll Love It
- No baking required: Perfect for hot days or busy schedules—just mix, roll, and refrigerate. No oven, no fuss!
- Naturally sweetened: The dried tart cherries and a touch of maple syrup give just the right amount of sweetness without refined sugar.
- Perfect for on-the-go: These energy balls are compact, portable, and mess-free—ideal for tossing into your bag for work, school, or travel.
- Customizable ingredients: Use whatever you have on hand—switch up the nut butter, add seeds, throw in some mini chocolate chips or coconut flakes.
- Satisfying and nourishing: Packed with fiber, healthy fats, and just enough carbs to keep you full and energized between meals.
Ingredient List
- 1 cup rolled oats
- ½ cup almond butter (or peanut butter)
- ⅓ cup dried tart cherries, chopped
- ¼ cup ground flaxseed
- 2 tablespoons honey or maple syrup
- 1 teaspoon vanilla extract
- ¼ teaspoon cinnamon (optional)
- Pinch of salt
- 2–3 tablespoons mini dark chocolate chips (optional)
Ingredient Notes
- Rolled oats: Old-fashioned oats work best here—they hold their shape and give the balls a nice chewy texture.
- Nut butter: I usually go with creamy almond butter for a mild, nutty flavor, but peanut butter adds a richer taste if that’s more your vibe.
- Dried tart cherries: Make sure they’re unsweetened or lightly sweetened—you want that tart pop, not overpowering sugar.
- Ground flaxseed: Adds a boost of fiber and helps bind everything together.
- Sweetener: Maple syrup gives a lovely depth, but honey works great if that’s what you have.
- Vanilla: Don’t skip it! It subtly enhances the overall flavor.
- Mini chocolate chips: Totally optional, but a handful gives that dessert-like touch (especially good for curbing sweet cravings).
Kitchen Equipment Needed
- Mixing bowl: For combining all the ingredients—use a medium to large one for easier mixing.
- Spatula or wooden spoon: To stir everything together—make sure it’s sturdy enough to handle the thick mixture.
- Measuring cups and spoons: For accurate portions—especially helpful when balancing the sweetness or adjusting texture.
- Sharp knife + cutting board: To roughly chop the dried tart cherries so they mix evenly throughout.
- Cookie scoop or tablespoon: Makes it easier to portion out evenly sized balls (and keeps your hands cleaner).
- Airtight container: For storing the finished energy balls in the fridge or freezer—I like using a glass container with a snap-on lid for freshness.
Instructions
Step 1: Prep the dried cherries
- Place your dried tart cherries on a cutting board.
- Roughly chop them into smaller bits—this helps them distribute evenly and ensures every bite gets some cherry goodness.
Pro Tip: If your cherries are extra dry or tough, soak them in warm water for 5 minutes, then pat dry before chopping. This makes them softer and easier to mix in.
Step 2: Combine the dry ingredients
- In a large mixing bowl, add the rolled oats, ground flaxseed, chopped dried cherries, cinnamon (if using), and a pinch of salt.
- Stir everything together until well combined and evenly mixed.
This dry base gives the balls their chewy texture and makes sure the flavor is balanced throughout.
Step 3: Mix the wet ingredients
- In a separate small bowl (or directly in the same bowl if you’re minimizing dishes), add the almond butter, honey or maple syrup, and vanilla extract.
- Stir until everything is smooth and well blended.
Pro Tip: If your nut butter is thick or cold, microwave it for 10–15 seconds to soften—it’ll mix much easier.
Step 4: Combine wet and dry mixtures
- Pour the wet mixture into the bowl with your dry ingredients.
- Use a spatula or sturdy spoon to stir everything together—it might take a bit of elbow grease, but it’ll come together.
- If the mixture feels too dry or crumbly, add a tiny splash of warm water (1 teaspoon at a time) until it sticks together easily.
You’re aiming for a dough-like consistency that holds its shape when pressed.
Step 5: Fold in chocolate chips (optional)
- Once the base is well combined, sprinkle in your mini dark chocolate chips.
- Gently fold them in with a spatula or clean hands.
Pro Tip: Let the mixture cool slightly before adding chocolate if your nut butter was warm—this prevents melting and mess.
Step 6: Roll into balls
- Use a cookie scoop or tablespoon to portion out the mixture.
- Roll each portion between your palms into a firm, smooth ball.
- Repeat until all the mixture is used—you should get about 12–14 balls, depending on size.
This part can be a little sticky, so slightly damp hands help if the mixture clings.
Step 7: Chill and store
- Place the rolled energy balls on a plate or baking sheet lined with parchment paper.
- Refrigerate for at least 30 minutes to firm up.
- Once set, transfer to an airtight container and store in the fridge for up to 1 week—or freeze for up to 2 months.
Now they’re ready for snacking whenever you need a quick boost!
Tips and Tricks for Success
- Chop cherries finely: Smaller bits of dried cherry make the mixture easier to roll and help distribute the tart flavor evenly in every bite.
- Use room temperature ingredients: Cold nut butter or honey can make mixing difficult—let them sit out for a few minutes if stored in the fridge.
- Taste before rolling: Once the mixture is combined, give it a quick taste. Want it sweeter? Add a touch more honey or a few extra chocolate chips.
- Don’t skip chilling: Chilling helps the balls firm up and hold their shape—don’t rush this step if you want perfect texture.
- Make a double batch: These store well, and you’ll be glad to have extras on hand for busy days or quick energy boosts.
Ingredient Substitutions and Variations
- Nut butter: Swap almond butter with peanut butter, cashew butter, or even sunflower seed butter for a nut-free option.
- Oats: Use quick oats if that’s what you have—they’ll be slightly softer but still tasty.
- Sweetener: Maple syrup and honey are interchangeable. For a lower glycemic option, try brown rice syrup.
- Dried fruit: Not a fan of cherries? Use dried cranberries, chopped apricots, or raisins instead.
- Add-ins: Stir in shredded coconut, chopped nuts, hemp seeds, or chia seeds for added crunch or nutrition.
- Spices: Cinnamon is optional, but feel free to add a pinch of nutmeg, ginger, or even a tiny bit of cardamom for extra flavor depth.
- Chocolate options: Try cacao nibs instead of chips for a more wholesome, less-sweet bite.
Serving Suggestions
- Grab-and-go snack: These are perfect straight from the fridge when you’re heading out the door or need something quick between meals.
- Pre-workout boost: I like to pop one or two about 30 minutes before a workout—they give just enough energy without weighing me down.
- With afternoon coffee or tea: I often pair one with my afternoon cup of tea when I need a little pick-me-up that isn’t overly sweet.
- Healthy dessert option: Serve a few chilled energy balls on a plate with a drizzle of dark chocolate or a dusting of cocoa powder for a guilt-free dessert.
- Kid-friendly lunchbox treat: These make a fun and wholesome addition to lunchboxes—just be mindful of nut allergies in school settings.
Storage and Reheating Instructions
- Refrigerator: Store in an airtight container in the fridge for up to 7 days. They stay firm, chewy, and fresh-tasting.
- Freezer: Freeze in a single layer on a baking sheet first, then transfer to a sealed freezer bag or container. They’ll keep for up to 2 months.
- Thawing: If frozen, let them sit at room temperature for about 10–15 minutes before eating—or pop one in your lunchbox and it’ll be perfect by snack time.
- Avoid reheating: These aren’t meant to be warmed up—heating them can make them oily or soft. Best enjoyed chilled or at room temp.
- Pack smart: If taking them on the go, use a small container or snack bag to keep them from getting squished in your bag.
Frequently Asked Questions
Can I make these energy balls without a food processor?
Absolutely! Just mix everything in a bowl with a sturdy spoon or your hands. Chopping the cherries finely helps them blend in more easily.
Are these energy balls gluten-free?
Yes—just make sure you’re using certified gluten-free oats. All other ingredients are naturally gluten-free.
What can I use instead of flaxseed?
You can sub in chia seeds, hemp seeds, or even oat flour for a similar texture and nutritional boost.
How do I keep them from sticking to my hands when rolling?
Slightly dampen your hands with water before rolling—that trick keeps the mixture from sticking and makes shaping a breeze.
Can I leave out the chocolate chips?
Totally! They’re optional. You can replace them with cacao nibs, chopped nuts, or just skip them for a simpler, fruit-forward bite.
How many should I eat at once?
One or two is usually perfect for a snack. They’re filling, so you probably won’t need more than that at a time!
Did you try this recipe? Let me know in the comments how it turned out!
Don’t forget to share your photos on Instagram and tag me @tasiahub_ or use the hashtag #tasiahub. I’d love to see your cherry-loaded creations!
No Bake Dried Tart Cherry Energy Balls
Equipment
- Mixing Bowl
- Spatula or wooden spoon
- Measuring cups and spoons
- Sharp knife & cutting board
- Cookie scoop or tablespoon
- Airtight container
Ingredients
- 1 cup rolled oats
- ½ cup almond butter or peanut butter
- ⅓ cup dried tart cherries chopped
- ¼ cup ground flaxseed
- 2 tablespoons honey or maple syrup
- 1 teaspoon vanilla extract
- ¼ teaspoon cinnamon optional
- Pinch of salt
- 2 –3 tablespoons mini dark chocolate chips optional
Instructions
Step 1: Prep the dried cherries
- Place your dried tart cherries on a cutting board.
- Roughly chop them into smaller bits—this helps them distribute evenly and ensures every bite gets some cherry goodness.
- Pro Tip: If your cherries are extra dry or tough, soak them in warm water for 5 minutes, then pat dry before chopping. This makes them softer and easier to mix in.
Step 2: Combine the dry ingredients
- In a large mixing bowl, add the rolled oats, ground flaxseed, chopped dried cherries, cinnamon (if using), and a pinch of salt.
- Stir everything together until well combined and evenly mixed.
- This dry base gives the balls their chewy texture and makes sure the flavor is balanced throughout.
Step 3: Mix the wet ingredients
- In a separate small bowl (or directly in the same bowl if you’re minimizing dishes), add the almond butter, honey or maple syrup, and vanilla extract.
- Stir until everything is smooth and well blended.
- Pro Tip: If your nut butter is thick or cold, microwave it for 10–15 seconds to soften—it’ll mix much easier.
Step 4: Combine wet and dry mixtures
- Pour the wet mixture into the bowl with your dry ingredients.
- Use a spatula or sturdy spoon to stir everything together—it might take a bit of elbow grease, but it’ll come together.
- If the mixture feels too dry or crumbly, add a tiny splash of warm water (1 teaspoon at a time) until it sticks together easily.
- You’re aiming for a dough-like consistency that holds its shape when pressed.
Step 5: Fold in chocolate chips (optional)
- Once the base is well combined, sprinkle in your mini dark chocolate chips.
- Gently fold them in with a spatula or clean hands.
- Pro Tip: Let the mixture cool slightly before adding chocolate if your nut butter was warm—this prevents melting and mess.
Step 6: Roll into balls
- Use a cookie scoop or tablespoon to portion out the mixture.
- Roll each portion between your palms into a firm, smooth ball.
- Repeat until all the mixture is used—you should get about 12–14 balls, depending on size.
- This part can be a little sticky, so slightly damp hands help if the mixture clings.
Step 7: Chill and store
- Place the rolled energy balls on a plate or baking sheet lined with parchment paper.
- Refrigerate for at least 30 minutes to firm up.
- Once set, transfer to an airtight container and store in the fridge for up to 1 week—or freeze for up to 2 months.
Notes
Nutritional Value (Per energy ball)
- Calories: 120–140 kcal
- Protein: 3–4 grams
- Carbohydrates: 13–15 grams
- Fiber: 2–3 grams
- Sugar: 7–9 grams
- Fat: 6–8 grams