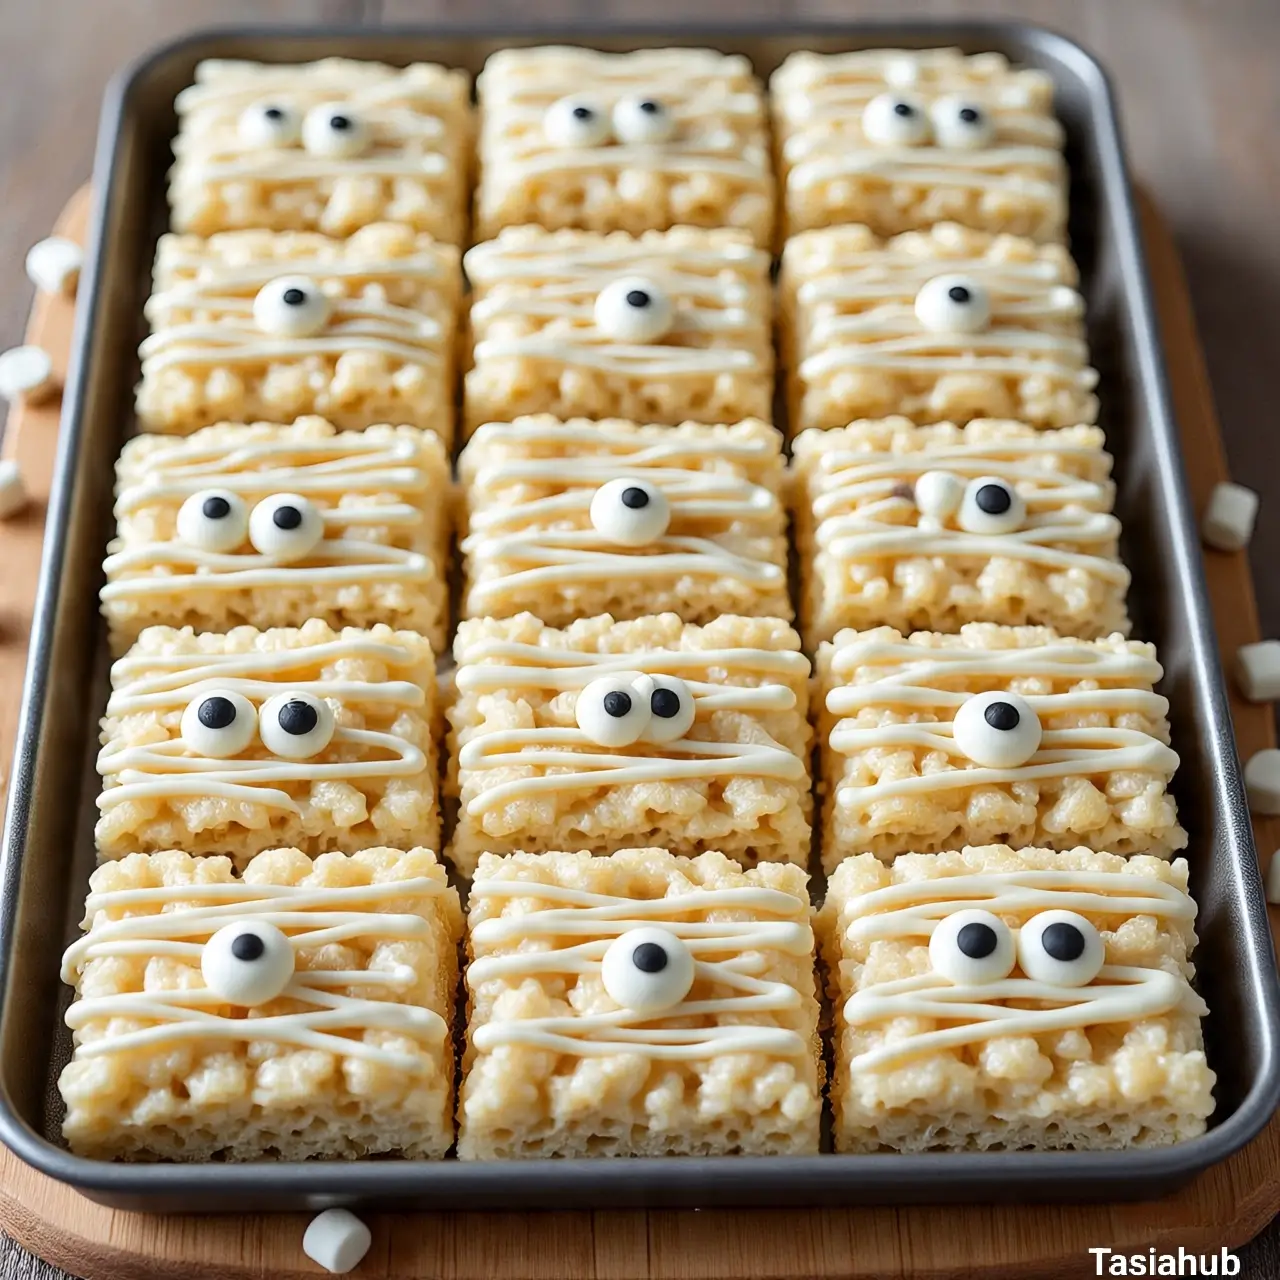
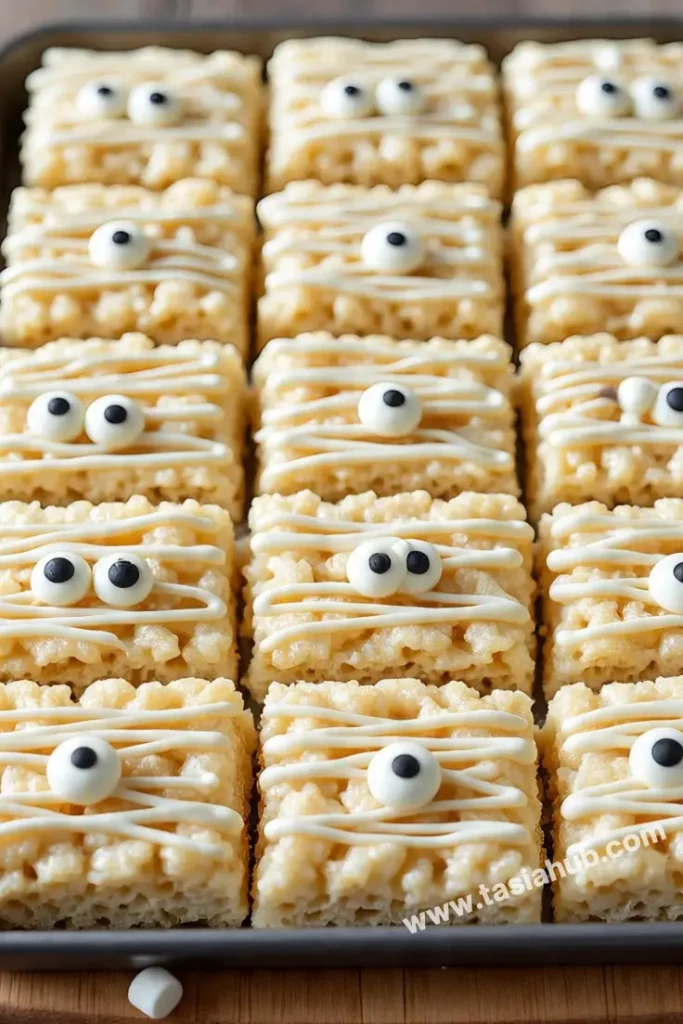
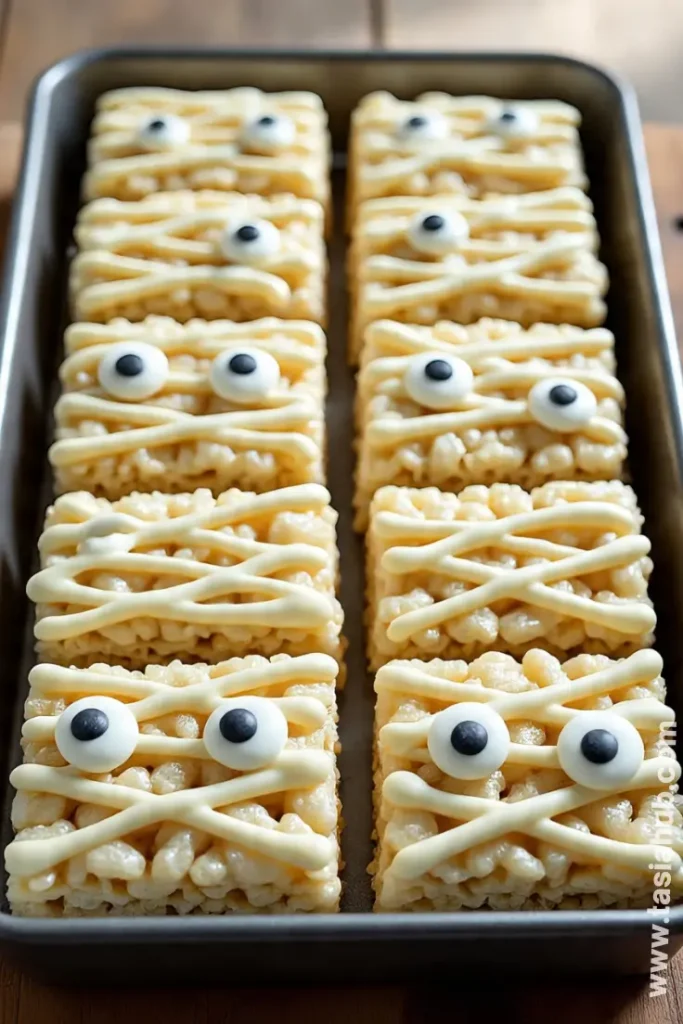
Mummy Rice Krispie Treats
Halloween is one of those holidays where the food can be just as fun as the costumes, and these mummy rice Krispie treats prove it. They’re playful, a little spooky, and perfect for serving at parties or packing into treat bags for friends. What I love most is that they start with the classic rice Krispies base we all grew up eating, but with just a few creative twists, they turn into adorable (and edible!) mummies.
Making themed desserts can sometimes feel intimidating, but these spooky rice Krispie treats are anything but complicated. They don’t require special baking skills or fancy tools—just melted marshmallows, butter, crispy cereal, white chocolate, and candy eyes. That’s it! The transformation happens when you drizzle the melted chocolate across each square, giving it that signature mummy “wrapped” look. It’s surprisingly easy and super satisfying to watch them come together.
The best part? These little treats are a guaranteed hit with both kids and adults. They’re sweet, crunchy, and packed with nostalgia, but dressed up for Halloween in the cutest way possible. If you’re hosting a get-together, sending something festive to school, or simply want a fun kitchen project, these Halloween rice Krispie treats check every box. I’ve even found they double as a fun decorating activity—set out the squares, some melted chocolate, and a bowl of candy eyes, and let everyone create their own mummy design.
So, whether you’re browsing for Halloween rice Krispie treats ideas or just want to jazz up your go-to Krispie treats, these mummies are the perfect blend of festive and foolproof. They’ll disappear quickly (no ghostly pun intended), so you might want to make a double batch!
Why You’ll Love It
- Perfectly spooky but still cute – These mummy rice crispy treats manage to be festive without being too scary, making them ideal for both kids and adults.
- No baking required – If you can melt butter and marshmallows, you can make these. It’s a stress-free dessert with maximum impact.
- Customizable fun – Add sprinkles, different candy eyes, or even drizzle with colored chocolate for your own twist on these Halloween rice Krispie treats.
- Portable and party-ready – They hold their shape well, so you can wrap them individually for school parties, potlucks, or Halloween goodie bags.
- Nostalgic with a twist – Everyone loves the classic rice Krispie treats, and this version brings a playful holiday spin that sparks smiles instantly.
Ingredients
For the Rice Krispie Treats
- 6 cups Rice Krispies cereal
- 4 tablespoons unsalted butter
- 1 (10 oz) bag mini marshmallows
- 1 teaspoon vanilla extract (optional)
For Decorating the Mummies
- 1 ½ cups white chocolate chips or melting wafers
- Candy eyeballs (about 24 pairs)
Ingredient Notes
- Rice Krispies cereal – I stick with the classic Kellogg’s Rice Krispies because they give that perfect crunch. Off-brands work too, but the texture can vary slightly.
- Mini marshmallows – Always go for fresh marshmallows! Old ones don’t melt as smoothly and can make your Krispie treats a little too stiff.
- Butter – Unsalted is best so you control the flavor, but if you only have salted, just skip adding any extra salt. I like the richness real butter gives compared to margarine.
- White chocolate – Melting wafers (like Ghirardelli or Wilton) make drizzling super easy since they melt smoother than chips. I always keep a bag in my pantry for quick holiday treats.
- Candy eyeballs – Don’t skip these! They’re what transform your simple squares into actual spooky rice Krispie treats. Plus, kids love sticking them on.
Kitchen Equipment Needed
- Large pot or saucepan – For melting the butter and marshmallows together. I like using a nonstick pot to make cleanup easier.
- Wooden spoon or heatproof spatula – Perfect for stirring the sticky marshmallow mixture without it clumping too much.
- 9×13-inch baking pan – This gives you evenly sized rice Krispie treats. If you want thicker mummies, use a smaller pan.
- Parchment paper – Helps lift the treats right out of the pan without sticking (a total lifesaver).
- Microwave-safe bowl – For melting the white chocolate before drizzling.
- Small spoon, piping bag, or zip-top bag – Makes it easy to drizzle the chocolate “bandages” over your mummies.
- Offset spatula (optional) – I like using this to press the cereal mixture into the pan evenly without burning my fingers.
Instructions
Step 1: Prepare Your Pan
- Line a 9×13-inch baking pan with parchment paper, leaving some overhang on the sides (this makes it easier to lift out later).
- Lightly grease the parchment with butter or nonstick spray so nothing sticks.
Pro Tip: Grease your spatula too—it keeps the sticky marshmallow mixture from clinging!
Step 2: Melt the Butter and Marshmallows
- In a large pot over medium-low heat, add the butter. Let it melt completely.
- Pour in the mini marshmallows and stir constantly until smooth and fully melted.
- If you like, stir in the vanilla extract for an extra cozy flavor boost.
Pro Tip: Keep the heat low—high heat can make the marshmallows tough instead of gooey.
Step 3: Add the Rice Krispies
- Remove the pot from the heat.
- Gently fold in the Rice Krispies cereal, making sure every piece gets coated in the marshmallow mixture.
- Stir until evenly combined and sticky.
Pro Tip: Work quickly! The mixture sets fast, so you’ll want to get it pressed into the pan while it’s still warm.
Step 4: Shape and Cool
- Transfer the mixture into your prepared pan.
- Use a greased spatula (or lightly buttered hands) to press it down evenly.
- Let it cool for about 30 minutes so the treats can firm up before cutting.
Step 5: Cut into Squares
- Once cooled, lift the treats out of the pan using the parchment overhang.
- Place on a cutting board and slice into even rectangles or squares (mummy-sized pieces!).
Step 6: Melt the White Chocolate
- Place the white chocolate chips or wafers into a microwave-safe bowl.
- Heat in 20-second intervals, stirring in between, until smooth and melted.
Pro Tip: Don’t rush the melting—short bursts prevent burning and give you silky chocolate.
Step 7: Create the Mummy Wrappings
- Transfer the melted chocolate into a piping bag or a zip-top bag with the corner snipped.
- Drizzle back and forth across each Rice Krispie square to create a “bandaged” look.
- While the chocolate is still wet, gently press on two candy eyeballs for each mummy.
Step 8: Set and Serve
- Let the chocolate harden at room temperature (about 15 minutes) or pop them in the fridge to speed things up.
- Serve on a spooky platter, pack into treat bags, or sneak one for yourself before they all disappear!
Tips and Tricks for Success
- Work fast with the marshmallow mix – Once you add the cereal, the mixture starts setting quickly. Have your pan prepped so you can press it in right away.
- Don’t pack too hard – Pressing the mixture into the pan too firmly makes your Krispie treats dense and tough. Gentle but firm pressure is best.
- Keep hands greased – A little butter or cooking spray on your fingers or spatula makes handling the sticky mixture so much easier.
- Use fresh marshmallows – They melt smoother and give you that soft, chewy texture everyone loves.
- Chill briefly for neat cutting – Pop the pan in the fridge for 10–15 minutes before slicing to get nice, clean edges.
Ingredient Substitutions and Variations
- Cereal swap – Try Cocoa Krispies or Fruity Pebbles for a fun twist on classic rice Krispie treats.
- Vegan-friendly – Use vegan marshmallows and plant-based butter for dairy-free mummies.
- Chocolate drizzle – Go half-and-half with white and milk chocolate for striped mummies.
- Extra spooky – Tint some of the white chocolate with gel food coloring (like green or purple) for monster-style wrappings.
- Add-ins – Mix in mini chocolate chips, crushed Oreos, or sprinkles for extra flavor and texture.
Serving Suggestions
- I love serving these mummy rice Krispie treats on a black Halloween platter with plastic spiders scattered around—it makes the display extra spooky and festive.
- Wrap them individually in clear treat bags tied with orange or black ribbon for a fun party favor or trick-or-treat handout.
- Pair them with other Halloween rice Krispie treats ideas like ghost pops or pumpkin-shaped versions for a themed dessert table.
- Serve with hot cocoa topped with whipped cream for a cozy October movie night.
- Bring them to school parties or potlucks—these little mummies always get more attention than the candy bars!
Storage and Reheating Instructions
- Room temperature: Store in an airtight container at room temp for up to 3 days—they’ll stay soft and chewy.
- Layering tip: Place parchment or wax paper between layers so they don’t stick together.
- Fridge option: You can refrigerate them for up to 5 days, but let them sit out a bit before serving so they aren’t too firm.
- Freezing: Wrap individually in plastic wrap and freeze in a zip-top bag for up to 1 month. Thaw at room temp before enjoying.
- Reheating: These aren’t really meant to be reheated, but if they feel too firm, a quick 5–8 seconds in the microwave softens them up.
Frequently Asked Questions
Can I make these mummy rice Krispie treats ahead of time?
Yes! You can make them 1–2 days in advance. Just store them in an airtight container at room temperature, and they’ll stay fresh for your Halloween party.
How do I keep my Rice Krispie treats soft?
The secret is using fresh marshmallows and not pressing the mixture too firmly into the pan. Gentle pressure keeps them light and chewy instead of dense.
Can I use marshmallow fluff instead of mini marshmallows?
You can, but the texture will be a little stickier and less firm. Mini marshmallows melt more evenly and give the classic Krispie treat consistency.
What if I don’t have candy eyes?
No problem! You can use mini chocolate chips, M&Ms, or even pipe little dots of melted chocolate for eyes. They’ll still look spooky and cute.
Do I need a piping bag for the chocolate drizzle?
Not at all. A zip-top bag with the corner snipped works perfectly. Even a spoon can do the trick—just drizzle back and forth for that wrapped look.
Can I double the recipe?
Definitely. Just use a larger baking sheet or two pans, and double all the ingredients. These disappear quickly, so doubling is usually a smart move!
Did you try these spooky rice Krispie treats? I’d love to hear how they turned out! Share your mummy creations in the comments or tag me so I can see your Halloween dessert magic.

Mummy Rice Krispie Treats
Equipment
- Large pot or saucepan
- Wooden spoon or heatproof spatula
- 9×13-inch Baking Pan
- Parchment paper
- Microwave-safe bowl
- Small spoon, piping bag, or zip-top bag
- Offset spatula (optional)
Ingredients
For the Rice Krispie Treats
- 6 cups Rice Krispies cereal
- 4 tablespoons unsalted butter
- 1 10 oz bag mini marshmallows
- 1 teaspoon vanilla extract optional
For Decorating the Mummies
- 1 ½ cups white chocolate chips or melting wafers
- Candy eyeballs about 24 pairs
Instructions
Step 1: Prepare Your Pan
- Line a 9×13-inch baking pan with parchment paper, leaving some overhang on the sides (this makes it easier to lift out later).
- Lightly grease the parchment with butter or nonstick spray so nothing sticks.
- Pro Tip: Grease your spatula too—it keeps the sticky marshmallow mixture from clinging!
Step 2: Melt the Butter and Marshmallows
- In a large pot over medium-low heat, add the butter. Let it melt completely.
- Pour in the mini marshmallows and stir constantly until smooth and fully melted.
- If you like, stir in the vanilla extract for an extra cozy flavor boost.
- Pro Tip: Keep the heat low—high heat can make the marshmallows tough instead of gooey.
Step 3: Add the Rice Krispies
- Remove the pot from the heat.
- Gently fold in the Rice Krispies cereal, making sure every piece gets coated in the marshmallow mixture.
- Stir until evenly combined and sticky.
- Pro Tip: Work quickly! The mixture sets fast, so you’ll want to get it pressed into the pan while it’s still warm.
Step 4: Shape and Cool
- Transfer the mixture into your prepared pan.
- Use a greased spatula (or lightly buttered hands) to press it down evenly.
- Let it cool for about 30 minutes so the treats can firm up before cutting.
Step 5: Cut into Squares
- Once cooled, lift the treats out of the pan using the parchment overhang.
- Place on a cutting board and slice into even rectangles or squares (mummy-sized pieces!).
Step 6: Melt the White Chocolate
- Place the white chocolate chips or wafers into a microwave-safe bowl.
- Heat in 20-second intervals, stirring in between, until smooth and melted.
- Pro Tip: Don’t rush the melting—short bursts prevent burning and give you silky chocolate.
Step 7: Create the Mummy Wrappings
- Transfer the melted chocolate into a piping bag or a zip-top bag with the corner snipped.
- Drizzle back and forth across each Rice Krispie square to create a “bandaged” look.
- While the chocolate is still wet, gently press on two candy eyeballs for each mummy.
Step 8: Set and Serve
- Let the chocolate harden at room temperature (about 15 minutes) or pop them in the fridge to speed things up.
- Serve on a spooky platter, pack into treat bags, or sneak one for yourself before they all disappear!
Notes
Nutritional Value (per serving, approx.):
- Calories: 150–180
- Carbohydrates: 28g
- Sugar: 18g
- Fat: 4–6g
- Protein: 1–2g
- Fiber: 0–1g