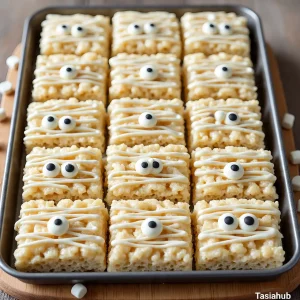
Mummy Rice Krispie Treats
Making themed desserts can sometimes feel intimidating, but these spooky rice Krispie treats are anything but complicated.
Equipment
- Large pot or saucepan
- Wooden spoon or heatproof spatula
- 9x13-inch Baking Pan
- Parchment paper
- Microwave-safe bowl
- Small spoon, piping bag, or zip-top bag
- Offset spatula (optional)
Ingredients
For the Rice Krispie Treats
- 6 cups Rice Krispies cereal
- 4 tablespoons unsalted butter
- 1 10 oz bag mini marshmallows
- 1 teaspoon vanilla extract optional
For Decorating the Mummies
- 1 ½ cups white chocolate chips or melting wafers
- Candy eyeballs about 24 pairs
Instructions
Step 1: Prepare Your Pan
- Line a 9x13-inch baking pan with parchment paper, leaving some overhang on the sides (this makes it easier to lift out later).
- Lightly grease the parchment with butter or nonstick spray so nothing sticks.
- Pro Tip: Grease your spatula too—it keeps the sticky marshmallow mixture from clinging!
Step 2: Melt the Butter and Marshmallows
- In a large pot over medium-low heat, add the butter. Let it melt completely.
- Pour in the mini marshmallows and stir constantly until smooth and fully melted.
- If you like, stir in the vanilla extract for an extra cozy flavor boost.
- Pro Tip: Keep the heat low—high heat can make the marshmallows tough instead of gooey.
Step 3: Add the Rice Krispies
- Remove the pot from the heat.
- Gently fold in the Rice Krispies cereal, making sure every piece gets coated in the marshmallow mixture.
- Stir until evenly combined and sticky.
- Pro Tip: Work quickly! The mixture sets fast, so you’ll want to get it pressed into the pan while it’s still warm.
Step 4: Shape and Cool
- Transfer the mixture into your prepared pan.
- Use a greased spatula (or lightly buttered hands) to press it down evenly.
- Let it cool for about 30 minutes so the treats can firm up before cutting.
Step 5: Cut into Squares
- Once cooled, lift the treats out of the pan using the parchment overhang.
- Place on a cutting board and slice into even rectangles or squares (mummy-sized pieces!).
Step 6: Melt the White Chocolate
- Place the white chocolate chips or wafers into a microwave-safe bowl.
- Heat in 20-second intervals, stirring in between, until smooth and melted.
- Pro Tip: Don’t rush the melting—short bursts prevent burning and give you silky chocolate.
Step 7: Create the Mummy Wrappings
- Transfer the melted chocolate into a piping bag or a zip-top bag with the corner snipped.
- Drizzle back and forth across each Rice Krispie square to create a “bandaged” look.
- While the chocolate is still wet, gently press on two candy eyeballs for each mummy.
Step 8: Set and Serve
- Let the chocolate harden at room temperature (about 15 minutes) or pop them in the fridge to speed things up.
- Serve on a spooky platter, pack into treat bags, or sneak one for yourself before they all disappear!
Notes
Nutritional Value (per serving, approx.):
- Calories: 150–180
- Carbohydrates: 28g
- Sugar: 18g
- Fat: 4–6g
- Protein: 1–2g
- Fiber: 0–1g