Fall Charcuterie Board

A fall charcuterie board is more than just a snack spread—it’s a beautiful way to celebrate the season’s rich flavors, warm colors, and cozy vibes. Imagine sitting with friends or family, a candle flickering nearby, and a platter filled with seasonal fruits, artisanal cheeses, savory meats, and little bites that make every mouthful feel like autumn. It’s not only delicious but also a feast for the eyes, blending rustic charm with an inviting variety of textures and tastes.
What makes a fall charcuterie board so special is the way it reflects the season. Instead of just the usual crackers and cheese, you get an assortment inspired by autumn’s bounty—crisp apple slices, sweet figs, roasted nuts, creamy brie drizzled with honey, and maybe even pumpkin-spiced treats for a little twist. The flavors are bold yet comforting, the colors are rich and earthy, and the whole setup feels like it belongs right in the middle of a cozy fall gathering.
The beauty of this kind of board is its flexibility. You can go all out with a large, elaborate spread for a party, or keep it simple for a quiet night in. There’s no strict rulebook—just a balance of sweet and savory, crunchy and creamy, vibrant and neutral tones. It’s about creating something that looks as good as it tastes while making guests (or just yourself) feel welcome and indulged.
A fall charcuterie board also becomes part of the décor. It brings a touch of seasonal magic to the table without much effort. Whether you’re hosting a Friendsgiving, having wine night, or just want to make an ordinary weekend feel special, this board can transform simple snacking into an experience. And the best part? You don’t have to be a chef to put one together—you just need the right seasonal ingredients and a bit of creativity.
Why You’ll Love It
- Seasonal flavors in every bite – From juicy pears and apples to spiced nuts and rich cheeses, every element feels like fall on a plate.
- Perfect for any occasion – Whether it’s a casual night in, a small gathering, or a holiday celebration, it fits right in.
- Visually stunning – The warm, earthy colors and varied textures make it just as beautiful as it is delicious.
- Easy to customize – You can swap ingredients to suit your taste, dietary needs, or what’s in season locally.
- No cooking required – It’s a low-stress, high-impact way to serve something impressive without turning on the stove.
Ingredient List
Cheeses
- 6 oz brie cheese wheel
- 6 oz sharp cheddar, sliced
- 4 oz gouda, sliced
- 4 oz blue cheese, crumbled
Meats
- 4 oz prosciutto
- 4 oz salami
- 3 oz chorizo slices
Fruits
- 1 apple, thinly sliced
- 1 pear, thinly sliced
- ½ cup red grapes
- ½ cup figs, halved
- ¼ cup dried cranberries
Savory Additions
- ½ cup mixed nuts (walnuts, pecans, almonds)
- ¼ cup marinated olives
- ¼ cup roasted pumpkin seeds
Sweet Touches
- 2 tbsp honey
- 2 tbsp fig jam
Bread & Crackers
- 1 small baguette, sliced
- 1 cup assorted crackers
Ingredient Notes
- Brie cheese – Choose a creamy, ripe brie for the best melt-in-your-mouth texture.
- Sharp cheddar – Aged cheddar gives that bold, tangy bite to balance sweeter fruits.
- Figs – Fresh figs add a rich sweetness, but you can use dried figs when fresh isn’t available.
- Honey – A drizzle over brie or blue cheese makes the flavors pop.
- Mixed nuts – Toast them lightly for extra crunch and depth of flavor.
- Baguette – Slice thinly and serve fresh, or toast lightly for more texture.
Kitchen Equipment Needed
- Large wooden board or platter – For arranging all the ingredients; I love using a rustic acacia wood board for that cozy fall look.
- Small bowls or ramekins – Perfect for holding honey, jams, and olives without them spreading onto the board.
- Cheese knives – Makes slicing and serving different cheeses easier; a small set with varied blades works best.
- Paring knife – For neatly slicing fruits like apples, pears, and figs.
- Serving tongs or forks – Keeps everything tidy when guests help themselves.
- Small spoon – Handy for drizzling honey or spreading jam.
Instructions
Step 1: Gather & prep (the easiest step — set yourself up to win)
- Clear a big workspace and lay out your board or platter.
- Pull cheeses out of the fridge 30–60 minutes before you plan to serve so they soften and show their full flavor.
- Open jars (honey, jam), slice the baguette, and get small bowls/ramekins ready for wet items (olives, spreads).
- Place knives, spoons, tongs, and napkins within easy reach.
Pro tip: Letting cheese come to room temperature makes it taste brighter and easier to slice — plan ahead so you don’t rush this.
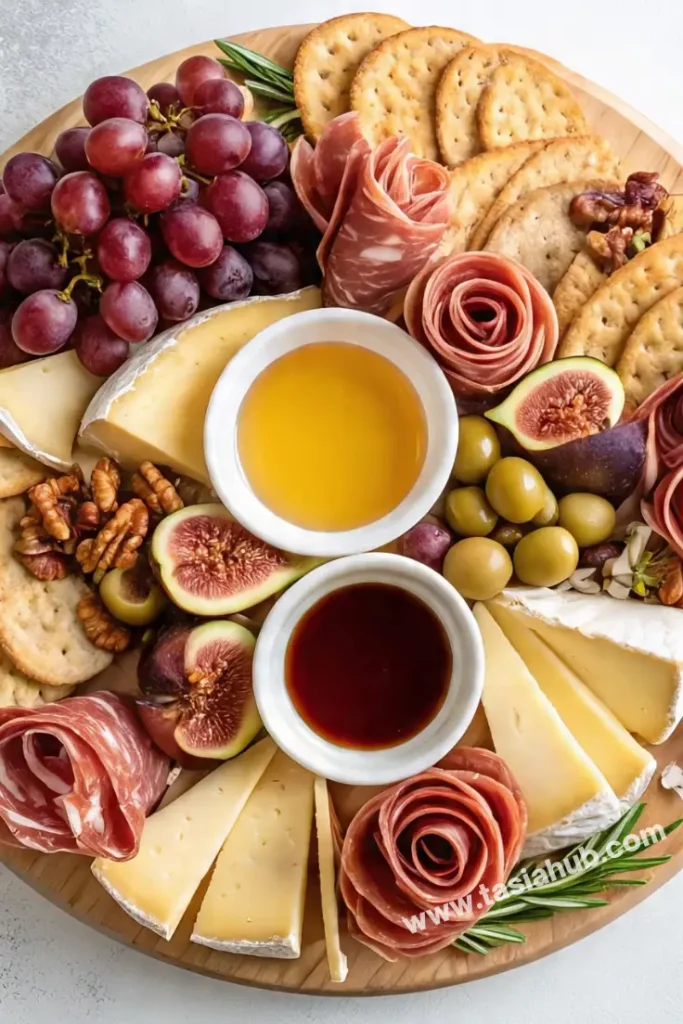
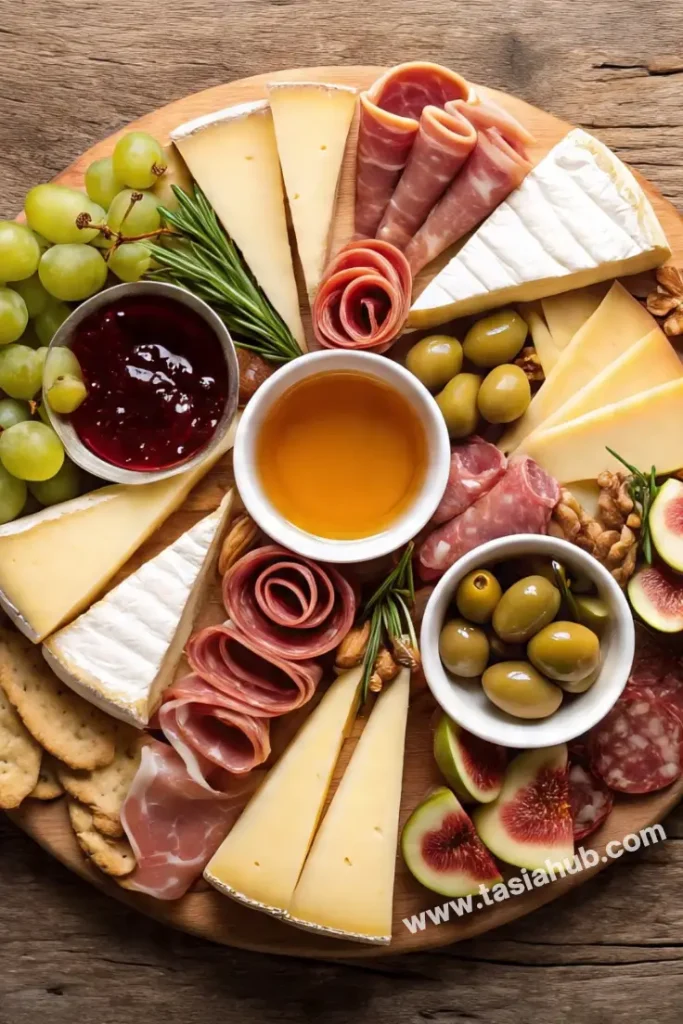
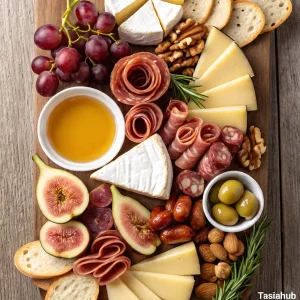
Step 2: Prep the cheeses (simple cuts, pretty presentation)
- Brie: leave the wheel whole or cut into a wedge; score the top if you’ll warm it later. Place on the board with a small knife.
- Hard cheeses (cheddar, gouda): slice some into thin pieces and cut some into chunks to encourage casual grabbing.
- Blue cheese: crumble into a small pile or place in a tiny dish if it’s very soft.
- Arrange cheeses in separate “anchor” spots across the board so they create visual balance.
Pro tip: Offer different cheese textures (soft, semi-soft, hard, tangy) and place knives so guests don’t cross-contaminate flavors.
Step 3: Prep the meats (fold, roll, and pile for texture)
- Prosciutto: drape into loose folds or make little “roses” by folding slices lengthwise and rolling.
- Salami: stack and fold or roll into cones so they stand up on the board.
- Chorizo or cured sausages: layer in small overlapping piles.
- Aim for small groupings (3–6 pieces each) rather than a big flat sheet of meat — it looks more artisanal.
Pro tip: Rolling or folding meats adds height and makes them easier to pick up without needing a fork.
Step 4: Place your anchors first (cheeses & small bowls)
- Put your largest items down first: cheeses and any bowls/ramekins (honey, jam, olives).
- Space anchors across the board so there’s no overcrowded corner.
- Leave pathways between anchors — these gaps will be for fruits, nuts, and crackers.
Step 5: Add the meats next (build around cheese)
- Tuck meat groupings near cheeses that pair well (e.g., prosciutto by brie; chorizo near sharper cheddar).
- Keep oily or strongly flavored meats slightly separate from delicate crackers or mild cheeses.
- Use the natural shape of the board — if it’s long, stagger items; if it’s round, work in a circular flow.
Step 6: Layer fruits, nuts, and sweet bites (fill the gaps)
- Cluster grapes in small bunches rather than scattering single grapes.
- Fan apple and pear slices, tucking them into crevices; toss briefly with a squeeze of lemon if you’re prepping ahead to prevent browning.
- Halve figs and nestle them near cheeses that’ll highlight their sweetness.
- Scatter toasted nuts and roasted pumpkin seeds in small piles to add crunch.
Pro tip: Tossing apple/pear slices with a little lemon juice keeps them fresh-looking if you prep 15–30 minutes early.
Step 7: Add bread, crackers, and height (variety & accessibility)
- Fan crackers along one side or create a small stack in a corner — variety is visually appealing.
- Lean baguette slices upright against a cheese or place them in a small bowl to keep them crisp.
- Introduce height with small jars, stacked crackers, or a folded napkin under one section of the board.
Step 8: Final touches & styling (the pretty details)
- Drizzle a little honey over the brie or place a honey dipper in the ramekin.
- Garnish with fresh herbs (rosemary sprigs, thyme) and a few edible flowers or thyme leaves for color.
- Add small labels or a note if you’re serving many guests (optional but helpful).
- Place serving utensils where they’re easy to reach, and make sure there’s an empty plate or two nearby for guests.
Pro tip: Warm brie option — if you want gooey, crowd-pleasing brie, preheat oven to 350°F (175°C) and bake the scored wheel for 10–12 minutes until soft but not bursting. Place it on the board immediately.
Step 9: Serving & storing leftovers (keep it fresh)
- Serve with small plates, napkins, and a set of knives so people don’t cross flavors.
- If the gathering lasts longer than a couple of hours, refresh delicate items (cut more fruit, replace soggy crackers).
- Store leftovers by wrapping cheeses separately in wax paper or airtight containers and refrigerate within two hours.
- Use leftover cured meats and cheeses within 3–5 days for best flavor and safety.
Tips and Tricks for Success
- Plan for variety – Include at least 3 types of cheese (soft, semi-soft, hard) and 2–3 types of meat for balance.
- Think in clusters, not lines – Group similar items together instead of lining them up for a more natural, abundant look.
- Use seasonal décor – Add mini pumpkins, autumn leaves, or cinnamon sticks (not for eating, just for looks) to enhance the fall vibe.
- Slice fruits just before serving – Keeps them fresh, crisp, and colorful.
- Balance sweet and savory – Always have something sweet near something salty for the perfect pairing bite.
- Serve at room temperature – Flavors pop more when ingredients aren’t ice-cold.
Ingredient Substitutions and Variations
- Cheeses – Swap gouda for Havarti, cheddar for Manchego, or brie for camembert.
- Meats – Try soppressata, turkey pepperoni, or smoked salmon for a twist.
- Fruits – Replace figs with persimmons, grapes with pomegranate seeds, or pears with Asian pears.
- Nuts – Use candied pecans, spiced almonds, or pistachios for extra flavor.
- Spreads – Swap fig jam with apple butter, pumpkin butter, or cranberry chutney.
- Crackers/Breads – Use rosemary focaccia slices, seeded flatbreads, or gluten-free crackers if needed.
Serving Suggestions
- Pair with a fall cocktail or wine – I love serving this board with a glass of pinot noir or a spiced apple cider sangria for a full seasonal experience.
- Add a warm element – A small dish of baked brie or warm spiced nuts adds coziness and contrast to the chilled items.
- Make it dinner – Serve with a side of butternut squash soup or pumpkin soup for a hearty, comforting meal.
- Keep it casual – For a movie night, pair the board with mulled apple cider and a basket of warm bread.
- Sweet ending – Offer a small plate of pumpkin cheesecake bites or chocolate truffles alongside the board for dessert.
Storage and Reheating Instructions
- Cheeses – Wrap each cheese separately in wax paper, then store in an airtight container in the fridge; use within 3–5 days.
- Meats – Store in resealable bags or airtight containers in the fridge; consume within 3 days for best flavor.
- Fruits – Remove from the board and store sliced fruits in airtight containers; eat within 1–2 days.
- Crackers and bread – Keep in a sealed bag or container at room temperature; refresh crispness by toasting briefly if needed.
- Warm elements – Reheat baked brie or warm nuts in the oven at 300°F (150°C) for 5–7 minutes until warmed through.
Frequently Asked Questions
How far in advance can I make a charcuterie board?
You can prep most of the ingredients (slice cheese, wash fruit, portion meats) up to 24 hours ahead and store them separately. Assemble the board about 30 minutes before serving for the freshest look and taste.
What’s the best size board for 6–8 people?
A large 18–20 inch board or platter works well. If you don’t have one that big, use two smaller boards and place them side by side for the same effect.
Can I make this board vegetarian?
Absolutely! Skip the meats and add more cheeses, roasted vegetables, marinated artichokes, and plant-based spreads like hummus or olive tapenade.
How do I keep apples and pears from browning?
Toss slices in a little lemon juice or a mixture of lemon juice and water. This keeps them looking fresh for up to an hour.
What’s a budget-friendly way to make a charcuterie board?
Buy cheeses in blocks and slice them yourself, choose in-season fruits, and shop bulk bins for nuts. You can still make it look full and beautiful without spending a fortune.
Can I make this gluten-free?
Yes! Simply swap the bread and crackers for gluten-free options and double-check spreads or processed meats for hidden gluten.
Did you try this recipe? Let me know in the comments how it turned out!
Don’t forget to share your photos on Instagram and tag me (@tasiahub_) or use the hashtag (#tasiahub). I’d love to see your creations!
Fall Charcuterie Board
Equipment
- Large wooden board or platter
- Small bowls or ramekins
- Cheese knives
- Paring knife
- Serving tongs or forks
- Small spoon
Ingredients
Cheeses
- 6 oz brie cheese wheel
- 6 oz sharp cheddar sliced
- 4 oz gouda sliced
- 4 oz blue cheese crumbled
Meats
- 4 oz prosciutto
- 4 oz salami
- 3 oz chorizo slices
Fruits
- 1 apple thinly sliced
- 1 pear thinly sliced
- ½ cup red grapes
- ½ cup figs halved
- ¼ cup dried cranberries
Savory Additions
- ½ cup mixed nuts walnuts, pecans, almonds
- ¼ cup marinated olives
- ¼ cup roasted pumpkin seeds
Sweet Touches
- 2 tbsp honey
- 2 tbsp fig jam
Bread & Crackers
- 1 small baguette sliced
- 1 cup assorted crackers
Instructions
Step 1: Gather & prep (the easiest step — set yourself up to win)
- Clear a big workspace and lay out your board or platter.
- Pull cheeses out of the fridge 30–60 minutes before you plan to serve so they soften and show their full flavor.
- Open jars (honey, jam), slice the baguette, and get small bowls/ramekins ready for wet items (olives, spreads).
- Place knives, spoons, tongs, and napkins within easy reach.
- Pro tip: Letting cheese come to room temperature makes it taste brighter and easier to slice — plan ahead so you don’t rush this.
Step 2: Prep the cheeses (simple cuts, pretty presentation)
- Brie: leave the wheel whole or cut into a wedge; score the top if you’ll warm it later. Place on the board with a small knife.
- Hard cheeses (cheddar, gouda): slice some into thin pieces and cut some into chunks to encourage casual grabbing.
- Blue cheese: crumble into a small pile or place in a tiny dish if it’s very soft.
- Arrange cheeses in separate “anchor” spots across the board so they create visual balance.
- Pro tip: Offer different cheese textures (soft, semi-soft, hard, tangy) and place knives so guests don’t cross-contaminate flavors.
Step 3: Prep the meats (fold, roll, and pile for texture)
- Prosciutto: drape into loose folds or make little “roses” by folding slices lengthwise and rolling.
- Salami: stack and fold or roll into cones so they stand up on the board.
- Chorizo or cured sausages: layer in small overlapping piles.
- Aim for small groupings (3–6 pieces each) rather than a big flat sheet of meat — it looks more artisanal.
- Pro tip: Rolling or folding meats adds height and makes them easier to pick up without needing a fork.
Step 4: Place your anchors first (cheeses & small bowls)
- Put your largest items down first: cheeses and any bowls/ramekins (honey, jam, olives).
- Space anchors across the board so there’s no overcrowded corner.
- Leave pathways between anchors — these gaps will be for fruits, nuts, and crackers.
Step 5: Add the meats next (build around cheese)
- Tuck meat groupings near cheeses that pair well (e.g., prosciutto by brie; chorizo near sharper cheddar).
- Keep oily or strongly flavored meats slightly separate from delicate crackers or mild cheeses.
- Use the natural shape of the board — if it’s long, stagger items; if it’s round, work in a circular flow.
Step 6: Layer fruits, nuts, and sweet bites (fill the gaps)
- Cluster grapes in small bunches rather than scattering single grapes.
- Fan apple and pear slices, tucking them into crevices; toss briefly with a squeeze of lemon if you’re prepping ahead to prevent browning.
- Halve figs and nestle them near cheeses that’ll highlight their sweetness.
- Scatter toasted nuts and roasted pumpkin seeds in small piles to add crunch.
- Pro tip: Tossing apple/pear slices with a little lemon juice keeps them fresh-looking if you prep 15–30 minutes early.
Step 7: Add bread, crackers, and height (variety & accessibility)
- Fan crackers along one side or create a small stack in a corner — variety is visually appealing.
- Lean baguette slices upright against a cheese or place them in a small bowl to keep them crisp.
- Introduce height with small jars, stacked crackers, or a folded napkin under one section of the board.
Step 8: Final touches & styling (the pretty details)
- Drizzle a little honey over the brie or place a honey dipper in the ramekin.
- Garnish with fresh herbs (rosemary sprigs, thyme) and a few edible flowers or thyme leaves for color.
- Add small labels or a note if you’re serving many guests (optional but helpful).
- Place serving utensils where they’re easy to reach, and make sure there’s an empty plate or two nearby for guests.
- Pro tip: Warm brie option — if you want gooey, crowd-pleasing brie, preheat oven to 350°F (175°C) and bake the scored wheel for 10–12 minutes until soft but not bursting. Place it on the board immediately.
Step 9: Serving & storing leftovers (keep it fresh)
- Serve with small plates, napkins, and a set of knives so people don’t cross flavors.
- If the gathering lasts longer than a couple of hours, refresh delicate items (cut more fruit, replace soggy crackers).
- Store leftovers by wrapping cheeses separately in wax paper or airtight containers and refrigerate within two hours.
- Use leftover cured meats and cheeses within 3–5 days for best flavor and safety.
Notes
Nutritional Value (Per Serving):
- Calories: ~350–400 kcal
- Protein: ~12g
- Carbohydrates: ~25g
- Fat: ~24g
- Fiber: ~3g
- Sugar: ~10g
- Sodium: ~650mg