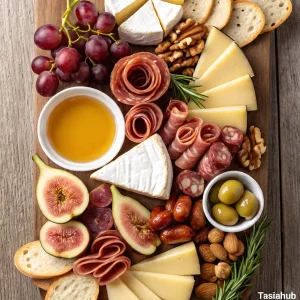
Fall Charcuterie Board
The beauty of this kind of board is its flexibility. You can go all out with a large, elaborate spread for a party, or keep it simple for a quiet night in.
Equipment
- Large wooden board or platter
- Small bowls or ramekins
- Cheese knives
- Paring knife
- Serving tongs or forks
- Small spoon
Ingredients
Cheeses
- 6 oz brie cheese wheel
- 6 oz sharp cheddar sliced
- 4 oz gouda sliced
- 4 oz blue cheese crumbled
Meats
- 4 oz prosciutto
- 4 oz salami
- 3 oz chorizo slices
Fruits
- 1 apple thinly sliced
- 1 pear thinly sliced
- ½ cup red grapes
- ½ cup figs halved
- ¼ cup dried cranberries
Savory Additions
- ½ cup mixed nuts walnuts, pecans, almonds
- ¼ cup marinated olives
- ¼ cup roasted pumpkin seeds
Sweet Touches
- 2 tbsp honey
- 2 tbsp fig jam
Bread & Crackers
- 1 small baguette sliced
- 1 cup assorted crackers
Instructions
Step 1: Gather & prep (the easiest step — set yourself up to win)
- Clear a big workspace and lay out your board or platter.
- Pull cheeses out of the fridge 30–60 minutes before you plan to serve so they soften and show their full flavor.
- Open jars (honey, jam), slice the baguette, and get small bowls/ramekins ready for wet items (olives, spreads).
- Place knives, spoons, tongs, and napkins within easy reach.
- Pro tip: Letting cheese come to room temperature makes it taste brighter and easier to slice — plan ahead so you don’t rush this.
Step 2: Prep the cheeses (simple cuts, pretty presentation)
- Brie: leave the wheel whole or cut into a wedge; score the top if you’ll warm it later. Place on the board with a small knife.
- Hard cheeses (cheddar, gouda): slice some into thin pieces and cut some into chunks to encourage casual grabbing.
- Blue cheese: crumble into a small pile or place in a tiny dish if it’s very soft.
- Arrange cheeses in separate “anchor” spots across the board so they create visual balance.
- Pro tip: Offer different cheese textures (soft, semi-soft, hard, tangy) and place knives so guests don’t cross-contaminate flavors.
Step 3: Prep the meats (fold, roll, and pile for texture)
- Prosciutto: drape into loose folds or make little “roses” by folding slices lengthwise and rolling.
- Salami: stack and fold or roll into cones so they stand up on the board.
- Chorizo or cured sausages: layer in small overlapping piles.
- Aim for small groupings (3–6 pieces each) rather than a big flat sheet of meat — it looks more artisanal.
- Pro tip: Rolling or folding meats adds height and makes them easier to pick up without needing a fork.
Step 4: Place your anchors first (cheeses & small bowls)
- Put your largest items down first: cheeses and any bowls/ramekins (honey, jam, olives).
- Space anchors across the board so there’s no overcrowded corner.
- Leave pathways between anchors — these gaps will be for fruits, nuts, and crackers.
Step 5: Add the meats next (build around cheese)
- Tuck meat groupings near cheeses that pair well (e.g., prosciutto by brie; chorizo near sharper cheddar).
- Keep oily or strongly flavored meats slightly separate from delicate crackers or mild cheeses.
- Use the natural shape of the board — if it’s long, stagger items; if it’s round, work in a circular flow.
Step 6: Layer fruits, nuts, and sweet bites (fill the gaps)
- Cluster grapes in small bunches rather than scattering single grapes.
- Fan apple and pear slices, tucking them into crevices; toss briefly with a squeeze of lemon if you’re prepping ahead to prevent browning.
- Halve figs and nestle them near cheeses that’ll highlight their sweetness.
- Scatter toasted nuts and roasted pumpkin seeds in small piles to add crunch.
- Pro tip: Tossing apple/pear slices with a little lemon juice keeps them fresh-looking if you prep 15–30 minutes early.
Step 7: Add bread, crackers, and height (variety & accessibility)
- Fan crackers along one side or create a small stack in a corner — variety is visually appealing.
- Lean baguette slices upright against a cheese or place them in a small bowl to keep them crisp.
- Introduce height with small jars, stacked crackers, or a folded napkin under one section of the board.
Step 8: Final touches & styling (the pretty details)
- Drizzle a little honey over the brie or place a honey dipper in the ramekin.
- Garnish with fresh herbs (rosemary sprigs, thyme) and a few edible flowers or thyme leaves for color.
- Add small labels or a note if you’re serving many guests (optional but helpful).
- Place serving utensils where they’re easy to reach, and make sure there’s an empty plate or two nearby for guests.
- Pro tip: Warm brie option — if you want gooey, crowd-pleasing brie, preheat oven to 350°F (175°C) and bake the scored wheel for 10–12 minutes until soft but not bursting. Place it on the board immediately.
Step 9: Serving & storing leftovers (keep it fresh)
- Serve with small plates, napkins, and a set of knives so people don’t cross flavors.
- If the gathering lasts longer than a couple of hours, refresh delicate items (cut more fruit, replace soggy crackers).
- Store leftovers by wrapping cheeses separately in wax paper or airtight containers and refrigerate within two hours.
- Use leftover cured meats and cheeses within 3–5 days for best flavor and safety.
Notes
Nutritional Value (Per Serving):
- Calories: ~350–400 kcal
- Protein: ~12g
- Carbohydrates: ~25g
- Fat: ~24g
- Fiber: ~3g
- Sugar: ~10g
- Sodium: ~650mg