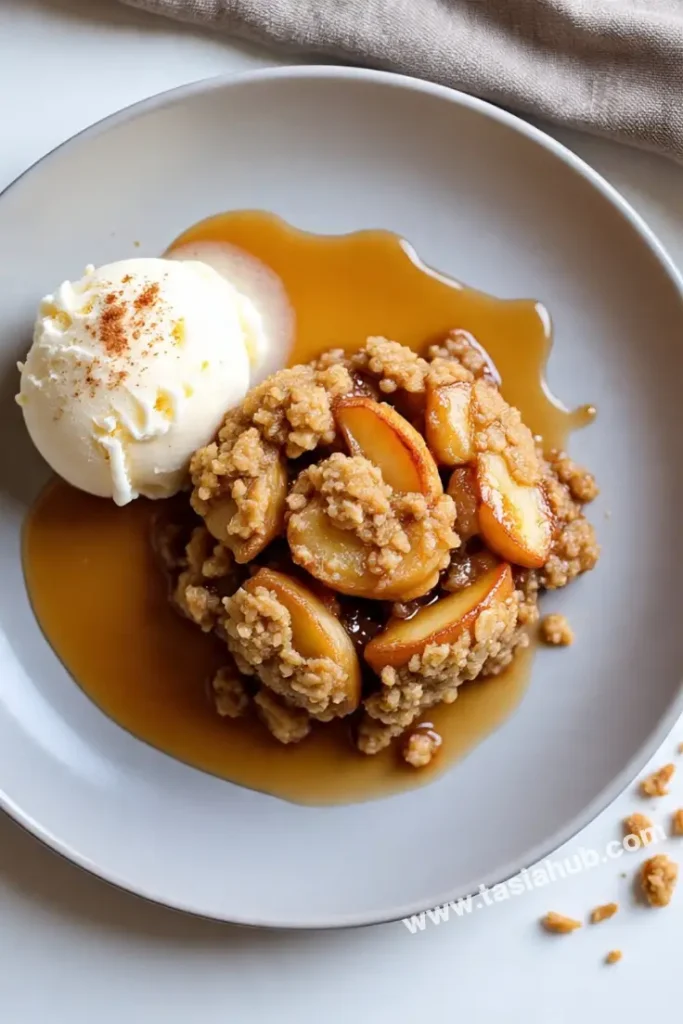
Yummy Apple Crisp

When you think of cozy, no-fuss desserts that warm you up from the inside out, apple crisp is a top contender. It’s that kind of dessert you make when you want something sweet and nostalgic, but also super simple to throw together. No need for fancy equipment or complicated steps—just apples, a buttery oat topping, and the magic that happens in the oven. The result? A warm, cinnamon-spiced fruit base with a golden, crumbly topping that begs for a scoop of vanilla ice cream.
Apple crisp has this perfect balance of sweet and tart, soft and crunchy. It’s the kind of dessert that fills your kitchen with the most amazing smell while it bakes—like fall spices and fresh apples having the time of their life. And the best part? You can use whatever apples you have on hand. Some people love tart Granny Smiths, others like sweeter varieties like Honeycrisp or Fuji. It really depends on your mood (or what’s in your fruit basket).
It’s also one of those recipes that feels like home. Maybe your grandma made it growing up, or you remember it at fall potlucks, served warm in foil pans. Even if you’ve never had homemade apple crisp before, the first bite feels like a hug. It’s rustic, unfussy, and completely satisfying—especially when you eat it straight from the dish with a spoon (no judgment here).
Whether you’re planning a weekend baking session or just trying to use up some apples that are past their prime, this apple crisp will deliver. It’s versatile, approachable, and honestly hard to mess up. Once you make it, don’t be surprised if it becomes your go-to dessert whenever you’re craving something comforting but quick.
Why You’ll Love It
- Easy to make with pantry staples – No need for a special trip to the store. This recipe uses simple ingredients you probably already have: oats, flour, butter, sugar, cinnamon, and apples.
- Perfectly balanced texture – You get soft, juicy apples on the bottom and a crisp, buttery crumble on top. That contrast makes every bite irresistible.
- Great for any season – While it’s especially cozy in the fall, apple crisp is delicious year-round. It’s a great way to use up apples whether they’re peak-season or starting to get a little soft.
- Customizable – Swap in different kinds of apples, mix in nuts or raisins, or add a splash of caramel sauce. You can tweak it to match your taste or whatever you have on hand.
- Crowd-pleaser – Serve it warm with ice cream at a dinner party or scoop it into bowls for a casual family dessert. It’s one of those dishes that everyone loves, no matter the occasion.
Ingredient List
For the Apple Filling:
- 6 medium apples (about 2½ to 3 pounds), peeled and sliced
- 2 tablespoons lemon juice
- ⅓ cup granulated sugar
- 1 teaspoon ground cinnamon
- ¼ teaspoon ground nutmeg
- 1 tablespoon all-purpose flour
For the Crisp Topping:
- ¾ cup old-fashioned rolled oats
- ½ cup all-purpose flour
- ½ cup packed light brown sugar
- ¼ teaspoon salt
- ½ teaspoon ground cinnamon
- ½ cup (1 stick) unsalted butter, cold and cut into small cubes
Ingredient Notes
- Use a mix of apples – I like combining tart (Granny Smith) and sweet (Honeycrisp or Fuji) apples for the best flavor and texture.
- Lemon juice – Brightens the apple flavor and helps prevent browning while you prep the rest.
- Old-fashioned oats – Stick with rolled oats for a crisp, chunky topping. Quick oats tend to make it more cake-like.
- Cold butter – This is key for a crumbly topping. Soft or melted butter will make it soggy.
- Brown sugar – Adds a hint of molasses flavor and gives the topping that rich, golden crunch.
Kitchen Equipment Needed
- 8×8-inch baking dish – Perfect size for a small batch that serves about 6. You can double the recipe for a 9×13 if you’re feeding a crowd.
- Large mixing bowl – For tossing the apple filling. I love using glass bowls so I can see everything mixing evenly.
- Medium mixing bowl – To make the crisp topping. One with high sides keeps the oats and flour from flying everywhere.
- Pastry cutter or fork – Helps cut the cold butter into the topping. A pastry cutter makes it quicker, but clean hands work too!
- Vegetable peeler – Speeds up peeling the apples. I like the Y-shaped peelers—they’re comfortable and fast.
- Sharp knife + cutting board – For slicing the apples nice and thin so they cook evenly.
- Measuring cups and spoons – Essential for getting that perfect topping ratio. I prefer stainless steel sets—they last forever.
Instructions
Step 1: Prep Your Baking Dish and Oven
- Preheat your oven to 350°F (175°C).
- Lightly grease an 8×8-inch baking dish with butter or non-stick spray. This helps prevent sticking and makes cleanup easier.
Pro Tip: If you’re doubling the recipe, use a 9×13-inch dish and keep an eye on the baking time—it may take a few extra minutes.
Step 2: Prepare the Apple Filling
- Peel and slice the apples into thin, even slices (about ¼-inch thick).
- Place the apple slices in a large mixing bowl.
- Add lemon juice and gently toss to coat—this brightens the flavor and keeps the apples from browning.
- Sprinkle in the granulated sugar, cinnamon, nutmeg, and flour.
- Mix everything gently until the apples are evenly coated in the spice mixture.
Pro Tip: Make sure all slices are similar in thickness so they cook at the same rate and stay tender without turning to mush.
Step 3: Make the Crisp Topping
- In a medium bowl, combine the rolled oats, flour, brown sugar, salt, and cinnamon.
- Stir until everything is well mixed.
- Add the cold, cubed butter to the dry ingredients.
- Use a pastry cutter, fork, or your fingertips to cut the butter into the mixture until it resembles coarse crumbs. You should still see small bits of butter throughout—that’s what makes the topping crispy and golden.
Pro Tip: Don’t overwork the butter. Stop when the mixture holds together slightly when pinched.
Step 4: Assemble the Crisp
- Pour the coated apple mixture into your prepared baking dish.
- Spread it out evenly, pressing down slightly to remove air pockets.
- Sprinkle the crisp topping evenly over the apples, making sure to cover the entire surface.
Step 5: Bake
- Place the dish on the center rack and bake for 40–45 minutes or until the topping is golden brown and the apples are bubbling around the edges.
- If the topping browns too quickly, cover loosely with foil for the last 10 minutes.
Pro Tip: Let it rest for at least 10–15 minutes after baking—this helps the filling set slightly and makes scooping easier.

Tips and Tricks for Success
- Slice apples evenly – Aim for uniform ¼-inch slices so they bake at the same rate and stay tender without turning mushy.
- Use cold butter for the topping – This is non-negotiable. Cold butter helps create that irresistible, crumbly texture we love in a crisp.
- Don’t skip the flour in the filling – It thickens the juices from the apples, preventing a watery bottom layer.
- Make ahead-friendly – You can prep the filling and topping separately, store them in the fridge, then assemble and bake when ready.
- Let it rest before serving – Give it 10–15 minutes out of the oven so the juices settle. It’ll be easier to scoop and won’t burn your tongue!
Ingredient Substitutions and Variations
- No brown sugar? – Use all white sugar and add ½ teaspoon of molasses if you have it for that deep flavor.
- Gluten-free option – Swap in a 1:1 gluten-free flour blend and make sure your oats are certified gluten-free.
- Dairy-free version – Use cold vegan butter or solid coconut oil in place of regular butter.
- Add nuts – Mix ½ cup chopped pecans or walnuts into the topping for extra crunch.
- Change up the fruit – Try mixing in pears, berries, or even peaches with the apples for a fun twist. Just keep the total fruit amount the same.
Serving Suggestions
- Classic à la mode – Top a warm scoop of apple crisp with a generous spoonful of vanilla ice cream. The cold ice cream melting into the warm filling is pure heaven.
- With a drizzle of caramel sauce – Add an extra layer of indulgence by drizzling warm caramel over each serving. It’s especially good if you’re serving guests.
- Whipped cream on top – For a lighter touch, I sometimes top mine with freshly whipped cream and a sprinkle of cinnamon. Still cozy, just not as rich as ice cream.
- With Greek yogurt for breakfast – Yes, you can totally eat apple crisp for breakfast! A scoop of it with a dollop of vanilla Greek yogurt makes a sweet-but-satisfying morning treat.
- Straight from the dish – Honestly? I’ve eaten cold apple crisp straight from the fridge with a spoon, and it still hits the spot. No shame in that game.
Storage and Reheating Instructions
- Refrigerate leftovers – Once cooled, cover the dish tightly with foil or transfer to an airtight container. Store in the fridge for up to 4 days.
- Reheat in the oven – To get the topping crisp again, reheat in a 350°F (175°C) oven for about 15–20 minutes, or until warmed through.
- Microwave for quick single servings – Place a portion in a microwave-safe bowl and heat in 30-second intervals until hot. The topping may be softer, but still delicious.
- Freeze for later – You can freeze the baked crisp in a freezer-safe container for up to 2 months. Thaw overnight in the fridge, then reheat as above.
- Avoid covering while reheating – Especially in the oven, leave it uncovered so the topping stays crisp instead of getting soggy.
Frequently Asked Questions
What are the best apples to use for apple crisp?
A mix of tart and sweet apples works best! I love using Granny Smith for that tang and Honeycrisp or Fuji for sweetness. Mixing them gives you the best texture and flavor combo.
Can I make this ahead of time?
Absolutely! You can prep both the filling and topping separately and store them in the fridge for up to 24 hours. Assemble right before baking for the crispiest topping.
Why is my apple crisp watery?
It usually means there wasn’t enough flour in the filling to soak up the juices, or the apples were too juicy. Make sure you include the flour and slice the apples thin so they cook evenly.
Can I use quick oats instead of rolled oats?
Yes, but the texture will be softer. Old-fashioned rolled oats give you that classic, crumbly topping. Quick oats work in a pinch but don’t give the same crunch.
How do I know when it’s done baking?
Look for bubbling juices around the edges and a golden brown topping. That usually takes about 40–45 minutes, but keep an eye on it toward the end!
Is this recipe freezer-friendly?
Yes! Once baked and cooled, freeze it in a sealed container for up to 2 months. Thaw overnight in the fridge and reheat in the oven until warmed through and crisp.
Did you try this recipe? Let me know in the comments how it turned out!
Don’t forget to share your photos on Instagram and tag me @tasiahub_ or use the hashtag #tasiahub. I’d love to see your creations!

Yummy Apple Crisp
Equipment
- 8×8-inch baking dish
- Large mixing bowl
- Medium mixing bowl
- Pastry cutter or fork
- Vegetable Peeler
- Sharp knife & cutting board
- Measuring cups and spoons
Ingredients
For the Apple Filling:
- 6 medium apples about 2½ to 3 pounds, peeled and sliced
- 2 tablespoons lemon juice
- ⅓ cup granulated sugar
- 1 teaspoon ground cinnamon
- ¼ teaspoon ground nutmeg
- 1 tablespoon all-purpose flour
For the Crisp Topping:
- ¾ cup old-fashioned rolled oats
- ½ cup all-purpose flour
- ½ cup packed light brown sugar
- ¼ teaspoon salt
- ½ teaspoon ground cinnamon
- ½ cup 1 stick unsalted butter, cold and cut into small cubes
Instructions
Step 1: Prep Your Baking Dish and Oven
- Preheat your oven to 350°F (175°C).
- Lightly grease an 8×8-inch baking dish with butter or non-stick spray. This helps prevent sticking and makes cleanup easier.
- Pro Tip: If you’re doubling the recipe, use a 9×13-inch dish and keep an eye on the baking time—it may take a few extra minutes.
Step 2: Prepare the Apple Filling
- Peel and slice the apples into thin, even slices (about ¼-inch thick).
- Place the apple slices in a large mixing bowl.
- Add lemon juice and gently toss to coat—this brightens the flavor and keeps the apples from browning.
- Sprinkle in the granulated sugar, cinnamon, nutmeg, and flour.
- Mix everything gently until the apples are evenly coated in the spice mixture.
- Pro Tip: Make sure all slices are similar in thickness so they cook at the same rate and stay tender without turning to mush.
Step 3: Make the Crisp Topping
- In a medium bowl, combine the rolled oats, flour, brown sugar, salt, and cinnamon.
- Stir until everything is well mixed.
- Add the cold, cubed butter to the dry ingredients.
- Use a pastry cutter, fork, or your fingertips to cut the butter into the mixture until it resembles coarse crumbs. You should still see small bits of butter throughout—that’s what makes the topping crispy and golden.
- Pro Tip: Don’t overwork the butter. Stop when the mixture holds together slightly when pinched.
Step 4: Assemble the Crisp
- Pour the coated apple mixture into your prepared baking dish.
- Spread it out evenly, pressing down slightly to remove air pockets.
- Sprinkle the crisp topping evenly over the apples, making sure to cover the entire surface.
Step 5: Bake
- Place the dish on the center rack and bake for 40–45 minutes or until the topping is golden brown and the apples are bubbling around the edges.
- If the topping browns too quickly, cover loosely with foil for the last 10 minutes.
- Pro Tip: Let it rest for at least 10–15 minutes after baking—this helps the filling set slightly and makes scooping easier.
Notes
Nutritional Value (per serving, approximate)
- Calories: 320–350 kcal
- Total Fat: 15g
- Saturated Fat: 9g
- Carbohydrates: 50g
- Sugars: 28g
- Fiber: 3–4g
- Protein: 2–3g
- Sodium: 100–150mg