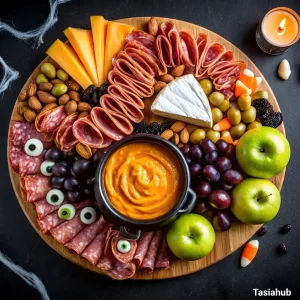
Halloween Charcuterie Board
What makes this kind of board even better is how flexible it is. You don’t need to be a professional food stylist to pull it off—just choose a variety of textures and flavors so there’s something for everyone.
Equipment
- Large wooden or slate board
- Small bowls or ramekins
- Cheese knives or spreaders
- Mini cookie cutters
- Small tongs or toothpicks
- Paring knife
Ingredients
Cheeses & Meats
- 6 oz brie cheese wheel
- 6 oz sharp cheddar cheese cut into slices
- 4 oz gouda cubed
- 6 oz salami slices
- 4 oz prosciutto slices
Crackers & Bread
- 1 cup assorted crackers round, square, seeded
- 6 breadsticks or pretzel rods
Fruits & Veggies
- 1 cup red grapes
- 1 cup black grapes
- ½ cup blackberries
- ½ cup cherry tomatoes
- ½ cup baby carrots
Sweets & Extras
- ½ cup candy corn
- ½ cup chocolate-covered pretzels
- ¼ cup black or green olives
- 2 –3 small decorative Halloween props plastic spiders, skeleton hands, etc.
Instructions
Step 1 — Plan your layout
- Pick the board or platter that fits the number of guests and the space where it will sit (coffee table vs buffet table).
- Decide on 1–2 focal points (a brie wheel, a “cauldron” of dip, or a small bowl of dramatic candies) — everything else will be arranged around them.
- Mentally map color and texture: aim to alternate light/dark and soft/crunchy as you move around the board.
- Pro tip: place focal items asymmetrically (not dead center) — it creates a more interesting, professional look.
Step 2 — Prep everything before you assemble
- Wash and fully dry any fruit and vegetables (moisture makes crackers soggy).
- Slice, cube, or fan cheeses; leave one soft cheese whole for a centerpiece (score the top of a brie if you want it to ooze later).
- Fold or roll cured meats into loose rosettes or ribbons so they look intentional and are easy to grab.
- Portion small items (olives, nuts, candies) into ramekins.
- Break or arrange crackers and bread so they’re bite-sized or easy to pick.
- Make any shaped items with mini cookie cutters (cheese bats, apple pumpkins) and set them aside.
- Pro tip: take cheeses out of the fridge 30–60 minutes before serving — room-temperature cheese tastes and slices much better.
Step 3 — Anchor the board with bowls and big pieces
- Place your bowls/ramekins first — these act as anchors and stop small loose items from rolling away.
- Add your largest items next (whole brie, clusters of grapes, a bowl of dip). Arrange them in a loose triangle or an off-center cluster to create visual flow.
- Leave space around these anchors to build “mini stations” of meat/cheese/cracker pairings.
- Pro tip: use odd numbers (3, 5) for anchor items — the eye likes asymmetrical odd groupings.
Step 4 — Build groups of meat, cheese, and crackers
- Arrange one cheese type next to a complementary meat (e.g., cheddar beside salami). Fan slices or stack cubes to add height.
- Tuck crackers and breadsticks into gaps, leaning some upright for vertical interest.
- Create small, discoverable pairings — a little cluster that reads as “grab-and-eat”: cheese + meat + cracker + a grape or olive.
- Pro tip: keep cheeses that pair well close together but don’t mix everything into one pile. Guests enjoy moving around the board to create their own bites.
Step 5 — Fill in with fruits, sweets, and contrasting textures
- Add dark fruits (black grapes, blackberries) in pockets to create spooky color pops.
- Scatter chocolate-covered pretzels, candy corn, or a small pile of Halloween candies in a couple of nooks.
- Use nuts, seeds, or crostini to provide crunch where the board feels soft.
- Put delicate items (chips, crisp cookies) last so they don’t get crushed.
- Pro tip: tuck a sweet item near savory pairings (chocolate near prosciutto, candy near sharp cheddar) — the contrast is addictive.
Step 6 — Add spooky styling and finishing touches
- Use mini cookie cutters to cut fun shapes from cheese or fruit and layer them on top of cheese or crackers.
- Make “eyeballs” by skewering an olive slice onto a round cheese cube or marshmallow, or press pimento-stuffed olives into cream cheese for instant creepiness.
- Sprinkle edible "dirt" (crushed crackers or Oreo crumbs) for a graveyard effect, or place a small plastic cauldron for dramatic flair.
- Scatter your decorative props strategically — avoid placing anything non-food where guests will be reaching unless it’s easy to remove.
- Pro tip: keep non-edible props separate enough that guests don’t accidentally pick them up with food — small signs or name tags are safer and helpful for allergies.
Step 7 — Final balance check and presentation
- Step back and scan the board from a guest’s perspective. Look for color clusters that need breaking up and empty spots that want a filler.
- Aim for variety at every angle — a different pairing should be visible from each side of the table.
- Add small labels for cheeses or allergen notes if you expect guests with dietary needs.
- Place serving utensils, extra plates, napkins, and small tongs nearby so guests can help themselves neatly.
- Pro tip: less is sometimes more — avoid cramming the board. A little negative space makes the arrangement read cleaner and makes grabbing easier.
Step 8 — Serving, timing, and storing leftovers
- Serve within 30–60 minutes of finishing the board so cheeses are still at their best and crisp items stay crunchy.
- If the board will sit out for long (party longer than 2 hours), rotate chilled items onto a small ice bed or bring out fresh batches periodically.
- Clear and store leftovers by removing props, covering cheeses in wax or parchment paper (not plastic directly on cheese), and refrigerating perishable items within two hours. Store crackers separately to keep them crisp.
- Pro tip: separate leftover cheese into usable portions and wrap in wax paper — they’ll keep better and won’t pick up odd smells in the fridge.
Notes
Nutritional Value Per Serving:
- Calories: 350–400 kcal
- Protein: 15–18 g
- Total Fat: 25–28 g
- Saturated Fat: 10–12 g
- Carbohydrates: 20–25 g
- Dietary Fiber: 3–4 g
- Sugars: 8–10 g
- Sodium: 600–800 mg