Ghost Meringues
What I love most about Halloween meringues is how surprisingly simple they are to make. With just a few ingredients and a little piping, you can turn a basic meringue into the cutest ghost food that kids and adults alike will love.
Equipment
- Electric mixer (hand or stand)
- Mixing Bowl
- Piping bag + round tip
- Baking Sheet
- Spatula
- Toothpick (optional)
Ingredients
- 3 large egg whites room temperature
- ¾ cup granulated sugar
- ¼ teaspoon cream of tartar
- 1 teaspoon vanilla extract
- Mini chocolate chips for eyes or melted chocolate
Instructions
Step 1 — Preheat and prep your workspace
- Preheat the oven to 200°F (95°C). This low-and-slow temperature dries the meringues without browning them.
- Line a baking sheet with parchment paper and set it on a flat surface.
- Make sure your mixing bowl and beaters are totally clean and dry — even a tiny smear of grease will keep egg whites from whipping.
- Pro tip: If your kitchen is very humid, try to work in the driest room of the house — humidity is the enemy of crisp meringues.
Step 2 — Separate the eggs carefully
- Crack each egg and separate the whites into a small bowl first (this prevents yolk contamination).
- Once you’ve confirmed there’s no yolk, add the whites to your large, clean mixing bowl.
- Let the whites sit for a few minutes to come to room temperature if they aren’t already.
- Pro tip (key step): Use pasteurized egg whites if you or anyone you’re serving is immunocompromised or if you’re worried about raw eggs.
Step 3 — Start whipping the egg whites to soft peaks
- Add the ¼ teaspoon cream of tartar to the bowl with the egg whites.
- Begin whipping on low speed until the whites are frothy, about 1–2 minutes.
- Increase to medium-high speed and whip until you see soft peaks — the peaks should fold over when you lift the whisk.
- Pro tip (key step): Start slow and build speed. That gentle ramp helps form a steady foam instead of big, unstable bubbles.
Step 4 — Add sugar gradually and whip to glossy, stiff peaks
- With the mixer running on medium-high, add the ¾ cup granulated sugar one tablespoon at a time, allowing each tablespoon to dissolve before adding the next.
- After all the sugar is added, continue whipping until the meringue is thick, glossy, and holds stiff peaks — the peak should stand straight up without drooping.
- Rub a tiny bit of the meringue between your fingers to check for grittiness; it should feel completely smooth.
- Pro tip (key step): Slow sugar addition is the single most important trick for a glossy, stable meringue. Rushing this step can leave you with grainy, weepy meringues.
Step 5 — Flavor and transfer to a piping bag
- Add the 1 teaspoon vanilla extract and fold it in gently with a spatula — don’t overmix or you’ll deflate the whites.
- Fit a piping bag with a round tip (about ½ inch) or simply snip the tip of a disposable bag for a roughly ½-inch opening.
- Spoon the meringue into the bag, smoothing the top so you have an even flow when piping.
- Pro tip: Keep the motion light and steady. Overworking the meringue now will knock out air and make your ghosts flat.
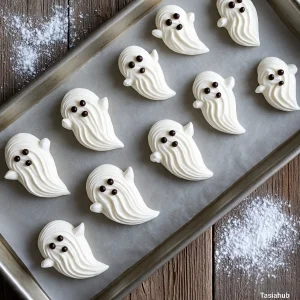
Step 6 — Pipe your ghost shapes
- Hold the piping bag perpendicular to the parchment and squeeze gently to form a small mound (about 1½–2 inches wide).
- To make the classic ghost “tail,” as you finish the mound, lift the bag slightly and give a quick upward flick — it creates a little pointy tail.
- Space ghosts at least 1 inch apart so air can circulate while they bake.
- If you’re using mini chocolate chips for eyes, gently press two chips into each ghost now. If using melted chocolate, you can add eyes after baking.
- Pro tip (key step): Practice one or two test ghosts first—you’ll quickly find a piping pressure and lift motion that gives a cute tail without collapsing the shape.
Step 7 — Bake low and slow until dry
- Place the baking sheet on the middle rack and bake at 200°F (95°C) for about 90 minutes, or until each meringue is dry to the touch and easily lifts off the parchment.
- Turn the oven off, crack the door, and let the meringues cool completely in the oven (at least 1 hour). This gentle cooldown prevents cracking and helps them dry fully.
- Pro tip (key step): Don’t open the oven while they’re drying — temperature swings can cause cracks or collapse.
Step 8 — Finish the faces and final touches
- If you didn’t press in mini chips before baking, melt a little chocolate and use a toothpick or a small piping bag to dot eyes onto cooled ghosts.
- For playful expressions, draw tiny mouths or eyebrows with the melted chocolate.
- Let the chocolate set completely before moving the ghosts.
Notes
Nutritional Value (per ghost, approx.)
- Calories: 25
- Carbohydrates: 6 g
- Sugar: 6 g
- Protein: 0 g
- Fat: 0 g
- Fiber: 0 g