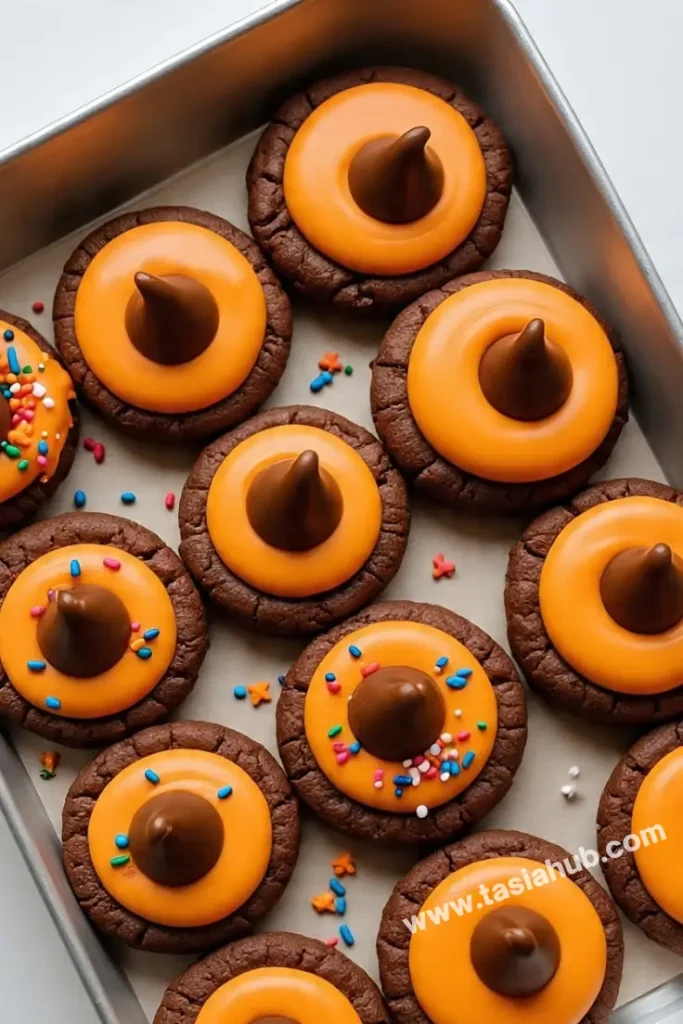
Witch Hat Cookies

Halloween is the perfect excuse to have a little fun in the kitchen, and these witch hat cookies are the kind of treat that makes everyone smile. They’re cute, festive, and surprisingly easy to put together, even if you’re not a seasoned baker. Think of them as one of those spooky cookies that look impressive on the table but don’t require hours of work.
What I love most is how versatile they are—you can use store-bought ingredients or make them completely from scratch, depending on how much time you have. Either way, they’re guaranteed to stand out among your Halloween cookies. Kids especially adore them because they get to help with the decorating, and let’s be honest, who can resist a cookie that doubles as a tiny witch hat?
These little treats also solve the “what should I bring?” dilemma for Halloween parties. They’re bite-sized, fun to eat, and fit right in with the rest of the Halloween desserts spread. You don’t have to worry about complicated steps, and you’ll end up with a platter full of cookies that look like they came straight from a witch’s kitchen.
If you’re planning a spooky-themed night at home, these witch hat cookies are also great for cozy movie marathons. Pair them with hot cocoa, cider, or even a cauldron of punch, and you’ve got yourself one of the easiest and most delightful Halloween food treats around.
Why You’ll Love It
- Festive but fuss-free – These witch hat cookies look like you spent hours crafting them, but they come together quickly with just a few ingredients.
- Kid-approved fun – Little hands love helping with the assembly, whether it’s sticking on the hats or adding colorful sprinkles.
- Perfect party treat – They’re bite-sized, mess-free, and instantly add charm to any Halloween dessert table.
- Customizable magic – Change up the colors, candies, or even the cookie base to match your party theme or personal taste.
- A mix of spooky and sweet – They’re the kind of spooky cookies that bring a playful Halloween vibe without being too scary.
Ingredient List
- 1 package of chocolate wafer cookies (or round shortbread cookies)
- 1 bag of chocolate kisses (unwrapped)
- 1 cup semi-sweet chocolate chips (for melting)
- 1 tablespoon coconut oil or vegetable shortening (optional, for smoother melting)
- Assorted sprinkles, colored sugar, or mini candies (for decorating the hat band)
- Orange, purple, or green frosting (piping gel or icing pen works great)
Ingredient Notes
- Chocolate Wafer Cookies – These make the perfect base for the witch hats. If you can’t find wafer cookies, shortbread or even Oreos (without the filling) will work.
- Chocolate Kisses – The classic Hershey’s Kisses are the “pointy hat” part. I like using the dark chocolate ones because they’re extra rich, but any flavor works.
- Melting Chocolate – A little melted chocolate acts as the “glue” to hold the hats together. Adding a touch of coconut oil helps keep it smooth and glossy.
- Frosting – Brightly colored icing pens or tubes make it super easy to add that fun hat band detail. Orange is classic, but purple and green pop beautifully against the dark chocolate.
- Sprinkles or Mini Candies – Don’t skip these! They add that playful, magical touch and make your witch hat cookies look extra festive on the Halloween dessert table.
Kitchen Equipment Needed
- Microwave-safe bowl – For melting the chocolate quickly and easily.
- Small spatula or spoon – To spread or dab melted chocolate onto the cookies.
- Piping bag or icing pens – For adding the colorful hat bands (I love using pre-filled icing pens—less mess, more fun!).
- Baking sheet lined with parchment paper – A flat surface for assembling and letting the witch hat cookies set.
- Small offset spatula or butter knife – Handy for smoothing frosting or scraping extra chocolate.
- Cooling rack (optional) – If you want the cookies to set neatly without sticking to the surface.
Instructions
Step 1 — Prep your workspace and ingredients
- Clear a clean, flat area on your counter and line a baking sheet with parchment paper. This is where your witch hat cookies will chill while they set.
- Unwrap all chocolate kisses and set them in a small bowl so they’re easy to grab.
- Measure out your chocolate chips and have the coconut oil or shortening ready if you’re using it.
- Place your sprinkles and icing pens within reach — once the chocolate is tacky you’ll want everything handy.
Pro tip: I like to keep a damp paper towel nearby to quickly wipe fingerprints off the kisses — it keeps them shiny and neat.
Step 2 — Melt the chocolate (your “glue”)
- Put the chocolate chips and coconut oil into a microwave-safe bowl.
- Microwave in 20–30 second bursts, stirring thoroughly between each burst, until the chocolate is smooth and glossy.
- Stirring after every short interval prevents overheating and graininess.
- (Alternate double-boiler method): If you prefer, set a heatproof bowl over simmering water and stir the chocolate until melted.
Pro tip: Heat slowly — melted chocolate can look fine and then seize if it gets too hot. Stop microwaving when there are still a few small chips and stir them out; residual heat will finish melting.
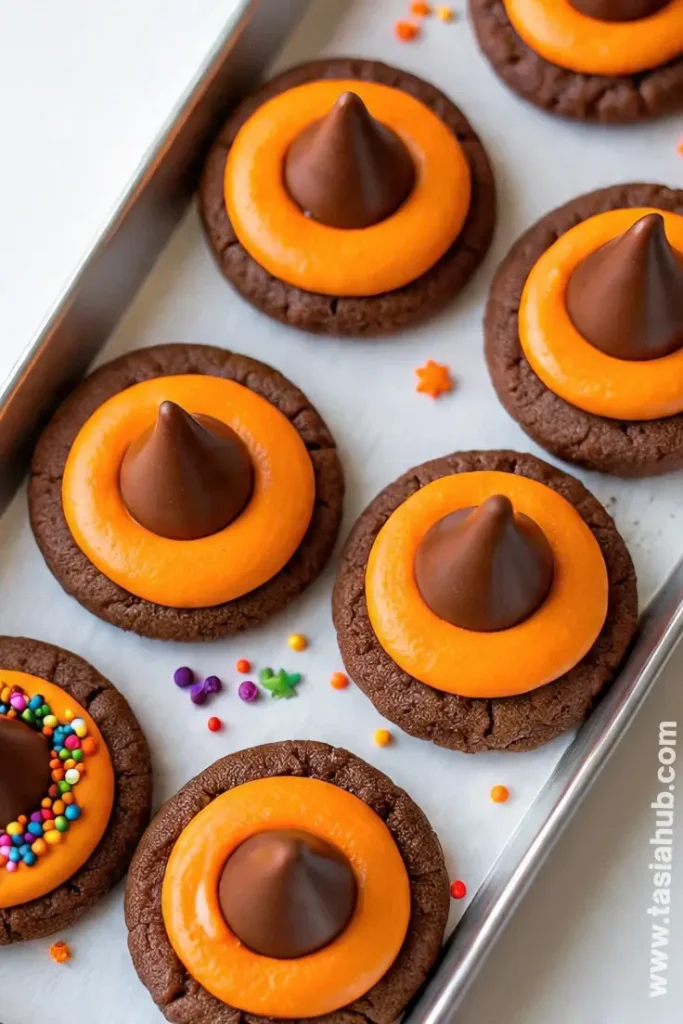
Step 3 — Attach the kisses to the cookie bases
- Turn a chocolate wafer cookie flat-side up. Using the small spatula or the back of a spoon, place a small dot (about ¼ teaspoon) of melted chocolate smack in the center.
- Press an unwrapped chocolate kiss, base-first, onto the dot of chocolate so the kiss sits like a tiny cone on top of the cookie. Hold for 2–3 seconds to set the glue.
- Repeat until the whole sheet is filled.
Pro tip: Don’t use too much melted chocolate — a little goes a long way. Too much will make the cookie soggy and messy. If a kiss wobbles, remove it gently and add a bit more chocolate under the next one.
Step 4 — Pipe the hat band
- Twist the icing pen (or snip the tip of your frosting tube) and test on a piece of parchment to get flow and pressure right.
- With a steady hand, pipe a thin band around the base of each kiss where it meets the cookie. You can do a simple line, a bow, or a tiny rectangle — whatever fits your style.
- If you want a neater look, practice one or two on scrap parchment first.
Pro tip: Rest your forearm on the counter to steady your hand when piping small details — it makes the lines cleaner and your wrist less tired.
Step 5 — Add sprinkles and final decorations
- While the band frosting is still soft, sprinkle on colored sugar, tiny candy bits, or use a dot of frosting to stick on a mini candy for extra sparkle.
- For a more whimsical look, add tiny stars or metallic beads to make your witch hat cookies pop on the Halloween dessert table.
- If any stray frosting smudges appear, gently wipe them with a clean toothpick before everything sets.
Pro tip: Sprinkle placement is easiest if you use a small spoon to drop sprinkles exactly where you want them — it avoids accidental messes across the cookie.
Step 6 — Let them set and store
- Let the assembled cookies sit at room temperature until the chocolate and frosting are fully set, about 20–40 minutes depending on humidity.
- If you’re in a hurry, place them in the fridge for 10–15 minutes — but be mindful that refrigeration can sometimes dull shine or cause slight condensation when they return to room temp.
- Store finished witch hat cookies in an airtight container, layering parchment between them so they don’t stick together. They keep well at room temperature for 3–4 days.
Pro tip: If you plan to transport these as part of Halloween food treats, stack them in a shallow box with a single layer per box or use cupcake liners to separate them — it prevents tipping and keeps the decorations intact.
Tips and Tricks for Success
- Work in small batches – Assemble 5–6 cookies at a time so the chocolate doesn’t harden before you attach the kisses.
- Keep ingredients at room temp – Cold kisses can cause the melted chocolate to set too quickly and crack.
- Use parchment, not foil – Parchment prevents sticking and makes cleanup effortless.
- Chill briefly, but not too long – A quick 10-minute chill helps set the cookies, but avoid leaving them in the fridge for hours or the chocolate may sweat.
- Get creative with details – Don’t stress about perfect lines. A little wobble in the frosting adds character — like a witch’s hat that’s been through a fun night of flying!
Ingredient Substitutions and Variations
- Cookie base – Swap wafer cookies for Oreos (cream removed), Nilla wafers, or even homemade sugar cookies.
- Chocolate kisses – Use flavored Kisses like caramel, almond, or hugs for a surprise twist inside each hat.
- “Glue” option – Instead of melted chocolate, try tinted royal icing or candy melts in Halloween colors.
- Frosting band – Use licorice strings or fruit leather strips cut into tiny bands if you don’t want to use frosting.
- Decorations – Switch up sprinkles for edible glitter, gold pearls, or even tiny candy eyeballs for a spookier vibe.
- Mini version – Make bite-sized witch hats using mini cookies and Hershey’s mini kisses for party platters.
Serving Suggestions
- I love arranging these witch hat cookies on a festive Halloween platter alongside candy corn and mini cupcakes—it makes a magical dessert table centerpiece!
- Serve them with a warm mug of hot cocoa or spiced cider; the chocolatey hats pair perfectly with a cozy drink.
- Add a few to a Halloween-themed lunchbox for kids—they love the surprise and the fun presentation.
- Place them around a cauldron of punch for a playful, interactive display at a party.
- Include them in treat bags for trick-or-treaters—they’re spooky cookies that double as an adorable keepsake.
Storage and Reheating Instructions
- Room temperature: Store in an airtight container for up to 4 days. Place parchment between layers to prevent sticking.
- Refrigeration: Chill in an airtight container for up to 1 week; allow cookies to come to room temperature before serving to avoid condensation.
- Freezing: Individually wrap each cookie in plastic wrap and store in a freezer-safe container for up to 2 months. Thaw at room temperature before serving.
- Reheating: No need to heat—these cookies are best enjoyed at room temperature. If desired, warm briefly in a low oven (250°F/120°C) for 3–5 minutes to soften slightly.
Frequently Asked Questions
Can I make witch hat cookies ahead of time?
Absolutely! You can assemble them a day or two in advance and store them in an airtight container at room temperature. Just add sprinkles or icing details closer to serving for maximum freshness.
Can I use a different type of chocolate?
Yes! Milk chocolate, dark chocolate, or flavored chocolate kisses all work. Just keep in mind that darker chocolate sets a bit firmer, while milk chocolate is creamier.
How do I prevent the cookies from sliding apart?
Use just a small dot of melted chocolate as glue and hold each kiss in place for a few seconds. Make sure the cookie base is flat and stable for the best results.
Can these be made gluten-free?
Totally! Swap the cookies for your favorite gluten-free wafers or shortbread. The rest of the ingredients are naturally gluten-free.
What’s the best way to decorate for beginners?
Icing pens or pre-filled tubes make it super easy. Start with simple bands around the base of the kiss and add sprinkles or tiny candies — no perfect piping required!
How long will these cookies last?
At room temperature, they stay fresh for about 3–4 days. In the fridge, up to a week, and you can even freeze them for a couple of months if needed.
Did you try this recipe? Let me know in the comments how your witch hat cookies turned out! Share your favorite decorations or twists—I love seeing creative Halloween food treats.

Witch Hat Cookies
Equipment
- Microwave-safe bowl
- Small spatula or spoon
- Piping bag or icing pens
- Baking sheet lined with parchment paper
- Small offset spatula or butter knife
- Cooling Rack (optional)
Ingredients
- 1 package of chocolate wafer cookies or round shortbread cookies
- 1 bag of chocolate kisses unwrapped
- 1 cup semi-sweet chocolate chips for melting
- 1 tablespoon coconut oil or vegetable shortening optional, for smoother melting
- Assorted sprinkles colored sugar, or mini candies (for decorating the hat band)
- Orange purple, or green frosting (piping gel or icing pen works great)
Instructions
Step 1 — Prep your workspace and ingredients
- Clear a clean, flat area on your counter and line a baking sheet with parchment paper. This is where your witch hat cookies will chill while they set.
- Unwrap all chocolate kisses and set them in a small bowl so they’re easy to grab.
- Measure out your chocolate chips and have the coconut oil or shortening ready if you’re using it.
- Place your sprinkles and icing pens within reach — once the chocolate is tacky you’ll want everything handy.
- Pro tip: I like to keep a damp paper towel nearby to quickly wipe fingerprints off the kisses — it keeps them shiny and neat.
Step 2 — Melt the chocolate (your “glue”)
- Put the chocolate chips and coconut oil into a microwave-safe bowl.
- Microwave in 20–30 second bursts, stirring thoroughly between each burst, until the chocolate is smooth and glossy.
- Stirring after every short interval prevents overheating and graininess.
- (Alternate double-boiler method): If you prefer, set a heatproof bowl over simmering water and stir the chocolate until melted.
- Pro tip: Heat slowly — melted chocolate can look fine and then seize if it gets too hot. Stop microwaving when there are still a few small chips and stir them out; residual heat will finish melting.
Step 3 — Attach the kisses to the cookie bases
- Turn a chocolate wafer cookie flat-side up. Using the small spatula or the back of a spoon, place a small dot (about ¼ teaspoon) of melted chocolate smack in the center.
- Press an unwrapped chocolate kiss, base-first, onto the dot of chocolate so the kiss sits like a tiny cone on top of the cookie. Hold for 2–3 seconds to set the glue.
- Repeat until the whole sheet is filled.
- Pro tip: Don’t use too much melted chocolate — a little goes a long way. Too much will make the cookie soggy and messy. If a kiss wobbles, remove it gently and add a bit more chocolate under the next one.
Step 4 — Pipe the hat band
- Twist the icing pen (or snip the tip of your frosting tube) and test on a piece of parchment to get flow and pressure right.
- With a steady hand, pipe a thin band around the base of each kiss where it meets the cookie. You can do a simple line, a bow, or a tiny rectangle — whatever fits your style.
- If you want a neater look, practice one or two on scrap parchment first.
- Pro tip: Rest your forearm on the counter to steady your hand when piping small details — it makes the lines cleaner and your wrist less tired.
Step 5 — Add sprinkles and final decorations
- While the band frosting is still soft, sprinkle on colored sugar, tiny candy bits, or use a dot of frosting to stick on a mini candy for extra sparkle.
- For a more whimsical look, add tiny stars or metallic beads to make your witch hat cookies pop on the Halloween dessert table.
- If any stray frosting smudges appear, gently wipe them with a clean toothpick before everything sets.
- Pro tip: Sprinkle placement is easiest if you use a small spoon to drop sprinkles exactly where you want them — it avoids accidental messes across the cookie.
Step 6 — Let them set and store
- Let the assembled cookies sit at room temperature until the chocolate and frosting are fully set, about 20–40 minutes depending on humidity.
- If you’re in a hurry, place them in the fridge for 10–15 minutes — but be mindful that refrigeration can sometimes dull shine or cause slight condensation when they return to room temp.
- Store finished witch hat cookies in an airtight container, layering parchment between them so they don’t stick together. They keep well at room temperature for 3–4 days.
- Pro tip: If you plan to transport these as part of Halloween food treats, stack them in a shallow box with a single layer per box or use cupcake liners to separate them — it prevents tipping and keeps the decorations intact.
Notes
Nutritional Value (per cookie, approximate):
- Calories: 120–140 kcal
- Fat: 7–8 g
- Saturated Fat: 4–5 g
- Carbohydrates: 15–17 g
- Sugar: 12–14 g
- Protein: 1–2 g
- Fiber: <1 g