The Best Caramel Apples

Who can resist the nostalgic charm of a good old caramel apple? It’s that perfect mix of crisp, juicy apple coated in a rich, buttery caramel shell — a treat that manages to feel both playful and decadent. Whether you grew up eating them at fall fairs, making them during Halloween, or only recently discovered them on Pinterest, caramel apples are a fun and satisfying dessert that instantly makes you feel like a kid again.
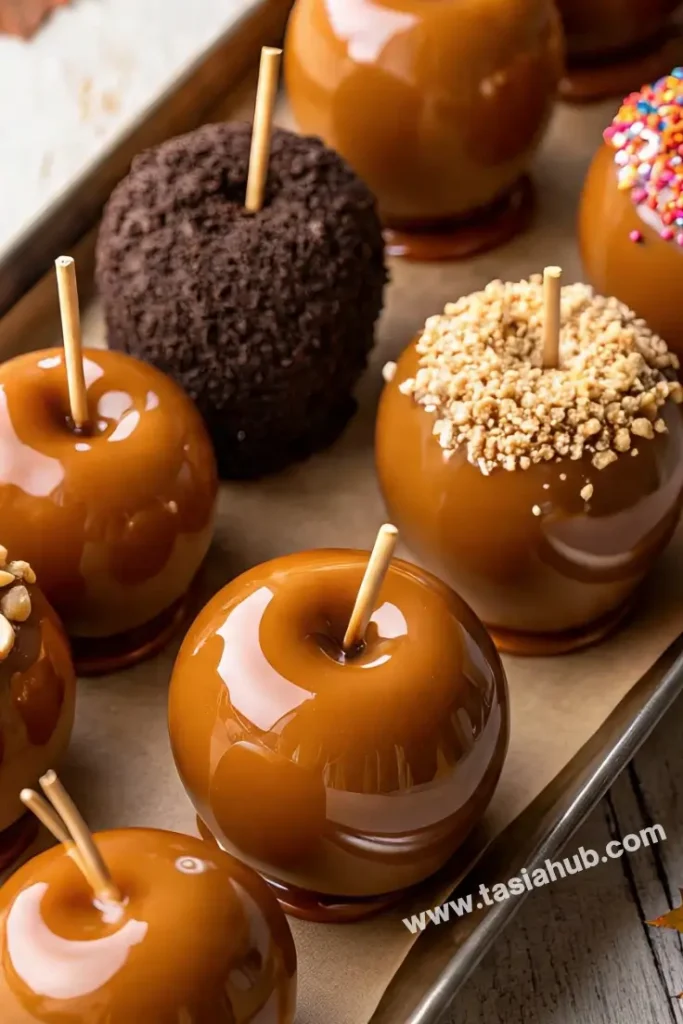
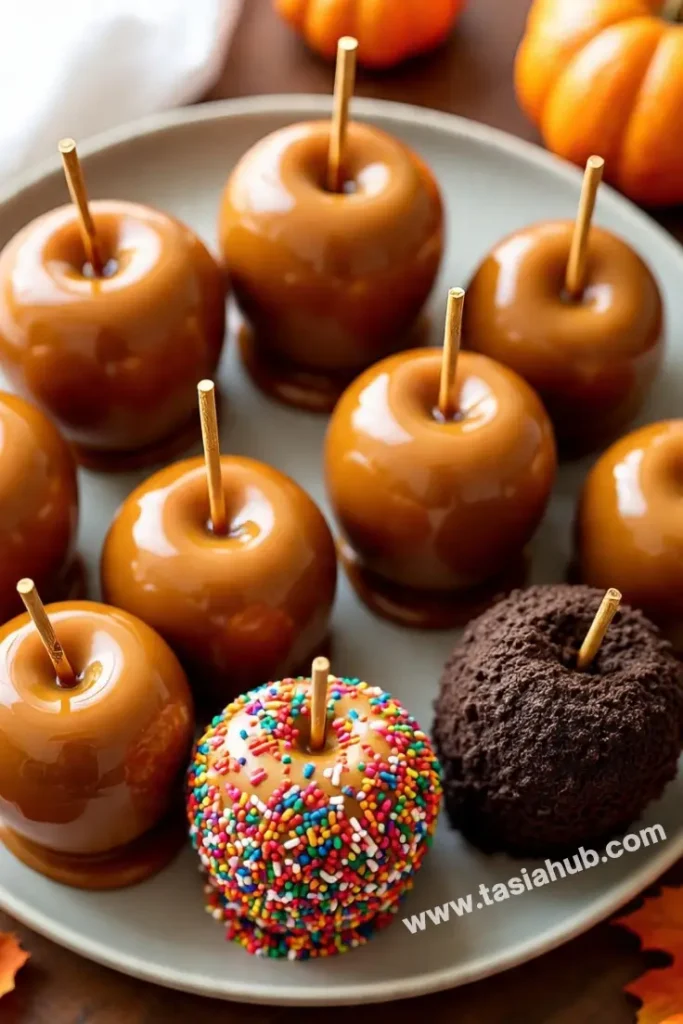
The great thing about caramel apples is how simple they are to make, yet they look like something you’d find at a gourmet candy shop. At their core, they’re just fresh apples and melted caramel, but that contrast between tart and sweet, soft and crunchy, gives them that wow factor. Plus, you can easily dress them up with your favorite toppings — crushed nuts, sprinkles, chocolate drizzle, crushed cookies, even a sprinkle of sea salt if you like that sweet-salty combo.
They’re also a fun DIY treat for family nights, parties, or holiday gatherings. Kids love helping with the dipping and decorating, and adults love eating them (though maybe with a knife and fork!). And if you wrap them up nicely in clear bags with a ribbon, they make adorable gifts or party favors.
If you’ve never made them at home before, don’t worry — it’s easier than you think. The trick is choosing the right apples, prepping them properly, and using a caramel that sticks without sliding off. Once you’ve got the hang of it, you’ll be making these beauties every chance you get.
Why You’ll Love It
- Perfect balance of sweet and tart: The crisp, slightly tart flavor of the apple pairs beautifully with the buttery sweetness of the caramel, giving you a satisfying bite every time.
- Customizable for any occasion: Whether you’re making them for a fall party, Halloween treat, or just a weekend indulgence, you can easily switch up the toppings to match the vibe or season.
- Fun and easy to make: No baking required! Just melt, dip, and decorate. It’s a great activity to do with kids or friends.
- Naturally gluten-free: If you’re looking for a fun treat that fits into a gluten-free diet, caramel apples are a great option — just watch your topping choices.
- Great for gifting or parties: Wrapped in a little cellophane with a cute tag, these make sweet homemade gifts or eye-catching additions to a dessert table.
Ingredient List
For the Caramel Coating:
- 1 cup (200g) granulated sugar
- 1 cup (220g) packed light brown sugar
- 1/2 cup (120ml) heavy cream
- 1/2 cup (115g) unsalted butter
- 1/2 cup (120ml) light corn syrup
- 1/4 tsp salt
- 1 tsp vanilla extract
For the Apples:
- 6 medium apples (Granny Smith or Honeycrisp work well)
- 6 wooden sticks (popsicle or lollipop sticks)
Optional Toppings:
- Chopped peanuts or almonds
- Mini chocolate chips
- Crushed Oreos or graham crackers
- Sprinkles
- Melted chocolate for drizzling
Ingredient Notes
- Granny Smith apples are my go-to — they’re tart and firm, which balances the sweet caramel and holds up well.
- Light corn syrup helps prevent the caramel from crystallizing — don’t leave it out!
- Use real heavy cream for a rich, smooth caramel. Milk won’t give the same texture.
- Unsalted butter is best so you can control the saltiness — if you only have salted, reduce or skip the added salt.
- Wash and dry apples thoroughly to remove any wax coating — caramel won’t stick properly to waxy skins.
- Toppings are where the fun begins! Make sure they’re chopped finely enough to stick well.
Kitchen Equipment Needed
- Heavy-bottom saucepan: For cooking the caramel evenly without burning. I love using my enamel-coated cast iron pot for this — heats like a dream.
- Candy thermometer: To make sure your caramel reaches the right temperature (around 245–250°F for soft-ball stage). Super helpful if you’re new to candy making!
- Wooden spoon or heatproof silicone spatula: For stirring the caramel without melting or sticking.
- Baking sheet lined with parchment or a silicone mat: This is where your dipped apples will set. Silicone mats make cleanup way easier.
- Sturdy skewers or popsicle sticks: For holding the apples — look for thick, durable ones so they don’t snap under the weight.
- Small bowls or plates: For holding your toppings and making the dipping process smoother. It helps to keep everything ready before you start.
Instructions
1. Prep the Apples
- Wash and dry the apples thoroughly.
- Use hot water and a bit of baking soda or vinegar to scrub off any wax.
- Dry completely with a clean towel — moisture prevents the caramel from sticking.
- Insert sticks into the apples.
- Push the stick into the top center of each apple, about halfway in.
- Set them on a parchment-lined tray and chill in the fridge while you make the caramel (this helps it set faster later).
2. Make the Caramel
- Combine ingredients in a heavy saucepan.
- Add the granulated sugar, brown sugar, heavy cream, butter, corn syrup, and salt.
- Cook the caramel.
- Place the saucepan over medium heat and stir constantly until the butter melts and everything blends.
- Attach a candy thermometer to the side of the pot, making sure it doesn’t touch the bottom.
- Let it boil without stirring.
- Once it starts boiling, stop stirring and let it bubble away until it reaches 245–250°F (soft-ball stage).
- Pro Tip: Stirring at this stage can cause crystallization — resist the urge!
- Remove from heat and stir in vanilla.
- Take the pot off the heat and gently stir in the vanilla extract.
- Let the caramel cool for about 3–5 minutes — it should thicken slightly but still be fluid.
3. Dip the Apples
- Set up your dipping station.
- Have your chilled apples, caramel, and toppings ready. Line a tray with parchment or a silicone mat.
- Dip each apple in caramel.
- Tilt the pot slightly and roll the apple in the caramel, coating it evenly.
- Let excess drip off, then twirl gently to catch any drips.
- Pro Tip: If the caramel gets too thick, reheat it gently over low heat.
- Add toppings immediately.
- While the caramel is still warm and sticky, press the apple into a bowl of toppings or sprinkle them on by hand.
- Place on the prepared tray to cool.
4. Let Them Set
- Cool at room temperature or chill.
- Let the apples sit for at least 30–45 minutes until the caramel is fully set.
- If you’re in a hurry, pop them in the fridge for 15 minutes — just be sure to bring them to room temp before serving so the caramel softens a bit.
- Store any extras.
- Wrap individually in wax paper or plastic wrap and keep them in the fridge for up to 3 days.
Tips and Tricks for Success
- Always start with clean, dry apples. Any leftover wax or moisture will cause the caramel to slide right off.
- Chill your apples before dipping. Cold apples help the warm caramel stick and set faster.
- Use a deep, narrow saucepan. It makes dipping easier and helps get full coverage without needing too much caramel.
- Work quickly but carefully. Caramel thickens as it cools, so have your toppings prepped and ready to go.
- Reheat caramel gently if needed. If it gets too thick for dipping, warm it on low heat and stir just until smooth again — don’t let it boil.
Ingredient Substitutions and Variations
- No corn syrup? Use golden syrup or honey, though the flavor and texture may be slightly different.
- Want a dairy-free version? Swap heavy cream with full-fat coconut cream and butter with vegan butter.
- Try different apples. Honeycrisp, Fuji, and Pink Lady are great if you want something sweeter than Granny Smith.
- Flavor twist: Add a pinch of cinnamon or sea salt to the caramel for a warm or salty-sweet flavor.
- Go wild with toppings! Crushed pretzels, toffee bits, dried fruit, or even cereal (like crushed Froot Loops) can add fun texture and flavor.
Serving Suggestions
- I love serving caramel apples sliced on a platter with a drizzle of extra melted chocolate for an elegant party treat.
- Wrap each apple in colorful cellophane and tie with a ribbon for easy, festive gifts.
- Pair caramel apples with a scoop of vanilla ice cream for a simple but indulgent dessert.
- Serve alongside a warm cup of spiced apple cider or hot chocolate — it’s the perfect cozy combo.
- For a fun twist, chop up caramel apples and sprinkle them over oatmeal or yogurt for a crunchy, sweet breakfast topping.
Storage and Reheating Instructions
- Store caramel apples individually wrapped in wax paper or plastic wrap in the refrigerator to keep them fresh for up to 3 days.
- Before serving, let them sit at room temperature for 10–15 minutes to soften the caramel slightly.
- Avoid reheating the caramel apples in the microwave — it can make the caramel too sticky or cause the apples to get mushy.
- If your caramel hardens too much, a quick gentle warm-up of the caramel in a saucepan before dipping can restore the perfect texture.
Frequently Asked Questions
Why is the caramel sliding off my apples?
This usually happens when the apples haven’t been cleaned properly. Most store-bought apples have a wax coating that prevents the caramel from sticking. Scrub them well with hot water and dry thoroughly before dipping.
Can I use store-bought caramel instead?
Absolutely! If you’re short on time, melt down store-bought soft caramel candies with a splash of cream. It won’t have the same rich, homemade flavor, but it still tastes great and works well for dipping.
How long do caramel apples last?
They’re best eaten within 2–3 days. Store them in the fridge, individually wrapped, and let them sit at room temperature for a few minutes before enjoying for that soft, chewy caramel texture.
Can I make them ahead of time for a party?
Yes! You can make them the day before. Just be sure to store them in a cool place or the fridge and wait to add any chocolate drizzle or delicate toppings until closer to serving.
What’s the best way to eat a caramel apple?
If biting into one feels too messy, slice it up! Use a sharp knife to cut it into wedges after it’s fully set. Great for sharing, too.
Can I use a different type of sugar?
Stick with granulated and light brown sugar for the best caramel texture and flavor. Alternatives like coconut sugar may work but can change the consistency and taste.
Did you try this recipe? Let me know in the comments how it turned out!
Don’t forget to share your photos on Instagram and tag me @tasiahub_ or use the hashtag #tasiahub. I’d love to see your creations!

The Best Caramel Apples
Equipment
- Heavy-bottom saucepan
- Candy thermometer
- Wooden spoon or heatproof silicone spatula
- Baking sheet lined with parchment or a silicone mat
- Sturdy skewers or popsicle sticks
- Small bowls or plates
Ingredients
For the Caramel Coating:
- 1 cup 200g granulated sugar
- 1 cup 220g packed light brown sugar
- 1/2 cup 120ml heavy cream
- 1/2 cup 115g unsalted butter
- 1/2 cup 120ml light corn syrup
- 1/4 tsp salt
- 1 tsp vanilla extract
For the Apples:
- 6 medium apples Granny Smith or Honeycrisp work well
- 6 wooden sticks popsicle or lollipop sticks
Optional Toppings:
- Chopped peanuts or almonds
- Mini chocolate chips
- Crushed Oreos or graham crackers
- Sprinkles
- Melted chocolate for drizzling
Instructions
Prep the Apples
- Wash and dry the apples thoroughly.
- Use hot water and a bit of baking soda or vinegar to scrub off any wax.
- Dry completely with a clean towel — moisture prevents the caramel from sticking.
- Insert sticks into the apples.
- Push the stick into the top center of each apple, about halfway in.
- Set them on a parchment-lined tray and chill in the fridge while you make the caramel (this helps it set faster later).
Make the Caramel
- Combine ingredients in a heavy saucepan.
- Add the granulated sugar, brown sugar, heavy cream, butter, corn syrup, and salt.
- Place the saucepan over medium heat and stir constantly until the butter melts and everything blends.
- Attach a candy thermometer to the side of the pot, making sure it doesn’t touch the bottom.
- Once it starts boiling, stop stirring and let it bubble away until it reaches 245–250°F (soft-ball stage).
- Pro Tip: Stirring at this stage can cause crystallization — resist the urge!
- Take the pot off the heat and gently stir in the vanilla extract.
- Let the caramel cool for about 3–5 minutes — it should thicken slightly but still be fluid.
Dip the Apples
- Have your chilled apples, caramel, and toppings ready. Line a tray with parchment or a silicone mat.
- Tilt the pot slightly and roll the apple in the caramel, coating it evenly.
- Let excess drip off, then twirl gently to catch any drips.
- Pro Tip: If the caramel gets too thick, reheat it gently over low heat.
- While the caramel is still warm and sticky, press the apple into a bowl of toppings or sprinkle them on by hand.
- Place on the prepared tray to cool.
Let Them Set
- Let the apples sit for at least 30–45 minutes until the caramel is fully set.
- If you’re in a hurry, pop them in the fridge for 15 minutes — just be sure to bring them to room temp before serving so the caramel softens a bit.
- Wrap individually in wax paper or plastic wrap and keep them in the fridge for up to 3 days.
Notes
Estimated Nutritional Value (Per Apple)
- Calories: ~350–400
- Carbohydrates: 60–70g
- Sugar: 45–55g
- Fat: 15–18g
- Protein: 1–2g
- Fiber: 3–4g
- Sodium: ~100mg