Thanksgiving Charcuterie Board
When I think about Thanksgiving, I don’t just picture turkey and mashed potatoes—I imagine the moments before the big meal. Everyone gathered in the living room, catching up, laughing, maybe sipping on a glass of wine or cider. That’s exactly when a Thanksgiving charcuterie board shines. It’s not just food; it’s an experience. A spread of savory bites, sweet nibbles, and seasonal touches that set the tone for the feast ahead.
What I love about a holiday charcuterie board is how effortless yet impressive it feels. You don’t have to cook everything from scratch or follow a strict recipe—just gather a mix of cheeses, cured meats, crackers, and autumn-inspired add-ons like cranberries, roasted nuts, or even little slices of pumpkin bread. It’s flexible and forgiving, which is a blessing on a day that usually feels packed with kitchen duties.
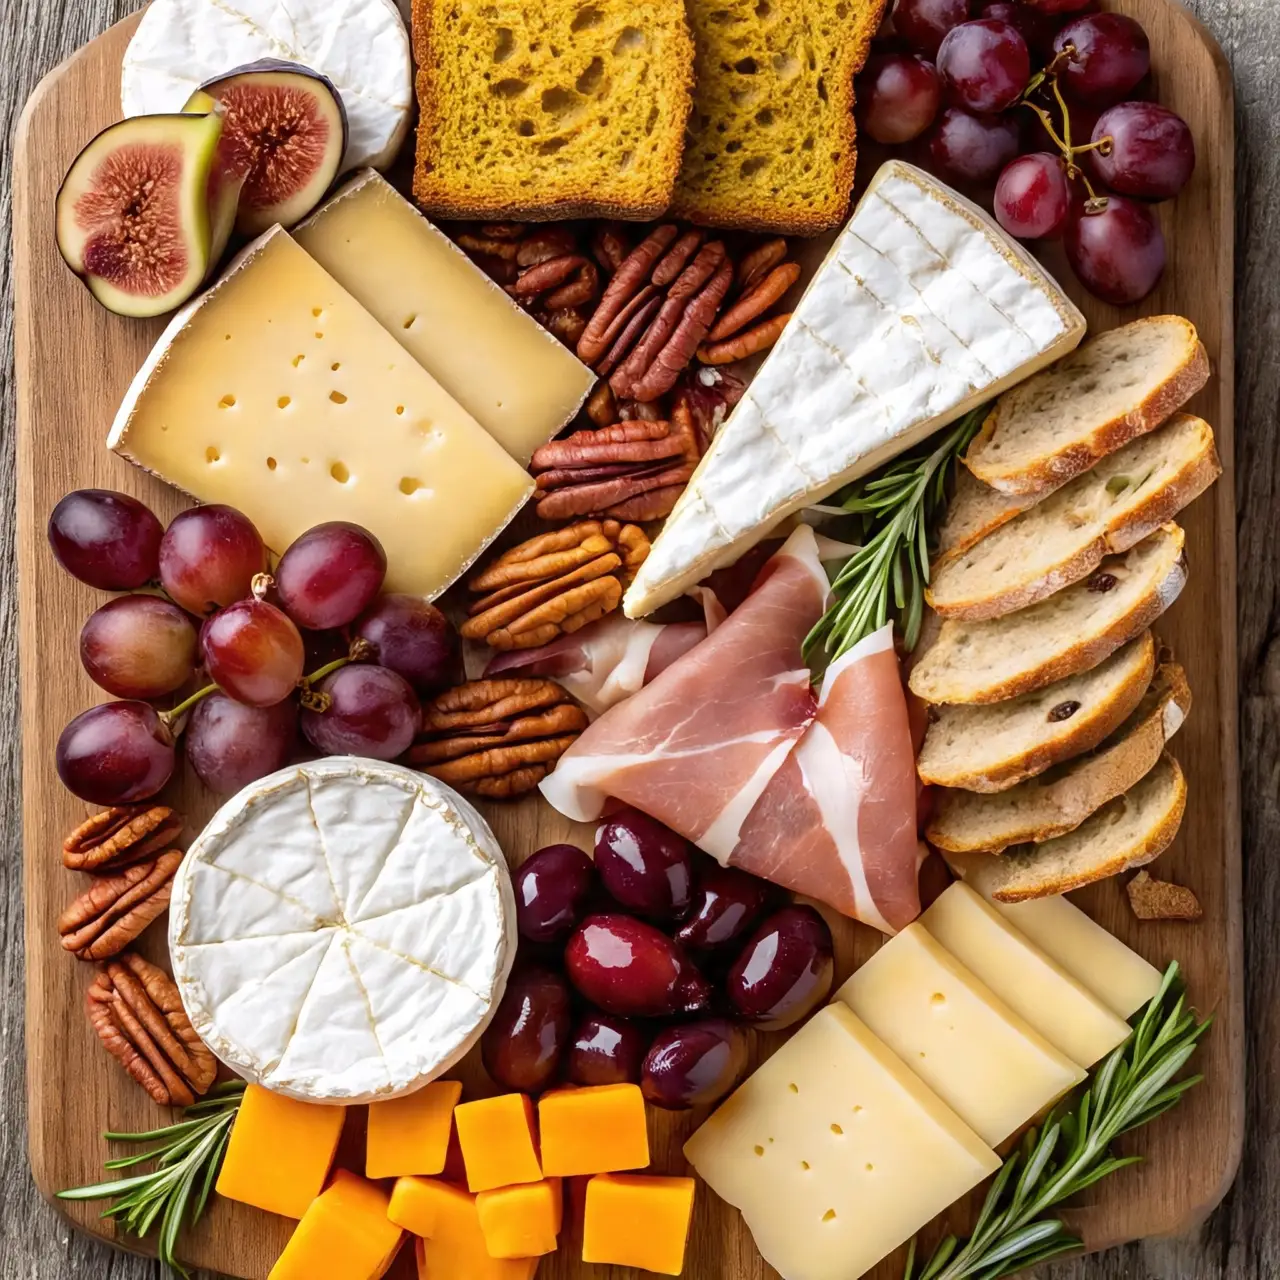
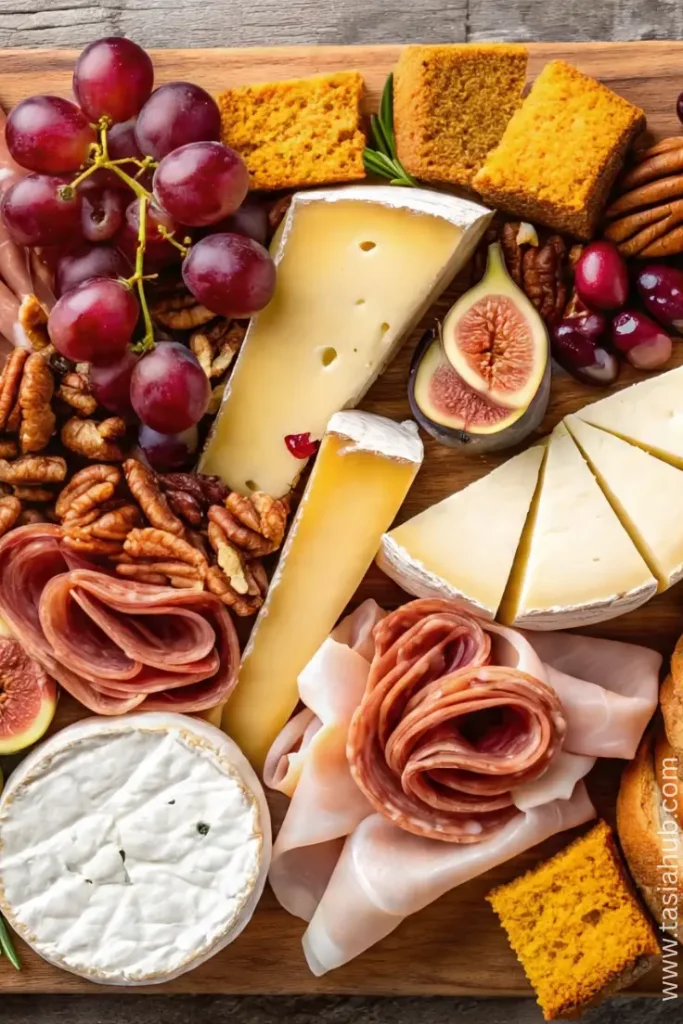
Beyond the flavors, a Thanksgiving charcuterie board becomes a little piece of edible art. The warm colors—deep reds, golden yellows, and rustic browns—mirror the fall leaves outside. The textures invite curiosity: creamy brie against crunchy pecans, salty prosciutto next to sweet fig jam. Guests naturally gather around it, picking and pairing as they go, which sparks conversation and connection before the main meal is even served.
And honestly, it’s also a lifesaver. If the turkey is running a little behind schedule (and let’s face it, it usually is), no one will even notice—they’ll be happily snacking and sipping around the board. It’s that perfect blend of beauty, practicality, and indulgence that makes it such a welcome addition to Thanksgiving day.
Why You’ll Love It
- It’s a stress-saver. No ovens, timers, or complicated prep—just assemble and enjoy while the turkey does its thing.
- Everyone gets a taste. From your cheese-loving aunt to the cousin who just came back from Europe with a newfound love for prosciutto, there’s truly something for everyone.
- It doubles as décor. Honestly, a well-styled charcuterie board looks like a centerpiece—you’ll want to snap photos before anyone digs in.
- It’s endlessly customizable. Sweet, savory, vegetarian-friendly, kid-approved—you can adjust based on your crowd and what you already have at home.
- Leftovers transform easily. Any extra cheese, nuts, or fruits can slide right into the next day’s sandwiches, salads, or even breakfast platters.
Ingredient List
Cheeses
- 1 wedge Brie (about 6 oz)
- 1 block sharp cheddar (8 oz)
- 1 wedge blue cheese (4 oz)
- 1 log goat cheese (4 oz)
Meats
- 6 oz prosciutto
- 6 oz salami, sliced
- 4 oz turkey slices (optional, for theme)
Crackers & Bread
- 1 box assorted crackers (about 8 oz)
- 1 baguette, sliced
- 1 sleeve breadsticks
Fruits & Sweets
- 1 cup red grapes
- 1 cup dried cranberries
- 1–2 fresh figs or fig jam
- 1 small bowl candied pecans (about ½ cup)
- 1 small piece pumpkin bread, sliced into cubes
Extras & Garnishes
- ½ cup mixed olives
- ½ cup roasted almonds
- Fresh rosemary sprigs
- Small dish of honey or maple butter
Ingredient Notes
- Brie – I always go for a creamy double or triple cream brie; it melts in your mouth and pairs beautifully with fruit.
- Cheddar – A sharp aged cheddar gives that tangy bite—don’t swap it for mild, you’ll lose that punch.
- Goat cheese – Soft, tangy, and so good drizzled with honey. Sometimes I even roll it in crushed pecans for extra flair.
- Prosciutto – Thin, salty ribbons of goodness. I like to fold them into little ruffles—it looks fancy with zero effort.
- Cranberries – Don’t skip these! They bring that Thanksgiving vibe and a tart sweetness that balances the rich cheeses.
- Pumpkin bread – Such a fun twist. A little unexpected, but it screams fall and tastes amazing with goat cheese.
- Rosemary sprigs – These aren’t just garnish—they add a woodsy aroma that makes the whole board feel festive.
Kitchen Equipment Needed
- Large Wooden or Slate Board – The foundation of your charcuterie; I love using my oversized acacia board because it feels rustic and perfectly on-theme for Thanksgiving.
- Small Bowls or Ramekins – Great for keeping jams, olives, or nuts from rolling all over the place.
- Cheese Knives & Spreaders – Each cheese deserves its own knife (no blue cheese invading the brie!). My go-to is a little 3-piece set I snagged on Amazon years ago.
- Mini Tongs or Forks – Keeps things tidy and lets guests grab meats or olives without using their fingers.
- Sharp Knife & Cutting Board – For slicing cheeses, fruits, and bread before assembling.
- Small Spoons – Perfect for scooping out honey, jams, or spreads without making a sticky mess.
Instructions
Step 1: Prep everything first
- Clear a large workspace so you can lay everything out and see it—this makes assembly so much easier.
- Remove all cheeses from the fridge 30–60 minutes before serving so they lose the chill and reveal their full flavor and texture.
- Slice the baguette on the bias into ½-inch slices; if you like a little crunch, toast them lightly.
- If any olives or jarred items have excess brine, give them a quick drain or pat with a paper towel.
- Portion jams, honey, and nut mixes into small bowls or ramekins so you can place them on the board without leaks.
Pro tip: Letting cheese warm up is worth the wait — it becomes creamier and more aromatic, and guests notice the difference.
Step 2: Anchor the board with bowls and big items
- Place 3–5 small bowls on the board first (jam, olives, candied pecans, honey). These act as visual and practical anchors.
- Spread the bowls out so they create balance across the board—one near the top, one near the middle, one near the edge.
- Leave enough room between bowls for cheeses and meats so nothing looks crowded.
Pro tip: Use mismatched but coordinated bowls (wood, ceramic, glass) for texture and interest — they add character without extra effort.
Step 3: Arrange the cheeses (start with the largest pieces)
- Position whole or large-format cheeses first: wedge of brie, block cheddar, a log of goat cheese, and the blue cheese wedge. Space them so guests can easily access each one.
- Pre-slice a few pieces from the harder cheeses (cheddar) so guests can grab those quickly, but keep most intact for presentation.
- For the brie: score the top with a knife in a crisscross pattern or place it whole with a small spreader beside it.
- Place the goat cheese log near a dish of honey or fig jam; those pair beautifully.
Pro tip: Put spreadable cheeses (brie, goat cheese) next to crackers or bread so guests don’t have to hunt for the right accompaniments.
Step 4: Add the cured meats (create movement and volume)
- Fold prosciutto into loose rosettes or drape over a small pile of breadsticks to create height.
- Fan salami or pepperoni slices in overlapping rows or fold into little stacks for texture.
- If using turkey slices, roll them and tuck them into a corner to reinforce the Thanksgiving theme without overpowering the board.
- Space meat groupings around the cheeses so there’s always a protein near a cheese.
Pro tip: Folding and rolling meats gives the board volume and makes it look intentional — think “little edible bouquets.”
Step 5: Tuck in crackers, bread, and crunchy elements
- Fan crackers along one side or stand them upright in a small pile to add vertical interest.
- Lay baguette slices in a semi-circle or stagger them so they’re easy to grab.
- Fill narrower gaps with breadsticks or extra cracker types for variety.
Pro tip: Keep fragile crackers separated from sticky spreads and soft cheeses to avoid soggy bites and frustrated guests.
Step 6: Add fruits, sweets, and seasonal touches
- Cluster grapes in small bunches rather than scattering single grapes—clusters read as more abundant and polished.
- Halve fresh figs and place them cut-side up so they look lush; scatter dried cranberries in small piles for pops of color.
- Nestle pumpkin bread cubes or small slices near goat cheese or brie for that fall surprise.
- Sprinkle candied pecans or roasted almonds into open spaces for crunch and warmth.
Pro tip: Use odd numbers when grouping items (3, 5, or 7) — it feels more natural and pleasing to the eye.
Step 7: Fill gaps, add herbs, and balance colors
- Step back and look for empty pockets; fill them with small piles of nuts, extra crackers, or single sprigs of rosemary.
- Scatter a few fresh rosemary sprigs around the board to add color and a woodsy aroma.
- Ensure color balance—if one side is heavy on reds, add some golden or green elements to the opposite side.
- Place cheese knives and spreaders where they’re easy to reach, and include a small spoon for jams/honey.
Pro tip: Create height with bowls or by stacking a few slices of bread—variation in height makes the board feel abundant and intentional.
Step 8: Final presentation and serving basics
- Put the completed board on a stabilizing surface (table or counter) with small plates and napkins nearby.
- Add toothpicks or little tongs for easy picking, and remind guests to use the appropriate knife for each cheese if you want to keep flavors pure.
- If you’ll serve wine or a hot cider, set glasses a few inches away so the board remains the focal point.
Food-safety note: Perishable items (soft cheeses, meats) should be refrigerated if left out for longer than two hours.
Step 9: Leftovers and cleanup (quick wrap)
- Wrap leftover cheeses tightly in parchment and store in the fridge in an airtight container—hard cheeses last longer if slightly wrapped to breathe.
- Store crackers separately to keep them crisp.
- Use leftover clustered grapes, meats, and cheeses the next day in salads, sandwiches, or breakfast toast.
Pro tip: Label the cheeses with little flags (or sticky notes) on the board before guests dig in — it’s helpful and looks charming.

Tips and Tricks for Success
- Room temp cheeses are best. Always pull cheeses out of the fridge 30–60 minutes before serving so the flavors shine.
- Think in clusters, not scatter. Group items together (nuts, grapes, crackers) rather than spreading them evenly—it looks fuller and more intentional.
- Mix textures. Aim for creamy + crunchy + chewy in every area of the board so no corner feels “flat.”
- Balance colors. Place brighter foods (grapes, figs, cranberries) opposite each other so the whole board feels harmonious.
- Odd numbers win. Use 3 or 5 slices, clusters, or piles—it’s more pleasing to the eye than even numbers.
- Add height. Layer meats into ruffles, stack crackers, or use bowls to break up the flat look.
- Keep utensils handy. One knife per cheese, spoons for jams, and tongs for meats prevent flavor mixing and messy fingers.
- Don’t overstuff. A little breathing room between items makes the board more approachable (and easier for guests to grab things).
Ingredient Substitutions and Variations
- Cheeses – Swap cheddar for gouda, manchego, or even a smoked cheese for depth.
- Brie – If you’re not a brie fan, try camembert or a triple cream cheese.
- Goat cheese – Use herbed cream cheese or Boursin for a similar creamy tang.
- Cured meats – Soppressata, chorizo, or even peppered turkey slices add variety if prosciutto or salami aren’t your style.
- Crackers & bread – Gluten-free crackers, pita chips, or pretzel thins all work beautifully.
- Fruits – Swap grapes for apple slices (toss in lemon to prevent browning), pears, or dried apricots.
- Nuts – Walnuts, pistachios, or cashews can stand in for almonds or pecans.
- Pumpkin bread – Replace with gingerbread, spiced cookies, or even cornbread cubes for a cozy seasonal twist.
- Honey – Maple syrup, apple butter, or a cranberry chutney makes an equally festive dip.
Serving Suggestions
- As a holiday appetizer spread. I love putting this board out an hour before dinner—it keeps guests happy and gives me breathing room while the turkey finishes.
- Pair with mulled cider or wine. A warm spiced cider is my personal favorite alongside the brie and cranberries—it feels so cozy and festive.
- Add it to brunch. Leftover board components the next morning with scrambled eggs or a frittata? Absolute win.
- Make it dessert-style. Swap some savory meats for more pumpkin bread, chocolates, or caramel-dipped apple slices for a sweet post-dinner grazing board.
- Casual movie night platter. I’ve pulled a smaller version of this board together for a Netflix night—it’s just as fun without the holiday fuss.
Storage and Reheating Instructions
- Cheeses – Wrap in parchment or wax paper first, then seal in an airtight container. This keeps them from drying out while still letting them breathe.
- Cured meats – Layer with parchment between slices and store in a zip-top bag in the fridge; they’ll stay good for 3–4 days.
- Bread & crackers – Store separately in airtight containers or resealable bags at room temp; keep away from moisture so they stay crisp.
- Fruits – Grapes and figs go back into the fridge in a produce bag; dried cranberries stay sealed in the pantry.
- Pumpkin bread – Wrap tightly in plastic wrap or foil; keep at room temp for 2–3 days, or freeze slices for up to 2 months.
- Reheating tip – Bread can be lightly toasted in the oven (350°F for 5–7 minutes) to bring back its crunch before serving again.
Frequently Asked Questions
How far in advance can I make a charcuterie board?
You can prep most of it a few hours ahead—slice cheeses, wash fruits, portion spreads into bowls—then wrap and refrigerate. Assemble the final board about 30 minutes before serving.
What if I don’t have a big board?
No worries! Use a large baking sheet, cutting board, or even two smaller boards side by side. It’s all about the arrangement, not the surface.
How much food should I plan per person?
As an appetizer, plan on about 2–3 oz of cheese and 2 oz of meat per person, plus extras like crackers and fruit. If this is your main spread, increase a little more.
Can I make this vegetarian-friendly?
Absolutely. Just skip the cured meats and add more nuts, roasted veggies, or marinated cheese cubes to keep things hearty.
Do I need to label the cheeses?
Not required, but it’s a nice touch! Little cheese markers or even toothpicks with handwritten flags make it fun (and help guests avoid surprises like blue cheese if it’s not their thing).
What drinks pair best?
Crisp white wines like Sauvignon Blanc, light reds like Pinot Noir, or non-alcoholic options like apple cider and sparkling water with cranberries all pair beautifully.
Did you try building this Thanksgiving charcuterie board? I’d love to hear how it turned out—share your creations in the comments below!

Thanksgiving Charcuterie Board
Equipment
- Large wooden or slate board
- Small bowls or ramekins
- Cheese Knives & Spreaders
- Mini Tongs or Forks
- Sharp knife & cutting board
- Small Spoons
Ingredients
Cheeses
- 1 wedge Brie about 6 oz
- 1 block sharp cheddar 8 oz
- 1 wedge blue cheese 4 oz
- 1 log goat cheese 4 oz
Meats
- 6 oz prosciutto
- 6 oz salami sliced
- 4 oz turkey slices optional, for theme
Crackers & Bread
- 1 box assorted crackers about 8 oz
- 1 baguette sliced
- 1 sleeve breadsticks
Fruits & Sweets
- 1 cup red grapes
- 1 cup dried cranberries
- 1 –2 fresh figs or fig jam
- 1 small bowl candied pecans about ½ cup
- 1 small piece pumpkin bread sliced into cubes
Extras & Garnishes
- ½ cup mixed olives
- ½ cup roasted almonds
- Fresh rosemary sprigs
- Small dish of honey or maple butter
Instructions
Step 1: Prep everything first
- Clear a large workspace so you can lay everything out and see it—this makes assembly so much easier.
- Remove all cheeses from the fridge 30–60 minutes before serving so they lose the chill and reveal their full flavor and texture.
- Slice the baguette on the bias into ½-inch slices; if you like a little crunch, toast them lightly.
- If any olives or jarred items have excess brine, give them a quick drain or pat with a paper towel.
- Portion jams, honey, and nut mixes into small bowls or ramekins so you can place them on the board without leaks.
- Pro tip: Letting cheese warm up is worth the wait — it becomes creamier and more aromatic, and guests notice the difference.
Step 2: Anchor the board with bowls and big items
- Place 3–5 small bowls on the board first (jam, olives, candied pecans, honey). These act as visual and practical anchors.
- Spread the bowls out so they create balance across the board—one near the top, one near the middle, one near the edge.
- Leave enough room between bowls for cheeses and meats so nothing looks crowded.
- Pro tip: Use mismatched but coordinated bowls (wood, ceramic, glass) for texture and interest — they add character without extra effort.
Step 3: Arrange the cheeses (start with the largest pieces)
- Position whole or large-format cheeses first: wedge of brie, block cheddar, a log of goat cheese, and the blue cheese wedge. Space them so guests can easily access each one.
- Pre-slice a few pieces from the harder cheeses (cheddar) so guests can grab those quickly, but keep most intact for presentation.
- For the brie: score the top with a knife in a crisscross pattern or place it whole with a small spreader beside it.
- Place the goat cheese log near a dish of honey or fig jam; those pair beautifully.
- Pro tip: Put spreadable cheeses (brie, goat cheese) next to crackers or bread so guests don’t have to hunt for the right accompaniments.
Step 4: Add the cured meats (create movement and volume)
- Fold prosciutto into loose rosettes or drape over a small pile of breadsticks to create height.
- Fan salami or pepperoni slices in overlapping rows or fold into little stacks for texture.
- If using turkey slices, roll them and tuck them into a corner to reinforce the Thanksgiving theme without overpowering the board.
- Space meat groupings around the cheeses so there’s always a protein near a cheese.
- Pro tip: Folding and rolling meats gives the board volume and makes it look intentional — think “little edible bouquets.”
Step 5: Tuck in crackers, bread, and crunchy elements
- Fan crackers along one side or stand them upright in a small pile to add vertical interest.
- Lay baguette slices in a semi-circle or stagger them so they’re easy to grab.
- Fill narrower gaps with breadsticks or extra cracker types for variety.
- Pro tip: Keep fragile crackers separated from sticky spreads and soft cheeses to avoid soggy bites and frustrated guests.
Step 6: Add fruits, sweets, and seasonal touches
- Cluster grapes in small bunches rather than scattering single grapes—clusters read as more abundant and polished.
- Halve fresh figs and place them cut-side up so they look lush; scatter dried cranberries in small piles for pops of color.
- Nestle pumpkin bread cubes or small slices near goat cheese or brie for that fall surprise.
- Sprinkle candied pecans or roasted almonds into open spaces for crunch and warmth.
- Pro tip: Use odd numbers when grouping items (3, 5, or 7) — it feels more natural and pleasing to the eye.
Step 7: Fill gaps, add herbs, and balance colors
- Step back and look for empty pockets; fill them with small piles of nuts, extra crackers, or single sprigs of rosemary.
- Scatter a few fresh rosemary sprigs around the board to add color and a woodsy aroma.
- Ensure color balance—if one side is heavy on reds, add some golden or green elements to the opposite side.
- Place cheese knives and spreaders where they’re easy to reach, and include a small spoon for jams/honey.
- Pro tip: Create height with bowls or by stacking a few slices of bread—variation in height makes the board feel abundant and intentional.
Step 8: Final presentation and serving basics
- Put the completed board on a stabilizing surface (table or counter) with small plates and napkins nearby.
- Add toothpicks or little tongs for easy picking, and remind guests to use the appropriate knife for each cheese if you want to keep flavors pure.
- If you’ll serve wine or a hot cider, set glasses a few inches away so the board remains the focal point.
- Food-safety note: Perishable items (soft cheeses, meats) should be refrigerated if left out for longer than two hours.
Step 9: Leftovers and cleanup (quick wrap)
- Wrap leftover cheeses tightly in parchment and store in the fridge in an airtight container—hard cheeses last longer if slightly wrapped to breathe.
- Store crackers separately to keep them crisp.
- Use leftover clustered grapes, meats, and cheeses the next day in salads, sandwiches, or breakfast toast.
- Pro tip: Label the cheeses with little flags (or sticky notes) on the board before guests dig in — it’s helpful and looks charming.
Notes
Nutritional Value (per serving, approximate):
- Calories: 350–400 kcal
- Protein: 14–16 g
- Carbohydrates: 20–25 g
- Sugar: 6–8 g
- Fat: 25–28 g
- Fiber: 2–3 g
- Sodium: 600–750 mg