Spiderweb Brownies
These spiderweb brownies are the kind of treat that makes you smile before you even take a bite. Rich, fudgy, and chocolatey at the core, they’re topped with a simple yet eye-catching design that instantly transforms them into a show-stopping Halloween dessert. It’s amazing how a swirl of white icing over a dark chocolate background can look so much like a web—it’s almost too fun to eat.
What I love about these spooky Halloween brownies is how approachable they are. You don’t need professional decorating skills or fancy tools—just a steady hand and a toothpick will do the trick. That’s part of the magic: they’re impressive enough for a party table yet easy enough to make on a weeknight if you want to surprise your family with something festive.
If you’ve ever stressed about creating Halloween food treats that look good and taste even better, these brownies are your answer. They’re soft and gooey in the center with just the right amount of chewiness around the edges. Once you draw that signature web pattern on top, they instantly become one of those “where did you get that?” desserts.
Brownies on their own are comforting and familiar, but when dressed up as spiderweb brownies, they take on a playful personality perfect for the season. Bring them to a potluck, serve them at a party, or keep them at home for a cozy movie night marathon of your favorite Halloween classics—they fit right in wherever you share them.
Why You’ll Love It
- They look way fancier than they are. The spiderweb design takes just minutes to make, but it instantly transforms a simple pan of brownies into spooky Halloween brownies that look bakery-worthy.
- Perfect balance of fun and flavor. These aren’t just cute Halloween food treats—they’re rich, fudgy, and absolutely satisfying for anyone who loves chocolate.
- Kid-approved (and adult-approved too!). Whether you’re baking with little ones who want to help with the web design or serving them to grown-ups at a Halloween party, they’ll disappear fast.
- Festive without being fussy. No complicated ingredients or hours of decorating—just a swirl of icing on top of your favorite brownies and you’re done.
- Great for sharing. From Halloween school parties to cozy gatherings at home, these Halloween brownies slice easily and serve a crowd without extra effort.
Ingredient List
For the Brownies:
- 1 cup (2 sticks) unsalted butter, melted
- 2 cups granulated sugar
- 4 large eggs
- 1 teaspoon vanilla extract
- 1 cup all-purpose flour
- 1 cup unsweetened cocoa powder
- ½ teaspoon baking powder
- ½ teaspoon salt
For the Spiderweb Topping:
- ½ cup white chocolate chips (or white candy melts)
- 1 teaspoon coconut oil (optional, for smoother melting)
Ingredient Notes
- Butter: Real butter gives the brownies that deep, indulgent flavor. I always use unsalted so I can control the saltiness myself.
- Cocoa powder: Go for a high-quality unsweetened cocoa powder (like Ghirardelli or Hershey’s Special Dark). It makes the difference between just “brownies” and truly rich, decadent Halloween desserts.
- Sugar: Regular granulated sugar works perfectly here—no need for anything fancy. It balances out the intense cocoa.
- White chocolate chips: These create the spider web look! I prefer melting white chocolate chips with just a touch of coconut oil so it spreads smoothly. Candy melts also work if you want a bright white finish.
- Vanilla extract: Don’t skip this—it rounds out the flavor of the brownies and keeps them from tasting flat.
Kitchen Equipment Needed
- 9×13-inch baking pan – Gives you nice, even squares. I love using a light-colored metal pan because it bakes more evenly than glass.
- Mixing bowls – One for the wet ingredients, one for the dry. Keeps things tidy and easy to combine.
- Whisk + spatula – The whisk helps blend the wet ingredients smoothly, while the spatula is perfect for folding everything together.
- Toothpick or skewer – Essential for dragging the melted white chocolate into that spiderweb pattern.
- Microwave-safe bowl (or double boiler) – For melting the white chocolate chips without burning them.
- Sharp knife – Makes it easier to cut clean slices once the brownies are cooled.
Instructions
Step 1: Prep Your Pan and Oven
- Preheat your oven to 350°F (175°C).
- Lightly grease a 9×13-inch baking pan or line it with parchment paper (leave some overhang for easy lifting later).
- Set aside while you make the batter.
Pro Tip: Lining with parchment makes removing and slicing the brownies a breeze—no sticking, no crumbling edges.
Step 2: Mix the Wet Ingredients
- In a large mixing bowl, whisk together the melted butter and sugar until combined and glossy.
- Add in the eggs one at a time, whisking well after each addition.
- Stir in the vanilla extract until smooth.
Pro Tip: Whisk continuously to help dissolve the sugar—it gives you that shiny, crackly top on the brownies.
Step 3: Combine the Dry Ingredients
- In a separate bowl, sift together the flour, cocoa powder, baking powder, and salt.
- Slowly add the dry mixture into the wet mixture.
- Switch to a spatula and gently fold until just combined—no flour streaks should remain.
Pro Tip: Don’t overmix at this stage. Overmixing can make brownies dense instead of fudgy.
Step 4: Bake the Brownies
- Pour the batter evenly into your prepared pan.
- Smooth out the top with a spatula so it bakes evenly.
- Bake for 28–32 minutes, or until a toothpick inserted in the center comes out with a few moist crumbs (not wet batter).
Pro Tip: Every oven runs differently—start checking at 28 minutes to avoid overbaking.
Step 5: Make the Spiderweb Topping
- In a microwave-safe bowl, melt the white chocolate chips with the coconut oil in 20-second intervals, stirring after each until smooth.
- Transfer the melted chocolate into a piping bag (or a small zip-top bag with the corner snipped off).
Pro Tip: If the chocolate feels too thick, stir in a tiny extra splash of coconut oil to loosen it up.
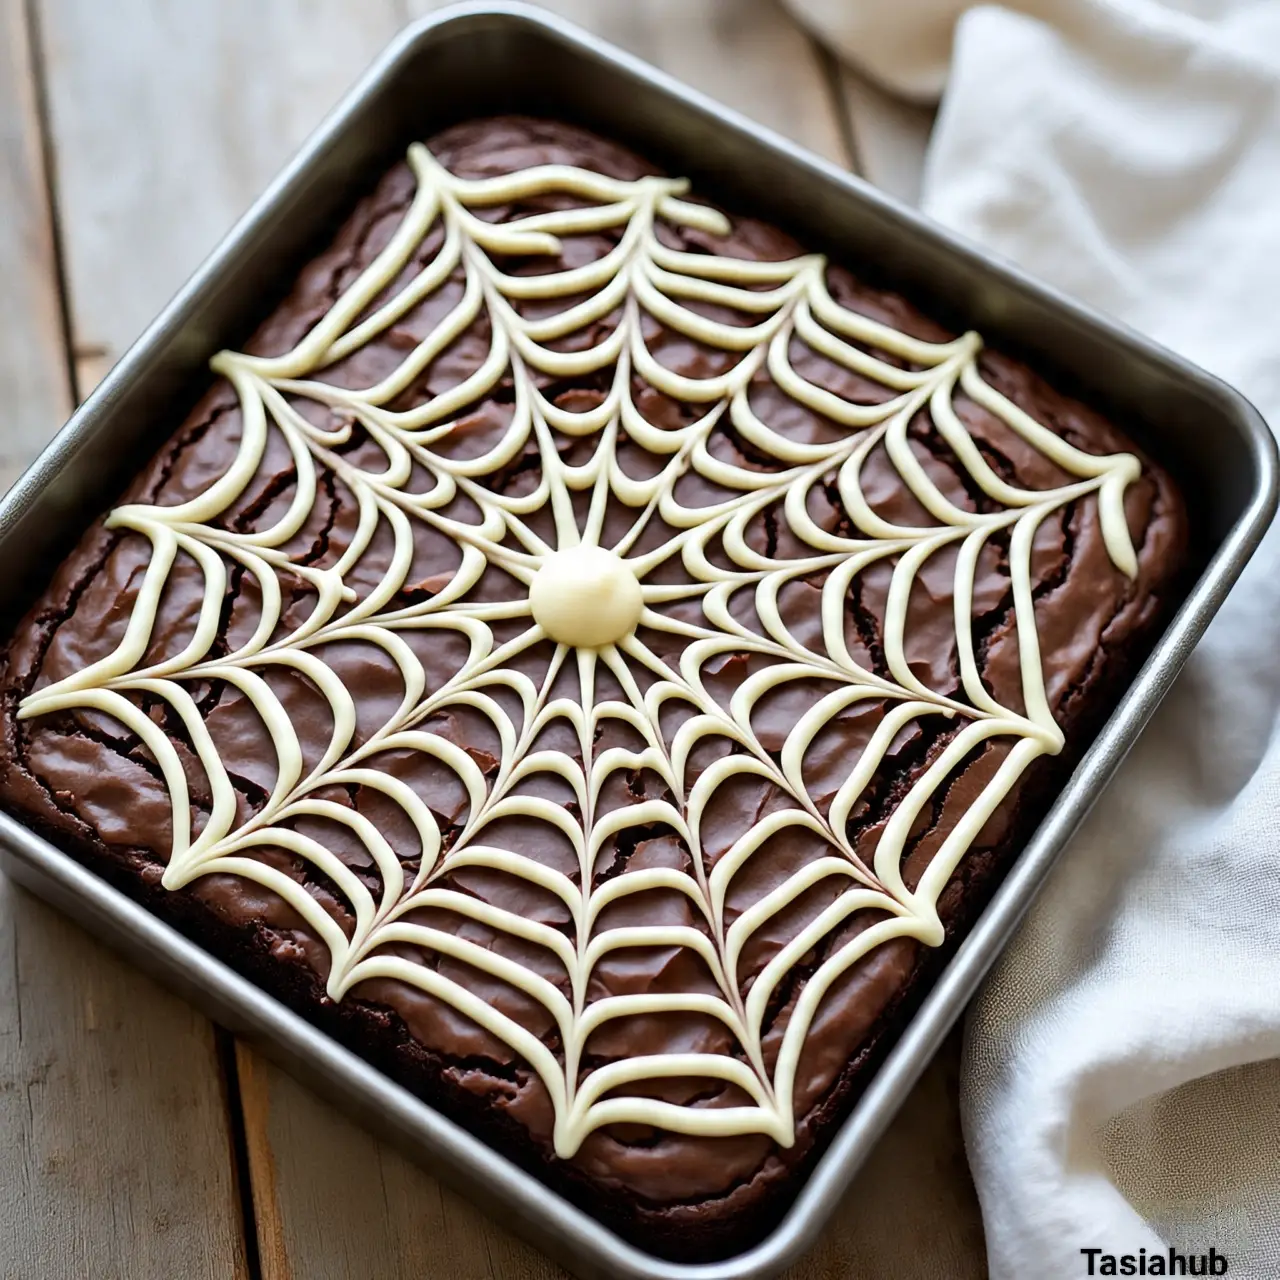
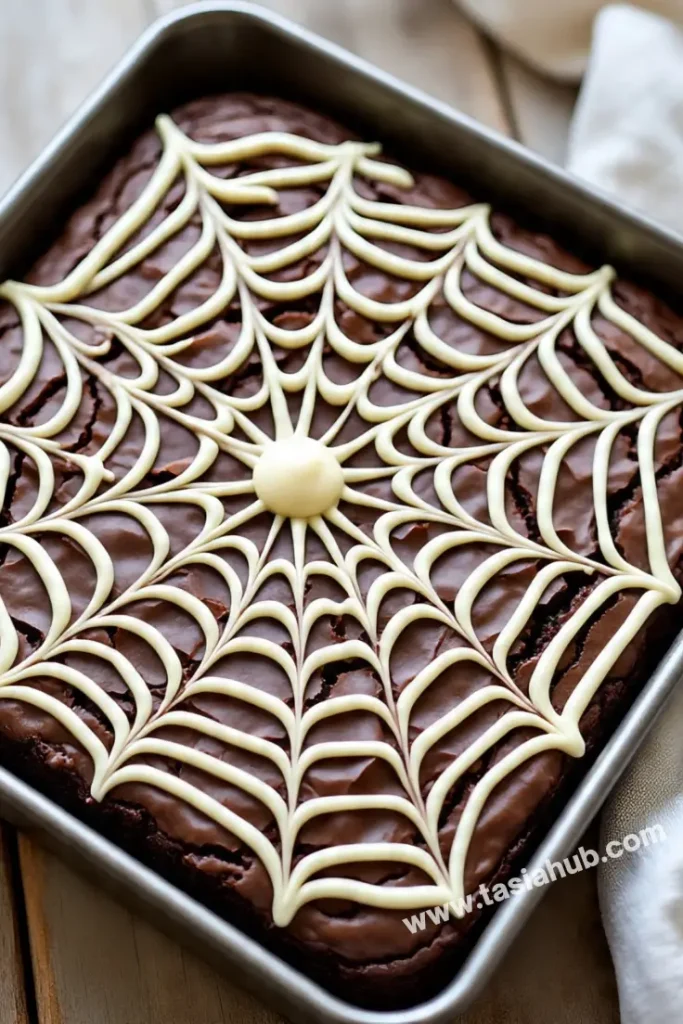
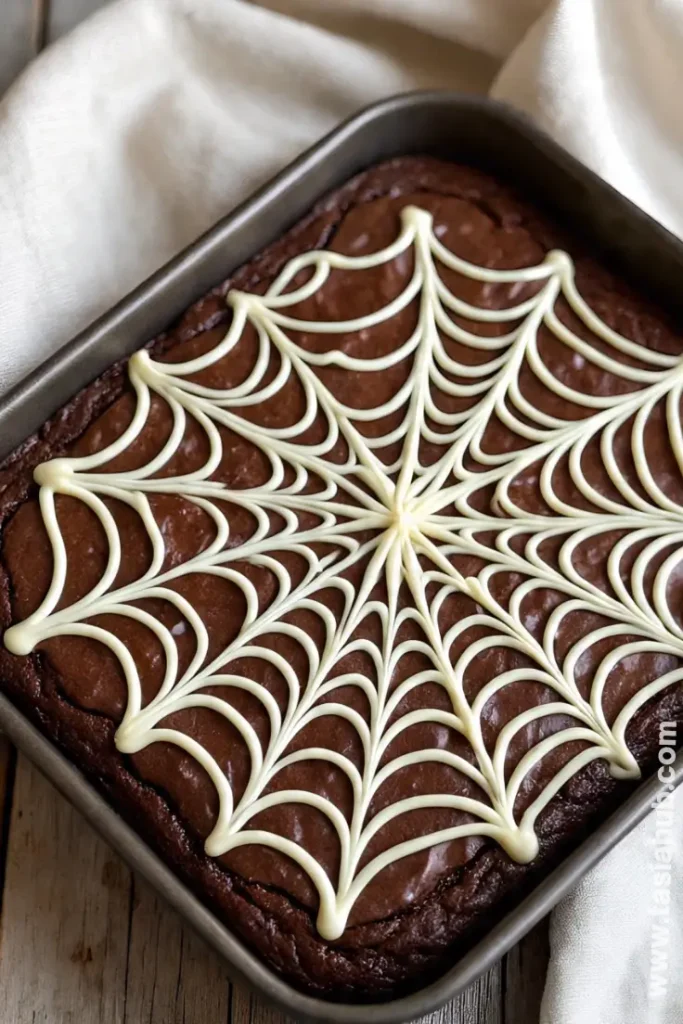
Step 6: Create the Spiderweb Design
- While the brownies are still slightly warm (but not hot), drizzle the melted white chocolate in concentric circles on top of the brownies.
- Take a toothpick or skewer and drag lines outward from the center to the edges, creating a web effect.
- Let the brownies cool completely so the chocolate sets before slicing.
Pro Tip: Wipe your toothpick clean between each drag for sharper, more defined web lines.
Tips and Tricks for Success
- Use room temperature eggs. They mix more evenly into the batter and help the brownies bake up with a better texture.
- Check doneness carefully. A toothpick with moist crumbs (not wet batter) means fudgy perfection. Overbaking will make them dry.
- Don’t rush the cooling. Letting the brownies cool before cutting keeps the squares neat and the spiderweb design intact.
- Cut with a warm knife. Run your knife under hot water, wipe dry, then slice for clean edges without dragging the topping.
- Plan ahead for parties. Make the brownies a day before your event—the flavor deepens overnight and they’re easier to cut when fully set.
Ingredient Substitutions and Variations
- Butter → Oil: Use vegetable or coconut oil if you prefer a slightly denser, extra-moist brownie.
- Sugar → Brown sugar: Swap half the granulated sugar for brown sugar to add a subtle caramel-like flavor.
- White chocolate → Icing glaze: If you’re out of white chocolate, whisk together powdered sugar, a splash of milk, and vanilla to pipe the spiderweb instead.
- Gluten-free flour: A 1:1 gluten-free baking blend works beautifully for these Halloween brownies.
- Extra add-ins: Stir in chocolate chips, crushed Oreos, or even orange and black sprinkles to make your spooky Halloween brownies even more festive.
- Mini versions: Bake the batter in a muffin tin for bite-sized Halloween food treats—perfect for school parties or snack tables.
Serving Suggestions
- Halloween party platter: Slice the spiderweb brownies into squares and arrange them on a festive tray with candy corn and mini pumpkins for decoration.
- Movie night treat: I love serving these with a big glass of cold milk while watching classic Halloween movies—it feels cozy and fun.
- Pair with ice cream: Warm up a brownie and top it with a scoop of vanilla ice cream—the hot-and-cold combo is irresistible.
- Lunchbox surprise: Tuck a small square into lunchboxes as a sweet Halloween food treat that’s sure to bring a smile.
- Potluck favorite: Bring a batch to share—everyone loves a dessert that doubles as edible décor.
Storage and Reheating Instructions
- Room temperature: Store brownies in an airtight container for up to 3 days. Keep them in a single layer or separate layers with parchment paper so the web design doesn’t smudge.
- Refrigerator: For longer storage, keep them in the fridge for up to a week. Let them come to room temperature before serving for the best texture.
- Freezer: Wrap individual squares tightly in plastic wrap, then place in a freezer-safe bag or container. Freeze for up to 2 months.
- Reheating: Microwave a brownie square for 10–15 seconds to bring back that fresh-from-the-oven softness.
Frequently Asked Questions
Can I use a boxed brownie mix for this recipe?
Absolutely! A boxed mix works great—just bake it as directed and add the spiderweb topping to make them look homemade and festive.
How do I keep the white chocolate from clumping?
Melt it slowly in the microwave in short bursts (20 seconds at a time) and stir well after each. Adding a touch of coconut oil also keeps it silky smooth.
Can I make these ahead of time?
Yes! Bake and decorate the brownies a day in advance. Store them covered at room temperature and they’ll be ready to serve the next day.
What’s the best way to cut clean brownie squares?
Let the brownies cool completely, then use a sharp knife dipped in hot water and wiped dry between slices. This keeps the web design neat.
Can I make these gluten-free or dairy-free?
Yes—just use a gluten-free 1:1 baking blend and swap the butter for coconut oil or a dairy-free butter substitute. They’ll still taste delicious!
Do I need a piping bag for the spiderweb?
Not at all! A small zip-top bag with the corner snipped off works perfectly for drizzling the white chocolate.
Did you try these spiderweb brownies? I’d love to hear how they turned out for you! Share your spooky creations in the comments below—I can’t wait to see how you made your Halloween brownies come to life.
Spiderweb Brownies
Equipment
- 9×13-inch Baking Pan
- Mixing Bowls
- Whisk & spatula
- Toothpick or Skewer
- Microwave-safe bowl or double boiler
- Sharp Knife
Ingredients
For the Brownies:
- 1 cup 2 sticks unsalted butter, melted
- 2 cups granulated sugar
- 4 large eggs
- 1 teaspoon vanilla extract
- 1 cup all-purpose flour
- 1 cup unsweetened cocoa powder
- ½ teaspoon baking powder
- ½ teaspoon salt
For the Spiderweb Topping:
- ½ cup white chocolate chips or white candy melts
- 1 teaspoon coconut oil optional, for smoother melting
Instructions
Step 1: Prep Your Pan and Oven
- Preheat your oven to 350°F (175°C).
- Lightly grease a 9×13-inch baking pan or line it with parchment paper (leave some overhang for easy lifting later).
- Set aside while you make the batter.
- Pro Tip: Lining with parchment makes removing and slicing the brownies a breeze—no sticking, no crumbling edges.
Step 2: Mix the Wet Ingredients
- In a large mixing bowl, whisk together the melted butter and sugar until combined and glossy.
- Add in the eggs one at a time, whisking well after each addition.
- Stir in the vanilla extract until smooth.
- Pro Tip: Whisk continuously to help dissolve the sugar—it gives you that shiny, crackly top on the brownies.
Step 3: Combine the Dry Ingredients
- In a separate bowl, sift together the flour, cocoa powder, baking powder, and salt.
- Slowly add the dry mixture into the wet mixture.
- Switch to a spatula and gently fold until just combined—no flour streaks should remain.
- Pro Tip: Don’t overmix at this stage. Overmixing can make brownies dense instead of fudgy.
Step 4: Bake the Brownies
- Pour the batter evenly into your prepared pan.
- Smooth out the top with a spatula so it bakes evenly.
- Bake for 28–32 minutes, or until a toothpick inserted in the center comes out with a few moist crumbs (not wet batter).
- Pro Tip: Every oven runs differently—start checking at 28 minutes to avoid overbaking.
Step 5: Make the Spiderweb Topping
- In a microwave-safe bowl, melt the white chocolate chips with the coconut oil in 20-second intervals, stirring after each until smooth.
- Transfer the melted chocolate into a piping bag (or a small zip-top bag with the corner snipped off).
- Pro Tip: If the chocolate feels too thick, stir in a tiny extra splash of coconut oil to loosen it up.
Step 6: Create the Spiderweb Design
- While the brownies are still slightly warm (but not hot), drizzle the melted white chocolate in concentric circles on top of the brownies.
- Take a toothpick or skewer and drag lines outward from the center to the edges, creating a web effect.
- Let the brownies cool completely so the chocolate sets before slicing.
- Pro Tip: Wipe your toothpick clean between each drag for sharper, more defined web lines.
Notes
Nutritional Value (per serving, approximate):
- Calories: 280–320 kcal
- Fat: 15–18 g
- Saturated fat: 9–11 g
- Carbohydrates: 38–42 g
- Sugar: 28–32 g
- Protein: 3–4 g
- Fiber: 2–3 g
- Sodium: 120–150 mg