Rice Cake Recipe

A Delicious and Easy Rice Cake Recipe
Rice cakes are a simple yet satisfying dish that can be enjoyed in many ways. Whether you like them crispy and golden or soft and chewy, they make a great snack or a light meal. This recipe is perfect for anyone looking for a quick, budget-friendly dish that requires just a few basic ingredients.
I love this recipe because it’s easy to prepare and perfect for using up leftover rice. Instead of letting extra rice go to waste, you can turn it into something delicious and crispy. Whether you need a quick snack for the kids or a simple dish for a busy weekday, these rice cakes always come in handy.
One of the best things about rice cakes is their versatility. You can make them sweet or savory, add different flavors, and even turn them into a fancy dish with just a few toppings.
They’re great for breakfast, lunch, or even as a side dish for dinner. Plus, they’re naturally gluten-free, making them a great option for those with dietary restrictions.
About Rice Cakes
Rice cakes are a popular dish in many cultures, from Korean tteok to crispy rice cakes found in various Asian cuisines. They can be made with just cooked rice and a few seasonings, then pan-fried until golden and crispy or steamed for a softer texture.
Unlike store-bought puffed rice cakes, which are light and airy, homemade rice cakes have a heartier texture and a more satisfying bite.
This recipe is different from other rice-based dishes because it transforms simple, leftover rice into a crispy, flavorful snack or meal. Unlike rice pancakes, which use flour and eggs for binding, these rice cakes hold together with just a little moisture and pressure, making them naturally gluten-free and easy to prepare.
Why You’ll Love It
- Quick and Easy – This recipe takes just a few minutes to prepare, making it perfect for busy days when you need something fast and delicious.
- Great Way to Use Leftover Rice – Instead of wasting extra rice, turn it into crispy rice cakes that taste even better the next day!
- Customizable Flavors – You can make them sweet or savory by adding different seasonings, cheeses, or even a drizzle of honey.
- Kid-Friendly – These rice cakes are crunchy on the outside and soft on the inside, making them a hit with kids who love fun and tasty finger foods.
- Budget-Friendly – Made with simple ingredients you already have at home, this dish is an affordable way to enjoy something delicious without spending extra money.
Ingredients
-
For the Rice Cakes:
- 2 cups cooked rice (white or brown)
- 2 tbsp cornstarch or flour (for binding)
- 1 egg (optional, for extra hold)
- ½ tsp salt
- ¼ tsp black pepper
- ½ tsp garlic powder (optional)
-
For Cooking:
- 2 tbsp oil (vegetable, olive, or sesame)
-
Optional Toppings & Add-ins:
- ¼ cup shredded cheese (for a melty, crispy texture)
- 1 tbsp soy sauce (for extra umami)
- 1 tsp sesame seeds (for a nutty crunch)
- 1 green onion, finely chopped (for a fresh kick)
Ingredient Notes
- Use leftover rice! – Day-old rice works best because it’s drier and holds together better. Fresh rice can be too soft and sticky.
- Cornstarch vs. Flour – Cornstarch gives a crispier texture, while flour makes it a little softer. Both work well!
- Egg or No Egg? – If your rice sticks together well, you can skip the egg. But if you want extra binding power, add it in!
- Oil Choice Matters – Sesame oil gives a rich, nutty flavor, while olive oil or vegetable oil keeps it neutral. Pick what suits your taste!
- Make it your own! – Add cheese, green onions, or even a little spice like chili flakes for extra flavor.
Kitchen Tools Needed
- Mixing Bowl – To combine the rice and seasonings easily.
- Fork or Spoon – For mixing and mashing the rice together.
- Measuring Cups & Spoons – To ensure the right balance of ingredients.
- Non-stick Skillet or Pan – Helps prevent sticking and gives the rice cakes a crispy golden crust. A cast-iron pan also works great!
- Spatula – For flipping the rice cakes without breaking them. A thin, flexible spatula works best.
- Cookie Cutter or Ring Mold (Optional) – Helps shape uniform rice cakes for a neat presentation. A lid or cup can also work!
I love using a cast-iron skillet for an extra crispy crust! If you want perfectly round rice cakes, a silicone egg ring makes shaping super easy.
Instructions
Step 1: Prepare the Rice Mixture (5 minutes)
- In a large mixing bowl, add the cooked rice, cornstarch (or flour), salt, pepper, and garlic powder.
- If using an egg, crack it into the bowl and mix everything well until the rice sticks together. You can use a spoon, but I like using my hands to gently mash the rice—it helps everything bind better!
- If the mixture feels too dry, add a teaspoon of water at a time until it holds together when pressed.
Pro Tip: Day-old rice can be a bit firm, so if needed, sprinkle it with a little water and microwave it for 20 seconds to soften slightly before mixing.
Step 2: Shape the Rice Cakes (5 minutes)
- Take about ¼ cup of the rice mixture and roll it into a ball.
- Flatten it gently with your hands to form a ½-inch thick patty. If you want uniform shapes, use a cookie cutter or press it into a ring mold.
- Repeat with the remaining mixture until all your rice cakes are ready.
Pro Tip: Lightly oil your hands if the rice is sticking too much while shaping.
Step 3: Cook the Rice Cakes (8-10 minutes)
- Heat 2 tablespoons of oil in a non-stick or cast-iron skillet over medium heat.
- Once the oil is hot, carefully place the rice cakes in the pan, making sure not to overcrowd them.
- Let them cook for 3-4 minutes per side or until golden brown and crispy. Flip them gently using a spatula.
Be patient! Don’t move them too early—this helps develop a crispy crust.
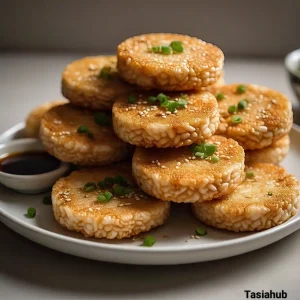
Step 4: Serve and Enjoy!
- Transfer the rice cakes to a plate lined with paper towels to remove excess oil.
- Enjoy them plain, or serve with soy sauce, spicy mayo, or a drizzle of honey for extra flavor!
These rice cakes are best enjoyed fresh, but you can also reheat them in a toaster oven or air fryer for a quick snack later!
Tips and Tricks for Success
- Use Cold Rice for the Best Texture – Freshly cooked rice can be too soft and sticky, making it harder to shape. Day-old rice is firmer and holds together better! If your rice is too dry, add a tiny bit of water before mixing.
- Don’t Skip the Binding Agent – If your rice cakes keep falling apart, try adding an extra teaspoon of cornstarch or an egg. This helps everything stick together nicely.
- Cook Over Medium Heat – Too high, and they’ll burn before getting crispy. Too low, and they’ll turn out soft instead of golden brown. Medium heat is the sweet spot!
- Shape Them Evenly – Keep them about ½-inch thick so they cook evenly. If they’re too thin, they might get too crispy; too thick, and they may not cook through.
- Add Toppings for Extra Flavor – Sprinkle sesame seeds on top before flipping for a nutty crunch, or melt some cheese on top for a gooey upgrade!
Ingredient Substitutions and Variations
Substitutions:
- Cornstarch → Flour – If you don’t have cornstarch, all-purpose flour works just as well.
- Egg → Mashed Potato or Cheese – If you’re avoiding eggs, mashed potato or shredded cheese can help hold the rice cakes together.
- Vegetable Oil → Butter or Sesame Oil – Butter adds richness, while sesame oil gives an amazing nutty flavor!
Variations:
- Cheesy Rice Cakes – Mix in ¼ cup of shredded cheese for extra flavor and melty goodness.
- Spicy Version – Add ½ tsp of chili flakes or a drizzle of sriracha for a little heat.
- Sweet Rice Cakes – Swap out the salt and pepper for 1 tbsp of sugar and a dash of cinnamon, then serve with honey or maple syrup.
- Savory Asian-Style – Add 1 tbsp soy sauce to the mix and top with chopped green onions and sesame seeds!
Get creative and make them your own!
Serving Suggestions
- Dipped in Sauce – These rice cakes taste amazing with soy sauce, spicy mayo, or a drizzle of honey for a sweet-savory contrast. I love dipping them in a mix of soy sauce and sesame oil for an umami kick!
- As a Side Dish – Serve them alongside grilled chicken, stir-fried veggies, or a fresh salad for a complete meal.
- Topped with an Egg – Add a fried or poached egg on top for a delicious and filling breakfast. The runny yolk makes it extra rich and satisfying!
- With a Soup or Stew – Pair these crispy rice cakes with a warm bowl of miso soup, chicken broth, or a hearty stew for a cozy meal.
- Sweet Version for Dessert – Sprinkle cinnamon and sugar on top, then drizzle with maple syrup or chocolate sauce for a fun twist!
Storage and Reheating Instructions
Storage:
- Let the rice cakes cool completely before storing them in an airtight container.
- They stay fresh in the refrigerator for up to 3 days.
- For longer storage, freeze them in a single layer on a baking sheet, then transfer to a freezer bag for up to 2 months.
Reheating:
- Stovetop (Best for Crispiness): Heat a small amount of oil in a pan over medium heat and reheat for about 2-3 minutes per side until crispy again.
- Oven or Air Fryer: Bake at 375°F (190°C) for 5-7 minutes, or air fry at 350°F (175°C) for 3-5 minutes. This keeps them crunchy!
- Microwave (Quick but Softer): Heat in 30-second intervals until warm. They won’t be as crispy, but they’ll still taste great.

If reheating in a pan, add a tiny bit of water and cover it for a few seconds before crisping them up—it helps rehydrate the rice without drying it out!
Frequently Asked Questions
Can I use freshly cooked rice?
Yes, but day-old rice works better because it’s drier and holds its shape. If using fresh rice, spread it out on a plate and let it cool for at least 30 minutes before making the rice cakes.
How do I keep my rice cakes from falling apart?
Make sure your rice is sticky enough! If it’s too dry, add a little water or an extra egg. Press the mixture firmly when shaping the cakes to help them hold together.
Can I bake these instead of frying?
Absolutely! Bake at 375°F (190°C) for about 15-20 minutes, flipping halfway through. They won’t be as crispy as pan-fried ones, but they’ll still taste great.
Are these gluten-free?
Yes! As long as you use cornstarch instead of flour, these rice cakes are completely gluten-free. Just double-check any sauces you add to make sure they’re GF too!
What’s the best dipping sauce?
Soy sauce with a splash of sesame oil is a classic choice, but you can also try spicy mayo, sriracha, or even a sweet dip like honey or maple syrup.
Can I freeze rice cakes?
Yes! Freeze them in a single layer first, then store them in a freezer bag. Reheat in a pan, oven, or air fryer for the best texture.
I’d love to hear how this recipe turns out for you! Did you try any fun variations? Let me know in the comments, and don’t forget to share your favorite dipping sauce! Happy cooking!
Don’t forget to share your photos on Instagram and tag me (@tasiahub_) or use the hashtag (#tasiahub). I’d love to see your creations!
Rice Cake Recipe
Equipment
- Mixing Bowl
- Fork or Spoon
- Measuring Cups & Spoons
- Non-stick Skillet or Pan
- Spatula
- Cookie Cutter or Ring Mold (Optional)
Ingredients
For the Rice Cakes:
- 2 cups cooked rice white or brown
- 2 tbsp cornstarch or flour for binding
- 1 egg optional, for extra hold
- ½ tsp salt
- ¼ tsp black pepper
- ½ tsp garlic powder optional
For Cooking:
- 2 tbsp oil vegetable, olive, or sesame
Optional Toppings & Add-ins:
- ¼ cup shredded cheese for a melty, crispy texture
- 1 tbsp soy sauce for extra umami
- 1 tsp sesame seeds for a nutty crunch
- 1 green onion finely chopped (for a fresh kick)
Instructions
Step 1: Prepare the Rice Mixture (5 minutes)
- In a large mixing bowl, add the cooked rice, cornstarch (or flour), salt, pepper, and garlic powder.
- If using an egg, crack it into the bowl and mix everything well until the rice sticks together. You can use a spoon, but I like using my hands to gently mash the rice—it helps everything bind better!
- If the mixture feels too dry, add a teaspoon of water at a time until it holds together when pressed.
- Pro Tip: Day-old rice can be a bit firm, so if needed, sprinkle it with a little water and microwave it for 20 seconds to soften slightly before mixing.
Step 2: Shape the Rice Cakes (5 minutes)
- Take about ¼ cup of the rice mixture and roll it into a ball.
- Flatten it gently with your hands to form a ½-inch thick patty. If you want uniform shapes, use a cookie cutter or press it into a ring mold.
- Repeat with the remaining mixture until all your rice cakes are ready.
- Pro Tip: Lightly oil your hands if the rice is sticking too much while shaping.
Step 3: Cook the Rice Cakes (8-10 minutes)
- Heat 2 tablespoons of oil in a non-stick or cast-iron skillet over medium heat.
- Once the oil is hot, carefully place the rice cakes in the pan, making sure not to overcrowd them.
- Let them cook for 3-4 minutes per side or until golden brown and crispy. Flip them gently using a spatula.
- Be patient! Don’t move them too early—this helps develop a crispy crust.
Step 4: Serve and Enjoy!
- Transfer the rice cakes to a plate lined with paper towels to remove excess oil.
- Enjoy them plain, or serve with soy sauce, spicy mayo, or a drizzle of honey for extra flavor!
Notes
Nutritional Value (Per Serving)
- Calories: ~220 kcal
- Carbohydrates: ~38g
- Protein: ~5g
- Fat: ~6g
- Fiber: ~1g
- Sodium: ~350mg
The nutritional information on this website is only an estimate and is provided for convenience and as a courtesy only. The accuracy of the nutritional information for any recipe on this site is not guaranteed. It should not be used as a substitute for a professional nutritionist’s advice.