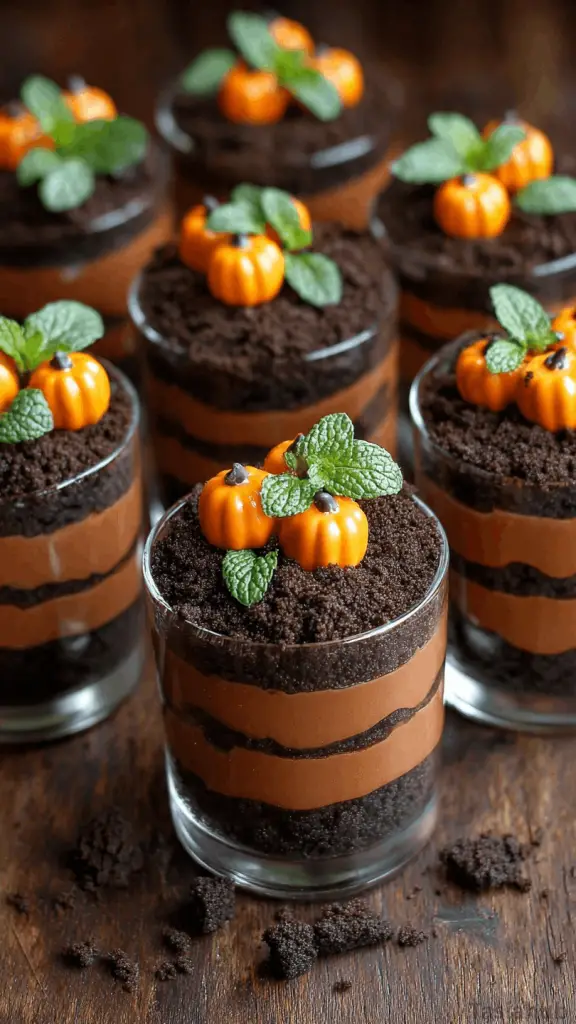
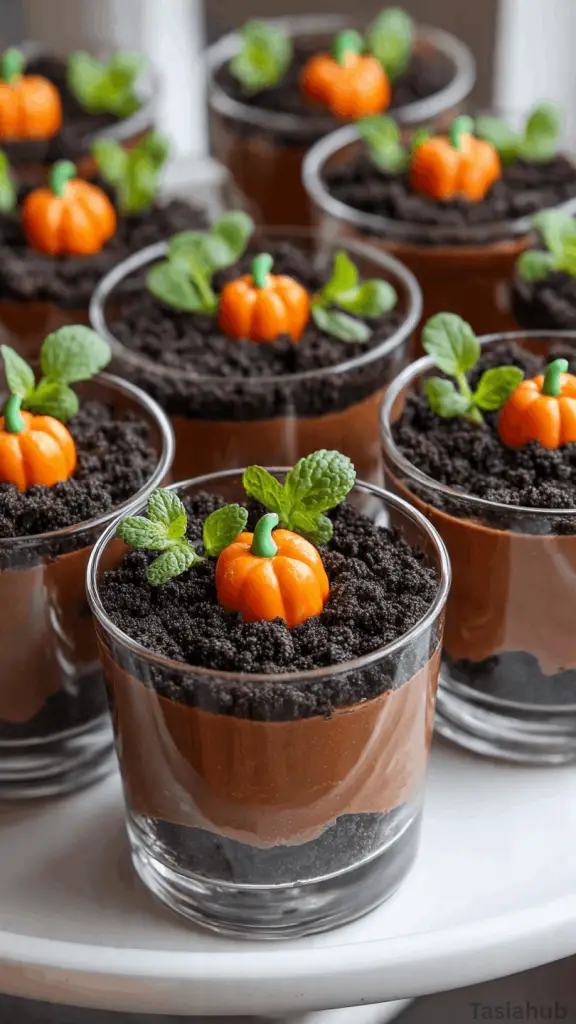
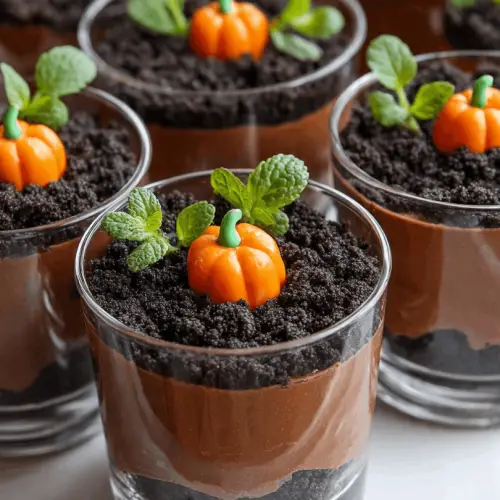
Pumpkin Patch Dirt Cups

Halloween is the perfect excuse to have fun in the kitchen, and pumpkin patch dirt cups are one of those treats that feel both playful and delicious. Imagine layers of chocolate pudding, crushed cookies, and a touch of gummy pumpkins peeking out of “soil” — it’s the kind of dessert that makes kids light up and adults sneak seconds.
What I love about this dirt cups recipe is how approachable it is. You don’t need to spend hours in the kitchen or stress over complicated steps. A few simple ingredients and a little creativity turn into a dessert that looks like it took far more effort than it really did. It’s one of those rare Halloween desserts that is just as easy as it is impressive.
Pumpkin patch dirt cups are also versatile. You can make individual cups for a party, or prepare one large dish if you’re serving a crowd. They’re the kind of fun Halloween food that doubles as decoration — bright little pumpkins in “dirt” look festive on any table. Plus, cleanup is a breeze since everything is served in cups.
For me, these treats are a go-to every October. They’re easy Halloween food with maximum effect — rich chocolate flavor, creamy pudding, crunchy cookie topping, and that whimsical pumpkin patch look that just screams Halloween fun. Whether you’re planning a classroom party, a neighborhood get-together, or just want to surprise your family with something festive, pumpkin patch dirt cups are always a hit.
Why You’ll Love It
- No baking required – All you need is pudding, cookies, and candy. The hardest part is resisting the urge to snack while layering everything together.
- Kid-friendly and fun – Kids can help crush the cookies, layer the pudding, and decorate with pumpkins. It’s basically dessert and an activity rolled into one.
- Perfect party presentation – The little pumpkin patch scene instantly makes your dessert table look festive without any fancy decorating skills.
- Customizable to your taste – Swap chocolate pudding for vanilla or even add a layer of whipped cream for extra richness. You can even use gluten-free cookies if needed.
- Make-ahead friendly – Assemble them a few hours before your party and keep chilled. They’re still fresh, creamy, and ready to wow your guests.
Ingredient List
- 1 (3.9 oz) box instant chocolate pudding mix
- 2 cups cold milk
- 1 (8 oz) container whipped topping, thawed
- 1 package chocolate sandwich cookies (about 15–18 cookies)
- Gummy pumpkin candies (or candy corn pumpkins)
- Fresh mint sprigs (optional, for “pumpkin patch vines”)
Ingredient Notes
- Instant chocolate pudding – I always go for the classic Jell-O brand because it sets up perfectly creamy. Make sure it’s the instant kind, not cook-and-serve, or you’ll be waiting a lot longer.
- Whipped topping – Cool Whip or any store brand works great here. It adds that fluffy, mousse-like texture when folded into the pudding.
- Chocolate sandwich cookies – Oreo cookies are the go-to, but honestly, any brand will do. Just crush them until they look like “dirt.” (Kids love helping with this part.)
- Gummy pumpkins – Don’t skip these! They’re the star of the pumpkin patch look. I like the Brach’s candy corn pumpkins since they’re soft, colorful, and easy to find during Halloween season.
- Mint sprigs – Totally optional, but they add that extra garden vibe. Plus, a little greenery makes the orange pumpkins really pop.
Kitchen Equipment Needed
- Mixing bowls – For whisking the pudding and folding in whipped topping. I love using a clear glass bowl so I can see everything mixing evenly.
- Whisk – Makes the pudding come together smooth and lump-free.
- Plastic bags or food processor – For crushing the cookies into “dirt.” (I usually let the kids go wild with a rolling pin over a zip-top bag.)
- Measuring cups – To get the milk and whipped topping just right.
- Serving cups or jars – Clear plastic cups work great for parties, but I like using small glass jars when I want them to look extra cute.
- Spoon or spatula – For layering pudding and crushed cookies without making a mess.
Instructions
Step 1 — Make the pudding mixture
- Pour the instant chocolate pudding mix into a medium mixing bowl.
- Add the 2 cups of cold milk all at once.
- Whisk briskly for about 1–2 minutes until the mixture thickens and looks glossy.
- Pro tip: Whisk continuously to prevent lumps — a steady, brisk whisk gives you the smoothest pudding.
- Gently fold in the thawed whipped topping with a spatula until the color is even and the texture is light and mousse-like. Don’t overmix; you want it airy.
- Pro tip: Fold with a light hand to keep the mixture fluffy — scoop from the bottom and bring it up over the top, rotating the bowl as you go.
Step 2 — Crush the cookies into “dirt”
- Put the chocolate sandwich cookies into a large zip-top bag and press out the air, or toss them into a food processor.
- Crush until most pieces are fine crumbs but leave a few slightly larger bits for texture (that little crunch makes these dirt cups feel extra homemade).
- Pro tip: If you’re using a rolling pin, wrap the cookies in a kitchen towel first — less mess and fewer broken crumbs all over your counter.
- Transfer about ¾ of the crumbs into a shallow bowl for layering; reserve the rest for final topping and texture.
Step 3 — Layer the cups (the fun part)
- Place your serving cups or jars on a tray so they’re easy to move.
- Spoon about 2–3 tablespoons of pudding into each cup to form the first layer (roughly one-third of the cup). Smooth lightly with the back of the spoon.
- Add a layer of cookie “dirt” — about 1–2 tablespoons — and gently press so it sits evenly.
- Repeat: add another 2–3 tablespoons pudding, then another 1–2 tablespoons cookie crumbs. Aim for two pudding layers and two dirt layers for that classic look.
- Pro tip: For neat layers, pipe the pudding into the cup using a large zip-top bag with the corner snipped off — it gives clean edges without needing special tools.
- Leave a little space (about ½ inch) at the top for decoration.
Step 4 — Decorate the pumpkin patch
- Spoon a final sprinkling of cookie crumbs over the top so it looks like rich soil.
- Gently press gummy pumpkin candies into the crumbs in small clusters to mimic a pumpkin patch. Vary the placement so each cup looks a little different.
- Tuck tiny mint sprigs or small fresh herb leaves beside the pumpkins to mimic vines. If you don’t have fresh mint, you can use small green-tinted icing leaves.
- Add any extra touches — a little mound of crumbs to “plant” a pumpkin, or a tiny drizzle of caramel if you want a glazed effect.
Step 5 — Chill and serve
- Cover the assembled cups with plastic wrap or place them in a covered container.
- Chill in the refrigerator for at least 30 minutes to firm up (I usually aim for 1–2 hours so they’re perfectly set and the flavors mingle).
- Pro tip: Chilling not only firms the dessert but also helps the cookie crumbs soften slightly so every bite has that creamy-soil texture.
- Serve cold. If you’re transporting them to a party, keep them chilled in a cooler until it’s time to plate.
Enjoy — and don’t be surprised if your guests ask for the recipe. This dirt cups recipe is one of those easy Halloween food winners that looks elaborate but practically makes itself.
Tips and Tricks for Success
- Chill before serving – Even a quick 30-minute chill helps the pudding set and the cookie crumbs soften just enough for that perfect dirt texture.
- Crush cookies evenly – Mix fine crumbs with a few chunky bits for a more realistic “soil” look.
- Assemble close to serving time for best look – The pumpkins and mint stay vibrant if you decorate within a few hours of eating.
- Use clear cups or jars – Seeing the layers makes these dirt cups extra fun and festive.
- Batch-friendly hack – Make one big “pumpkin patch” in a trifle bowl if you’re short on time or serving a crowd.
Ingredient Substitutions and Variations
- Pudding flavor swap – Try vanilla, pumpkin spice, or butterscotch pudding for a different twist.
- Cookies – Use chocolate graham crackers, gluten-free cookies, or even brownie crumbs as the “dirt.”
- Whipped topping alternative – Freshly whipped cream works beautifully if you want a less sweet option.
- Candy toppings – Candy corn, gummy worms, or Reese’s Pieces can replace pumpkins for variety (kids especially love gummy worms wriggling out of the dirt).
- Healthier version – Use sugar-free pudding mix, light whipped topping, and reduced-sugar cookies without losing the fun.
- Themed variations – Swap pumpkins for pastel candies in spring to make “flower patch” dirt cups or red/green candies in December for a “holiday garden.”
Serving Suggestions
- Party-ready cups – Serve these pumpkin patch dirt cups at Halloween parties in clear plastic cups so guests can admire the layers before digging in.
- Family movie night – I love serving them while we watch a spooky movie marathon — it feels festive without being too fussy.
- Classroom treats – Make mini versions in 4 oz cups for kids’ school parties; they’re the perfect size for little hands.
- Dessert table centerpiece – Arrange them on a tray with candy corn, popcorn, and other Halloween desserts for a colorful, edible display.
- Personal indulgence – Honestly, I sometimes make just one for myself in a mason jar — it’s my little Halloween pick-me-up with a cup of coffee.
Storage and Reheating Instructions
- Refrigeration – Store assembled dirt cups in the fridge, covered with plastic wrap or lids, for up to 2–3 days.
- Keep toppings fresh – If making ahead, wait to add pumpkins and mint until the day of serving so they stay bright and firm.
- Freezing – Not recommended, as pudding and whipped topping don’t thaw well.
- Reheating – No reheating needed (this is a chilled dessert!). Just pull them from the fridge when ready to serve.
Frequently Asked Questions
Can I make pumpkin patch dirt cups ahead of time?
Yes! You can prepare them a day in advance. Just hold off on adding the gummy pumpkins and mint until a few hours before serving so they look fresh.
How do I crush the cookies without a food processor?
Super easy — place the cookies in a zip-top bag, seal it tight, and crush them with a rolling pin or even the bottom of a pan. It’s a fun job for kids too!
Can I use homemade pudding instead of instant?
Definitely! Homemade pudding works beautifully, just make sure it’s cooled and thickened before layering so it doesn’t get too runny.
Are dirt cups gluten-free?
Not by default, since sandwich cookies usually contain gluten. But you can easily make them gluten-free by swapping in gluten-free cookies.
Can I use different candies instead of pumpkins?
Of course! Gummy worms are the classic dirt cup topping, but candy corn, chocolate rocks, or even Reese’s Pieces give it a festive twist.
How long will they last in the fridge?
They’re best enjoyed within 2–3 days. After that, the cookies can get too soft and the candy may lose its texture.
Did you try this pumpkin patch dirt cups recipe? Let me know in the comments how it turned out — I’d love to hear if you made them for a party, a school event, or just a fun family treat!
Pumpkin Patch Dirt Cups
Equipment
- Mixing Bowls
- Whisk
- Plastic bags or food processor
- Measuring cups
- Serving cups or jars
- Spoon or spatula
Ingredients
- 1 3.9 oz box instant chocolate pudding mix
- 2 cups cold milk
- 1 8 oz container whipped topping, thawed
- 1 package chocolate sandwich cookies about 15–18 cookies
- Gummy pumpkin candies or candy corn pumpkins
- Fresh mint sprigs optional, for “pumpkin patch vines”
Instructions
Step 1 — Make the pudding mixture
- Pour the instant chocolate pudding mix into a medium mixing bowl.
- Add the 2 cups of cold milk all at once.
- Whisk briskly for about 1–2 minutes until the mixture thickens and looks glossy.
- Pro tip: Whisk continuously to prevent lumps — a steady, brisk whisk gives you the smoothest pudding.
- Gently fold in the thawed whipped topping with a spatula until the color is even and the texture is light and mousse-like. Don’t overmix; you want it airy.
- Pro tip: Fold with a light hand to keep the mixture fluffy — scoop from the bottom and bring it up over the top, rotating the bowl as you go.
Step 2 — Crush the cookies into “dirt”
- Put the chocolate sandwich cookies into a large zip-top bag and press out the air, or toss them into a food processor.
- Crush until most pieces are fine crumbs but leave a few slightly larger bits for texture (that little crunch makes these dirt cups feel extra homemade).
- Pro tip: If you’re using a rolling pin, wrap the cookies in a kitchen towel first — less mess and fewer broken crumbs all over your counter.
- Transfer about ¾ of the crumbs into a shallow bowl for layering; reserve the rest for final topping and texture.
Step 3 — Layer the cups (the fun part)
- Place your serving cups or jars on a tray so they’re easy to move.
- Spoon about 2–3 tablespoons of pudding into each cup to form the first layer (roughly one-third of the cup). Smooth lightly with the back of the spoon.
- Add a layer of cookie “dirt” — about 1–2 tablespoons — and gently press so it sits evenly.
- Repeat: add another 2–3 tablespoons pudding, then another 1–2 tablespoons cookie crumbs. Aim for two pudding layers and two dirt layers for that classic look.
- Pro tip: For neat layers, pipe the pudding into the cup using a large zip-top bag with the corner snipped off — it gives clean edges without needing special tools.
- Leave a little space (about ½ inch) at the top for decoration.
Step 4 — Decorate the pumpkin patch
- Spoon a final sprinkling of cookie crumbs over the top so it looks like rich soil.
- Gently press gummy pumpkin candies into the crumbs in small clusters to mimic a pumpkin patch. Vary the placement so each cup looks a little different.
- Tuck tiny mint sprigs or small fresh herb leaves beside the pumpkins to mimic vines. If you don’t have fresh mint, you can use small green-tinted icing leaves.
- Add any extra touches — a little mound of crumbs to “plant” a pumpkin, or a tiny drizzle of caramel if you want a glazed effect.
Step 5 — Chill and serve
- Cover the assembled cups with plastic wrap or place them in a covered container.
- Chill in the refrigerator for at least 30 minutes to firm up (I usually aim for 1–2 hours so they’re perfectly set and the flavors mingle).
- Pro tip: Chilling not only firms the dessert but also helps the cookie crumbs soften slightly so every bite has that creamy-soil texture.
- Serve cold. If you’re transporting them to a party, keep them chilled in a cooler until it’s time to plate.
Notes
Nutritional Value (per serving, approximate):
- Calories: 250–300
- Fat: 12–15g
- Saturated Fat: 7–9g
- Carbohydrates: 35–40g
- Sugar: 25–30g
- Protein: 3–4g
- Fiber: 1–2g
I want to try this recipe
Not sure about #5 step- do you fold cool whip into pudding?
How do you get layer of white in the second layer?