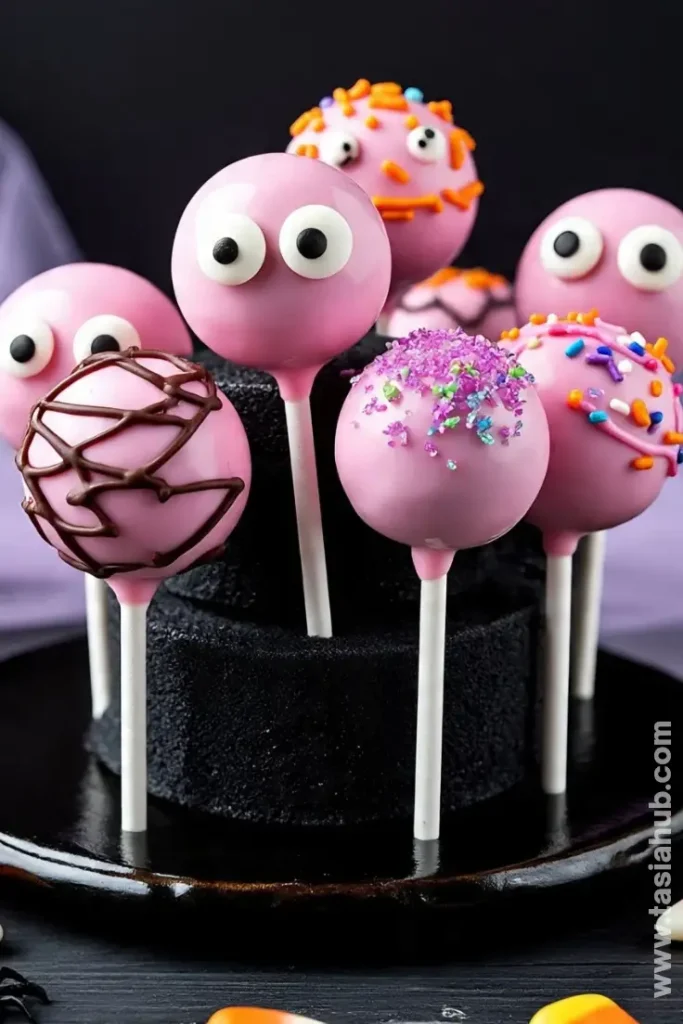
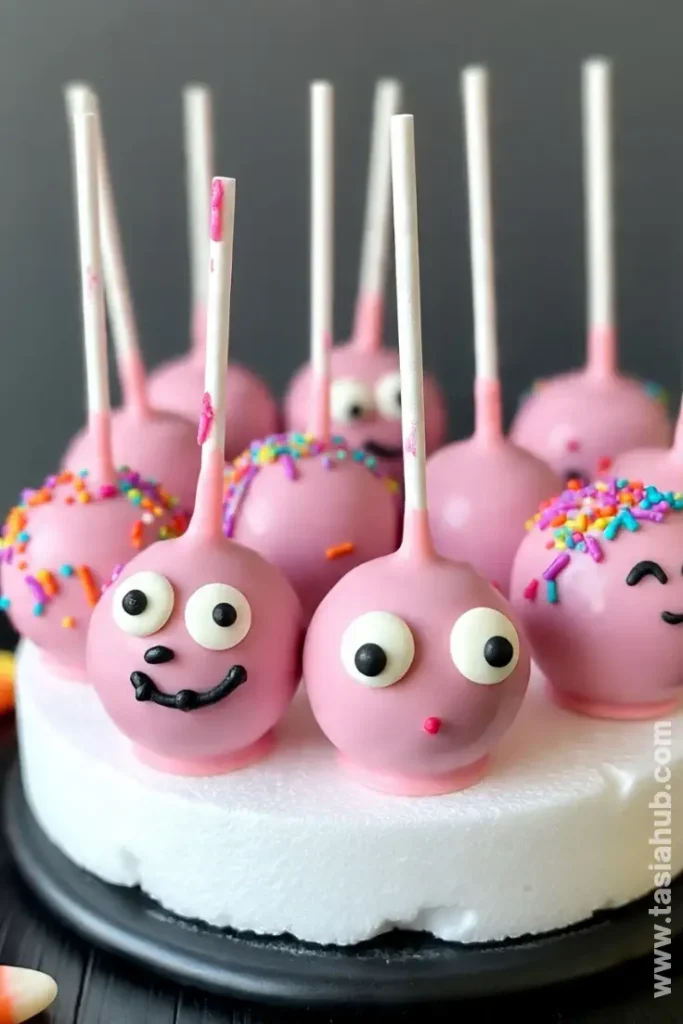
Pink Halloween Cake Pops
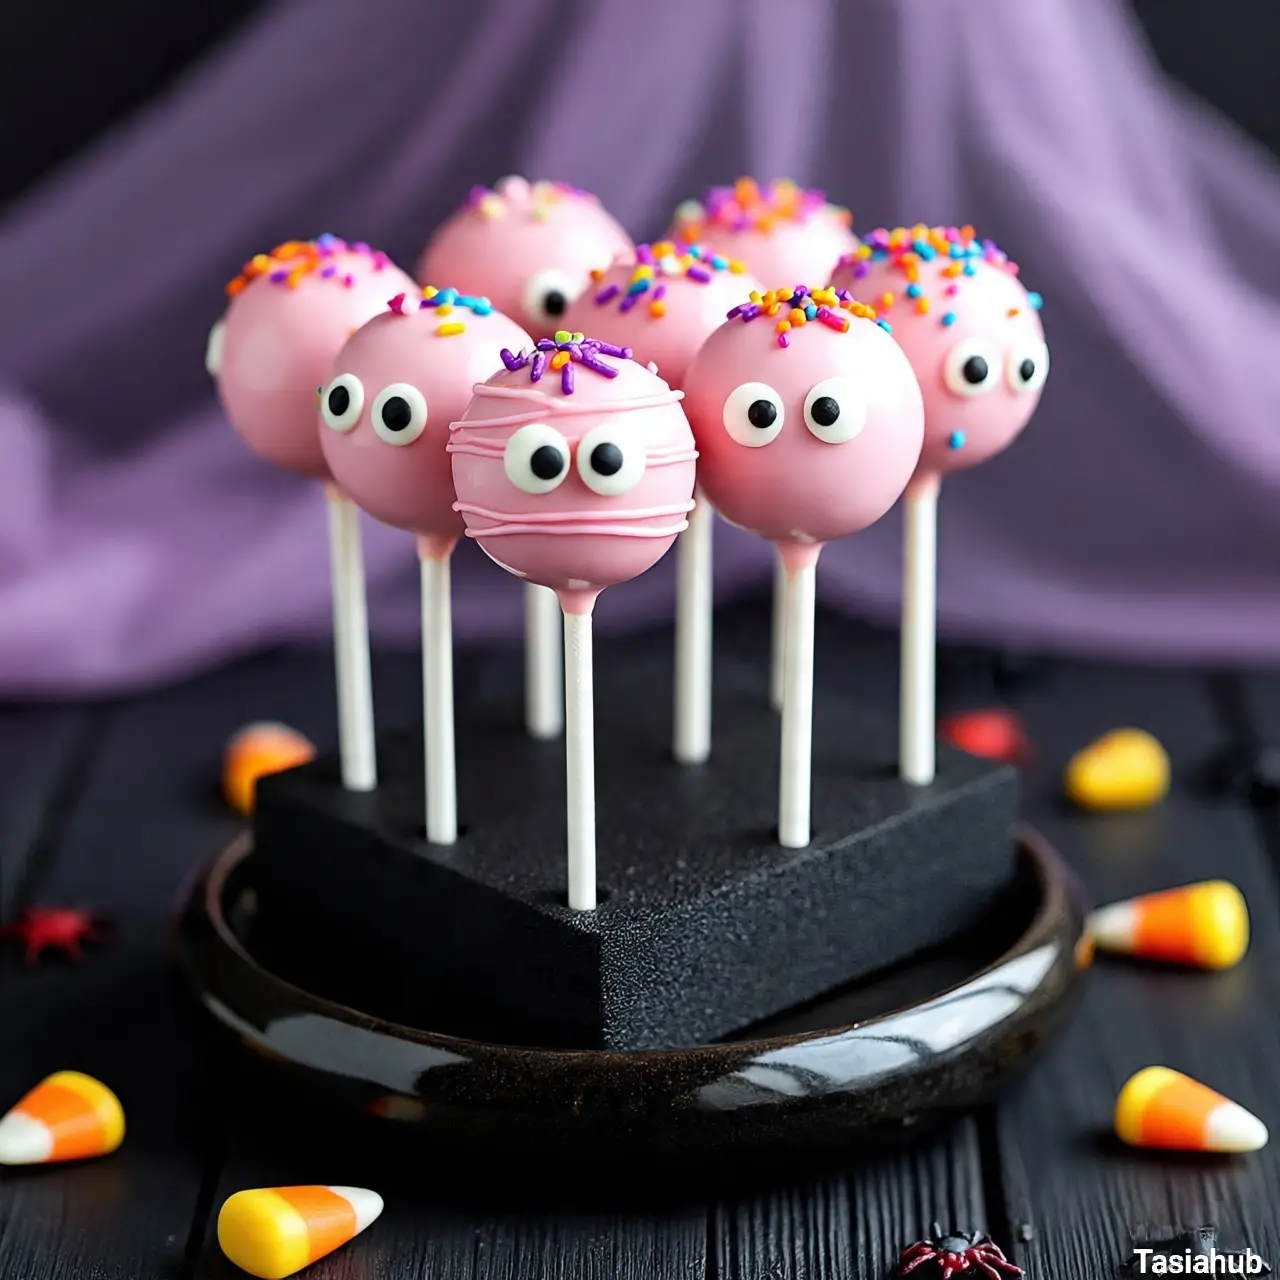
Halloween doesn’t always have to be dark, eerie, or drenched in black and orange. This year, I wanted to shake things up a bit and bring a pop of color to the spooky season—literally! Enter these pink Halloween cake pops: sweet, playful, and just a little mischievous. They’re perfect if you’re hosting a Halloween party, a Halloween baby shower, or just want to delight the kids (and adults) with something unexpected among the usual spooky treats.
I love how versatile these little treats are. You can make them adorable, scary, or somewhere delightfully in between. One minute, they can be covered in soft pastel pink with candy eyes peeking out, and the next, they can have fun “spooky” details with sprinkles, edible glitter, or tiny chocolate webs. Halloween cake pops ideas like this are perfect for anyone who wants a sweet treat that’s both festive and visually stunning.
These cake pops aren’t just about looks—they’re about flavor too. The cake inside is moist and rich, and the coating adds just the right amount of sweetness and crunch. You can customize the flavors however you like, from classic vanilla or chocolate to strawberry or funfetti. And because they’re bite-sized, they’re super easy to serve and even easier to enjoy.
I first made these for a friend’s Halloween baby shower cake pops, and they were an instant hit. Guests couldn’t stop snapping pictures before taking a bite! Honestly, these little guys are more than just dessert—they’re conversation starters, mood lifters, and, yes, a little mischievous in their own way. They bring a fresh twist to the Halloween table, proving that spooky treats don’t always have to be dark and scary—they can be pink, pretty, and oh-so-fun.
Why You’ll Love It
- Eye-catching and unique: Unlike the usual orange and black Halloween desserts, these pink Halloween cake pops stand out on any dessert table. They’re perfect for surprising guests and adding a playful twist to your spooky spread.
- Customizable fun: You can get creative with decorations—add candy eyes, edible glitter, sprinkles, or even tiny chocolate bats. Each cake pop can be its own little work of art, making them ideal for Halloween cake pops ideas that are truly one-of-a-kind.
- Perfect for any event: From Halloween baby shower cake pops to a kids’ party or adult gathering, these treats fit any celebration. Their bright and cheerful look makes them kid-friendly while still appealing to adults.
- Bite-sized bliss: Each pop is perfectly portioned, so guests can grab one (or two!) without feeling overwhelmed. They’re great for mingling, party favors, or even a festive afternoon treat at home.
- Deliciously indulgent: Moist cake, sweet coating, and fun decorations combine to make a treat that’s as tasty as it is adorable. Every bite is a little moment of happiness disguised as a spooky treat.
Ingredient List
For the Cake Pops
- 2 cups vanilla cake crumbs (about 1 baked 8-inch cake)
- 1/2 cup cream cheese frosting
- 1 tsp vanilla extract
For the Coating
- 12 oz white chocolate melts (or candy melts)
- Pink gel food coloring (optional, for extra vibrant pops)
- 2 tsp coconut oil (to thin chocolate if needed)
For Decoration
- Candy eyes
- Halloween-themed sprinkles
- Edible glitter or colored sugar
Ingredient Notes
- I always use full-fat cream cheese frosting—it makes the cake pops super moist and easy to shape.
- Don’t skip the vanilla extract! It really enhances the sweetness and pairs perfectly with the pink coating.
- White chocolate melts work best because they harden nicely and give a smooth, glossy finish—trust me, the candy melts just don’t shine like these.
- If you want your pink color to really pop, use gel food coloring instead of liquid—it keeps your coating smooth and shiny.
- Candy eyes and sprinkles are optional but add so much fun and personality! I love mixing spooky and cute for a playful vibe.
Kitchen Equipment Needed
- Mixing bowls – For combining cake crumbs and frosting. I love using glass bowls so I can see everything coming together.
- Spatula or spoon – For folding ingredients without making a mess; a silicone spatula works best.
- Baking sheet – To place the cake pops while chilling; I always line it with parchment paper for easy cleanup.
- Parchment paper – Keeps the pops from sticking while they set.
- Microwave-safe bowl – For melting chocolate; I prefer a glass bowl that’s easy to stir.
- Lollipop sticks – To hold your cake pops; reusable metal sticks work too if you want something eco-friendly.
- Styrofoam block or cake pop stand – To let the pops dry upright; a stand keeps decorations intact.
- Small spoon or piping bag – For drizzling chocolate or adding decorations precisely.
Instructions
Step 1: Prepare the Cake
- Bake an 8-inch vanilla cake according to your favorite recipe or box instructions.
- Let it cool completely on a wire rack—this is key! Warm cake will make shaping messy and melt your frosting.
- Once cooled, crumble the cake into fine crumbs in a large mixing bowl.
Pro Tip: I like using my hands for the last few crumbs—it helps break up any chunks and ensures smooth, uniform cake pops.
Step 2: Mix in the Frosting
- Add 1/2 cup of cream cheese frosting and 1 tsp of vanilla extract to the cake crumbs.
- Stir gently with a spatula until fully combined. The mixture should hold together when pressed but not be too sticky.
Pro Tip: Start with less frosting and add a little more if needed. Too much frosting will make the pops hard to shape.
Step 3: Shape the Cake Pops
- Scoop out a small amount of cake mixture (about 2 tablespoons) and roll it into a ball with your hands.
- Place each ball on a parchment-lined baking sheet.
- Once all balls are shaped, chill in the fridge for 30–40 minutes to firm up.
Pro Tip: Cold cake balls stick to the chocolate coating better and are easier to handle.
Step 4: Prepare the Coating
- Melt 12 oz of white chocolate melts in a microwave-safe bowl. Heat in 30-second intervals, stirring each time until smooth.
- Stir in 2 tsp of coconut oil to thin the chocolate if it feels too thick.
- Add a few drops of pink gel food coloring until you reach your desired shade.
Pro Tip: Stir continuously while melting chocolate to prevent lumps or burning.
Step 5: Dip the Cake Pops
- Dip the tip of a lollipop stick into the melted chocolate, then insert it halfway into a chilled cake ball. This helps the stick stay in place.
- Fully dip each cake pop into the pink chocolate, letting excess drip off.
- Stick the dipped cake pops upright in a styrofoam block or cake pop stand to set.
Pro Tip: Tap the stick lightly against the bowl edge to remove extra chocolate without ruining the coating.
Step 6: Decorate Your Pops
- Before the coating fully hardens, add candy eyes, sprinkles, or edible glitter to each pop.
- For extra fun, use a piping bag or spoon to drizzle contrasting chocolate over the pops.
- Let the pops fully set at room temperature or in the fridge for about 20–30 minutes.
Pro Tip: Decorating while the coating is slightly soft ensures everything sticks perfectly without sliding off.
Tips and Tricks for Success
- Chill the cake balls before dipping—they hold their shape better and prevent chocolate from cracking.
- Use a toothpick or skewer for testing chocolate thickness; it should coat the ball smoothly without dripping too fast.
- Work in small batches when dipping so the chocolate doesn’t harden before you’re done.
- Let your decorations set while the coating is still slightly soft for the best adhesion.
- Keep the cake pops upright while drying to avoid misshapen or lopsided treats.
- Store in an airtight container at room temperature for a day or two, or in the fridge for up to a week.
Ingredient Substitutions and Variations
- Cake flavor swap: Chocolate, red velvet, or funfetti cake works just as well as vanilla.
- Frosting alternatives: Buttercream or even marshmallow fluff can replace cream cheese frosting.
- Coating options: Use dark chocolate, milk chocolate, or even flavored candy melts for variety.
- Color variations: Mix gel food coloring to create different shades—think lavender, mint, or even pastel orange!
- Decorations: Swap candy eyes for edible spiders, mini pumpkins, or colored sprinkles for a different Halloween theme.
- Lollipop sticks: Wooden sticks or reusable metal sticks work if you don’t have standard lollipop sticks.
Serving Suggestions
- I love arranging these pink Halloween cake pops on a tiered stand at a party—it makes the table instantly festive and fun!
- Pair them with a simple glass of milk or hot chocolate for a cozy, kid-friendly treat.
- Serve them alongside other spooky treats like mini cupcakes or Halloween-themed cookies for a colorful dessert spread.
- Use them as party favors—wrap each pop in cellophane and tie with a ribbon for guests to take home.
- For a playful twist at a Halloween baby shower, display them with matching pastel-themed decorations—they’re always a crowd-pleaser!
Storage and Reheating Instructions
- Store in an airtight container at room temperature for up to 2 days.
- For longer storage, keep them in the fridge for up to 1 week.
- Avoid freezing—cake pops can become dry and lose their texture.
- Let chilled pops sit at room temperature for 10–15 minutes before serving for the best flavor and texture.
- Handle gently while removing from storage to prevent decorations from breaking or sliding off.
Frequently Asked Questions
How do I prevent cake pops from falling off the stick?
Dip the tip of the stick in chocolate before inserting it into the cake ball. This “glue” helps keep the cake pop secure while you dip and decorate.
Can I make these cake pops ahead of time?
Yes! You can assemble and chill them a day in advance. Just store in an airtight container in the fridge and decorate right before serving if you want the coating extra fresh.
What if my chocolate coating is too thick?
Stir in a little coconut oil or shortening to thin it out. Heat in short bursts if needed, but whisk continuously to keep it smooth.
Can I use boxed cake instead of homemade?
Absolutely! Boxed cake works perfectly—just crumble it finely and mix with frosting until it holds together. Flavor and ease both win here.
How do I store cake pops for longer periods?
Keep them in an airtight container at room temperature for 2 days or in the fridge for up to a week. Avoid freezing—they can dry out and lose their texture.
Can I make these without lollipop sticks?
Yes, you can serve them as cake truffles on a plate. Just dip, decorate, and enjoy with a spoon or toothpick for easy handling.
Did you try these pink Halloween cake pops? Let me know in the comments how they turned out—I love seeing your creative twists on spooky treats!

Pink Halloween Cake Pops
Equipment
- Mixing Bowls
- Spatula or spoon
- Baking Sheet
- Parchment paper
- Microwave-safe bowl
- Lollipop sticks
- Styrofoam block or cake pop stand
- Small spoon or piping bag
Ingredients
For the Cake Pops
- 2 cups vanilla cake crumbs about 1 baked 8-inch cake
- 1/2 cup cream cheese frosting
- 1 tsp vanilla extract
For the Coating
- 12 oz white chocolate melts or candy melts
- Pink gel food coloring optional, for extra vibrant pops
- 2 tsp coconut oil to thin chocolate if needed
For Decoration
- Candy eyes
- Halloween-themed sprinkles
- Edible glitter or colored sugar
Instructions
Step 1: Prepare the Cake
- Bake an 8-inch vanilla cake according to your favorite recipe or box instructions.
- Let it cool completely on a wire rack—this is key! Warm cake will make shaping messy and melt your frosting.
- Once cooled, crumble the cake into fine crumbs in a large mixing bowl.
- Pro Tip: I like using my hands for the last few crumbs—it helps break up any chunks and ensures smooth, uniform cake pops.
Step 2: Mix in the Frosting
- Add 1/2 cup of cream cheese frosting and 1 tsp of vanilla extract to the cake crumbs.
- Stir gently with a spatula until fully combined. The mixture should hold together when pressed but not be too sticky.
- Pro Tip: Start with less frosting and add a little more if needed. Too much frosting will make the pops hard to shape.
Step 3: Shape the Cake Pops
- Scoop out a small amount of cake mixture (about 2 tablespoons) and roll it into a ball with your hands.
- Place each ball on a parchment-lined baking sheet.
- Once all balls are shaped, chill in the fridge for 30–40 minutes to firm up.
- Pro Tip: Cold cake balls stick to the chocolate coating better and are easier to handle.
Step 4: Prepare the Coating
- Melt 12 oz of white chocolate melts in a microwave-safe bowl. Heat in 30-second intervals, stirring each time until smooth.
- Stir in 2 tsp of coconut oil to thin the chocolate if it feels too thick.
- Add a few drops of pink gel food coloring until you reach your desired shade.
- Pro Tip: Stir continuously while melting chocolate to prevent lumps or burning.
Step 5: Dip the Cake Pops
- Dip the tip of a lollipop stick into the melted chocolate, then insert it halfway into a chilled cake ball. This helps the stick stay in place.
- Fully dip each cake pop into the pink chocolate, letting excess drip off.
- Stick the dipped cake pops upright in a styrofoam block or cake pop stand to set.
- Pro Tip: Tap the stick lightly against the bowl edge to remove extra chocolate without ruining the coating.
Step 6: Decorate Your Pops
- Before the coating fully hardens, add candy eyes, sprinkles, or edible glitter to each pop.
- For extra fun, use a piping bag or spoon to drizzle contrasting chocolate over the pops.
- Let the pops fully set at room temperature or in the fridge for about 20–30 minutes.
- Pro Tip: Decorating while the coating is slightly soft ensures everything sticks perfectly without sliding off.
Notes
Nutritional Value (per cake pop, approx.)
- Calories: 140 kcal
- Carbohydrates: 18 g
- Protein: 1 g
- Fat: 7 g
- Cholesterol: 10 mg
- Sodium: 80 mg
- Fiber: 0.5 g
- Sugar: 13 g