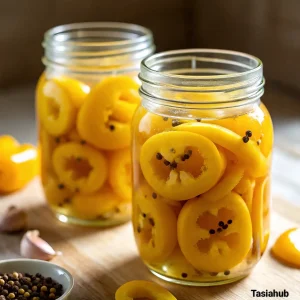
Pickled Banana Peppers

Pickled banana peppers are one of those little kitchen gems that you don’t realize you need until you have them — and then suddenly, you’re putting them on everything. From sandwiches and burgers to pizzas, tacos, salads, and even eggs, they bring a tangy, mildly spicy kick that instantly perks up any dish. They’re like a flavor booster in a jar — and making them at home is way easier (and tastier) than grabbing a store-bought version.
What I love most about pickled banana peppers is how customizable they are. You get to control the tang, the sweetness, and the spice level. Want them a little sweeter? Add more sugar. Like them fiery? Toss in some red pepper flakes or sliced jalapeños. Plus, homemade pickles always feel a bit special — it’s the kind of kitchen project that feels satisfying without being overwhelming.
If you’ve ever grown banana peppers in your garden or picked up a bunch at the market on impulse, this is one of the best ways to preserve them. They hold their crunch beautifully when pickled, and the process doesn’t require any fancy equipment or skills. Just slice, simmer the brine, pour, and refrigerate.
Whether you’re stocking your fridge with some quick-pickled pantry heroes or prepping a jar to gift a fellow food lover, pickled banana peppers deserve a spot in your regular rotation. Let’s talk about how to make them — it’s way easier than you’d think, and once you taste the first crisp, zingy bite, you’ll totally get the hype.
Why You’ll Love It
- Quick and easy to make – No canning required! These refrigerator pickles come together in just about 15 minutes, and they’re ready to eat in a day or two.
- Perfectly tangy with a hint of heat – They hit that sweet spot between zesty and slightly spicy, making them a versatile topping for so many dishes.
- Great way to use up fresh banana peppers – Whether you’re harvesting from the garden or found a great deal at the farmers market, this recipe helps you preserve them for weeks.
- Customizable to your taste – Adjust the sugar, vinegar, or spice to make them just how you like — sweet, garlicky, extra hot, or mild.
- Better than store-bought – Fresher, crunchier, and no unnecessary preservatives — once you try homemade, it’s hard to go back.
Ingredient List
- Banana Peppers – 4–5 cups, sliced into rings
- Garlic Cloves – 3, smashed
- White Vinegar – 1 cup
- Water – 1 cup
- Sugar – 2 tablespoons
- Salt – 1 tablespoon (kosher or pickling salt preferred)
- Mustard Seeds – 1 teaspoon
- Celery Seeds – ½ teaspoon
- Black Peppercorns – ½ teaspoon
- Red Pepper Flakes – ¼ teaspoon (optional, for heat)
Ingredient Notes
- Banana Peppers: Use fresh, firm peppers — yellow or slightly orange is perfect. Avoid soft or wrinkled ones.
- White Vinegar: I prefer distilled white vinegar for a clean, sharp tang, but you can also use apple cider vinegar for a slightly sweeter, deeper flavor.
- Sugar: A touch of sugar balances the acidity. You can add more if you like them sweeter.
- Salt: Don’t use iodized table salt — it can make the brine cloudy and affect flavor. Stick to kosher or pickling salt.
- Mustard & Celery Seeds: These add that classic pickle flavor and subtle spice. Don’t skip them!
- Red Pepper Flakes: Optional, but a great way to add a little kick. Add more if you love heat.
Kitchen Equipment Needed
- Sharp Knife or Mandoline – For slicing the banana peppers into even rings. I love using a mandoline for quick, uniform cuts.
- Cutting Board – A stable surface for prepping your peppers and garlic.
- Small Saucepan – To heat the brine (vinegar, water, sugar, salt, and spices).
- Measuring Cups & Spoons – For accuracy when making the brine.
- Glass Jars with Lids – For storing the pickled peppers. Mason jars or any clean, airtight jars work great. I personally love wide-mouth pint jars for easy filling and scooping later.
- Funnel (optional but helpful) – Makes pouring the hot brine into jars less messy.
Instructions
1. Prep the Peppers and Garlic
- Wash the banana peppers thoroughly and pat them dry.
- Slice them into thin rings, about ¼ inch thick. Discard the stems and shake out the seeds if you prefer a cleaner look.
- Peel and lightly smash the garlic cloves to help release their flavor.
Pro Tip: Wearing gloves while slicing can help if your skin is sensitive to pepper oils — even banana peppers can leave a slight sting after a while.
2. Pack the Jars
- Grab your clean glass jars and divide the sliced peppers evenly between them.
- Drop a smashed garlic clove into each jar.
- If you’re using optional spices (like red pepper flakes), add them now too.
Pro Tip: Pack the peppers in tightly, but don’t press them down — you want room for the brine to flow through.
3. Make the Brine
- In a small saucepan, combine the white vinegar, water, sugar, salt, mustard seeds, celery seeds, and black peppercorns.
- Bring the mixture to a gentle boil over medium heat, stirring occasionally to dissolve the sugar and salt completely.
Pro Tip: Once the mixture starts to bubble around the edges, give it a final stir — the goal is to fully dissolve everything, not reduce the liquid.
4. Pour the Brine Over the Peppers
- Carefully pour the hot brine into each jar, making sure to cover the peppers completely.
- Use a spoon or chopstick to gently poke around and release any trapped air bubbles.
- Leave about ½ inch of headspace at the top.
Pro Tip: Using a funnel makes this step neater, especially when working with smaller jars.
5. Seal and Cool
- Wipe the rims of the jars with a clean cloth or paper towel.
- Add the lids and tighten until just snug — don’t over-tighten.
- Let the jars sit at room temperature until they cool completely.
6. Refrigerate and Let Them Pickle
- Once cooled, pop the jars in the refrigerator.
- Let the peppers pickle for at least 24 hours before tasting, though they get better after 2–3 days.
Pro Tip: These pickles keep well in the fridge for up to 1 month — and they tend to get more flavorful with time!

Tips and Tricks for Success
- Use fresh, firm peppers – The fresher your banana peppers, the crunchier your final pickles will be.
- Slice evenly – Uniform slices help the peppers pickle evenly and look prettier in the jar.
- Let the brine fully dissolve – Stir the mixture well before pouring to make sure the salt and sugar are completely dissolved — this ensures even flavor.
- Always use clean jars – A clean, dry jar is key to preventing spoilage and keeping your pickles fresh for weeks.
- Wait before eating – They’ll taste fine after 24 hours, but if you can hold off for 2–3 days, the flavor deepens and mellows beautifully.
Ingredient Substitutions and Variations
- Apple cider vinegar instead of white vinegar – Adds a fruitier, slightly sweeter tang.
- Honey or maple syrup instead of sugar – For a natural sweetener twist.
- Add sliced onions or carrots – Toss in a few thin slices for extra crunch and flavor variety.
- Try different peppers – Swap in some jalapeños or sweet bell peppers for a mixed pepper jar.
- Add herbs – A sprig of dill or oregano in each jar adds a fresh herbal note.
- Spice it up – Increase red pepper flakes or add a sliced jalapeño for a hotter version.
Serving Suggestions
- Pile them onto sandwiches and burgers – They add the perfect tangy crunch to grilled cheese, burgers, subs, or even breakfast sandwiches.
- Toss into salads – I love adding a handful to Greek or Italian-style salads for an instant flavor boost.
- Top your pizza – Banana peppers on homemade (or store-bought) pizza? Always a yes. They pair especially well with pepperoni or sausage.
- Mix into pasta salads – A few rings tossed into cold pasta salad brighten everything up with zesty flavor.
- Snack straight from the jar – Not even kidding — I’ve definitely stood by the fridge with a fork, sneaking bites right out of the jar!

Storage and Reheating Instructions
- Store in the refrigerator – Keep the pickled banana peppers in airtight jars in the fridge. No need to can them!
- Chill before eating – They taste best cold, straight from the fridge, especially after a couple of days of marinating.
- Shelf life – They’ll stay fresh and flavorful in the fridge for up to 1 month.
- No reheating needed – These are meant to be enjoyed cold or at room temp — no heating required. Just grab and go!
Frequently Asked Questions
Can I use green banana peppers?
Absolutely! Green banana peppers work just as well — the color doesn’t affect the pickling process, though yellow ones tend to be a bit sweeter.
Do I have to boil the brine?
Yes, bringing the brine to a boil helps dissolve the salt and sugar and allows the flavors to infuse properly. Just a quick simmer does the trick.
How spicy are pickled banana peppers?
They’re usually mild with just a touch of heat. You can bump up the spice by adding more red pepper flakes or tossing in a hot pepper or two.
Can I use this brine for other vegetables?
Totally! This brine works great for onions, carrots, jalapeños, cucumbers — you name it. Just adjust slice thickness and pickling time based on the veggie.
How long do they need to sit before eating?
They’re good after 24 hours in the fridge, but I recommend waiting 2–3 days if you can — the flavor gets better with time.
Do I need to sterilize the jars?
Since these are refrigerator pickles, you don’t need to fully sterilize, but make sure your jars are very clean and dry before using.
Did you try this recipe? Let me know in the comments how it turned out!
Don’t forget to share your photos on Instagram and tag me @tasiahub_ or use the hashtag #tasiahub. I’d love to see your creations!
Pickled Banana Peppers
Equipment
- Sharp knife or mandoline
- Cutting board
- Small saucepan
- Measuring Cups & Spoons
- Glass Jars with Lids
- Funnel (optional but helpful)
Ingredients
- Banana Peppers – 4–5 cups sliced into rings
- Garlic Cloves – 3 smashed
- White Vinegar – 1 cup
- Water – 1 cup
- Sugar – 2 tablespoons
- Salt – 1 tablespoon kosher or pickling salt preferred
- Mustard Seeds – 1 teaspoon
- Celery Seeds – ½ teaspoon
- Black Peppercorns – ½ teaspoon
- Red Pepper Flakes – ¼ teaspoon optional, for heat
Instructions
Prep the Peppers and Garlic
- Wash the banana peppers thoroughly and pat them dry.
- Slice them into thin rings, about ¼ inch thick. Discard the stems and shake out the seeds if you prefer a cleaner look.
- Peel and lightly smash the garlic cloves to help release their flavor.
- Pro Tip: Wearing gloves while slicing can help if your skin is sensitive to pepper oils — even banana peppers can leave a slight sting after a while.
Pack the Jars
- Grab your clean glass jars and divide the sliced peppers evenly between them.
- Drop a smashed garlic clove into each jar.
- If you’re using optional spices (like red pepper flakes), add them now too.
- Pro Tip: Pack the peppers in tightly, but don’t press them down — you want room for the brine to flow through.
Make the Brine
- In a small saucepan, combine the white vinegar, water, sugar, salt, mustard seeds, celery seeds, and black peppercorns.
- Bring the mixture to a gentle boil over medium heat, stirring occasionally to dissolve the sugar and salt completely.
- Pro Tip: Once the mixture starts to bubble around the edges, give it a final stir — the goal is to fully dissolve everything, not reduce the liquid.
Pour the Brine Over the Peppers
- Carefully pour the hot brine into each jar, making sure to cover the peppers completely.
- Use a spoon or chopstick to gently poke around and release any trapped air bubbles.
- Leave about ½ inch of headspace at the top.
- Pro Tip: Using a funnel makes this step neater, especially when working with smaller jars.
Seal and Cool
- Wipe the rims of the jars with a clean cloth or paper towel.
- Add the lids and tighten until just snug — don’t over-tighten.
- Let the jars sit at room temperature until they cool completely.
Refrigerate and Let Them Pickle
- Once cooled, pop the jars in the refrigerator.
- Let the peppers pickle for at least 24 hours before tasting, though they get better after 2–3 days.
- Pro Tip: These pickles keep well in the fridge for up to 1 month — and they tend to get more flavorful with time!
Notes
Nutritional Value (Per 2 tablespoon serving)
- Calories: 5
- Carbohydrates: 1g
- Sugar: 0.5g
- Fiber: 0.2g
- Fat: 0g
- Protein: 0g
- Sodium: ~100–150mg