Peppermint Brownie Cookies
When winter rolls around and the holidays draw near, I love bringing festive flavors into the kitchen. Peppermint is one of my favorite ways to do that—its bright, refreshing taste instantly sparks holiday cheer. That’s why these peppermint brownie cookies have become a staple in my Christmas cookie lineup. They’re rich, fudgy, and studded with just the right amount of peppermint for a delightful holiday treat.
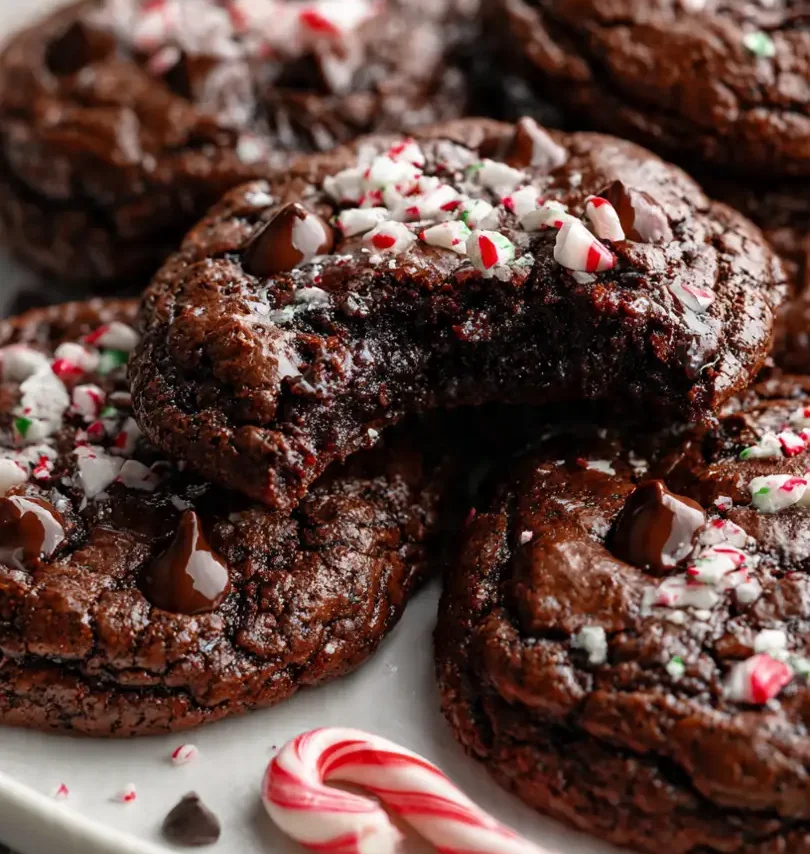
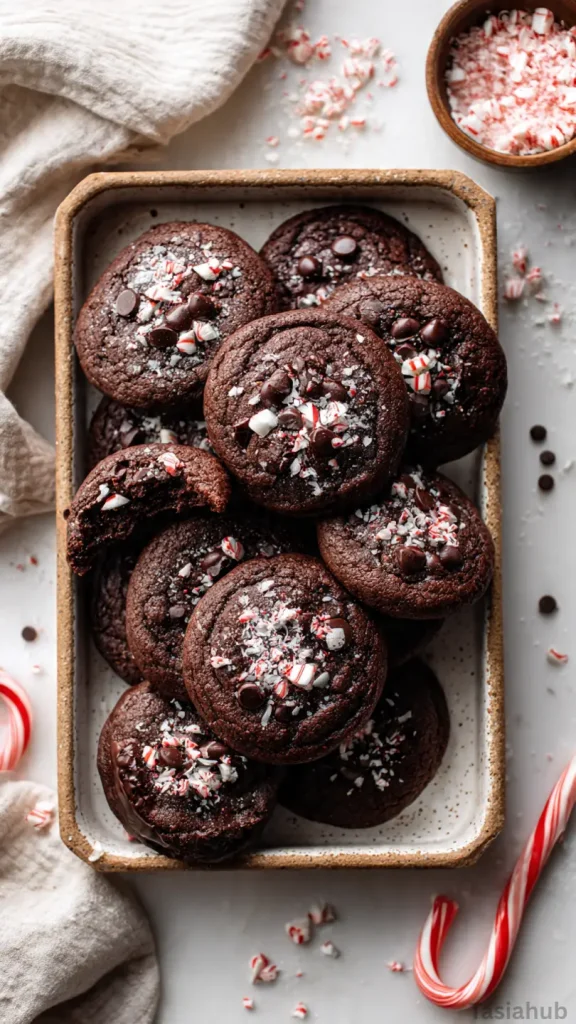
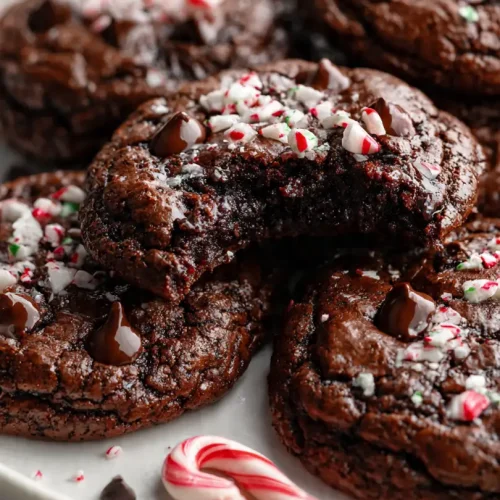
What makes these cookies extra special is the combination of two holiday favorites: brownies and peppermint. Each bite has that decadent chocolate base you crave, but with a festive twist that makes them perfect for gifting or sharing at holiday parties. The texture is somewhere between a chewy brownie and a soft cookie, giving the best of both worlds in every bite.
I love how versatile peppermint desserts can be during the holiday season. You can serve them warm with a glass of milk, freeze them for later, or even include them in a dessert platter alongside other Christmas baked goods. They’re easy to make, yet they look and taste like something you’d find in a bakery—without all the fuss.
For anyone who loves the holidays as much as I do, this peppermint brownies recipe is a must-try. It’s simple enough to make with the kids, fun to decorate with crushed candy canes or peppermint chips, and guarantees a crowd-pleasing addition to your holiday cookie swap.
Why You’ll Love It
- Fudgy meets festive: These cookies have that deep, chocolatey richness of classic brownies but with a refreshing peppermint twist that instantly puts you in the holiday spirit.
- Perfect for gifting: Stack a few in a clear bag, tie with a ribbon, and you’ve got a homemade treat that looks as beautiful as it tastes—ideal for Christmas cookie exchanges or last-minute gifts.
- Easy holiday baking: No complicated steps or fancy tools here—just simple ingredients and a few minutes of mixing and baking for bakery-worthy results.
- Versatile and fun to decorate: Sprinkle crushed candy canes on top, drizzle with melted chocolate, or add festive sprinkles for an extra holiday touch.
- Peppermint perfection: If you love peppermint dessert recipes, these cookies strike that perfect balance—cool, minty flavor without overpowering the rich chocolate base.
Ingredient List
For the Cookies:
- 1 cup all-purpose flour
- ½ cup unsweetened cocoa powder
- ½ teaspoon baking powder
- ¼ teaspoon salt
- ½ cup unsalted butter, melted
- 1 cup granulated sugar
- ½ cup brown sugar, packed
- 2 large eggs
- 1 teaspoon vanilla extract
- ½ teaspoon peppermint extract
- ¾ cup semi-sweet chocolate chips
- ¼ cup crushed candy canes or peppermint candies
Ingredient Notes
- Cocoa powder: Go for a good-quality unsweetened cocoa—something rich and dark. I usually use Ghirardelli for that deep chocolate flavor that makes these cookies irresistible.
- Peppermint extract: Don’t skip this one! It’s the key to that signature holiday flavor. A little goes a long way, so measure carefully.
- Brown sugar: Adds moisture and chewiness—together with the cocoa, it gives that brownie-like texture we’re after.
- Chocolate chips: Melt slightly in the warm dough for those gooey chocolate pockets—so good!
- Crushed candy canes: Sprinkle them on top right after baking for a sweet, minty crunch and a festive touch.
Kitchen Equipment Needed
- Mixing bowls: You’ll need one for the dry ingredients and one for the wet—simple, but essential for smooth mixing.
- Electric hand mixer or whisk: Helps blend the sugars and butter quickly for that glossy, brownie-like batter. I love using my KitchenAid hand mixer—it’s powerful yet lightweight.
- Measuring cups and spoons: Accuracy matters, especially with cocoa and peppermint extract.
- Rubber spatula: Perfect for folding in chocolate chips and scraping every bit of batter from the bowl.
- Baking sheet: Line it with parchment paper for easy cleanup and even baking.
- Cookie scoop: Keeps your cookies evenly sized and helps them bake consistently (plus, it makes portioning so much faster).
- Wire cooling rack: Helps the cookies cool evenly without becoming soggy underneath.
Instructions
1. Prep — heat the oven and get set
- Preheat oven to 350°F (175°C) and position a rack in the center.
- Line a baking sheet with parchment paper or a silicone baking mat.
- If you plan to chill dough, set aside a small plate or tray for the dough balls.
2. Mix the dry ingredients
- In a medium bowl, measure and add: all-purpose flour, unsweetened cocoa powder, baking powder, and salt.
- Whisk the dry ingredients together until evenly combined and there are no visible streaks.
- Pro tip: Sift the cocoa powder if it’s lumpy, then whisk continuously to prevent lumps — it makes the batter much smoother.
3. Mix the wet ingredients
- In a large bowl, pour in the melted unsalted butter. Let it sit 1–2 minutes so it cools slightly (you don’t want to scramble the eggs).
- Add granulated sugar and brown sugar to the butter. Stir or beat for about 60 seconds until the mixture is glossy and most of the sugar is dissolved.
- Add the eggs one at a time, mixing well after each addition so the batter becomes smooth.
- Stir in the vanilla extract and the ½ teaspoon peppermint extract. Taste a tiny bit of the batter (optional) to check peppermint level — peppermint extract is strong, so a little goes a long way.
- Pro tip: Use a hand mixer on low for the sugars + butter step if you want a silkier texture; otherwise vigorous whisking works fine.
4. Combine wet + dry — make the dough
- Add the dry mixture to the wet mixture in two additions. Fold with a spatula until just combined — stop as soon as you don’t see streaks of flour.
- Fold in the semi-sweet chocolate chips until evenly distributed.
- Pro tip: Don’t overmix here. Overworking the dough develops gluten and will make the cookies cakier instead of fudgy—this recipe aims for a brownie-like chew.
5. Optional chill for tighter, fudgier cookies
- If you prefer thicker, fudgier cookies, cover the bowl and chill the dough for 20–30 minutes. Chilling firms the butter and prevents spreading.
- If you’re short on time, you can skip chilling — the cookies will spread a little more and still taste delicious.
6. Portioning & decorating
- Use a 2-tablespoon cookie scoop (or a rounded tablespoon for slightly smaller cookies) to portion dough. Drop scoops onto the prepared baking sheet about 2 inches apart.
- Gently press a few extra chocolate chips on top of each dough mound and sprinkle with the crushed candy canes so they stick while baking.
7. Bake — timing for texture
- Bake on the center rack for 10–12 minutes:
- 10 minutes — center will be soft and fudgy (my personal favorite).
- 12 minutes — slightly more set and a bit cakier.
- Look for slightly cracked tops and set edges; the centers should still look a touch underbaked.
- Pro tip: Remove the cookies when the centers are still a bit soft — they’ll finish setting on the hot sheet and stay gooey instead of dry.
- Let the cookies cool on the baking sheet for 5 minutes (this helps them firm up), then transfer to a wire rack to cool completely.
Tips and Tricks for Success
- Measure carefully: Cocoa powder and flour can easily be overmeasured. Spoon and level instead of scooping straight from the bag for accurate results.
- Use room-temperature eggs: They blend better with melted butter and sugar, giving you that glossy, brownie-like batter.
- Don’t overbake: The cookies should look slightly underdone in the center when you pull them out—they’ll set as they cool and stay soft inside.
- Crush candy canes finely: Large chunks tend to melt unevenly or get sticky—smaller pieces give a prettier, even peppermint crunch.
- Chill for thicker cookies: If you love dense, bakery-style cookies, chill your dough for 20–30 minutes before baking to minimize spreading.
- Use good cocoa: A high-quality unsweetened cocoa deepens the chocolate flavor and makes the cookies taste extra rich.
Ingredient Substitutions and Variations
- Gluten-free version: Swap all-purpose flour for a 1:1 gluten-free baking blend. The cookies will still be soft and fudgy.
- Double chocolate twist: Add white chocolate chips along with the semi-sweet for extra richness and a pretty contrast.
- Peppermint swirl: Gently fold in crushed peppermint bark or Andes peppermint pieces instead of candy canes for a smoother, melt-in-your-mouth finish.
- Extra festive topping: Drizzle cooled cookies with melted white chocolate and sprinkle crushed peppermint on top—it gives them that bakery look.
- Less minty option: Reduce peppermint extract to ¼ teaspoon for just a hint of flavor if you prefer it subtle.
- Add espresso powder: A teaspoon of espresso powder enhances the chocolate flavor beautifully (it won’t taste like coffee).
Serving Suggestions
- With hot cocoa or coffee: I love pairing these peppermint brownie cookies with a cozy mug of peppermint hot chocolate or a warm latte—it’s the ultimate winter treat.
- As part of a Christmas dessert platter: Arrange them with sugar cookies, gingerbread men, and truffles for a festive mix of Christmas baked goods.
- With a scoop of vanilla ice cream: Warm a cookie for 10 seconds in the microwave and top with a scoop of ice cream for a decadent peppermint brownie sundae.
- For gifting: Stack a few in a clear bag or holiday tin, tie with a ribbon, and you’ve got a thoughtful, homemade gift that everyone loves.
- Movie night treat: When I’m curled up with a blanket watching holiday movies, a plate of these cookies is always by my side—soft, minty, and perfectly chewy.

Storage and Reheating Instructions
- Room temperature: Store cookies in an airtight container for up to 4 days. Place parchment between layers to prevent sticking.
- Freezer-friendly: Freeze baked cookies in a single layer, then transfer to a freezer bag for up to 3 months. Thaw at room temperature before serving.
- Freeze dough: Scoop cookie dough balls, freeze until solid, then store in a freezer bag. Bake from frozen, adding 1–2 extra minutes to bake time.
- Reheating: Warm cookies in the microwave for about 10–12 seconds to bring back that fresh-from-the-oven softness.
- Keep them fresh: Add a slice of bread to your cookie container—it helps maintain moisture and keeps the cookies soft longer.
Frequently Asked Questions
Can I make the dough ahead of time?
Absolutely! You can prepare the dough up to 2 days in advance. Just cover it tightly and store it in the fridge. When ready to bake, let it sit at room temperature for 15–20 minutes so it’s easier to scoop.
How do I keep the cookies soft?
Store them in an airtight container with a small slice of bread—the cookies will absorb the moisture and stay chewy for days. Avoid refrigerating baked cookies, as that can dry them out.
Can I use peppermint oil instead of extract?
Yes, but it’s much stronger than extract! Use only about ⅛ teaspoon to start, then adjust to taste. A little goes a long way with peppermint oil.
What if I don’t have candy canes?
You can substitute with peppermint chips, crushed mint candies, or even chopped Andes mints. Each gives a slightly different flavor and texture, but all work beautifully.
Can I make these more chocolatey?
Definitely! Add ¼ cup more chocolate chips or drizzle melted chocolate over the cooled cookies for extra richness. You can even mix in chunks of dark chocolate for a bolder flavor.
Are these good for Christmas cookie swaps?
They’re perfect! They look festive, travel well, and stay soft for days—making them one of the best peppermint cookies to share during the holidays.
Why do my cookies spread after chilling?
• Dough is too warm when it hits the oven
If the dough softens while you’re scooping, it can spread fast. Try scooping the dough first, then chilling the shaped dough balls for 30–45 minutes and baking them straight from the fridge.
• Butter was too hot when mixed in
If the butter is still hot (not just warm), it melts the sugar too much and creates a looser dough. Make sure the melted butter is warm to the touch, not hot, before adding sugars.
• Flour measurement matters here
Too little flour = spreading. Spoon flour into the measuring cup and level it. If your cookies are consistently spreading, adding 1–2 extra tablespoons of flour usually fixes it without changing texture.
• Pan + oven heat
Dark pans and very hot ovens can cause early melting before the structure sets. Baking on parchment-lined light-colored pans and placing the dough in a fully preheated oven helps the cookies set faster.
One extra tip if you want guaranteed thickness:
Right when the cookies come out of the oven, use a round cookie cutter or glass to gently scoot the edges inward. It sounds fussy, but it works incredibly well.
Did you try this recipe? Let me know in the comments how it turned out! I’d love to hear how you enjoyed these peppermint brownie cookies or how you made them your own.
Peppermint Brownie Cookies
Equipment
- Mixing Bowls
- Electric hand mixer or whisk
- Measuring cups and spoons
- Rubber spatula
- Baking Sheet
- Cookie scoop
- Wire Cooling Rack
Ingredients
- 1 cup all-purpose flour
- ½ cup unsweetened cocoa powder
- ½ teaspoon baking powder
- ¼ teaspoon salt
- ½ cup unsalted butter melted
- 1 cup granulated sugar
- ½ cup brown sugar packed
- 2 large eggs
- 1 teaspoon vanilla extract
- ½ teaspoon peppermint extract
- ¾ cup semi-sweet chocolate chips
- ¼ cup crushed candy canes or peppermint candies
Instructions
Prep — heat the oven and get set
- Preheat oven to 350°F (175°C) and position a rack in the center.
- Line a baking sheet with parchment paper or a silicone baking mat.
- If you plan to chill dough, set aside a small plate or tray for the dough balls.
Mix the dry ingredients
- In a medium bowl, measure and add: all-purpose flour, unsweetened cocoa powder, baking powder, and salt.
- Whisk the dry ingredients together until evenly combined and there are no visible streaks.
- Pro tip: Sift the cocoa powder if it’s lumpy, then whisk continuously to prevent lumps — it makes the batter much smoother.
Mix the wet ingredients
- In a large bowl, pour in the melted unsalted butter. Let it sit 1–2 minutes so it cools slightly (you don’t want to scramble the eggs).
- Add granulated sugar and brown sugar to the butter. Stir or beat for about 60 seconds until the mixture is glossy and most of the sugar is dissolved.
- Add the eggs one at a time, mixing well after each addition so the batter becomes smooth.
- Stir in the vanilla extract and the ½ teaspoon peppermint extract. Taste a tiny bit of the batter (optional) to check peppermint level — peppermint extract is strong, so a little goes a long way.
- Pro tip: Use a hand mixer on low for the sugars + butter step if you want a silkier texture; otherwise vigorous whisking works fine.
Combine wet + dry — make the dough
- Add the dry mixture to the wet mixture in two additions. Fold with a spatula until just combined — stop as soon as you don’t see streaks of flour.
- Fold in the semi-sweet chocolate chips until evenly distributed.
- Pro tip: Don’t overmix here. Overworking the dough develops gluten and will make the cookies cakier instead of fudgy—this recipe aims for a brownie-like chew.
Optional chill for tighter, fudgier cookies
- If you prefer thicker, fudgier cookies, cover the bowl and chill the dough for 20–30 minutes. Chilling firms the butter and prevents spreading.
- If you’re short on time, you can skip chilling — the cookies will spread a little more and still taste delicious.
Portioning & decorating
- Use a 2-tablespoon cookie scoop (or a rounded tablespoon for slightly smaller cookies) to portion dough. Drop scoops onto the prepared baking sheet about 2 inches apart.
- Gently press a few extra chocolate chips on top of each dough mound and sprinkle with the crushed candy canes so they stick while baking.
Bake — timing for texture
- Bake on the center rack for 10–12 minutes:
- 10 minutes — center will be soft and fudgy (my personal favorite).
- 12 minutes — slightly more set and a bit cakier.
- Look for slightly cracked tops and set edges; the centers should still look a touch underbaked.
- Pro tip: Remove the cookies when the centers are still a bit soft — they’ll finish setting on the hot sheet and stay gooey instead of dry.
Cooling & storing
- Let the cookies cool on the baking sheet for 5 minutes (this helps them firm up), then transfer to a wire rack to cool completely.
- Store cooled cookies in an airtight container at room temperature for up to 4 days. Layer with parchment to avoid sticking.
- To freeze: flash-freeze baked cookies on a tray, then transfer to a freezer bag for up to 3 months. You can also freeze scooped raw dough (flash-freeze, then bag) and bake from frozen — add 1–2 minutes to bake time.
Notes
Nutritional Value (per cookie – estimated)
- Calories: 180 kcal
- Carbohydrates: 25 g
- Protein: 2 g
- Fat: 8 g
- Saturated Fat: 4 g
- Cholesterol: 30 mg
- Sodium: 60 mg
- Fiber: 1 g
- Sugar: 18 g
What adjustments, if any, should be made when cooking in high altitude?
Great question! At high altitudes, you may need to make a couple of small adjustments. Try increasing the oven temperature by about 15–25°F and check the cookies a minute or two earlier, since they can dry out faster. You can also add 1–2 extra teaspoons of liquid (like milk or water) to keep them soft and fudgy. Everything else stays the same — just keep an eye on those edges and slightly underbaked centers!
Hello! I chilled my dough overnight and when I baked them, they spread…. A Lot! Any ideas what I could have done wrong?
You were supposed to chill for 20-30 minutes. Sorry about your cookies.
I had the same issue happen. I chilled them for 30 minutes and the first batch spread a lot. So then I tried chilling them overnight and the same thing happened.
This recipe uses melted butter, which naturally makes cookies spread more than recipes made with creamed butter. Chilling helps, but chilling alone won’t fully stop spreading if a few other factors are in play. Refer to the FAQ section to understand what could have gone wrong and how to fix it.