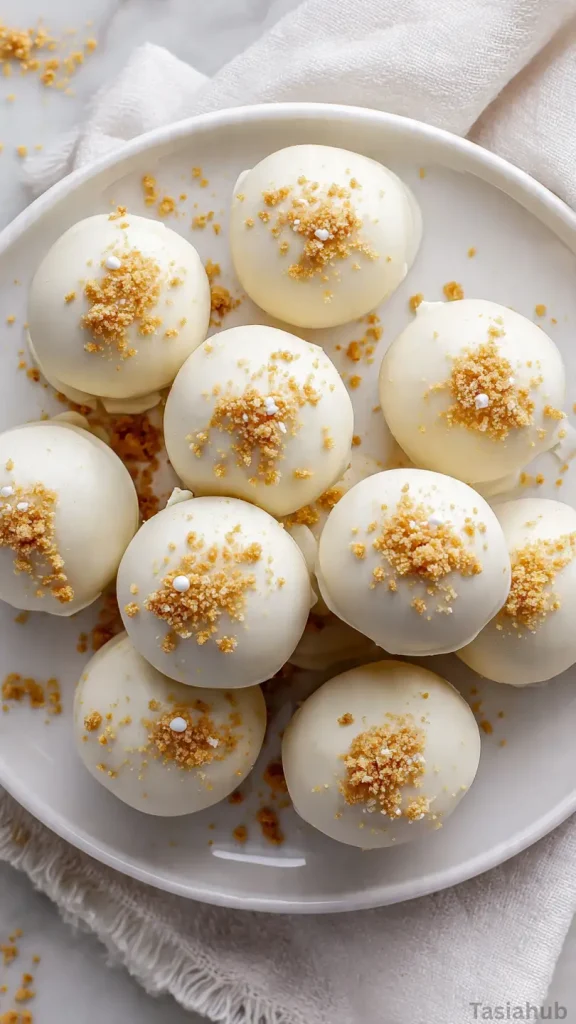
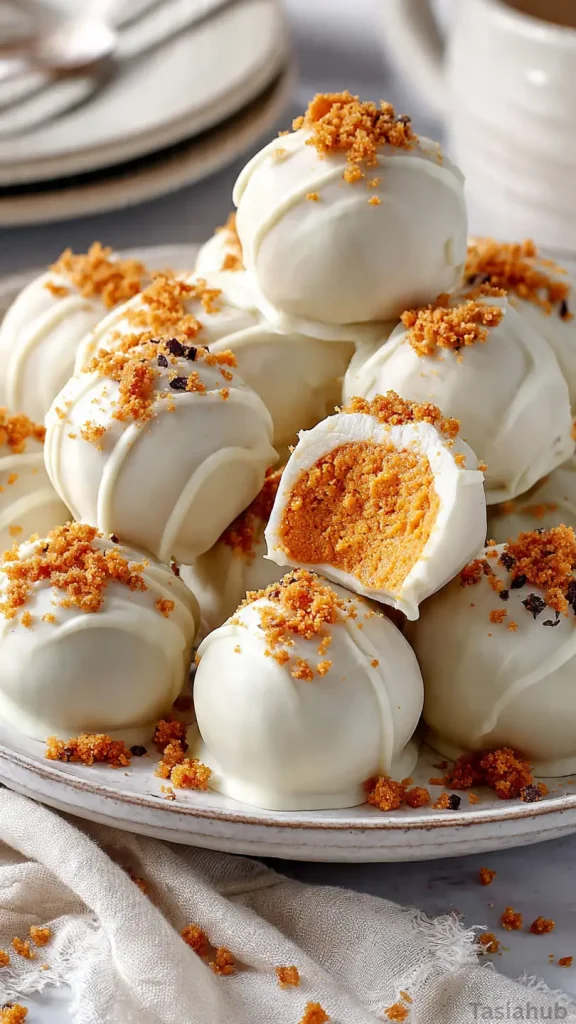
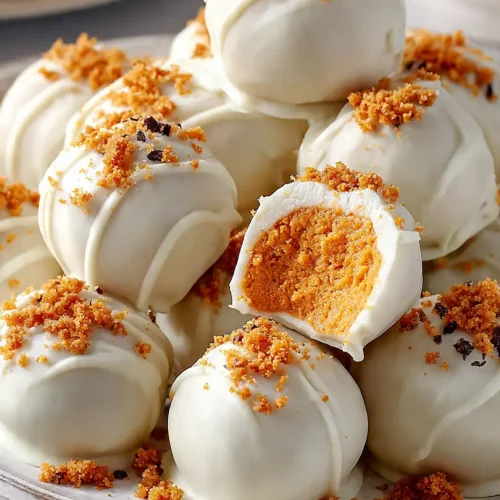
No Bake Pumpkin Cheesecake Balls
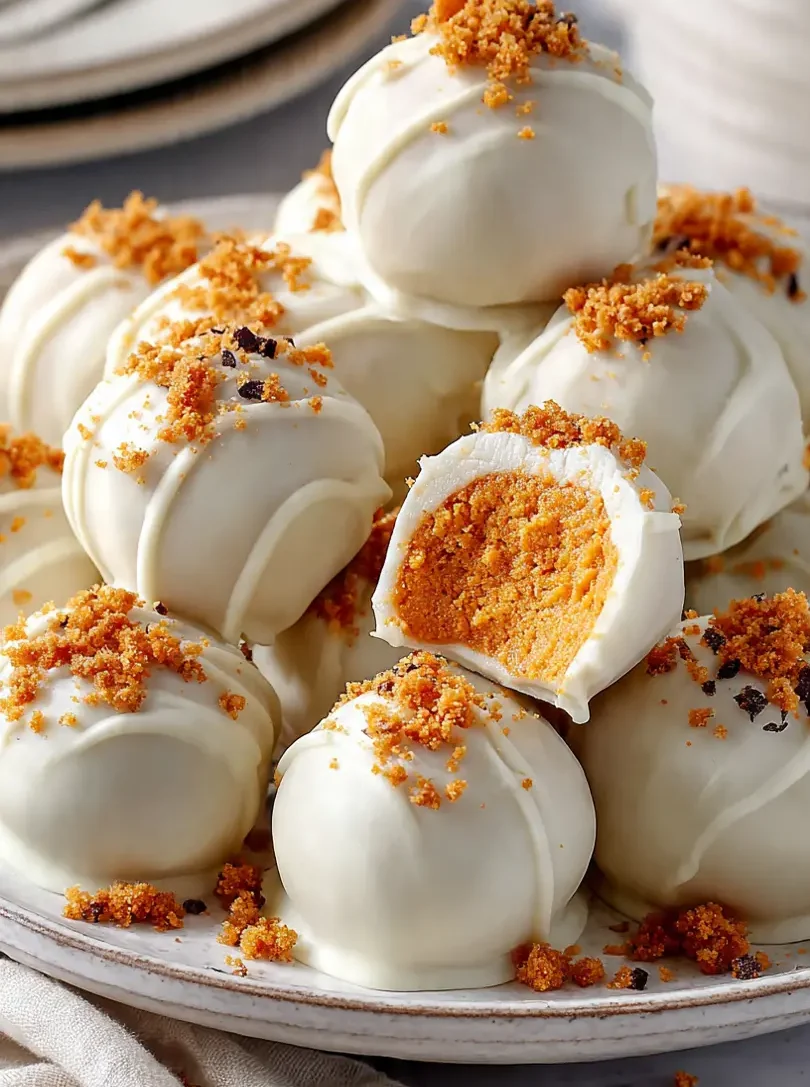
When the holidays roll around, I always like to have a few quick and easy recipes tucked away that don’t require a ton of effort but still feel festive and special. These no bake pumpkin cheesecake balls are exactly that kind of treat. They’re creamy, full of cozy pumpkin flavor, and coated in just the right amount of sweetness to make them a hit on any dessert table.
One of the best parts about this recipe is how approachable it is. You don’t need an oven, complicated equipment, or hours in the kitchen. In fact, these little bites come together in less than 30 minutes, and they chill in the fridge until you’re ready to serve. That makes them the perfect option when you need easy dessert for Thanksgiving but still want something that looks and tastes impressive.
I also love that these cheesecake balls fit right in with other Thanksgiving desserts without competing for oven space—which is always in short supply during the holiday rush. They add variety to the table of pies, cakes, and cookies, offering something that feels just a little different but still perfectly seasonal. Plus, they’re bite-sized, so guests can enjoy them even after a big meal without feeling overwhelmed.
Whether you’re putting together a tray of sweets for Thanksgiving, bringing something to a potluck, or just want to treat yourself with a fall-inspired snack, these no bake desserts for Thanksgiving are the kind of recipe you’ll want to make again and again. They’re festive, fun, and delicious—basically everything a holiday sweet should be.
Why You’ll Love It
- No oven needed: With all the cooking that goes on during the holidays, it’s a relief to have a treat that doesn’t take up precious oven space. These chill in the fridge, not the oven.
- Festive pumpkin flavor: Every bite is creamy, spiced, and loaded with cozy pumpkin goodness—it tastes like fall in the best way.
- Bite-sized and sharable: Perfect for a dessert platter or passing around after dinner, they’re easy for guests to grab and enjoy without needing a fork or plate.
- Quick and foolproof: You only need a few ingredients and a little mixing. Even if you’re not much of a baker, these come out looking (and tasting) impressive.
- Make-ahead friendly: They hold up beautifully in the fridge, so you can prep them the day before Thanksgiving and focus on the big meal stress-free.
Ingredient List
For the Cheesecake Balls:
- 8 oz cream cheese, softened
- 1 cup pumpkin purée (not pumpkin pie filling)
- 1 ½ cups graham cracker crumbs
- 1 cup powdered sugar
- 1 teaspoon pumpkin pie spice
- 1 teaspoon vanilla extract
For the Coating:
- 1 ½ cups white chocolate chips (or candy melts)
- 1 tablespoon coconut oil (optional, for smoother coating)
- Crushed graham crackers or cinnamon sugar (for topping)
Ingredient Notes
- Cream cheese: Use full-fat cream cheese for the richest, creamiest texture. The reduced-fat version works, but it won’t taste quite as decadent.
- Pumpkin purée: Make sure it’s pure pumpkin, not pumpkin pie filling—the filling already has sugar and spices added, which can throw off the recipe.
- Graham cracker crumbs: I usually blitz whole crackers in the food processor because the flavor feels fresher. Store-bought crumbs work fine too if you want to save time.
- Pumpkin pie spice: Don’t skip this—it ties all the flavors together and gives that unmistakable holiday vibe.
- White chocolate chips: I like using Ghirardelli because they melt so smoothly, but candy melts are a great no-fuss option if you want a super even coating.
Kitchen Equipment Needed
- Mixing bowls: You’ll need a couple—one for the cheesecake mixture and one for melting the chocolate. I like using glass bowls so I can keep an eye on everything.
- Hand mixer or stand mixer: Helps whip the cream cheese and pumpkin together until smooth and creamy. A whisk works if you don’t mind a little arm workout.
- Cookie scoop or tablespoon: Perfect for making evenly sized cheesecake balls without the mess. My small cookie scoop is a lifesaver here.
- Baking sheet: Line it with parchment paper to set the balls before dipping them in chocolate. Keeps cleanup super easy.
- Microwave-safe bowl or double boiler: For melting the white chocolate coating. I usually go with the microwave in short bursts—it’s quick and convenient.
- Fork or dipping tool: Makes coating the cheesecake balls in chocolate much less messy.
Instructions
1. Soften & prep the ingredients
- Remove the cream cheese from the fridge and let it sit at room temperature until very soft — about 30–45 minutes. If you’re short on time, cut it into small cubes and microwave in 6–8 second bursts until just softened.
- Measure out the pumpkin purée, powdered sugar, spices, and graham crumbs so everything is ready to go.
Pro tip: Soft cream cheese blends into a silkier filling. If it’s too cold, you’ll end up with lumps and a denser texture.
2. Make the cheesecake filling
- Place the softened cream cheese in a mixing bowl. Beat with a hand mixer (or whisk) until completely smooth.
- Gradually add the powdered sugar and continue to beat until the mixture is light and fluffy.
- Add the pumpkin purée, vanilla, and pumpkin pie spice. Mix just until combined — scrape the sides of the bowl so everything is evenly incorporated.
- Fold in the graham cracker crumbs with a spatula. Mix until the mixture holds together and is scoopable but not overly dry.
Pro tip: Sift the powdered sugar if it’s lumpy — it makes the filling perfectly smooth without any gritty bits.
3. Chill the filling so it’s scoopable
- Transfer the bowl to the fridge for 20–30 minutes if the mixture feels too soft to shape. You want it firm enough to scoop into neat balls.
- If the mixture is on the dry side after chilling, add 1–2 tablespoons of heavy cream or milk and mix briefly to loosen.
Pro tip: Chilling makes rolling easier and prevents your hands from getting sticky while you shape the balls.
4. Scoop and roll the cheesecake balls
- Use a small cookie scoop (about 1 tablespoon) or a measured tablespoon to portion the filling.
- Drop each scoop onto a parchment-lined baking sheet. Gently press and roll between your palms to form smooth, even balls.
- Space them about 1 inch apart.
Quick note: If the filling sticks to your hands, lightly oil your palms or wear disposable gloves to keep things tidy.
5. Firm the balls before coating
- Place the tray of rolled balls in the freezer for 15–25 minutes, or in the fridge for 30–45 minutes, until they’re firm but not rock-solid. This short firming step makes dipping much easier and stops the balls from falling apart when you coat them.
Pro tip: Don’t skip this step — chilled balls maintain their shape when you dunk them into warm chocolate.
6. Melt the coating
- Put the white chocolate chips (or candy melts) in a microwave-safe bowl. Heat in 20–30 second bursts, stirring between each burst, until almost melted. Stir until smooth.
- If you want a thinner coating, stir in up to 1 tablespoon coconut oil (or neutral vegetable oil) — add a little at a time until you reach a smooth, dippable consistency.
Pro tip: Keep water away from the chocolate — even a tiny splash will cause it to seize and become grainy.
7. Dip and decorate
- Using a fork or dipping tool, spear a chilled cheesecake ball and dip it into the melted chocolate, swirling to coat. Lift and tap the fork lightly against the side of the bowl to let excess chocolate drip off.
- Transfer the coated ball back to the parchment-lined sheet. Quickly sprinkle with crushed graham crackers, cinnamon sugar, or little autumn sprinkles before the coating sets.
- Repeat until all balls are coated.
Quick note: Work in batches if your chocolate starts to firm up — you can rewarm the bowl for a few seconds in the microwave if needed.
8. Final set and storage
- Chill the coated cheesecake balls in the fridge for at least 30–60 minutes until the coating is fully set.
- Store finished cheesecake balls in an airtight container in the refrigerator for up to 4–5 days. For longer storage, freeze them in a single layer on a tray until firm, then transfer to a freezer-safe bag for up to 1 month. Thaw in the fridge for 20–30 minutes before serving.
Pro tip: If you plan to freeze, skip any delicate sprinkles that might not survive thawing — add those after thawing for the best look.
Tips and Tricks for Success
- Chill before rolling: Don’t skip that fridge or freezer step—firmer filling makes shaping (and dipping) so much easier.
- Use a cookie scoop: This keeps the cheesecake balls uniform in size so they look extra neat on a dessert tray.
- Work in small batches: Keep half of the cheesecake balls in the fridge while dipping the others so they don’t soften too much.
- Thin the coating if needed: A touch of coconut oil or vegetable shortening makes the chocolate silky and easier to work with.
- Decorate fast: Add toppings right after dipping because the chocolate sets quickly.
- Serve chilled: These taste best straight from the fridge—they hold their shape and the pumpkin flavor pops more.
Ingredient Substitutions and Variations
- Crust crumbs: Swap graham crackers for crushed gingersnaps or Biscoff cookies for a spicier, deeper flavor.
- Chocolate coating: Use dark or milk chocolate instead of white chocolate for a less sweet finish.
- Pumpkin spice: If you don’t have pumpkin pie spice, mix cinnamon, nutmeg, ginger, and a pinch of cloves.
- Dairy-free option: Use vegan cream cheese and dairy-free chocolate chips for a plant-based version.
- Festive topping: Roll in crushed pecans, drizzle with caramel, or add holiday sprinkles to match the occasion.
- Mini cheesecakes: Press the filling into a lined mini muffin tin and top with melted chocolate for a no-roll version.
Serving Suggestions
- Serve these cheesecake balls on a pretty platter alongside other Thanksgiving desserts like pies and cookies—they add such a fun variety to the table.
- I love enjoying one with my afternoon coffee when I need a little sweet pick-me-up—the creamy pumpkin flavor pairs perfectly with something warm and cozy.
- Add them to a dessert charcuterie board with chocolate-dipped pretzels, caramel popcorn, and fresh fruit for an easy party spread.
- For a festive touch, place each ball in a mini cupcake liner—they look polished and make grabbing one super convenient.
- If you want to go extra indulgent, drizzle with caramel sauce right before serving—it’s such a beautiful finishing touch.
Storage and Reheating Instructions
- Refrigerator: Store cheesecake balls in an airtight container in the fridge for up to 4–5 days.
- Freezer: Freeze in a single layer on a baking sheet until firm, then transfer to a freezer-safe bag. They’ll last up to 1 month.
- Thawing: Let frozen cheesecake balls thaw in the fridge for 20–30 minutes before serving—this way, they stay creamy but not too soft.
- Reheating: No reheating needed (they’re no-bake!), but you can let them sit at room temperature for 5–10 minutes if you prefer a softer texture.
Frequently Asked Questions
Can I make these cheesecake balls ahead of time?
Yes! They’re actually better when made ahead because the flavors develop as they chill. I usually make them the day before Thanksgiving and store them in the fridge until serving.
Do I have to use white chocolate for the coating?
Not at all—you can dip them in milk or dark chocolate if you prefer. White chocolate gives a sweet, festive look, but any chocolate will taste amazing with pumpkin flavor.
What if I don’t have pumpkin pie spice?
No worries! Just mix 1 teaspoon cinnamon with ¼ teaspoon nutmeg, ¼ teaspoon ginger, and a tiny pinch of cloves. It’s basically the same blend.
Can I freeze pumpkin cheesecake balls?
Yes. Freeze them in a single layer until firm, then transfer to a bag or airtight container. They’ll keep for about a month. Just thaw in the fridge before serving.
How do I keep the chocolate coating from cracking?
Make sure the cheesecake balls are chilled but not rock-solid frozen before dipping. If they’re too cold, the sudden temperature change can cause cracks.
Can I make these without a mixer?
Definitely. A sturdy whisk and a little patience will get the job done—just be sure the cream cheese is very soft so it blends smoothly.
Did you try these no bake pumpkin cheesecake balls? I’d love to hear how they turned out for you—share in the comments so we can all swap tips and ideas!
No Bake Pumpkin Cheesecake Balls
Equipment
- Mixing Bowls
- Hand mixer or stand mixer
- Cookie scoop or tablespoon
- Baking Sheet
- Microwave-safe bowl or double boiler
- Fork or dipping tool
Ingredients
For the Cheesecake Balls:
- 8 oz cream cheese softened
- 1 cup pumpkin purée not pumpkin pie filling
- 1 ½ cups graham cracker crumbs
- 1 cup powdered sugar
- 1 teaspoon pumpkin pie spice
- 1 teaspoon vanilla extract
For the Coating:
- 1 ½ cups white chocolate chips or candy melts
- 1 tablespoon coconut oil optional, for smoother coating
- Crushed graham crackers or cinnamon sugar for topping
Instructions
Soften & prep the ingredients
- Remove the cream cheese from the fridge and let it sit at room temperature until very soft — about 30–45 minutes. If you’re short on time, cut it into small cubes and microwave in 6–8 second bursts until just softened.
- Measure out the pumpkin purée, powdered sugar, spices, and graham crumbs so everything is ready to go.
- Pro tip: Soft cream cheese blends into a silkier filling. If it’s too cold, you’ll end up with lumps and a denser texture.
Make the cheesecake filling
- Place the softened cream cheese in a mixing bowl. Beat with a hand mixer (or whisk) until completely smooth.
- Gradually add the powdered sugar and continue to beat until the mixture is light and fluffy.
- Add the pumpkin purée, vanilla, and pumpkin pie spice. Mix just until combined — scrape the sides of the bowl so everything is evenly incorporated.
- Fold in the graham cracker crumbs with a spatula. Mix until the mixture holds together and is scoopable but not overly dry.
- Pro tip: Sift the powdered sugar if it’s lumpy — it makes the filling perfectly smooth without any gritty bits.
Chill the filling so it’s scoopable
- Transfer the bowl to the fridge for 20–30 minutes if the mixture feels too soft to shape. You want it firm enough to scoop into neat balls.
- If the mixture is on the dry side after chilling, add 1–2 tablespoons of heavy cream or milk and mix briefly to loosen.
- Pro tip: Chilling makes rolling easier and prevents your hands from getting sticky while you shape the balls.
Scoop and roll the cheesecake balls
- Use a small cookie scoop (about 1 tablespoon) or a measured tablespoon to portion the filling.
- Drop each scoop onto a parchment-lined baking sheet. Gently press and roll between your palms to form smooth, even balls.
- Space them about 1 inch apart.
- Quick note: If the filling sticks to your hands, lightly oil your palms or wear disposable gloves to keep things tidy.
Firm the balls before coating
- Place the tray of rolled balls in the freezer for 15–25 minutes, or in the fridge for 30–45 minutes, until they’re firm but not rock-solid. This short firming step makes dipping much easier and stops the balls from falling apart when you coat them.
- Pro tip: Don’t skip this step — chilled balls maintain their shape when you dunk them into warm chocolate.
Melt the coating
- Put the white chocolate chips (or candy melts) in a microwave-safe bowl. Heat in 20–30 second bursts, stirring between each burst, until almost melted. Stir until smooth.
- If you want a thinner coating, stir in up to 1 tablespoon coconut oil (or neutral vegetable oil) — add a little at a time until you reach a smooth, dippable consistency.
- Pro tip: Keep water away from the chocolate — even a tiny splash will cause it to seize and become grainy.
Dip and decorate
- Using a fork or dipping tool, spear a chilled cheesecake ball and dip it into the melted chocolate, swirling to coat. Lift and tap the fork lightly against the side of the bowl to let excess chocolate drip off.
- Transfer the coated ball back to the parchment-lined sheet. Quickly sprinkle with crushed graham crackers, cinnamon sugar, or little autumn sprinkles before the coating sets.
- Repeat until all balls are coated.
- Quick note: Work in batches if your chocolate starts to firm up — you can rewarm the bowl for a few seconds in the microwave if needed.
Final set and storage
- Chill the coated cheesecake balls in the fridge for at least 30–60 minutes until the coating is fully set.
- Store finished cheesecake balls in an airtight container in the refrigerator for up to 4–5 days. For longer storage, freeze them in a single layer on a tray until firm, then transfer to a freezer-safe bag for up to 1 month. Thaw in the fridge for 20–30 minutes before serving.
- Pro tip: If you plan to freeze, skip any delicate sprinkles that might not survive thawing — add those after thawing for the best look.
Notes
Nutritional Value (per ball)
- Calories: ~140
- Fat: 8g
- Saturated Fat: 4.5g
- Carbohydrates: 15g
- Sugar: 11g
- Protein: 2g
- Fiber: 1g
- Sodium: 65mg