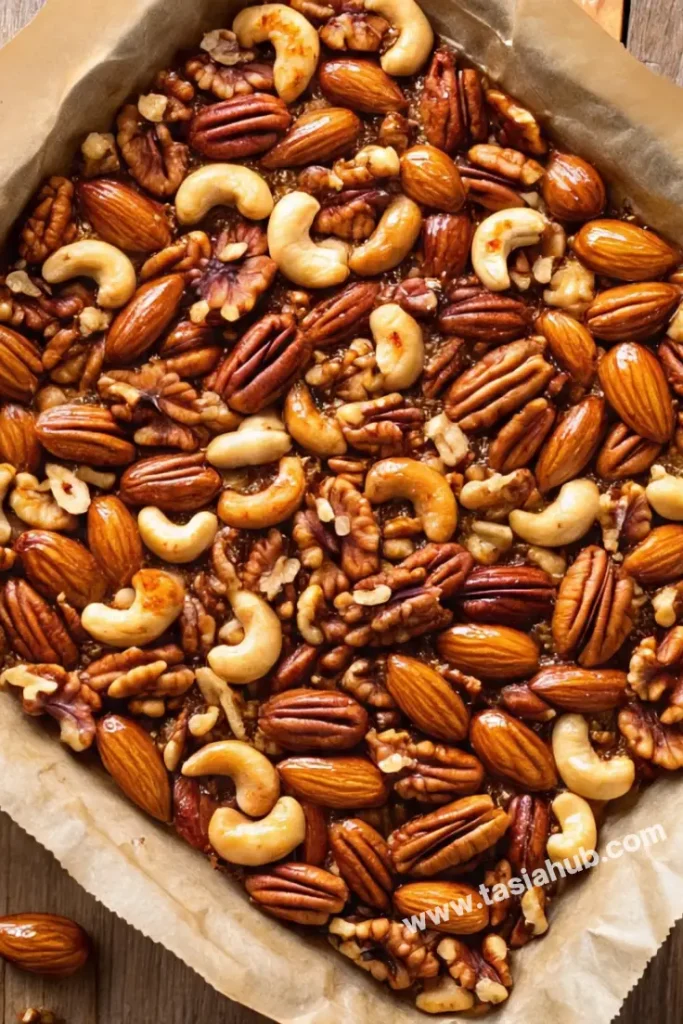
Maple Roasted Nuts

There’s something about the cozy months of fall and winter that makes me crave warm, toasty flavors. And while I love a good cheese board or baked brie, I’ve found that having a simple bowl of roasted nuts on the table is just as irresistible. They’re the kind of snack people keep reaching for without even realizing it—perfect for when you want to keep your guests happily munching before the main meal.
This roasted nuts recipe is my go-to when I need something quick but special. The sweetness of maple syrup clings beautifully to the nuts, creating a glossy coating that bakes into a slightly caramelized crunch. Add in a touch of salt and maybe a sprinkle of warming spices, and suddenly you’ve got the ultimate blend of savory, sweet, and cozy. They smell incredible while roasting too—like the holidays rolled into one tray.
What I love most is how versatile they are. Hosting a last-minute get-together? These make easy fall appetizers you can whip up in under 30 minutes. Need something to nibble on while wrapping gifts or setting up for a holiday gathering? A bowl of maple roasted nuts on the coffee table feels festive without being fussy. I even make them in big batches, then portion them into jars for thoughtful edible gifts.
To me, they’re the definition of a cozy party snack—warm, crunchy, lightly sweet, and just indulgent enough to feel special. Whether you’re serving them with cocktails at a small dinner party or alongside mulled cider as part of your favorite winter food spread, these maple roasted nuts never disappoint.
Why You’ll Love It
- Quick and effortless. With just a handful of ingredients and about 20 minutes in the oven, you’ve got a crowd-pleasing snack that feels gourmet without any fuss.
- Sweet, salty, and perfectly crunchy. The maple syrup caramelizes around the nuts, giving you that irresistible balance of flavors that keeps you going back for “just one more.”
- Festive and versatile. These maple roasted nuts fit right in at a cozy movie night, a chic dinner party, or a big holiday gathering—they’re the kind of snack that always belongs.
- Perfect for gifting. Pack them into little jars or bags, tie with a ribbon, and you’ve got a homemade edible gift that feels thoughtful and special.
- Naturally adaptable. You can use your favorite nut mix (almonds, pecans, cashews, walnuts, or a blend) and even switch up the spices to suit your mood—cinnamon for fall, cayenne for a spicy twist, or rosemary for a savory note.
Ingredient List
- 2 cups mixed nuts (almonds, pecans, cashews, walnuts work great)
- 3 tablespoons pure maple syrup
- 1 tablespoon olive oil (or melted butter)
- 1 teaspoon cinnamon (optional, but lovely for fall)
- ½ teaspoon flaky sea salt (plus more to taste)
- Pinch of cayenne pepper (optional, for a little kick)
Ingredient Notes
- Mixed nuts – I like using a blend of almonds, pecans, and cashews for the best mix of crunch and flavor. Walnuts are great too, but they can get a little more bitter when roasted—pairing them with sweeter nuts balances it out.
- Maple syrup – Don’t skip the pure maple syrup here! The real stuff (not pancake syrup) makes all the difference with its deep, caramel-like flavor.
- Olive oil or butter – Olive oil gives a lighter, slightly savory finish, while melted butter adds richness. I often go with butter during the holidays—it just feels cozier.
- Cinnamon – This brings out the warm, spiced flavor that makes these nuts taste like fall. If you’re not a cinnamon fan, try pumpkin spice or even smoked paprika for something unique.
- Cayenne pepper – Totally optional, but a tiny pinch really makes the sweetness pop. It won’t make the nuts fiery, just more interesting.
Kitchen Equipment Needed
- Baking sheet – For spreading the nuts in a single layer so they roast evenly. I like using a rimmed sheet to keep the maple syrup from running off.
- Parchment paper – Makes cleanup a breeze and prevents sticky syrup from clinging to the pan. (Trust me, you’ll thank yourself for this step!)
- Mixing bowl – To toss the nuts with the maple syrup, oil, and spices. Any medium-sized bowl works here.
- Wooden spoon or spatula – Perfect for stirring everything together and spreading the nuts out before roasting.
- Measuring cups + spoons – To keep the sweet-salty balance just right. I always keep my magnetic stack of measuring spoons handy—it saves me from losing the teaspoon in the drawer shuffle.
Instructions
Step 1: Preheat Your Oven
- Set your oven to 350°F (175°C).
- While it heats, line a baking sheet with parchment paper for easy cleanup.
Pro Tip: Always preheat the oven fully before roasting—starting cold can make the nuts bake unevenly.
Step 2: Mix the Wet Ingredients
- In a medium mixing bowl, add the maple syrup and olive oil (or melted butter).
- Stir them together until smooth and glossy.
Pro Tip: If using butter, make sure it’s fully melted but not hot—otherwise it can clump when mixed with the syrup.
Step 3: Add the Spices
- Sprinkle in the cinnamon, sea salt, and cayenne pepper (if using).
- Stir again until the mixture looks like a thin, spiced syrup.
Pro Tip: Taste the syrup mixture before adding the nuts—you can adjust the salt or spice here so the flavor is perfectly balanced.
Step 4: Coat the Nuts
- Add the mixed nuts to the bowl.
- Use a spatula or wooden spoon to toss everything together until each nut is evenly coated.
- Take a moment to scrape the sides of the bowl so none of that syrupy goodness goes to waste.
Pro Tip: Make sure the nuts are coated but not swimming in syrup—too much liquid will cause clumping instead of crisp roasting.
Step 5: Spread on the Baking Sheet
- Pour the coated nuts onto your prepared baking sheet.
- Spread them into an even layer, keeping them from overlapping too much.
Pro Tip: If the nuts are piled on top of each other, they’ll steam instead of roast—spacing is key for that golden crunch.
Step 6: Roast the Nuts
- Place the tray in the preheated oven.
- Roast for 18–20 minutes, stirring halfway through to prevent burning.
- Keep an eye on them during the last 5 minutes—the maple syrup can go from golden to too dark quickly.
Pro Tip: Your nose is the best timer—when they smell deeply toasty and sweet, they’re ready!
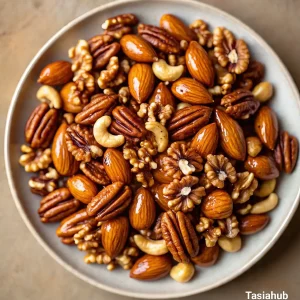
Step 7: Cool and Enjoy
- Remove the baking sheet from the oven.
- Let the nuts cool completely before serving—this allows the maple coating to set into a crunchy glaze.
- Once cooled, break up any clusters and transfer to a bowl or jar.
Pro Tip: Store leftovers (if there are any!) in an airtight container for up to a week—they’ll stay fresh and crunchy.
Tips and Tricks for Success
- Keep a close eye near the end. Nuts can go from perfectly golden to burnt in a flash, especially with maple syrup involved. Check them during the last 5 minutes.
- Stir halfway through. This helps the coating caramelize evenly and prevents sticking.
- Cool completely before storing. The glaze hardens as it cools—if you pack them up too soon, you’ll end up with sticky clumps.
- Use parchment paper. Skipping it makes cleanup a sticky nightmare (learned that one the hard way!).
- Double the batch for parties. These disappear fast—having extra means you won’t run out before the main course.
Ingredient Substitutions and Variations
- Nuts: Swap in hazelnuts, macadamias, or peanuts if you prefer. A single type works just as well as a mix.
- Sweetener: Try honey or brown sugar in place of maple syrup for a different twist. (Honey adds floral notes, brown sugar makes it richer.)
- Spices: Go beyond cinnamon—pumpkin pie spice, chai spice, or even smoked paprika are fun flavor upgrades.
- Savory version: Skip the cinnamon and add rosemary + black pepper for a herby, cocktail-style snack.
- Heat lovers: Use extra cayenne or add a pinch of chili powder for a spicier bite.
- Vegan option: Stick with olive oil instead of butter to keep the recipe fully plant-based.
Serving Suggestions
- As a cocktail snack. Set out a bowl of these maple roasted nuts with wine, cider, or a holiday cocktail—they pair beautifully with both sweet and savory drinks.
- On a cheese board. I love tucking them alongside brie, sharp cheddar, or gouda—the sweet crunch adds just the right contrast.
- Sprinkled over salads. Toss a handful on top of a fall salad with arugula, pears, and goat cheese—it instantly feels restaurant-worthy.
- On top of desserts. These nuts are dreamy sprinkled over ice cream, yogurt, or even pumpkin pie for an extra layer of crunch.
- As edible gifts. I often package them in little jars tied with ribbon for friends and neighbors—they’re always a hit during the holidays.

Storage and Reheating Instructions
- Room temperature: Store cooled nuts in an airtight container at room temp for up to 1 week.
- Fridge option: For longer freshness, keep them in the fridge for up to 3 weeks.
- Freezer-friendly: Freeze in a sealed bag or container for up to 3 months; thaw at room temperature before serving.
- Re-crisping: If they lose a bit of crunch, spread them on a baking sheet and warm at 300°F (150°C) for 5–7 minutes to refresh.
- Avoid humidity: Keep them in a dry, cool spot—moisture will make the coating sticky and chewy.
Frequently Asked Questions
Can I use only one type of nut?
Yes! Almonds, pecans, or cashews all work beautifully on their own. Just keep the total amount the same as the recipe.
Do I have to use maple syrup?
Not necessarily—honey or brown sugar can step in, though maple syrup gives the richest flavor and best caramelization.
How do I keep the nuts from sticking together?
Spread them out in a single layer on the baking sheet and stir halfway through baking. Let them cool completely before storing.
Are these maple roasted nuts vegan?
They can be! Just use olive oil instead of butter, and you’ve got a completely plant-based snack.
Can I make them ahead of time?
Absolutely. They stay crunchy for about a week at room temp, making them perfect for prepping before a party or holiday gathering.
Can I make these nuts spicy?
Yes—just increase the cayenne or add chili powder for more heat. It’s a great balance against the maple sweetness.
Did you try this recipe? Let me know in the comments how it turned out! I’d love to hear how you served your maple roasted nuts—whether at a cozy dinner, a big holiday gathering, or just as a snack for yourself.
Maple Roasted Nuts
Equipment
- Baking Sheet
- Parchment paper
- Mixing Bowl
- Wooden spoon or spatula
- Measuring Cups & Spoons
Ingredients
- 2 cups mixed nuts almonds, pecans, cashews, walnuts work great
- 3 tablespoons pure maple syrup
- 1 tablespoon olive oil or melted butter
- 1 teaspoon cinnamon optional, but lovely for fall
- ½ teaspoon flaky sea salt plus more to taste
- Pinch of cayenne pepper optional, for a little kick
Instructions
Step 1: Preheat Your Oven
- Set your oven to 350°F (175°C).
- While it heats, line a baking sheet with parchment paper for easy cleanup.
- Pro Tip: Always preheat the oven fully before roasting—starting cold can make the nuts bake unevenly.
Step 2: Mix the Wet Ingredients
- In a medium mixing bowl, add the maple syrup and olive oil (or melted butter).
- Stir them together until smooth and glossy.
- Pro Tip: If using butter, make sure it’s fully melted but not hot—otherwise it can clump when mixed with the syrup.
Step 3: Add the Spices
- Sprinkle in the cinnamon, sea salt, and cayenne pepper (if using).
- Stir again until the mixture looks like a thin, spiced syrup.
- Pro Tip: Taste the syrup mixture before adding the nuts—you can adjust the salt or spice here so the flavor is perfectly balanced.
Step 4: Coat the Nuts
- Add the mixed nuts to the bowl.
- Use a spatula or wooden spoon to toss everything together until each nut is evenly coated.
- Take a moment to scrape the sides of the bowl so none of that syrupy goodness goes to waste.
- Pro Tip: Make sure the nuts are coated but not swimming in syrup—too much liquid will cause clumping instead of crisp roasting.
Step 5: Spread on the Baking Sheet
- Pour the coated nuts onto your prepared baking sheet.
- Spread them into an even layer, keeping them from overlapping too much.
- Pro Tip: If the nuts are piled on top of each other, they’ll steam instead of roast—spacing is key for that golden crunch.
Step 6: Roast the Nuts
- Place the tray in the preheated oven.
- Roast for 18–20 minutes, stirring halfway through to prevent burning.
- Keep an eye on them during the last 5 minutes—the maple syrup can go from golden to too dark quickly.
- Pro Tip: Your nose is the best timer—when they smell deeply toasty and sweet, they’re ready!
Step 7: Cool and Enjoy
- Remove the baking sheet from the oven.
- Let the nuts cool completely before serving—this allows the maple coating to set into a crunchy glaze.
- Once cooled, break up any clusters and transfer to a bowl or jar.
- Pro Tip: Store leftovers (if there are any!) in an airtight container for up to a week—they’ll stay fresh and crunchy.
Notes
- Calories: 200–220 kcal
- Fat: 18–20 g (mostly healthy unsaturated fats)
- Carbohydrates: 10–12 g
- Sugar: 6–8 g (from maple syrup)
- Protein: 4–5 g
- Fiber: 2–3 g