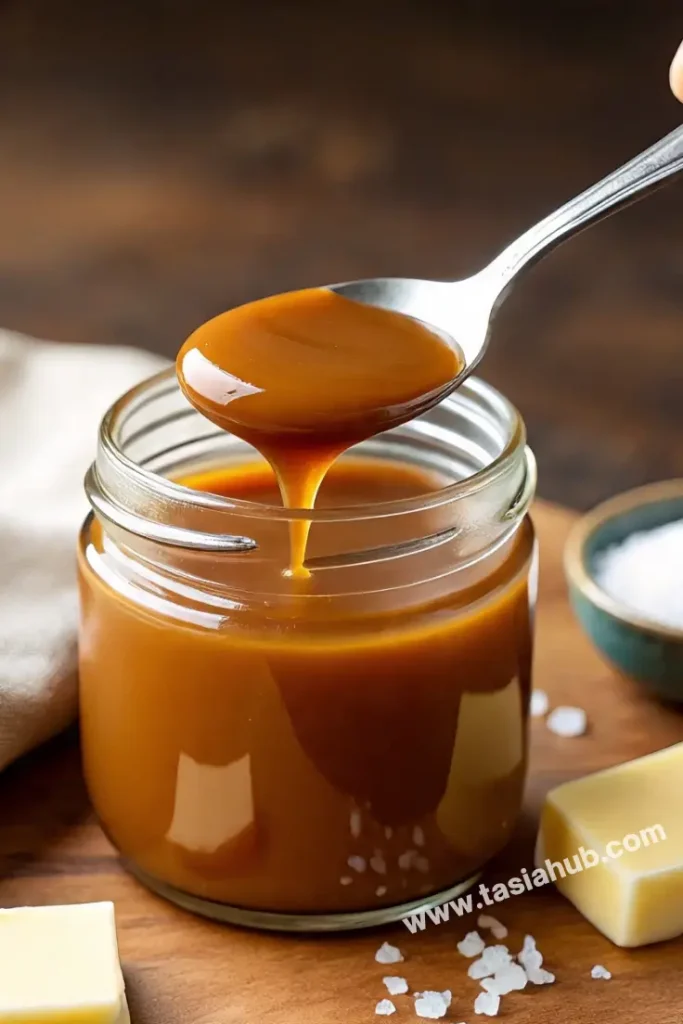
Homemade Caramel Sauce

Caramel sauce is one of those magical kitchen creations that instantly makes anything taste better—whether you’re drizzling it over vanilla ice cream, folding it into brownies, or swirling it into your morning coffee. The best part? You don’t need to rely on store-bought versions that are often packed with preservatives and artificial flavorings. Making your own caramel sauce at home is not only incredibly satisfying but also gives you full control over the flavor and consistency.
What makes homemade caramel so special is its rich, buttery flavor and silky smooth texture. It’s sweet, yes—but not in a one-note way. A good caramel has depth, with hints of toasted sugar and a buttery finish that coats your tongue just enough to keep you coming back for more. And once you make it from scratch, you’ll be amazed at how simple the process really is. Just a handful of pantry staples—sugar, butter, cream, and a pinch of salt—come together in under 15 minutes to create something truly indulgent.
If you’ve ever been intimidated by the idea of melting sugar or worried about burning it, you’re not alone. Caramel has a bit of a reputation for being tricky, but with the right tips and a little attention, it becomes way less scary and way more approachable. You’ll just need to keep an eye on the heat and be ready to move quickly once things start bubbling. And once you get the hang of it, you might even find yourself experimenting—adding sea salt for a salted caramel twist, a splash of bourbon for a grown-up flavor, or even a dash of vanilla to round it all out.
Whether you’re making this sauce to elevate a dessert or to bottle up and gift during the holidays, having a go-to homemade caramel sauce recipe in your back pocket is always a good idea. It stores well, reheats beautifully, and most importantly—it tastes way better than anything you’ll find in a jar.
Why You’ll Love It
- Simple Ingredients, Big Flavor – You only need four basic ingredients to make this rich, luscious sauce, and the result is far better than anything store-bought.
- Versatile & Delicious – Pour it over ice cream, dip apple slices into it, stir it into coffee, or drizzle over pancakes—it’s a multi-use treat you’ll keep finding excuses to use.
- Customizable – Like it a bit salty? Prefer it with a splash of vanilla or a touch of bourbon? This recipe is super flexible, so you can tweak it to match your taste.
- Great for Gifting – Poured into a cute jar and tied with a ribbon, this homemade caramel sauce makes a thoughtful (and impressive!) edible gift.
- Stays Smooth & Reheats Well – Unlike some sauces that harden or separate, this one stays smooth and creamy, and it’s easy to reheat without losing its texture.
Ingredient List
- 1 cup granulated sugar
- 6 tablespoons unsalted butter, cut into cubes
- 1/2 cup heavy cream (room temperature)
- 1/2 teaspoon salt (optional, for salted caramel)
Ingredient Notes
- Granulated Sugar – Regular white sugar works best here. Avoid using brown sugar for this particular recipe as it changes the texture and flavor profile.
- Unsalted Butter – Using unsalted butter helps you control the salt level better. If you only have salted butter, you can reduce or skip the added salt.
- Heavy Cream – Make sure it’s at room temperature or slightly warm; adding cold cream to hot sugar can cause it to seize or splatter aggressively.
- Salt – A pinch really enhances the caramel flavor, even if you’re not going for “salted caramel.” If you want a true salted version, consider using flaky sea salt for finishing.
- Optional Add-Ins – A splash of vanilla extract or bourbon can take this sauce to the next level for a more complex flavor.
Kitchen Equipment Needed
- Heavy-bottomed saucepan – Helps distribute heat evenly and prevents burning. I love using my small stainless steel saucepan for better control.
- Heat-resistant silicone spatula or wooden spoon – For stirring the caramel without scratching the pan or melting. Silicone is great for getting into the corners of the pot.
- Measuring cups and spoons – Accuracy is key in caramel-making, especially for the sugar and cream.
- Whisk – Useful for blending in the butter and cream smoothly once the sugar is melted.
- Glass jar or heat-safe container – For storing the finished sauce. I like using mason jars—they look cute and seal well.
Instructions
Step 1: Melt the Sugar
- Add 1 cup granulated sugar to a clean, dry heavy-bottomed saucepan (preferably stainless steel).
- Turn the heat to medium and let the sugar start to melt.
- Begin stirring once you see the edges turning liquid, using a heatproof silicone spatula or wooden spoon.
- Continue to stir gently and constantly as the sugar melts completely into a golden-brown liquid.
Pro Tip: The sugar may clump as it melts—don’t panic. Keep stirring and it will eventually smooth out.
Step 2: Add the Butter
- Once the sugar is fully melted and amber in color, carefully add 6 tablespoons of cubed unsalted butter.
- It will bubble up vigorously—this is normal!
- Stir until the butter is completely melted and combined with the sugar.
Pro Tip: Add the butter slowly and stir constantly to help it incorporate more smoothly and prevent splattering.
Step 3: Pour in the Cream
- Slowly pour in 1/2 cup of room-temperature heavy cream while stirring.
- Again, the mixture will bubble up a lot, so go slow and steady.
- Keep stirring until the cream is fully mixed in and the sauce is smooth and glossy.
Pro Tip: Whisk continuously while adding the cream to avoid lumps and prevent the sugar from seizing.
Step 4: Add Salt and Simmer Briefly
- Stir in 1/2 teaspoon salt, or adjust to taste (or skip if making a classic sweet caramel).
- Let the sauce simmer for 1–2 minutes on low heat to thicken slightly.
- Then, remove it from the heat.
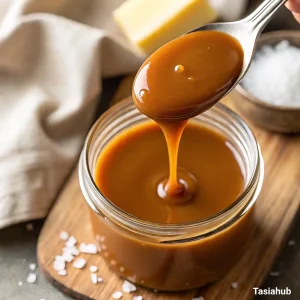
Step 5: Cool and Store
- Let the caramel cool for about 10–15 minutes in the pan.
- Pour it into a glass jar or heat-safe container.
- The sauce will continue to thicken as it cools.
Pro Tip: Don’t scrape the bottom of the pan when transferring—the darker bits can make the sauce taste bitter. Just pour the smooth top portion.
Tips and Tricks for Success
- Use a light-colored saucepan – It’s much easier to see the color of the sugar as it melts, which helps prevent burning.
- Don’t walk away – Caramel moves quickly once the sugar starts melting. Stay close and keep your eyes on it the entire time.
- Have all ingredients pre-measured – Things happen fast, so having your butter and cream ready to go makes everything smoother.
- Keep the cream at room temperature – Cold cream can cause the hot caramel to seize or splatter more aggressively.
- Be patient with clumps – Sugar clumps are normal early in the process; they will melt with continued stirring. Don’t crank up the heat.
Ingredient Substitutions and Variations
- Brown Sugar – Swap granulated sugar for brown sugar for a deeper, molasses-like flavor. The texture will be slightly thicker.
- Salted Butter – If you only have salted butter, reduce or skip the added salt.
- Coconut Cream – For a dairy-free option, use full-fat coconut cream in place of heavy cream. It adds a light coconut flavor too.
- Vanilla Extract – Stir in 1/2 to 1 teaspoon of vanilla extract at the end for added depth.
- Bourbon or Whiskey – Add 1–2 teaspoons after removing from heat for a grown-up twist on classic caramel.
- Flaky Sea Salt – Sprinkle on top after the sauce is poured into jars for a perfect salted caramel finish.
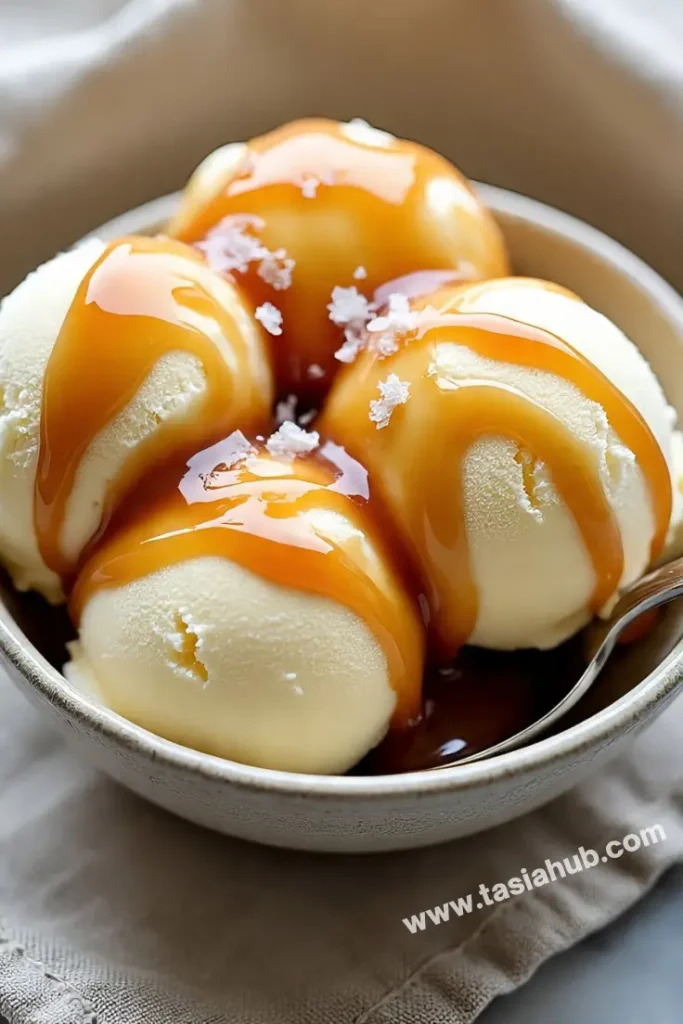
Serving Suggestions
- Drizzled over vanilla ice cream – Classic and unbeatable! It instantly upgrades a simple dessert into something extra special.
- Swirled into brownies or blondies – Pour a little into your batter or drizzle on top before baking for gooey caramel pockets.
- On pancakes or waffles – Skip the syrup and go with warm caramel sauce instead—it’s a weekend breakfast treat!
- As a dip for apple slices – I love this combo in the fall—it’s nostalgic and always hits the spot.
- Stirred into hot coffee – When I want something cozy, I add a spoonful to my morning brew for an instant caramel latte vibe.
Storage and Reheating Instructions
- Refrigerate in an airtight jar – Store in a glass jar or container with a tight lid for up to 2 weeks.
- Let it cool before sealing – Allow the sauce to reach room temperature before placing the lid on to avoid condensation.
- Reheat gently – Warm in the microwave in 15-second bursts, stirring between each, or in a small saucepan over low heat.
- Add a splash of cream if too thick – If the caramel thickens too much after chilling, a tiny bit of cream will loosen it right up.
- Freeze for longer storage – You can freeze caramel sauce in an airtight container for up to 3 months. Thaw in the fridge overnight, then reheat gently.
Frequently Asked Questions
Can I make this caramel sauce without a thermometer?
Absolutely! This recipe is designed to be made without one. Just keep a close eye on the sugar—when it turns a deep amber color, it’s ready for the next step. If you’re unsure, aim for the color of honey or a copper penny.
Why did my caramel sauce turn grainy?
Grainy caramel usually means the sugar crystallized. This can happen if you stir too early or if there’s sugar on the sides of the pan. To prevent this, use a wet pastry brush to wipe down the sides while the sugar is melting, or swirl the pan gently until it’s mostly liquid.
Can I double the recipe?
Yes, but use a larger saucepan to prevent bubbling over, and keep a close eye on the temperature. The cooking time may be a little longer, but the steps are the same.
Is it supposed to be this runny?
Caramel sauce thickens as it cools. Right after cooking, it may seem a little thin, but give it 10–15 minutes to rest. If it’s still too runny once cooled, simmer it for a few extra minutes next time.
Can I use milk instead of cream?
You can, but it won’t be as rich or smooth. Milk has less fat, which means the sauce might be thinner and not quite as creamy. If possible, stick with heavy cream or try coconut cream for a non-dairy version.
How long does it last?
Stored properly in the fridge, your caramel sauce can last up to 2 weeks. Just reheat before serving, and it’ll taste just as good as day one!
Did you try this recipe? Let me know in the comments how it turned out!
Don’t forget to share your photos on Instagram and tag me @tasiahub_ or use the hashtag #tasiahub. I’d love to see your caramel creations!
Homemade Caramel Sauce
Equipment
- Heavy-bottomed saucepan
- Heat-resistant silicone spatula or wooden spoon
- Measuring cups and spoons
- Whisk
- Glass jar or heat-safe container
Ingredients
- 1 cup granulated sugar
- 6 tablespoons unsalted butter cut into cubes
- 1/2 cup heavy cream room temperature
- 1/2 teaspoon salt optional, for salted caramel
Instructions
Step 1: Melt the Sugar
- Add 1 cup granulated sugar to a clean, dry heavy-bottomed saucepan (preferably stainless steel).
- Turn the heat to medium and let the sugar start to melt.
- Begin stirring once you see the edges turning liquid, using a heatproof silicone spatula or wooden spoon.
- Continue to stir gently and constantly as the sugar melts completely into a golden-brown liquid.
- Pro Tip: The sugar may clump as it melts—don’t panic. Keep stirring and it will eventually smooth out.
Step 2: Add the Butter
- Once the sugar is fully melted and amber in color, carefully add 6 tablespoons of cubed unsalted butter.
- It will bubble up vigorously—this is normal!
- Stir until the butter is completely melted and combined with the sugar.
- Pro Tip: Add the butter slowly and stir constantly to help it incorporate more smoothly and prevent splattering.
Step 3: Pour in the Cream
- Slowly pour in 1/2 cup of room-temperature heavy cream while stirring.
- Again, the mixture will bubble up a lot, so go slow and steady.
- Keep stirring until the cream is fully mixed in and the sauce is smooth and glossy.
- Pro Tip: Whisk continuously while adding the cream to avoid lumps and prevent the sugar from seizing.
Step 4: Add Salt and Simmer Briefly
- Stir in 1/2 teaspoon salt, or adjust to taste (or skip if making a classic sweet caramel).
- Let the sauce simmer for 1–2 minutes on low heat to thicken slightly.
- Then, remove it from the heat.
Step 5: Cool and Store
- Let the caramel cool for about 10–15 minutes in the pan.
- Pour it into a glass jar or heat-safe container.
- The sauce will continue to thicken as it cools.
Notes
Nutritional Value Per 1-tablespoon Serving :
- Calories: 105
- Fat: 6g
- Saturated Fat: 4g
- Carbohydrates: 13g
- Sugar: 13g
- Protein: 0g
- Sodium: 60mg (with salt added)