Halloween Eyeball Cake Pops
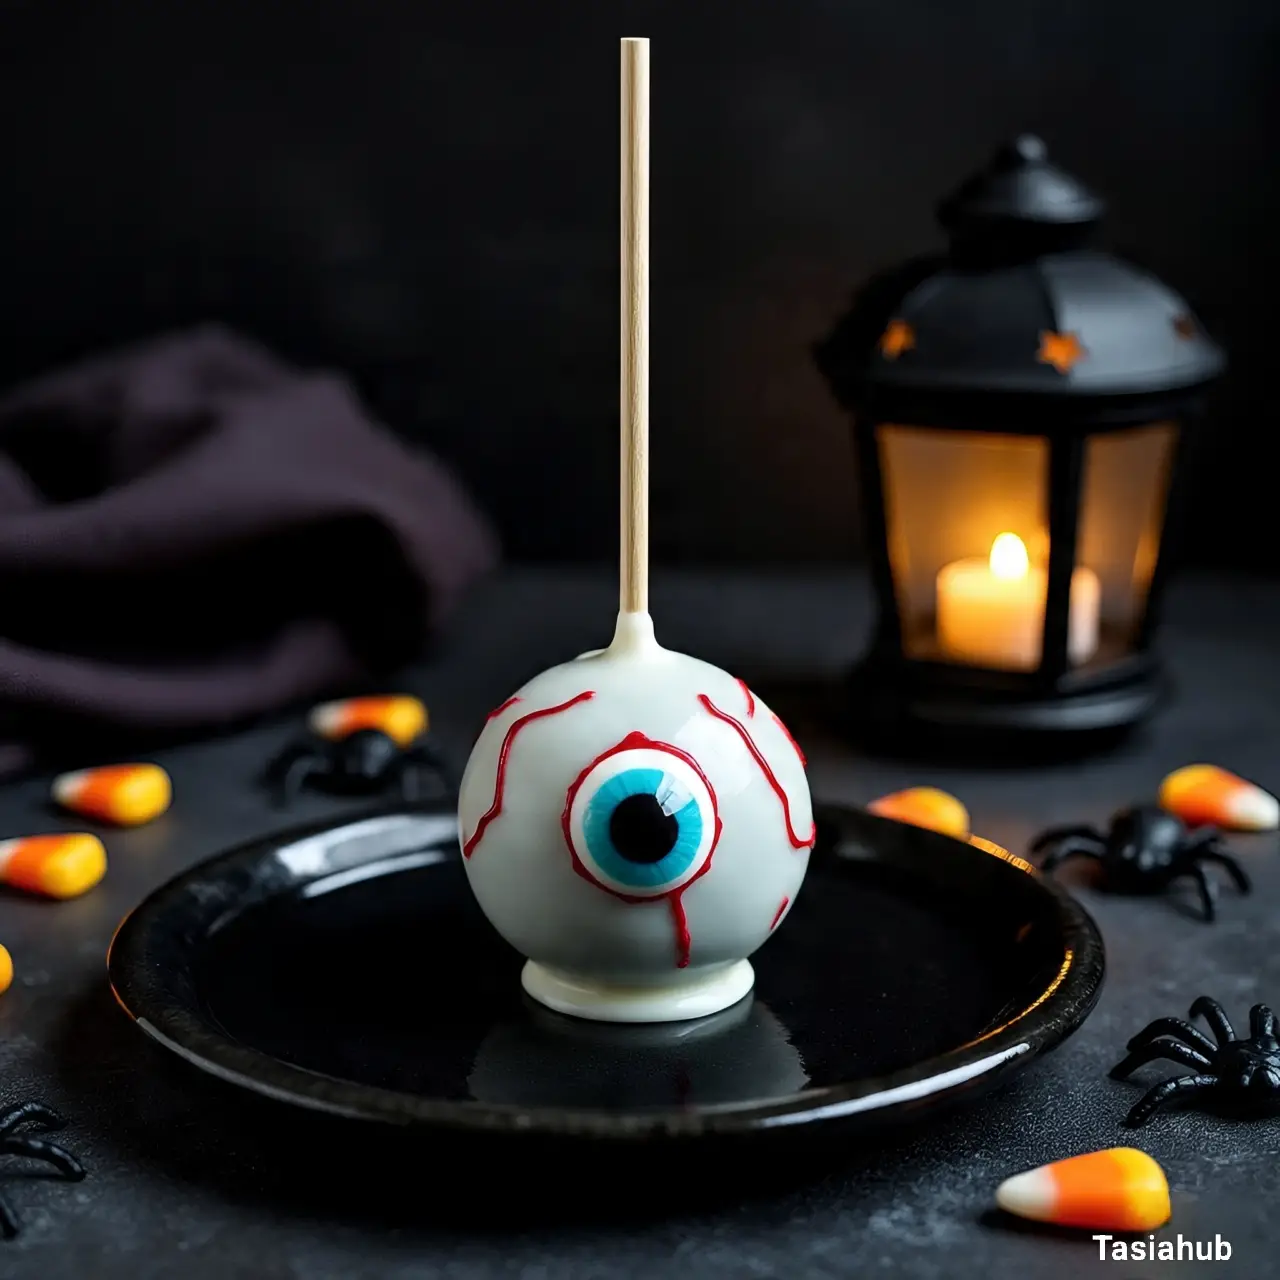
Halloween is the perfect excuse to get creative in the kitchen, and these Halloween eyeball cake pops are pure fun with a side of spookiness. I love how something as simple as a cake pop can transform into a tiny, eerie treat that’s perfect for parties, school events, or even a little treat for yourself while binge-watching your favorite Halloween movies. The best part? They’re incredibly easy to make, even if you’re not a professional baker.
These Halloween cake balls start with a moist, fluffy cake base crumbled into bite-sized pieces and mixed with just enough frosting to hold everything together. Then comes the fun part: shaping them into perfect little spheres and decorating them to look like creepy, candy-colored eyeballs. The process is playful, almost like crafting edible art, and kids and adults alike will get a kick out of helping—or sneaking bites along the way!
I’ve tried a few Halloween cake pops ideas over the years, but the eyeball version never fails to get a reaction. You can make them as colorful or as gruesome as you want—think bright red veins, spooky green irises, or classic white with a pop of blue. They’re also incredibly versatile. Use them as a centerpiece for your Halloween dessert table, give them out to trick-or-treaters in cute little bags, or even add them to a Halloween-themed charcuterie board for a creepy-cute twist.
What makes this Halloween cake pops recipe stand out is how simple yet dramatic it looks. A few creative touches, like candy eyeballs or edible markers for detailing, instantly turn a basic cake ball into a conversation starter. Whether you’re an experienced baker or just someone who enjoys a fun kitchen project, these eyeball cake pops are a must-try. They’re playful, slightly spooky, and perfectly delicious—what more could you ask for in a Halloween treat?
Why You’ll Love It
- Creepy but Cute: These Halloween eyeball cake pops strike the perfect balance between spooky and adorable. They’ll make your dessert table look festive without being overly gory.
- Fun to Make: Shaping, decorating, and adding the “eyeball details” is almost like doing a little Halloween craft in the kitchen. It’s playful for both adults and kids!
- Customizable: You can get creative with colors, flavors, and decorations. Swap in different cake flavors or frosting colors, and experiment with edible markers, candy eyes, or drizzles of chocolate to match your theme.
- Perfect Party Treats: These cake pops are handheld, mess-free, and super shareable—ideal for Halloween parties, classroom treats, or handing out to trick-or-treaters.
- Impress Without Stress: Despite their dramatic appearance, they’re actually simple to make. A few ingredients and some creativity go a long way, giving you a wow-factor dessert without hours in the kitchen.
Ingredients
For the Cake Pops
- 1 box yellow or chocolate cake mix (plus ingredients listed on the box: eggs, oil, water)
- 1 cup cream cheese frosting (or your favorite frosting)
For the Coating & Decoration
- 12 oz white candy melts
- 1–2 tsp vegetable oil (to thin the candy melts if needed)
- Candy eyes or edible markers for decorating
- Red gel icing (for veins and extra spooky effect)
Ingredient Notes
- I always use Duncan Hines cake mix—it comes out so moist and fluffy every time.
- Don’t skip the cream cheese frosting! It’s key to keeping your Halloween cake balls moist and perfectly shaped.
- For the coating, Wilton white candy melts melt smoothly and harden with a nice glossy finish.
- The candy eyes are optional but seriously take the eyeball effect to the next level—trust me, they’re worth it!
- A tiny dab of vegetable oil helps the candy melts coat evenly without cracking.
Kitchen Equipment Needed
- Mixing bowls – For combining cake crumbs and frosting. I love using glass bowls because you can see everything clearly.
- Electric mixer or hand mixer – Makes blending cake and frosting super easy and smooth.
- Baking sheet – For chilling the cake balls before dipping. I use a non-stick one to avoid sticking.
- Parchment paper or silicone mat – Keeps the cake pops from sticking and makes cleanup a breeze.
- Microwave-safe bowl – For melting candy melts evenly without burning.
- Spoons or small cookie scoop – Helps portion the cake mixture into even balls.
- Lollipop sticks – Essential for turning cake balls into fun, handheld Halloween cake pops.
- Cooling rack – Perfect for letting the candy coating set without smudges.
- Edible markers or piping bags – For decorating the eyeballs with details like veins or irises.
Instructions
Step 1: Bake the Cake
- Preheat your oven according to the cake mix instructions.
- Prepare your cake batter following the directions on the box (usually mixing eggs, oil, water, and dry mix).
- Pour the batter into a greased 9×13-inch pan and bake as instructed.
- Let the cake cool completely—this is key so the frosting doesn’t melt when you mix it in.
Pro Tip: For extra moist cake pops, don’t overbake the cake. Check a toothpick in the center; it should come out with just a few crumbs.
Step 2: Crumble the Cake
- Once the cake is fully cooled, use your hands or a fork to crumble it into fine pieces in a large mixing bowl.
- Make sure there are no large chunks—smooth, even crumbs make it easier to form perfect balls.
Pro Tip: Some crumbs can be slightly larger—it adds texture to your cake pops, but avoid big chunks that won’t hold together.
Step 3: Mix in Frosting
- Add about 1 cup of cream cheese frosting to the crumbled cake.
- Use a spoon or your hands to mix until the mixture sticks together when pressed.
Pro Tip: Start with less frosting—you can always add more if the mixture feels too dry. Too much frosting will make your cake balls too soft.
Step 4: Shape the Cake Balls
- Scoop small portions of the cake mixture (about 1–1.5 inches in diameter).
- Roll each portion into a smooth ball using your hands.
- Place the balls on a baking sheet lined with parchment paper or a silicone mat.
- Chill in the fridge for at least 30 minutes or in the freezer for 10–15 minutes.
Pro Tip: Chilling the balls first helps them hold their shape when dipping in candy melts.
Step 5: Prepare the Candy Coating
- Melt the white candy melts in a microwave-safe bowl in 30-second intervals, stirring in between.
- Add 1–2 tsp of vegetable oil if the coating is too thick—this helps it dip smoothly.
Pro Tip: Whisk continuously while melting to prevent lumps and keep the coating glossy.
Step 6: Insert the Sticks
- Dip the tip of a lollipop stick into the melted candy, then insert it halfway into a cake ball.
- This acts as glue and keeps the cake ball secure on the stick.
- Repeat with all cake balls.
Step 7: Dip the Cake Pops
- Hold the stick and dip the cake ball into the melted candy, fully coating it.
- Gently tap off the excess candy back into the bowl.
- Place the dipped cake pop upright on a parchment-lined tray or insert into a styrofoam block to set.
Pro Tip: Don’t dip in overly thin candy melts—they’ll slide off. If needed, let the candy cool slightly before dipping.
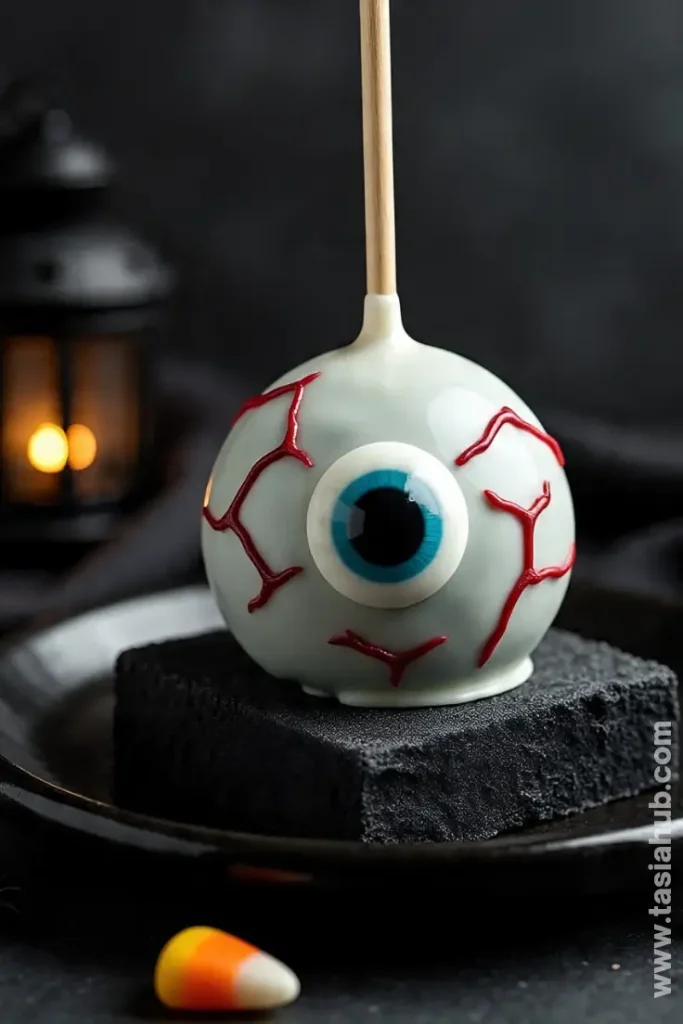
Step 8: Decorate the Eyeballs
- Before the coating sets completely, place candy eyes on each cake pop or use edible markers to draw the iris and pupil.
- Use red gel icing to draw small veins for a spooky effect.
- Let the pops fully set for at least 15–20 minutes before serving.
Tips and Tricks for Success
- Chill the cake balls well before dipping—they’ll hold their shape better and prevent cracking.
- Use a gentle tap to remove excess candy coating; too much tapping can cause drips or uneven coating.
- If the candy melts thicken while working, microwave in short 10-second bursts to keep them smooth.
- Work in small batches when decorating, especially if adding candy eyes or gel details.
- Store in an airtight container at room temperature for up to 3 days or in the fridge for up to a week.
Ingredient Substitutions and Variations
- Cake Mix: Swap for homemade cake if you prefer; chocolate, red velvet, or pumpkin spice all work beautifully.
- Frosting: Use buttercream, cream cheese, or even Nutella for a richer flavor.
- Candy Coating: Chocolate or colored candy melts can replace white for different Halloween looks.
- Decorations: Skip candy eyes and use colored sprinkles, edible glitter, or piping gel for fun variations.
- Flavor Boost: Add a teaspoon of vanilla extract, almond extract, or pumpkin spice to the cake mixture for extra flavor.
Serving Suggestions
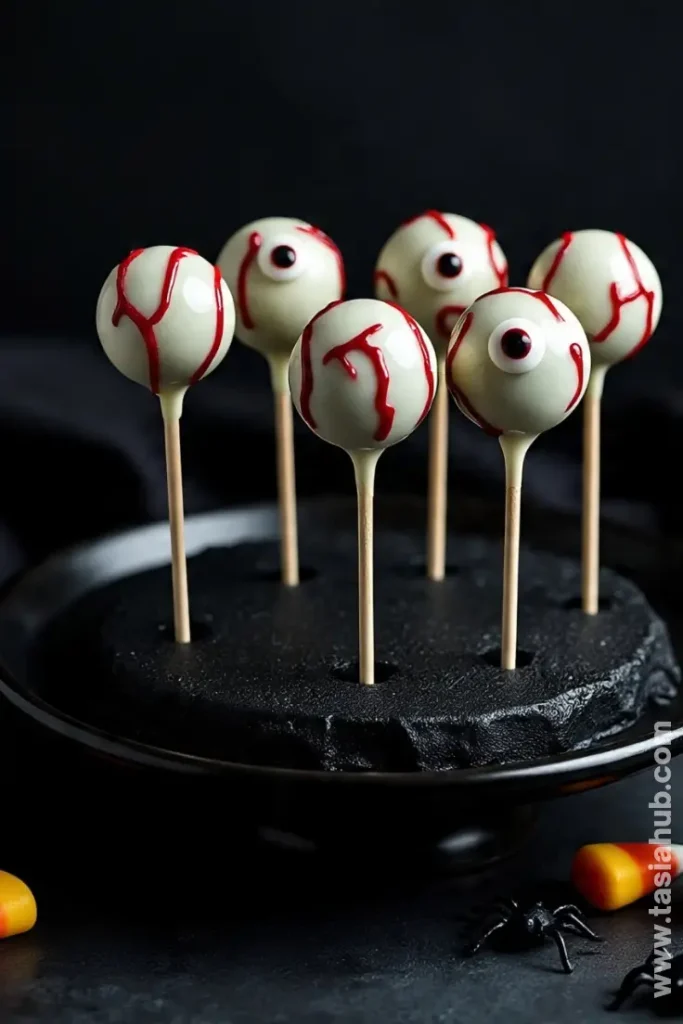
- I love placing a bunch of these eyeball cake pops in a spooky Halloween-themed jar on my dessert table—it’s such a fun centerpiece that guests can grab and go!
- Serve them alongside a tray of Halloween cupcakes or cookies for a full, festive dessert spread.
- For a party, stick them into a pumpkin or Styrofoam block and let kids “pick their eyeball” like a game—it’s always a hit.
- Pair with a cup of hot chocolate or pumpkin spice latte—the sweet, creamy drink balances the rich, cakey pop perfectly.
- Wrap a few in clear cellophane bags tied with orange or black ribbon for cute, portable Halloween treats to give neighbors or friends.
Storage and Reheating Instructions
- Store in an airtight container at room temperature for up to 3 days.
- For longer storage, keep in the fridge for up to a week—let them sit at room temperature for 10–15 minutes before serving.
- Avoid freezing if possible, as the candy coating can crack when thawed.
- Do not microwave; candy coating can melt and ruin the shape.
- Handle gently when moving to avoid smudging the decorative details.
Frequently Asked Questions
Can I make these cake pops ahead of time?
Yes! You can make them a day or two in advance and store them in an airtight container at room temperature. Just add any delicate decorations, like candy eyes, right before serving.
What’s the best cake flavor for eyeball cake pops?
Classic yellow or chocolate cake works beautifully, but red velvet, pumpkin spice, or funfetti are also great options depending on your Halloween theme.
Can I use homemade frosting instead of store-bought?
Absolutely! Buttercream or cream cheese frosting works perfectly. Just make sure it’s firm enough to hold the cake together without making it too sticky.
How do I prevent the candy coating from cracking?
Chill the cake balls before dipping and avoid letting the candy melts get too hot. Adding a teaspoon of vegetable oil can help create a smoother, more flexible coating.
Can I skip the candy eyes?
Yes! You can draw the details using edible markers, piping gel, or even small candies. The cake pops will still look spooky and fun.
Are these safe for kids?
Totally! Just skip any alcoholic or adult-only additions. They’re kid-friendly and perfect for classroom parties or Halloween gatherings.
Did you try this recipe? Let me know in the comments how your Halloween eyeball cake pops turned out!
Halloween Eyeball Cake Pops
Equipment
- Mixing Bowls
- Electric mixer or hand mixer
- Baking Sheet
- Parchment paper or silicone mat
- Microwave-safe bowl
- Spoons or small cookie scoop
- Lollipop sticks
- Cooling Rack
- Edible markers or piping bags
Ingredients
For the Cake Pops
- 1 box yellow or chocolate cake mix plus ingredients listed on the box: eggs, oil, water
- 1 cup cream cheese frosting or your favorite frosting
For the Coating & Decoration
- 12 oz white candy melts
- 1 –2 tsp vegetable oil to thin the candy melts if needed
- Candy eyes or edible markers for decorating
- Red gel icing for veins and extra spooky effect
Instructions
Step 1: Bake the Cake
- Preheat your oven according to the cake mix instructions.
- Prepare your cake batter following the directions on the box (usually mixing eggs, oil, water, and dry mix).
- Pour the batter into a greased 9×13-inch pan and bake as instructed.
- Let the cake cool completely—this is key so the frosting doesn’t melt when you mix it in.
- Pro Tip: For extra moist cake pops, don’t overbake the cake. Check a toothpick in the center; it should come out with just a few crumbs.
Step 2: Crumble the Cake
- Once the cake is fully cooled, use your hands or a fork to crumble it into fine pieces in a large mixing bowl.
- Make sure there are no large chunks—smooth, even crumbs make it easier to form perfect balls.
- Pro Tip: Some crumbs can be slightly larger—it adds texture to your cake pops, but avoid big chunks that won’t hold together.
Step 3: Mix in Frosting
- Add about 1 cup of cream cheese frosting to the crumbled cake.
- Use a spoon or your hands to mix until the mixture sticks together when pressed.
- Pro Tip: Start with less frosting—you can always add more if the mixture feels too dry. Too much frosting will make your cake balls too soft.
Step 4: Shape the Cake Balls
- Scoop small portions of the cake mixture (about 1–1.5 inches in diameter).
- Roll each portion into a smooth ball using your hands.
- Place the balls on a baking sheet lined with parchment paper or a silicone mat.
- Chill in the fridge for at least 30 minutes or in the freezer for 10–15 minutes.
- Pro Tip: Chilling the balls first helps them hold their shape when dipping in candy melts.
Step 5: Prepare the Candy Coating
- Melt the white candy melts in a microwave-safe bowl in 30-second intervals, stirring in between.
- Add 1–2 tsp of vegetable oil if the coating is too thick—this helps it dip smoothly.
- Pro Tip: Whisk continuously while melting to prevent lumps and keep the coating glossy.
Step 6: Insert the Sticks
- Dip the tip of a lollipop stick into the melted candy, then insert it halfway into a cake ball.
- This acts as glue and keeps the cake ball secure on the stick.
- Repeat with all cake balls.
Step 7: Dip the Cake Pops
- Hold the stick and dip the cake ball into the melted candy, fully coating it.
- Gently tap off the excess candy back into the bowl.
- Place the dipped cake pop upright on a parchment-lined tray or insert into a styrofoam block to set.
- Pro Tip: Don’t dip in overly thin candy melts—they’ll slide off. If needed, let the candy cool slightly before dipping.
Step 8: Decorate the Eyeballs
- Before the coating sets completely, place candy eyes on each cake pop or use edible markers to draw the iris and pupil.
- Use red gel icing to draw small veins for a spooky effect.
- Let the pops fully set for at least 15–20 minutes before serving.
Notes
Nutritional Value (per cake pop, approximate)
- Calories: 160–180
- Carbohydrates: 22g
- Sugar: 16g
- Fat: 7g
- Cholesterol: 15mg
- Sodium: 120mg
- Protein: 2g