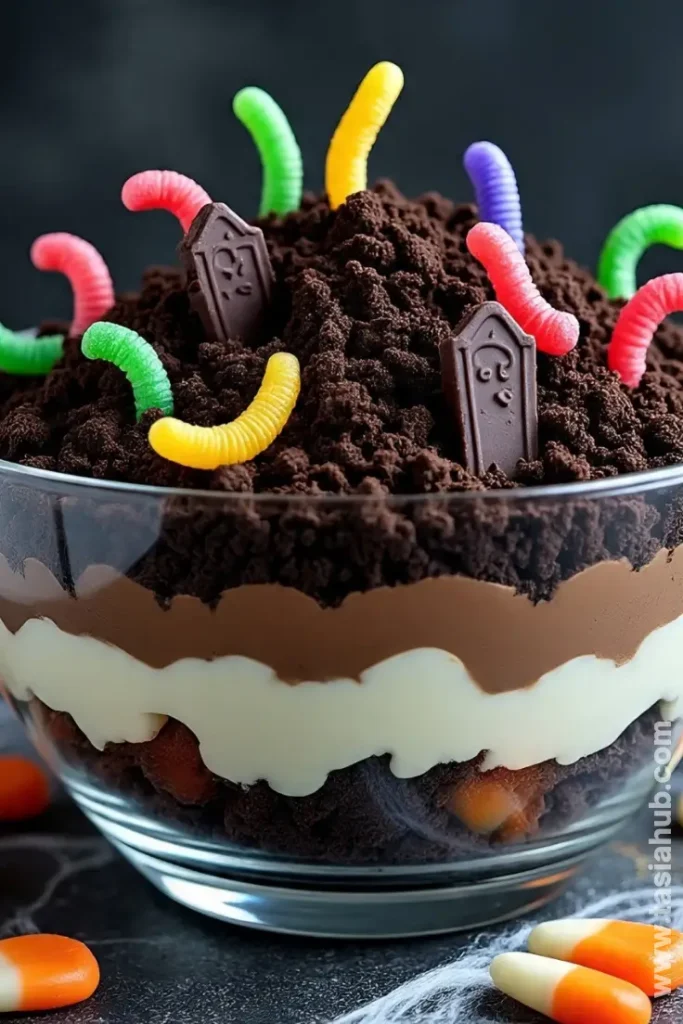
Halloween Dirt Cake
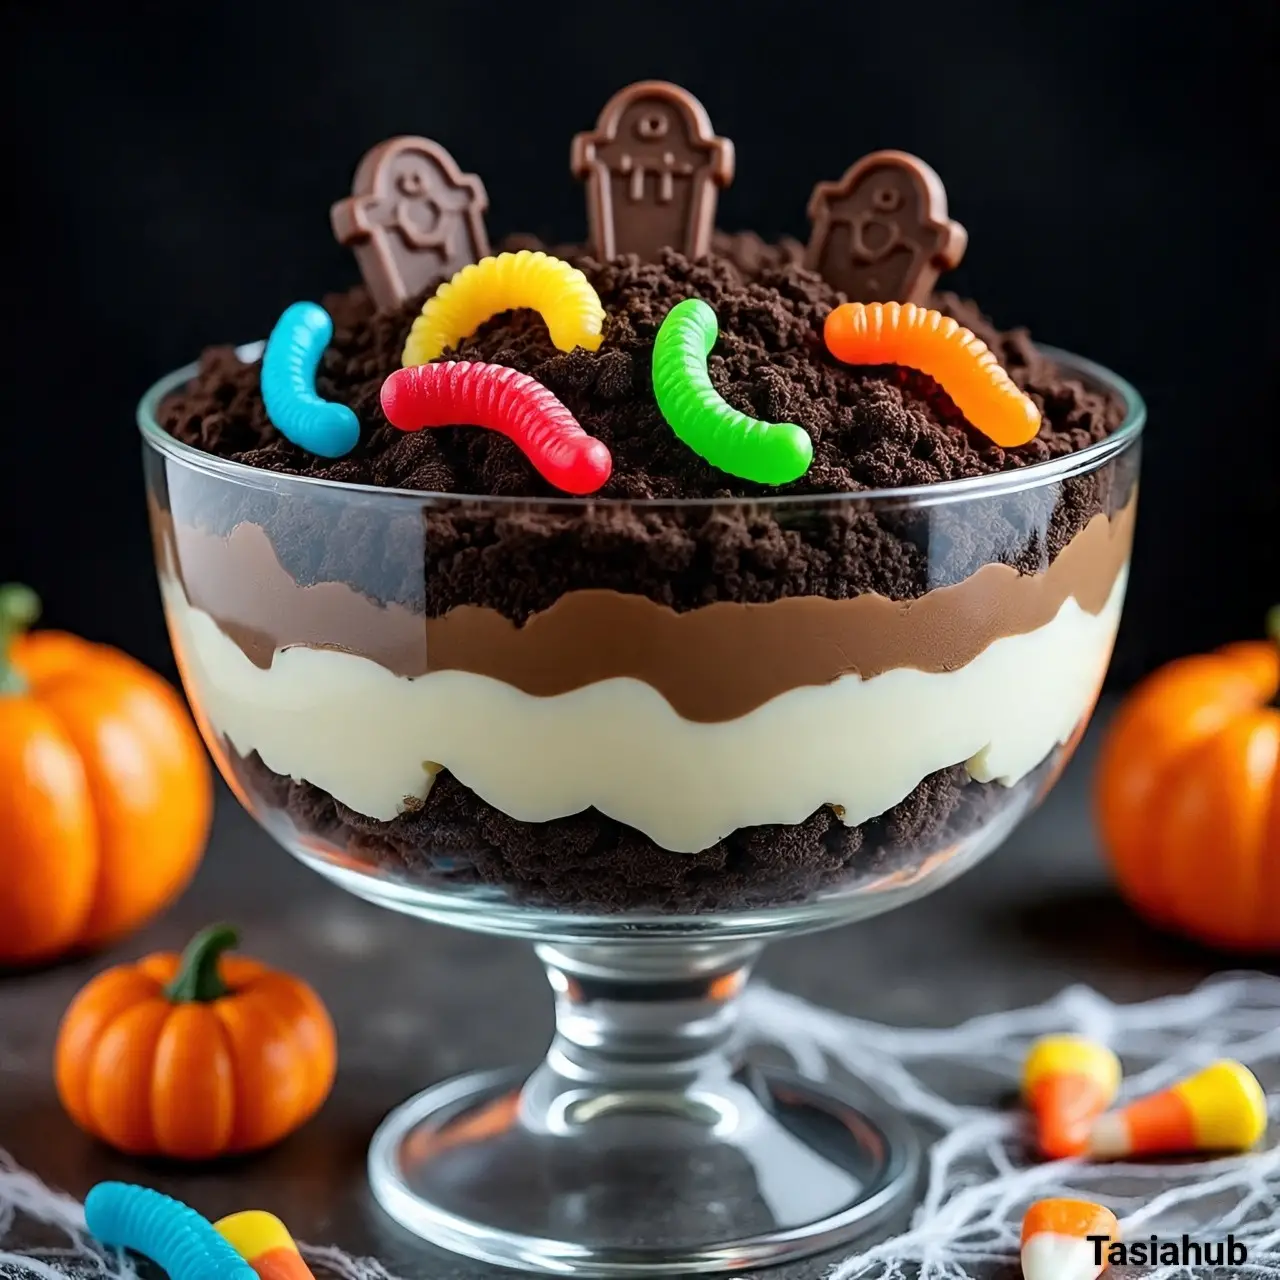
Halloween is the perfect time to get a little creative in the kitchen, and nothing screams spooky and fun quite like a Halloween dirt cake. This dessert isn’t just for kids—there’s plenty of room for adults to enjoy a decadent, chocolatey treat with a creepy twist. Imagine layers of rich chocolate pudding, crushed cookies that mimic dirt, and gummy worms peeking out from the top—it’s playful, indulgent, and the kind of dessert that sparks conversations at any Halloween gathering.
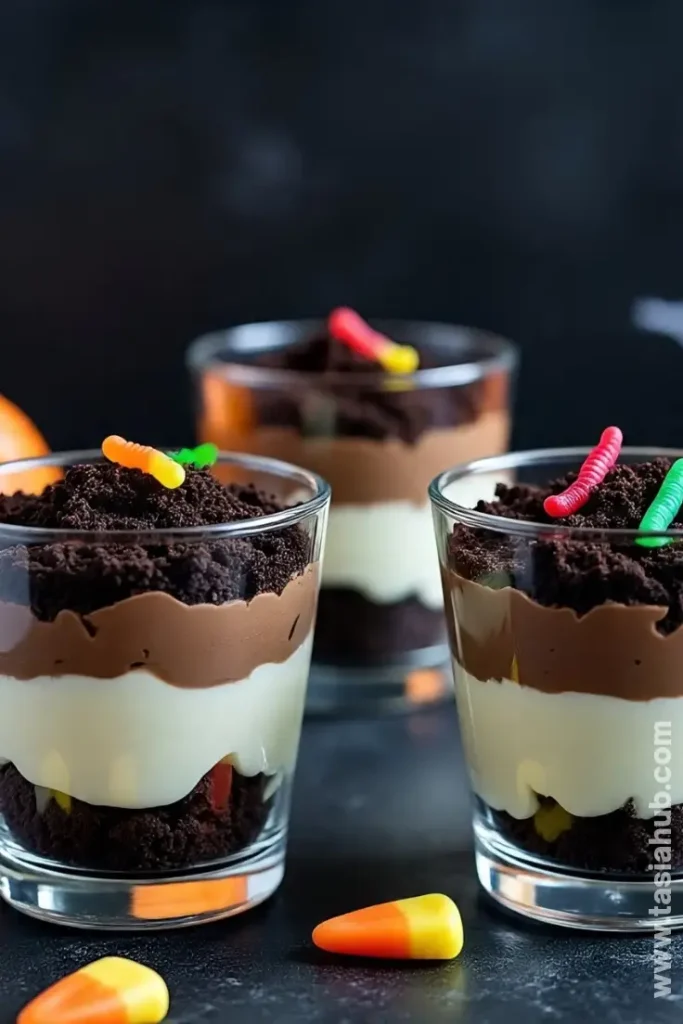
One of the best things about this graveyard dirt cake is how easy it is to make, even if you’re not usually a baker. Unlike some scary cakes that require complex techniques or fancy decorations, a dirt cake lets you get creative without any stress. You can layer it in a large trifle bowl for a dramatic effect or make individual cups for a fun, personal touch. Either way, it’s guaranteed to be a hit among guests.
This chocolate dirt cake stands out among Halloween desserts for adults because it balances rich flavors with a whimsical presentation. The chocolate pudding is smooth and luscious, while the crushed cookies provide just the right amount of crunch to mimic “earth.” Adding gummy worms or candy tombstones on top instantly transforms a simple dessert into a spooky masterpiece, making it a favorite for Halloween parties or even just a cozy night at home with friends.
Beyond the taste and presentation, dirt cake is one of those rare desserts that invites experimentation. You can try different layers, mix in flavored puddings, or even sprinkle a little edible glitter for a magical graveyard effect. It’s approachable, playful, and utterly delicious—a perfect addition to your lineup of Halloween desserts. If you’re compiling a list of dirt cake recipes, this one will definitely stand out for its flavor, texture, and fun factor.
Why You’ll Love It
- Super Fun to Make: Layering chocolate pudding, crushed cookies, and gummy worms turns dessert prep into a playful activity. It’s almost like creating your own little edible graveyard, and honestly, that part is half the fun!
- Perfect for Adults and Kids Alike: While it’s spooky enough for Halloween parties, this chocolate dirt cake hits all the right notes for adult taste buds with its rich, indulgent chocolate flavor.
- Customizable and Creative: You can go all out with candy tombstones, edible spiders, or even a splash of chocolate ganache. Each version feels unique, so you can get as wild or as simple as you like.
- Quick and Stress-Free: Unlike some scary cakes that take hours, this dirt cake comes together quickly, making it ideal for last-minute Halloween desserts or a sweet addition to your dessert table.
- A Crowd-Pleaser Every Time: Between the creamy pudding, crumbly cookie “dirt,” and sweet candy accents, it’s one of those desserts that disappears fast—everyone always asks for seconds.
Ingredient List
For the Dirt Cake:
- 1 (16 oz) package of Oreo cookies, crushed
- 1 (8 oz) package cream cheese, softened
- 1/2 cup unsalted butter, softened
- 2 cups powdered sugar
- 2 (3.9 oz) packages instant chocolate pudding mix
- 3 1/2 cups cold milk
- 1 (8 oz) container whipped topping, thawed
- Gummy worms (about 12–15)
- Chocolate or candy tombstones for decoration (optional)
Ingredient Notes
- Oreo cookies: I always use the classic Oreos—they give the perfect “dirt” texture. Double-stuffed works too if you like it extra creamy.
- Cream cheese: Don’t skip this! It adds richness and helps the pudding layer stay silky.
- Instant chocolate pudding: Make sure it’s the instant kind—it sets up faster and gives that smooth, decadent texture.
- Whipped topping: Fold it gently into the cream cheese mixture to keep it light and fluffy.
- Gummy worms and candy tombstones: This is where the fun comes in! The more creative you get, the spookier your graveyard dirt cake will look.
Kitchen Equipment Needed
- Mixing bowls (2–3): For combining cream cheese, sugar, and pudding layers; I love using glass bowls so you can see the layers forming.
- Hand mixer or stand mixer: Makes whipping the cream cheese and powdered sugar effortless and smooth.
- Measuring cups and spoons: Essential for accuracy—plus, I always keep a small set handy for quick sprinklings of extra cookie crumbs.
- Spatula: Perfect for folding in whipped topping without deflating it. My silicone spatula is a lifesaver.
- 9×13-inch baking dish or trifle bowl: For layering the dirt cake. A trifle bowl gives it that impressive “graveyard” look.
- Food processor or zip-top bag + rolling pin: To crush the Oreos into that perfect dirt texture.
- Spoon or small scoop: For placing the layers neatly and for adding gummy worms in fun spots.
Instructions
Step 1: Crush the Oreos
- Place the Oreos in a food processor and pulse until they resemble fine dirt.
- No food processor? Toss the cookies into a zip-top bag and gently crush with a rolling pin.
- Pro tip: Leave a few slightly larger pieces for texture—it makes your dirt cake look more realistic.
Step 2: Make the Cream Cheese Mixture
- In a mixing bowl, beat the softened cream cheese and butter together until smooth and creamy.
- Gradually add powdered sugar, mixing until fully incorporated.
- Pro tip: Scrape down the sides of the bowl to avoid lumps and get a smooth, silky texture.
Step 3: Prepare the Chocolate Pudding
- In a separate bowl, whisk together instant chocolate pudding mix and cold milk.
- Whisk continuously for 2–3 minutes until it thickens.
- Pro tip: Use cold milk straight from the fridge—it helps the pudding set faster and stay thick.
Step 4: Fold in the Whipped Topping
- Gently fold half of the whipped topping into the cream cheese mixture.
- In another bowl, fold the remaining whipped topping into the chocolate pudding.
- Pro tip: Use a spatula and fold carefully to keep the mixture light and fluffy.
Step 5: Layer the Dirt Cake
- In your 9×13-inch dish or trifle bowl, start with a layer of crushed Oreos.
- Add a layer of the cream cheese mixture, spreading evenly.
- Follow with a layer of chocolate pudding, then another layer of crushed Oreos.
- Repeat until all ingredients are used, finishing with a top layer of Oreo “dirt.”
Step 6: Add the Spooky Decorations
- Nestle gummy worms in the top layer of Oreo crumbs, letting them peek out for that graveyard effect.
- Add chocolate or candy tombstones for extra spook factor.
- Pro tip: Chill the cake for at least 2–3 hours before serving so the layers set perfectly.
Step 7: Serve and Enjoy
- Scoop into individual bowls or serve directly from the dish.
- Watch your guests’ faces light up as they dig into this creepy, chocolatey treat!
Tips and Tricks for Success
- Don’t rush the chilling: Letting your dirt cake set in the fridge for at least 2–3 hours ensures the layers hold up beautifully.
- Keep the “dirt” texture: Crush the Oreos just enough to resemble soil; too fine can make it muddy-looking.
- Fold, don’t stir: When combining whipped topping with cream cheese or pudding, fold gently to keep it light and airy.
- Play with layers: Alternate thick and thin layers of pudding and cream cheese mixture for a visually appealing graveyard effect.
- Gummy worm placement: Place some worms partially buried and some on top—it looks more realistic and fun!
Ingredient Substitutions and Variations
- Cookies: Swap Oreos for chocolate graham crackers or chocolate wafer cookies for a slightly different “dirt” texture.
- Cream cheese: Use mascarpone for a richer, creamier layer.
- Chocolate pudding: Try chocolate fudge or chocolate hazelnut pudding for extra indulgence.
- Whipped topping: Homemade whipped cream works beautifully and adds a fresher taste.
- Decorations: Add crushed chocolate-covered pretzels for “twigs” or candy bones for an even spookier graveyard vibe.
Serving Suggestions
- I love serving this dirt cake in individual clear cups—each guest gets their own mini graveyard, and the layers look extra spooky!
- For a party, place the dirt cake on a Halloween-themed platter with extra gummy worms crawling around—it makes the presentation super fun.
- Pair a scoop of this chocolate dirt cake with a glass of cold milk or a rich coffee; the creamy chocolate and crunchy “dirt” balance perfectly.
- Top with a drizzle of chocolate sauce or caramel just before serving for an extra indulgent touch.
- Serve alongside other Halloween desserts for adults, like pumpkin cupcakes or candy bark, to create a dessert table that wows.
Storage and Reheating Instructions
- Refrigerate: Keep in an airtight container for up to 3–4 days. The flavors actually meld beautifully after a day.
- Freeze: You can freeze individual portions for up to 1 month; thaw in the fridge overnight before serving.
- No reheating needed: This dessert is best served chilled, so skip the oven or microwave—it’s all about that creamy, cold texture.
- Keep decorations fresh: Add gummy worms and candy tombstones right before serving if storing for a few days to prevent them from becoming sticky.
Frequently Asked Questions
Can I make this Halloween dirt cake ahead of time?
Absolutely! You can prepare it a day in advance and keep it chilled in the fridge. The flavors actually taste better after a few hours as they meld together.
Can I use a different type of cookie instead of Oreos?
Yes! Chocolate wafer cookies or graham crackers work great too. Just crush them finely so they resemble dirt for that classic graveyard dirt cake look.
Is this dessert suitable for adults only?
Not at all—while it’s one of the fun Halloween desserts for adults, kids love it too! You can adjust candy decorations to be kid-friendly or extra spooky for adults.
How long should I chill the dirt cake before serving?
Chill for at least 2–3 hours. This helps the layers set and makes serving much easier, plus the pudding and cream cheese flavors blend beautifully.
Can I make this dairy-free or lighter?
Yes! Swap the cream cheese and whipped topping for dairy-free alternatives, and use a pudding mix that’s plant-based. It’s just as delicious and still makes a perfect Halloween dessert.
Any tips for decorating like a pro?
Use a mix of gummy worms, candy tombstones, and even edible glitter for extra fun. Placing some worms partially buried and some on top gives a realistic creepy graveyard effect.
Did you try this Halloween dirt cake? Let me know in the comments how it turned out!

Halloween Dirt Cake
Equipment
- Mixing bowls (2–3)
- Hand mixer or stand mixer
- Measuring cups and spoons
- Spatula
- 9×13-inch baking dish or trifle bowl
- Food processor or zip-top bag + rolling pin
- Spoon or small scoop
Ingredients
- 1 16 oz package of Oreo cookies, crushed
- 1 8 oz package cream cheese, softened
- 1/2 cup unsalted butter softened
- 2 cups powdered sugar
- 2 3.9 oz packages instant chocolate pudding mix
- 3 1/2 cups cold milk
- 1 8 oz container whipped topping, thawed
- Gummy worms about 12–15
- Chocolate or candy tombstones for decoration optional
Instructions
Step 1: Crush the Oreos
- Place the Oreos in a food processor and pulse until they resemble fine dirt.
- No food processor? Toss the cookies into a zip-top bag and gently crush with a rolling pin.
- Pro tip: Leave a few slightly larger pieces for texture—it makes your dirt cake look more realistic.
Step 2: Make the Cream Cheese Mixture
- In a mixing bowl, beat the softened cream cheese and butter together until smooth and creamy.
- Gradually add powdered sugar, mixing until fully incorporated.
- Pro tip: Scrape down the sides of the bowl to avoid lumps and get a smooth, silky texture.
Step 3: Prepare the Chocolate Pudding
- In a separate bowl, whisk together instant chocolate pudding mix and cold milk.
- Whisk continuously for 2–3 minutes until it thickens.
- Pro tip: Use cold milk straight from the fridge—it helps the pudding set faster and stay thick.
Step 4: Fold in the Whipped Topping
- Gently fold half of the whipped topping into the cream cheese mixture.
- In another bowl, fold the remaining whipped topping into the chocolate pudding.
- Pro tip: Use a spatula and fold carefully to keep the mixture light and fluffy.
Step 5: Layer the Dirt Cake
- In your 9×13-inch dish or trifle bowl, start with a layer of crushed Oreos.
- Add a layer of the cream cheese mixture, spreading evenly.
- Follow with a layer of chocolate pudding, then another layer of crushed Oreos.
- Repeat until all ingredients are used, finishing with a top layer of Oreo “dirt.”
Step 6: Add the Spooky Decorations
- Nestle gummy worms in the top layer of Oreo crumbs, letting them peek out for that graveyard effect.
- Add chocolate or candy tombstones for extra spook factor.
- Pro tip: Chill the cake for at least 2–3 hours before serving so the layers set perfectly.
Step 7: Serve and Enjoy
- Scoop into individual bowls or serve directly from the dish.
- Watch your guests’ faces light up as they dig into this creepy, chocolatey treat!
Notes
Nutritional Value (per serving, approximate)
- Calories: 380–400
- Total Fat: 20g
- Carbohydrates: 48g
- Sugar: 33g
- Protein: 5g
- Fiber: 2g
- Sodium: 320mg