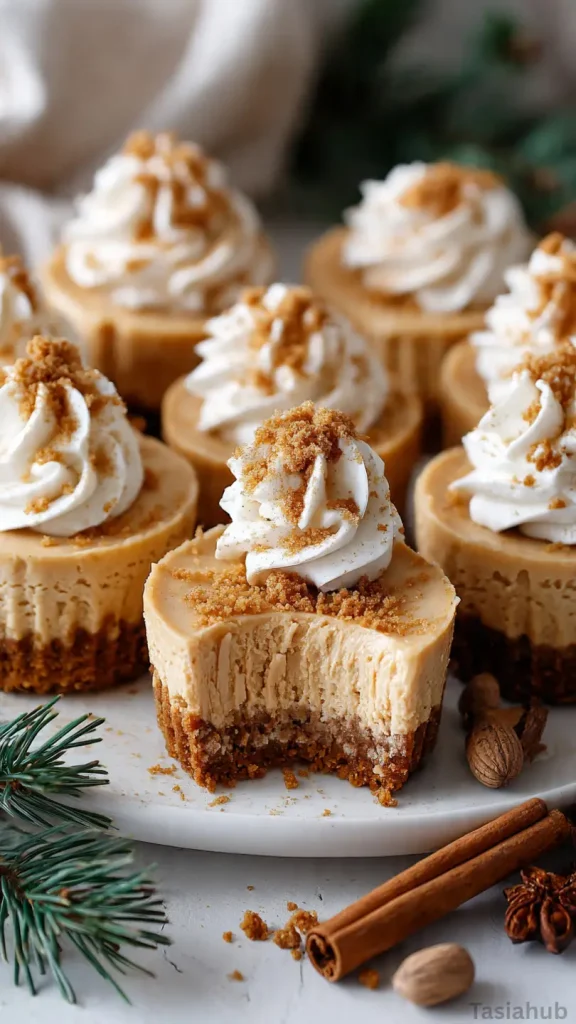
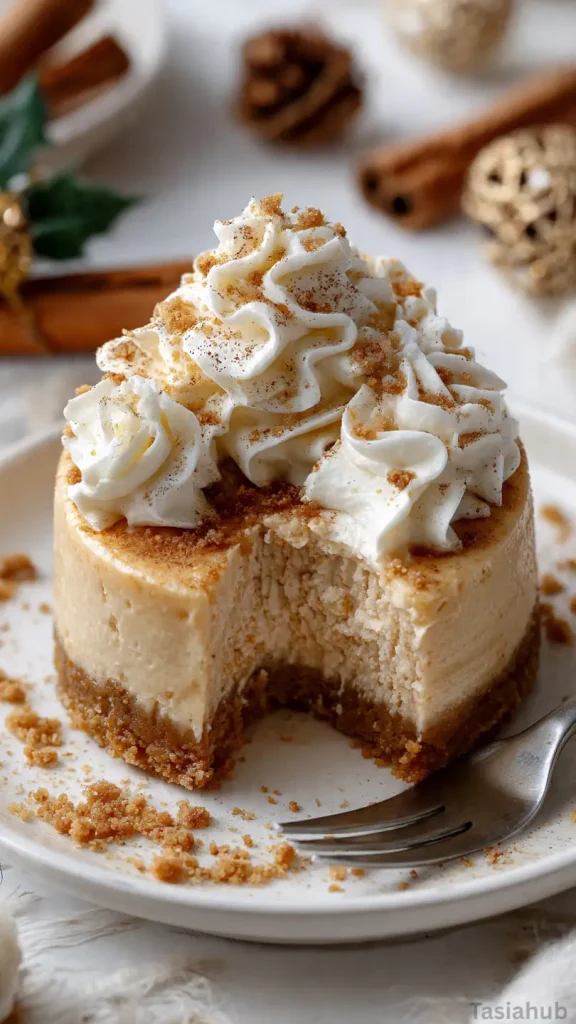
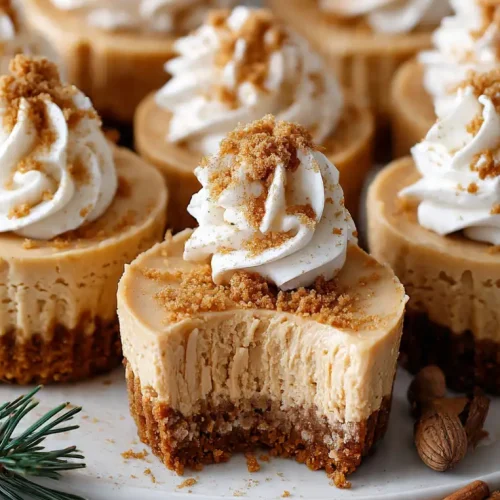
Gingerbread Cheesecake Cups
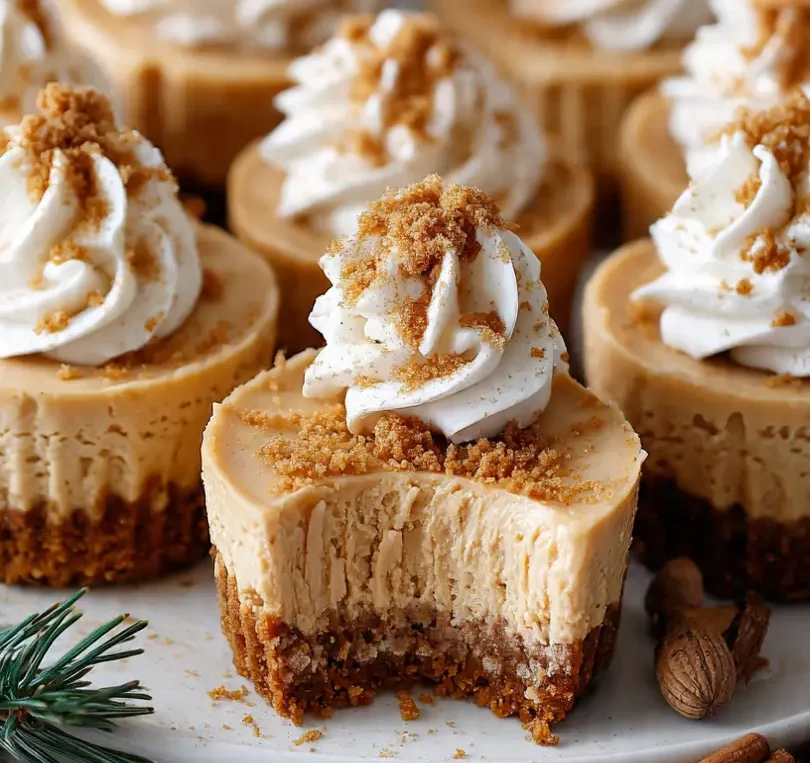
Few desserts capture the cozy spirit of the holidays quite like these gingerbread cheesecake cups. They’re sweet, spiced, creamy, and perfectly portioned for festive gatherings. Each bite feels like the warmth of Christmas in dessert form — smooth cream cheese filling nestled over a buttery ginger cookie base, topped with a swirl of whipped cream and a sprinkle of cinnamon.
I love how these mini treats combine two holiday favorites — cheesecake and gingerbread — into one irresistible dessert. The flavors are rich but balanced: that familiar kick of ginger and cinnamon from the crust pairs beautifully with the velvety cheesecake layer. And because they’re made in individual cups, they’re ideal for serving a crowd without the fuss of slicing or plating a full cake.
These gingerbread cheesecake cups make the cutest addition to your holiday dessert table. Whether you’re planning a big family dinner or a cozy Christmas movie night, these little cheesecakes will fit right in. Kids adore them too, making them one of the most fun and festive Christmas desserts for kids — creamy, sweet, and just the right size for tiny hands.
They also make great Thanksgiving cheesecake bites when you want something easy to grab and enjoy after a hearty meal. Their no-fuss, handheld size means guests can mingle and enjoy dessert at their own pace. Plus, their spiced aroma fills the room with that unmistakable holiday cheer, reminding everyone why Christmas desserts hold such a special place in the season.
These mini gingerbread cheesecakes are the kind of treat that disappears fast, so it’s always smart to make a few extra. With their irresistible mix of creamy cheesecake, spiced flavor, and bite-sized charm, they’re guaranteed to bring smiles and maybe even become your new favorite holiday tradition.
Why You’ll Love It
- Perfectly portioned for parties: No need to slice or share — these mini cheesecakes are already the perfect serving size. Great for buffets, dessert tables, or passing around at family gatherings.
- Festive flavor in every bite: The cozy blend of ginger, cinnamon, and nutmeg gives that unmistakable holiday warmth, balanced beautifully by the creamy cheesecake filling.
- Kid-approved and crowd-friendly: These make adorable Christmas desserts for kids — easy to hold, fun to eat, and full of that classic gingerbread flavor everyone loves.
- Make-ahead friendly: They chill beautifully, so you can prep them a day or two in advance and have dessert ready when guests arrive.
- Holiday showstopper with minimal effort: Though they look fancy, these mini gingerbread cheesecakes come together with simple ingredients and no complicated steps — just pure, festive indulgence.
Ingredient List
For the Crust:
- 1 ½ cups crushed gingersnap cookies
- 3 tablespoons granulated sugar
- 4 tablespoons unsalted butter, melted
For the Cheesecake Filling:
- 16 oz cream cheese, softened
- ½ cup brown sugar
- 2 tablespoons molasses
- 1 teaspoon vanilla extract
- 1 teaspoon ground ginger
- 1 teaspoon cinnamon
- ¼ teaspoon nutmeg
- 2 large eggs
For Topping (Optional):
- Whipped cream
- Crushed gingersnap cookies or holiday sprinkles
- A light dusting of cinnamon
Ingredient Notes
- Gingersnap cookies: I always use crisp gingersnaps for the crust — they blend perfectly and give that bold ginger kick. Don’t use soft cookies; they won’t hold up as well.
- Molasses: Don’t skip the molasses! It’s the secret ingredient that gives these Christmas mini cheesecakes their deep, rich holiday flavor.
- Cream cheese: Go for full-fat cream cheese (like Philadelphia) — it makes the filling extra creamy and smooth.
- Spices: Fresh spices make all the difference here. If your cinnamon or nutmeg has been sitting in the pantry for years, grab a new batch for maximum flavor.
- Whipped cream topping: A little swirl on top adds that festive, bakery-style touch — plus, it balances the warmth of the spices beautifully.
Kitchen Equipment Needed
- Muffin pan: For baking those perfectly portioned mini cheesecakes. I love using a non-stick 12-cup pan for easy release.
- Paper liners or silicone cups: Keep the cheesecakes neat and make cleanup a breeze — silicone liners are my go-to for reusable convenience.
- Mixing bowls: You’ll need one for the crust and another for the filling — a medium and large size work perfectly.
- Electric mixer or hand whisk: To beat the cream cheese until it’s silky smooth with no lumps.
- Measuring cups and spoons: Accuracy is key for the perfect cheesecake texture.
- Spatula: Great for scraping down the sides of the bowl and evenly dividing the batter into the cups.
- Food processor (optional): If you want extra-fine gingersnap crumbs for the crust, a food processor does the job in seconds.
Instructions
1. Prep the oven and pan
- Preheat oven to 325°F (160°C).
- Line a 12-cup muffin pan with paper liners or silicone cups.
- If using paper liners, set a shallow baking dish (large enough to hold the muffin pan) nearby — you’ll use it for a warm water bath later.
2. Make the crust
- Place 1½ cups gingersnap cookies in a food processor and pulse until fine crumbs. (If you don’t have a food processor, place cookies in a zip-top bag and crush with a rolling pin.)
- Transfer crumbs to a bowl and stir in 3 tablespoons granulated sugar.
- Stir in 4 tablespoons melted butter until the mixture looks like wet sand and holds together when pressed.
- Divide the crumb mixture evenly among the 12 liners (about 2 tablespoons per cup).
- Press the crumbs firmly into the bottom of each liner to form a compact base. Use the bottom of a measuring cup for an even press.
- Optional: Bake the crusts for 5 minutes to set them, then let cool slightly. (Baking helps a crisper base — skip if you’re short on time.)
3. Make the cheesecake filling
- In a large bowl, beat 16 oz softened cream cheese on medium speed until smooth and lump-free (about 2–3 minutes).
- Pro tip: Don’t rush this step. Start slow to avoid splatters, scrape the bowl, then increase speed. Fully softened cream cheese is the secret to a silky filling.
- Add ½ cup brown sugar and 2 tablespoons molasses; beat until combined and smooth.
- Mix in 1 teaspoon vanilla, 1 teaspoon ground ginger, 1 teaspoon cinnamon, and ¼ teaspoon nutmeg until evenly distributed.
- Add the eggs one at a time, mixing on low speed and scraping the bowl between additions until each egg is incorporated.
- Pro tip: Mix eggs in on low to prevent adding excess air — too much air can cause cracks while baking.
4. Assemble the cups
- Spoon or pipe the cheesecake filling over the prepared crusts, filling each cup about ¾ to ⅞ full. Use an offset spatula or the back of a spoon to smooth the tops.
- Tap the muffin pan gently on the counter to release any large air bubbles.
5. Bake (with optional water bath)
- Place the muffin pan into the shallow baking dish if using a water bath. Carefully pour hot (not boiling) water into the baking dish until it reaches about halfway up the sides of the muffin pan.
- Pro tip: Water bath = fewer cracks. The steam helps bake the cheesecakes evenly and keeps the tops smooth.
- Bake at 325°F (160°C) for 18–22 minutes, or until the edges are set and the center still has a slight jiggle (it will firm as it chills).
- Turn off the oven and leave the door slightly ajar for 10 minutes to help prevent a sudden temperature change that could crack the tops.
6. Cool and chill
- Remove the muffin pan from the water bath (if used) and set it on a wire rack. Let the cheesecakes cool to room temperature in the pan (about 1 hour).
- Once cooled, transfer the pan to the refrigerator and chill for at least 4 hours — overnight is best for firm texture and full flavor development.
7. Add toppings and serve
- Before serving, pipe or spoon a dollop of whipped cream on each cheesecake cup. Sprinkle with crushed gingersnaps, a dusting of cinnamon, or festive sprinkles.
- Serve chilled. These are great straight from the fridge or allowed to sit a few minutes at room temp if you prefer a softer bite.
8. Quick troubleshooting & tiny tips
- Lumpy filling? Beat longer at medium speed and scrape the bowl well. Cold cream cheese or rushed mixing causes lumps.
- Cracked tops? Don’t overbake and consider using the water bath method next time.
- Want richer flavor? Add 1 tablespoon of sour cream to the filling for extra tang and silkiness.
Tips and Tricks for Success
- Use room temperature ingredients: Cold cream cheese or eggs can make the batter lumpy and prevent that smooth, creamy texture cheesecakes are known for.
- Don’t overmix: Once you add the eggs, mix just until combined. Overbeating introduces air, which can lead to cracks during baking.
- Check for the perfect jiggle: The cheesecakes are done when the edges are set, but the center still has a gentle wobble. They’ll firm up as they cool.
- Cool gradually: Avoid quick temperature changes — let them cool slowly in the oven with the door slightly open, then chill in the fridge. This helps prevent cracks.
- Make ahead: These little cheesecakes taste even better the next day as the flavors meld together — perfect for busy holiday prep!
- Add toppings just before serving: This keeps whipped cream fluffy and cookies crisp, especially if you’re making them a day in advance.
Ingredient Substitutions and Variations
- Crust swap: Try graham crackers, Biscoff cookies, or digestive biscuits instead of gingersnaps for a milder flavor.
- Lighter version: Use reduced-fat cream cheese and a bit of Greek yogurt to lighten the texture without losing flavor.
- Flavor twist: Add a tablespoon of maple syrup or caramel sauce to the batter for a sweet holiday twist.
- Topping ideas: Go beyond whipped cream — drizzle with caramel, top with mini gingerbread men, or sprinkle crushed candy canes for a festive touch.
- No-bake version: Skip baking by using a no-bake cheesecake filling (cream cheese, whipped cream, sugar, and molasses) over a chilled gingersnap crust. Perfect when you don’t want to turn on the oven!
- Thanksgiving variation: Swap gingerbread for spiced graham crumbs and add a hint of pumpkin puree — transforming these into easy Thanksgiving cheesecake bites.
Serving Suggestions
- Festive dessert platter: I love serving these mini gingerbread cheesecakes on a holiday dessert tray alongside sugar cookies and fudge — they make the table look extra cheerful and inviting.
- Topped with whipped cream and cinnamon: A light swirl of whipped cream and a sprinkle of cinnamon make them look bakery-perfect without much effort.
- Holiday party bites: These are the ultimate finger desserts for Christmas gatherings or office potlucks — no cutting, no mess, just easy grab-and-go sweetness.
- With a warm drink: Pair them with a cup of hot cocoa, eggnog, or spiced latte for a cozy evening treat that tastes like Christmas in every sip.
- After-dinner indulgence: I like serving them after a hearty holiday meal — they’re rich yet perfectly portioned, so guests can enjoy dessert without feeling too full.
Storage and Reheating Instructions
- Refrigerate: Store leftover cheesecakes in an airtight container in the fridge for up to 5 days. Keep toppings separate until ready to serve.
- Freeze: Wrap each cheesecake (without toppings) tightly in plastic wrap, then place them in a freezer bag. They’ll keep for up to 2 months.
- Thawing: To serve, thaw overnight in the refrigerator or for about 1 hour at room temperature.
- Reheating: These cheesecakes are best enjoyed chilled, but if you prefer a softer texture, let them sit at room temperature for 10–15 minutes before serving.
- Make-ahead tip: You can prepare the crust and filling up to a day in advance, then bake the next day for fresh, perfectly set mini cheesecakes.
Frequently Asked Questions
Can I make these gingerbread cheesecake cups ahead of time?
Yes! These mini cheesecakes actually taste better the next day once the flavors have had time to blend. Just store them in the fridge and add your toppings right before serving.
How do I prevent my mini cheesecakes from cracking?
The key is not to overbake and to let them cool slowly. Turning off the oven and leaving the door slightly open for 10 minutes helps them adjust to temperature changes gently.
Can I use store-bought gingersnap crumbs instead of crushing cookies?
Absolutely! Pre-crushed gingersnap crumbs work great and save time — just measure the same amount as listed in the recipe.
What if I don’t have a muffin pan?
You can use small ramekins or even mini mason jars for a fun, individual presentation. Just adjust the baking time slightly if using thicker containers.
Can I make these cheesecakes without eggs?
Yes — replace the eggs with ¼ cup of sour cream and 1 tablespoon of cornstarch. The texture will be slightly softer, but still creamy and delicious.
How long do they need to chill before serving?
At least 4 hours, but overnight is ideal. The longer chill time helps the cheesecakes set perfectly and enhances the gingerbread flavor.
Did you try this recipe? Let me know in the comments how it turned out — I’d love to hear how you served your gingerbread cheesecake cups and if they made it onto your holiday dessert list!
Gingerbread Cheesecake Cups
Equipment
- Muffin Pan
- Paper liners or silicone cups
- Mixing Bowls
- Electric Mixer (or Hand Whisk)
- Measuring cups and spoons
- Spatula
- Food processor (optional)
Ingredients
For the Crust:
- 1 ½ cups crushed gingersnap cookies
- 3 tablespoons granulated sugar
- 4 tablespoons unsalted butter melted
For the Cheesecake Filling:
- 16 oz cream cheese softened
- ½ cup brown sugar
- 2 tablespoons molasses
- 1 teaspoon vanilla extract
- 1 teaspoon ground ginger
- 1 teaspoon cinnamon
- ¼ teaspoon nutmeg
- 2 large eggs
For Topping (Optional):
- Whipped cream
- Crushed gingersnap cookies or holiday sprinkles
- A light dusting of cinnamon
Instructions
Prep the oven and pan
- Preheat oven to 325°F (160°C).
- Line a 12-cup muffin pan with paper liners or silicone cups.
- If using paper liners, set a shallow baking dish (large enough to hold the muffin pan) nearby — you’ll use it for a warm water bath later.
Make the crust
- Place 1½ cups gingersnap cookies in a food processor and pulse until fine crumbs. (If you don’t have a food processor, place cookies in a zip-top bag and crush with a rolling pin.)
- Transfer crumbs to a bowl and stir in 3 tablespoons granulated sugar.
- Stir in 4 tablespoons melted butter until the mixture looks like wet sand and holds together when pressed.
- Divide the crumb mixture evenly among the 12 liners (about 2 tablespoons per cup).
- Press the crumbs firmly into the bottom of each liner to form a compact base. Use the bottom of a measuring cup for an even press.
- Optional: Bake the crusts for 5 minutes to set them, then let cool slightly. (Baking helps a crisper base — skip if you’re short on time.)
Make the cheesecake filling
- In a large bowl, beat 16 oz softened cream cheese on medium speed until smooth and lump-free (about 2–3 minutes).
- Pro tip: Don’t rush this step. Start slow to avoid splatters, scrape the bowl, then increase speed. Fully softened cream cheese is the secret to a silky filling.
- Add ½ cup brown sugar and 2 tablespoons molasses; beat until combined and smooth.
- Mix in 1 teaspoon vanilla, 1 teaspoon ground ginger, 1 teaspoon cinnamon, and ¼ teaspoon nutmeg until evenly distributed.
- Add the eggs one at a time, mixing on low speed and scraping the bowl between additions until each egg is incorporated.
- Pro tip: Mix eggs in on low to prevent adding excess air — too much air can cause cracks while baking.
Assemble the cups
- Spoon or pipe the cheesecake filling over the prepared crusts, filling each cup about ¾ to ⅞ full. Use an offset spatula or the back of a spoon to smooth the tops.
- Tap the muffin pan gently on the counter to release any large air bubbles.
Bake (with optional water bath)
- Place the muffin pan into the shallow baking dish if using a water bath. Carefully pour hot (not boiling) water into the baking dish until it reaches about halfway up the sides of the muffin pan.
- Pro tip: Water bath = fewer cracks. The steam helps bake the cheesecakes evenly and keeps the tops smooth.
- Bake at 325°F (160°C) for 18–22 minutes, or until the edges are set and the center still has a slight jiggle (it will firm as it chills).
- Turn off the oven and leave the door slightly ajar for 10 minutes to help prevent a sudden temperature change that could crack the tops.
Cool and chill
- Remove the muffin pan from the water bath (if used) and set it on a wire rack. Let the cheesecakes cool to room temperature in the pan (about 1 hour).
- Once cooled, transfer the pan to the refrigerator and chill for at least 4 hours — overnight is best for firm texture and full flavor development.
Add toppings and serve
- Before serving, pipe or spoon a dollop of whipped cream on each cheesecake cup. Sprinkle with crushed gingersnaps, a dusting of cinnamon, or festive sprinkles.
- Serve chilled. These are great straight from the fridge or allowed to sit a few minutes at room temp if you prefer a softer bite.
Quick troubleshooting & tiny tips
- Lumpy filling? Beat longer at medium speed and scrape the bowl well. Cold cream cheese or rushed mixing causes lumps.
- Cracked tops? Don’t overbake and consider using the water bath method next time.
- Want richer flavor? Add 1 tablespoon of sour cream to the filling for extra tang and silkiness.
Notes
Nutritional Value (per mini cheesecake cup, approximate):
- Calories: 280 kcal
- Total Fat: 18 g
- Saturated Fat: 10 g
- Cholesterol: 70 mg
- Sodium: 130 mg
- Total Carbohydrates: 26 g
- Dietary Fiber: 1 g
- Sugars: 18 g
- Protein: 4 g