Dried Tart Cherry and Chocolate Chip Cookies
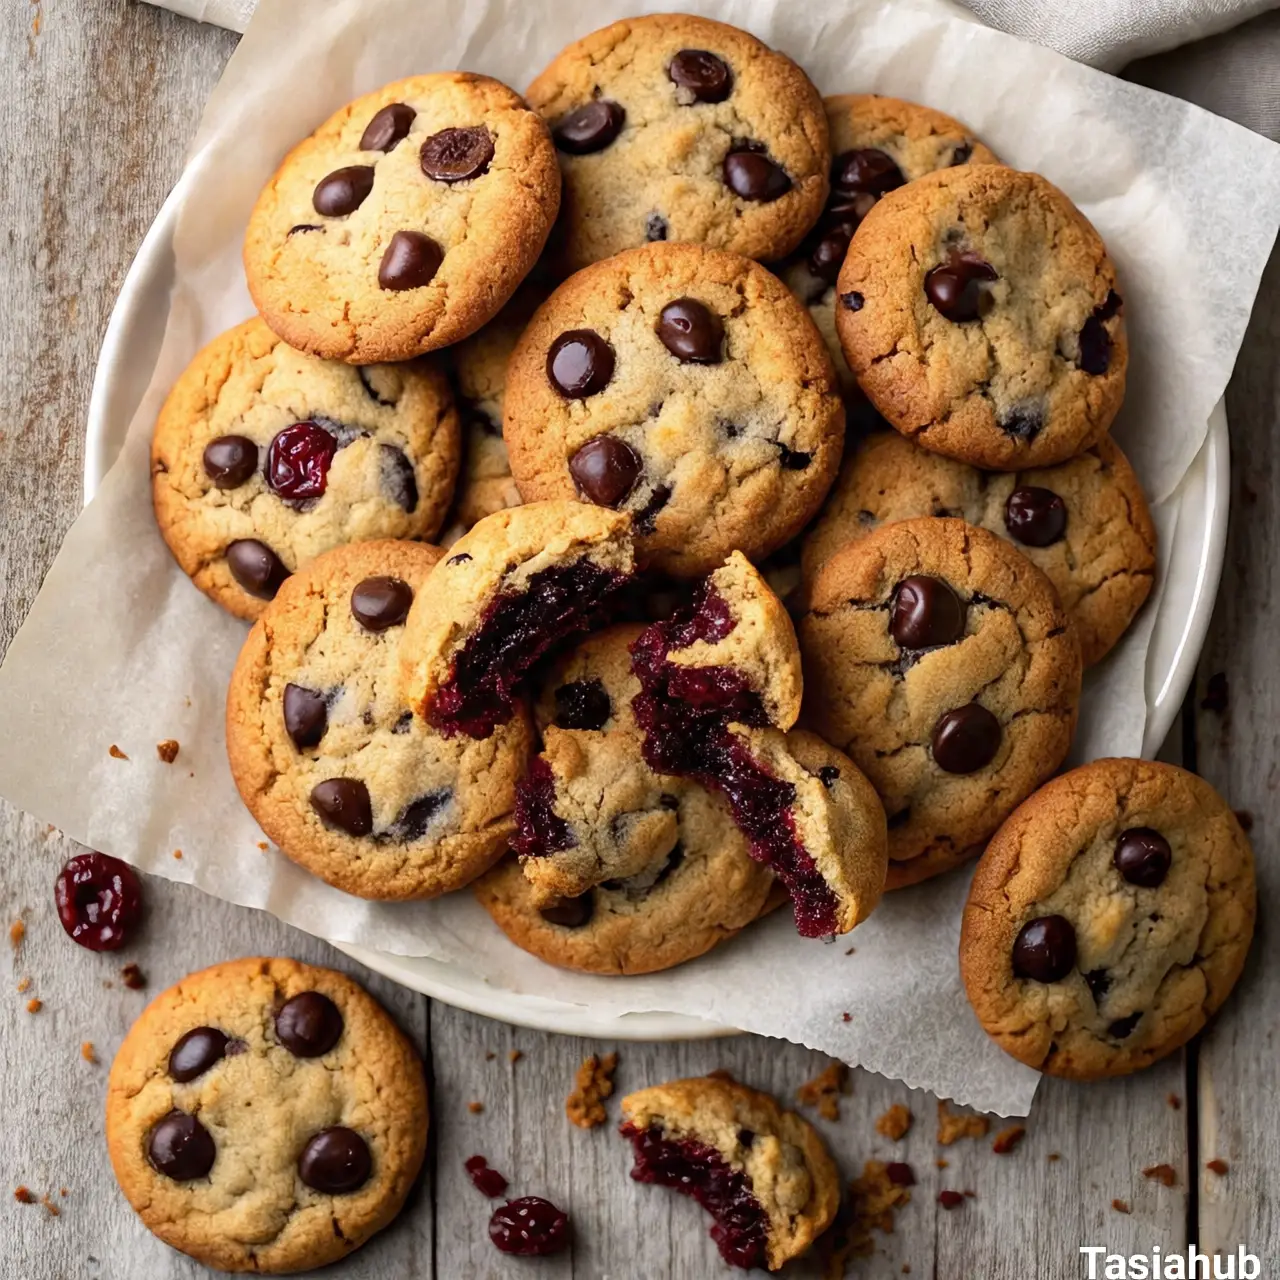
Cookies that perfectly balance sweetness and a hint of tartness? Yes, please! These dried tart cherry and chocolate chip cookies are exactly that — a delightful twist on the classic chocolate chip cookie that brings a burst of tangy cherry flavor with every bite. The dried tart cherries add a chewy texture and a subtle zing, complementing the rich, melty chocolate chips in a way that makes the cookie feel a little more special and a lot more addictive.
What I love most about these cookies is how the flavors come together naturally. The tartness of the cherries cuts through the sweetness of the dough and chocolate, so the cookie never feels overly sugary. It’s that perfect balance that keeps you reaching for one more, whether it’s with your afternoon coffee or as a midnight snack. Plus, the chewiness of the cherries adds a nice contrast to the soft, tender cookie, making every bite interesting.
Another great thing about this recipe is how simple it is. You don’t need any fancy ingredients or techniques — just some good-quality dried tart cherries, classic chocolate chips, and your basic cookie dough staples. These cookies are also great for making ahead and sharing, since they stay fresh for several days and even taste better as the flavors meld over time.
If you’re looking for a cookie that’s familiar yet a little unexpected, this dried tart cherry and chocolate chip combo might just become your new favorite. Whether you’re baking for yourself, a gathering, or as a thoughtful gift, these cookies hit that sweet spot that everyone will love. Ready to get baking? Let’s dive into how you can make these delicious treats at home.
Why You’ll Love It
- Perfect Flavor Balance: The tartness of the dried cherries pairs beautifully with the sweetness of the chocolate chips, creating a cookie that’s neither too sweet nor too tangy — just right.
- Chewy and Soft Texture: These cookies have a wonderful chew from the dried cherries combined with a soft, tender crumb, giving every bite a satisfying mix of textures.
- Simple Ingredients: No need for anything fancy — just pantry staples plus dried tart cherries and chocolate chips, making this recipe easy to whip up anytime.
- Great Make-Ahead Treat: These cookies stay fresh for days and actually taste even better after a day or two as the flavors deepen and mingle.
- Perfect for Sharing: Whether it’s for a party, lunchbox, or a cozy afternoon snack, these cookies are crowd-pleasers that everyone will enjoy.
Ingredient List
For the Cookie Dough
- 1 cup (2 sticks) unsalted butter, softened
- 3/4 cup brown sugar, packed
- 1/2 cup granulated sugar
- 2 large eggs
- 1 teaspoon vanilla extract
Dry Ingredients
- 2 1/4 cups all-purpose flour
- 1 teaspoon baking soda
- 1/2 teaspoon salt
Mix-ins
- 1 cup dried tart cherries
- 1 1/2 cups semi-sweet chocolate chips
Ingredient Notes
- I always use unsalted butter to control the salt level better and keep the flavor balanced.
- Brown sugar adds moisture and a slight caramel flavor that pairs well with the cherries.
- Don’t skip the vanilla extract—it really brings out the depth of flavors in the cookie.
- For dried tart cherries, I prefer unsweetened or lightly sweetened varieties to avoid making the cookies too sweet.
- Semi-sweet chocolate chips are my go-to here because they complement the tartness without overpowering it.
- Make sure your flour is fresh and properly measured—too much flour can make the cookies dry.
Kitchen Equipment Needed
- Mixing Bowls: For combining wet and dry ingredients separately — I like using glass bowls because they’re easy to clean and microwave-safe.
- Electric Mixer or Hand Mixer: Speeds up creaming butter and sugar for a smooth dough; a hand mixer works great if you don’t have a stand mixer.
- Measuring Cups and Spoons: Accurate measurements are key to perfect cookies. I prefer metal measuring spoons for durability.
- Rubber or Silicone Spatula: Ideal for scraping down the sides of the bowl and folding in cherries and chocolate chips gently.
- Baking Sheets: Flat sheets for even baking — I use heavy-duty aluminum ones that heat evenly and last forever.
- Parchment Paper or Silicone Baking Mat: Prevents sticking and makes cleanup a breeze.
- Cooling Rack: Helps cookies cool evenly and maintain their texture instead of getting soggy on the hot baking sheet.
Instructions
Step 1: Prepare Your Ingredients and Tools
- Take the butter out of the fridge and let it soften at room temperature for about 30 minutes. Soft butter creams better with sugar for a smooth dough.
- Preheat your oven to 350°F (175°C). Line two baking sheets with parchment paper or silicone mats so your cookies don’t stick.
- Measure out all your ingredients precisely and have them ready. This “mise en place” makes the process much smoother.
Step 2: Cream Butter and Sugars
- In a large mixing bowl, add the softened butter, brown sugar, and granulated sugar.
- Using an electric mixer on medium speed, beat the mixture until it’s light and fluffy — about 3 to 4 minutes.
- Pro Tip: Scrape down the sides of the bowl with a spatula halfway through to ensure everything mixes evenly.
Step 3: Add Eggs and Vanilla
- Crack in the eggs, one at a time, beating well after each addition to fully incorporate.
- Add the vanilla extract and mix again until everything is smooth and combined.
- Your mixture should look creamy and slightly thickened.
Step 4: Mix Dry Ingredients Separately
- In another bowl, whisk together the flour, baking soda, and salt.
- This helps evenly distribute the leavening and salt throughout the flour to avoid uneven baking or salty spots.
Step 5: Combine Wet and Dry Ingredients
- Gradually add the dry ingredients to the wet mixture in about three parts, mixing on low speed after each addition.
- Stop mixing as soon as you don’t see any more flour streaks to avoid overworking the dough, which can make cookies tough.
- Pro Tip: Using low speed here prevents flour from flying everywhere and helps keep the dough tender.
Step 6: Fold in Cherries and Chocolate Chips
- Use a spatula to gently fold in the dried tart cherries and chocolate chips until they are evenly distributed.
- Avoid beating vigorously here to keep the mix-ins whole and the dough texture soft.
Step 7: Scoop the Dough onto Baking Sheets
- Using a cookie scoop or tablespoon, drop rounded balls of dough onto your prepared baking sheets.
- Leave about 2 inches of space between each cookie to allow for spreading.
- For even baking, try to make each dough ball roughly the same size.
Step 8: Bake the Cookies
- Place the baking sheets in the preheated oven and bake for 10 to 12 minutes, or until the edges are golden but the centers still look slightly soft.
- Pro Tip: Rotate the baking sheets halfway through baking for even color and texture.
Step 9: Cool Properly
- Remove the cookies from the oven and let them sit on the baking sheet for 5 minutes. This helps them firm up so they don’t break when moved.
- Transfer the cookies to a wire cooling rack to cool completely.
Step 10: Store and Enjoy
- Once cooled, store your cookies in an airtight container at room temperature for up to 5 days.
- These cookies also freeze well—just pop them in a freezer-safe bag and thaw at room temperature when ready to enjoy!

Tips and Tricks for Success
- Use room temperature butter for easier creaming and a lighter cookie texture.
- Don’t overmix once you add the flour; overworking dough can make cookies dense and tough.
- Chill the dough for 30 minutes if you want thicker cookies that spread less during baking.
- Use parchment paper or silicone mats to prevent sticking and make cleanup easier.
- For even baking, rotate your baking sheets halfway through the bake time.
- Let cookies cool on the baking sheet a few minutes before transferring to a rack to avoid breakage.
- Store cookies in an airtight container to keep them soft and fresh longer.
Ingredient Substitutions and Variations
- Swap dried tart cherries for dried cranberries or raisins if you prefer a different chewy fruit.
- Use dark chocolate chips instead of semi-sweet for a richer, slightly less sweet cookie.
- For a nutty crunch, add 1/2 cup chopped walnuts or pecans with the cherries and chocolate chips.
- Replace all-purpose flour with gluten-free flour blend for a gluten-free version—just check the blend includes xanthan gum or similar.
- Substitute coconut oil for butter to make a dairy-free cookie; note it may change texture slightly.
- Add a teaspoon of cinnamon or orange zest to the dough for a warm, fragrant twist.
Serving Suggestions
- Enjoy these dried tart cherry and chocolate chip cookies with a cold glass of milk—classic and comforting every time.
- I love pairing them with a cup of hot coffee or black tea for a cozy afternoon treat that’s both sweet and slightly tart.
- Serve alongside vanilla ice cream for a simple yet decadent dessert that highlights the cookie’s chewy texture.
- These cookies make a perfect addition to a holiday cookie platter or gift box—everyone will appreciate the unique cherry twist!
- For a fun snack, break them into chunks and sprinkle over yogurt or oatmeal to add texture and bursts of chocolate and cherry flavor.

Storage and Reheating Instructions
- Store cookies in an airtight container at room temperature for up to 5 days to keep them soft and fresh.
- To freeze, place cooled cookies in a freezer-safe bag or container for up to 3 months. Thaw at room temperature before enjoying.
- To refresh cookies after storage, warm them in a 300°F (150°C) oven for 5 minutes to revive softness and melty chocolate.
- You can also microwave a cookie for 10-15 seconds for a quick warm treat—but watch closely to avoid drying them out.
- Keep leftover cookies away from strong-smelling foods to preserve their cherry-chocolate flavor.
Frequently Asked Questions
Can I use fresh cherries instead of dried tart cherries?
Fresh cherries have too much moisture and will change the cookie texture. Dried tart cherries give that perfect chewy bite and concentrated flavor.
What if I don’t have tart cherries—can I use another dried fruit?
Absolutely! Dried cranberries, cherries, or even raisins work well and add their own unique sweetness and chew.
How do I prevent my cookies from spreading too much?
Make sure your butter is softened but not melted, and chill the dough for 20-30 minutes before baking to help the cookies hold their shape.
Can I make these cookies gluten-free?
Yes! Use a gluten-free all-purpose flour blend with xanthan gum for the best results. The texture might be slightly different but still delicious.
How long do these cookies stay fresh?
Stored in an airtight container, they stay fresh for up to 5 days at room temperature and freeze well for up to 3 months.
Did you try this recipe? Let me know in the comments how it turned out!
Don’t forget to share your photos on Instagram and tag me (@tasiahub_) or use the hashtag (#tasiahub). I’d love to see your creations!
Dried Tart Cherry and Chocolate Chip Cookies
Equipment
- Mixing Bowls
- Electric mixer or hand mixer
- Measuring cups and spoons
- Rubber or Silicone Spatula
- Baking sheets
- Parchment paper or silicone baking mat
- Cooling Rack
Ingredients
For the Cookie Dough
- 1 cup 2 sticks unsalted butter, softened
- 3/4 cup brown sugar packed
- 1/2 cup granulated sugar
- 2 large eggs
- 1 teaspoon vanilla extract
Dry Ingredients
- 2 1/4 cups all-purpose flour
- 1 teaspoon baking soda
- 1/2 teaspoon salt
Mix-ins
- 1 cup dried tart cherries
- 1 1/2 cups semi-sweet chocolate chips
Instructions
Step 1: Prepare Your Ingredients and Tools
- Take the butter out of the fridge and let it soften at room temperature for about 30 minutes. Soft butter creams better with sugar for a smooth dough.
- Preheat your oven to 350°F (175°C). Line two baking sheets with parchment paper or silicone mats so your cookies don’t stick.
- Measure out all your ingredients precisely and have them ready. This “mise en place” makes the process much smoother.
Step 2: Cream Butter and Sugars
- In a large mixing bowl, add the softened butter, brown sugar, and granulated sugar.
- Using an electric mixer on medium speed, beat the mixture until it’s light and fluffy — about 3 to 4 minutes.
- Pro Tip: Scrape down the sides of the bowl with a spatula halfway through to ensure everything mixes evenly.
Step 3: Add Eggs and Vanilla
- Crack in the eggs, one at a time, beating well after each addition to fully incorporate.
- Add the vanilla extract and mix again until everything is smooth and combined.
- Your mixture should look creamy and slightly thickened.
Step 4: Mix Dry Ingredients Separately
- In another bowl, whisk together the flour, baking soda, and salt.
- This helps evenly distribute the leavening and salt throughout the flour to avoid uneven baking or salty spots.
Step 5: Combine Wet and Dry Ingredients
- Gradually add the dry ingredients to the wet mixture in about three parts, mixing on low speed after each addition.
- Stop mixing as soon as you don’t see any more flour streaks to avoid overworking the dough, which can make cookies tough.
- Pro Tip: Using low speed here prevents flour from flying everywhere and helps keep the dough tender.
Step 6: Fold in Cherries and Chocolate Chips
- Use a spatula to gently fold in the dried tart cherries and chocolate chips until they are evenly distributed.
- Avoid beating vigorously here to keep the mix-ins whole and the dough texture soft.
Step 7: Scoop the Dough onto Baking Sheets
- Using a cookie scoop or tablespoon, drop rounded balls of dough onto your prepared baking sheets.
- Leave about 2 inches of space between each cookie to allow for spreading.
- For even baking, try to make each dough ball roughly the same size.
Step 8: Bake the Cookies
- Place the baking sheets in the preheated oven and bake for 10 to 12 minutes, or until the edges are golden but the centers still look slightly soft.
- Pro Tip: Rotate the baking sheets halfway through baking for even color and texture.
Step 9: Cool Properly
- Remove the cookies from the oven and let them sit on the baking sheet for 5 minutes. This helps them firm up so they don’t break when moved.
- Transfer the cookies to a wire cooling rack to cool completely.
Step 10: Store and Enjoy
- Once cooled, store your cookies in an airtight container at room temperature for up to 5 days.
- These cookies also freeze well—just pop them in a freezer-safe bag and thaw at room temperature when ready to enjoy!
Notes
Nutritional Value (Per cookie, estimated)
- Calories: ~190
- Fat: 10g
- Saturated Fat: 6g
- Carbohydrates: 25g
- Sugar: 15g
- Protein: 2g
- Fiber: 1g
- Cholesterol: 25mg
- Sodium: 100mg