Christmas Monster Cookies
When it comes to holiday baking, these Christmas monster cookies are the ultimate crowd-pleasers. They’re soft, chewy, and loaded with colorful candies that make every bite a celebration. Whether you’re baking for a cookie exchange, a family gathering, or just a cozy night in with a mug of cocoa, these cookies will absolutely hit the spot.
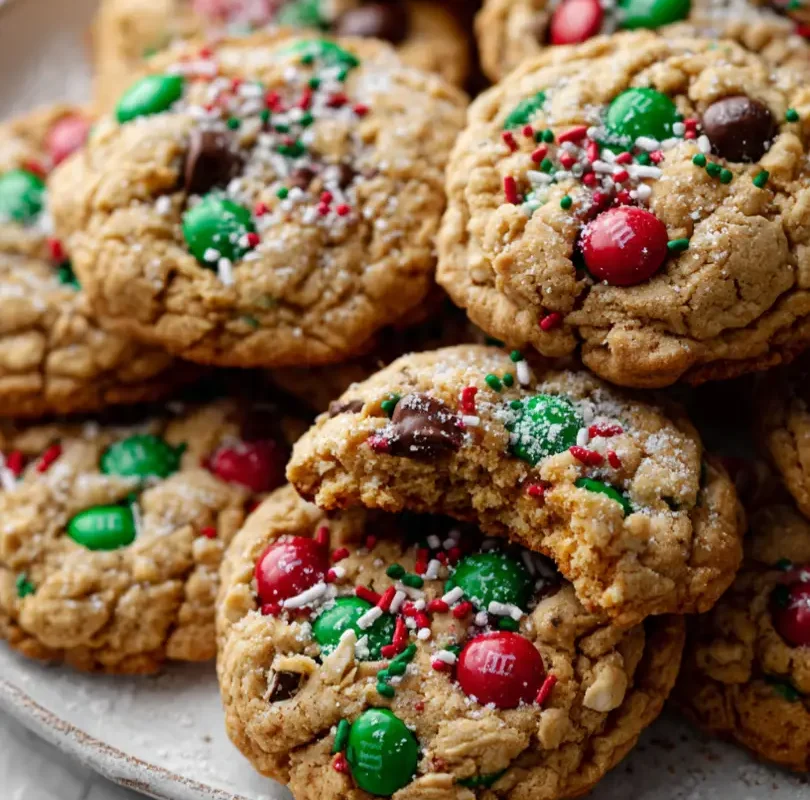
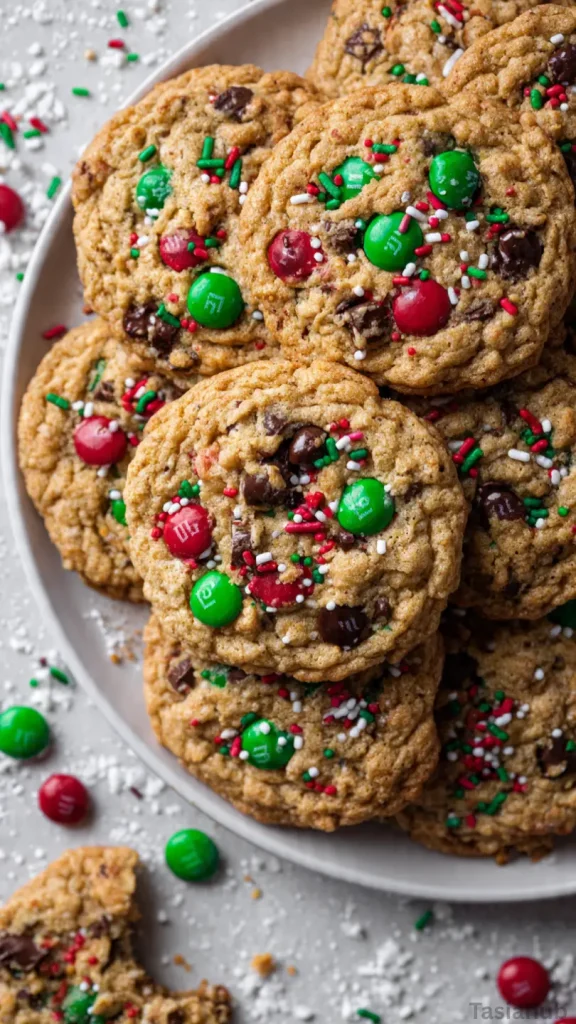
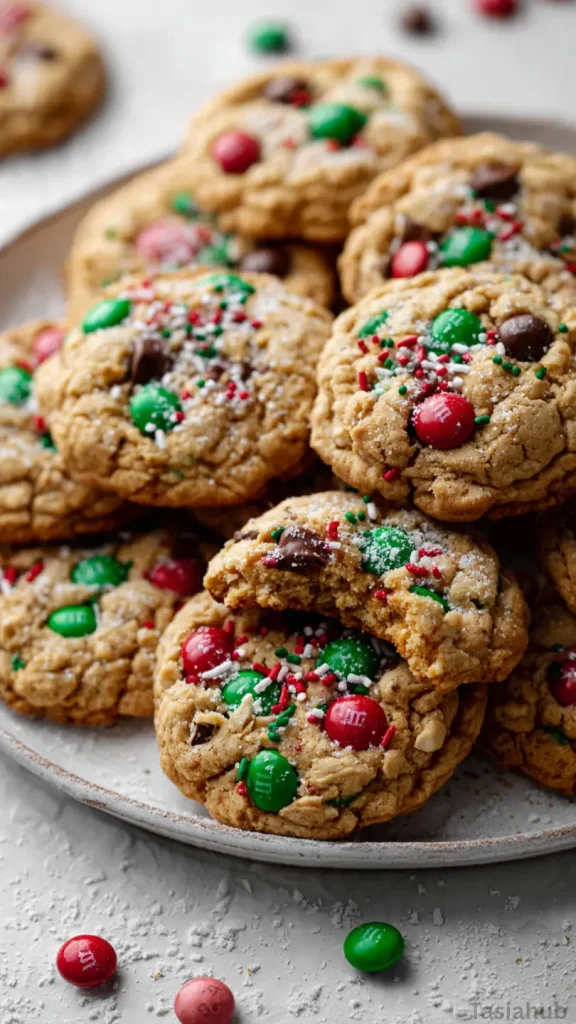
I’ve always loved recipes that feel both festive and comforting, and this one checks all the boxes. Each cookie bursts with a mix of chocolate chips, peanut butter, oats, and those classic red and green M&M’s that make them shine on any cookie tray. They’re a fun twist on traditional holiday monster cookies — a little bit nostalgic, a little bit over-the-top, and completely irresistible.
One of my favorite things about these is how adaptable they are. You can make them extra chewy or a bit crispier depending on how long you bake them, and you can mix in your favorite candies or nuts for a personal touch. They’re the kind of really good cookies that disappear fast — and everyone will be asking for the recipe before the night’s over.
If you’re in the mood to simplify your holiday baking lineup, these are a must-try. They’ve got the ease of easy thumbprint cookies but with the fun, chunky texture of a monster cookie. Plus, they fit right into your spread of Christmas cookies, pairing perfectly with chocolate thumbprint cookies, sugar cookies, or even gingerbread men. Bake a batch, pour yourself a cup of something warm, and enjoy that cozy holiday feeling one delicious bite at a time.
Why You’ll Love It
- Festive and colorful: The red and green candies make these cookies instantly Christmas-ready — they’ll stand out beautifully on your dessert table or in a gift box.
- Soft, chewy, and perfectly loaded: Each bite has the best mix of oats, peanut butter, and chocolate — that thick, chewy texture that makes you go back for another before you even realize it.
- A cookie for everyone: Kids love the colorful candies, adults love the rich, buttery flavor — it’s the one cookie everyone agrees on.
- Easy to make, hard to mess up: You don’t need fancy ingredients or chill time. Just mix, scoop, and bake for consistently delicious results.
- Holiday classic with a twist: It brings together the comfort of Christmas cookies and the indulgence of monster cookies — the perfect mash-up for festive baking.
Ingredient List
For the Cookies:
- 1 cup creamy peanut butter
- ½ cup unsalted butter, softened
- 1 cup brown sugar, packed
- ½ cup granulated sugar
- 2 large eggs
- 1 teaspoon vanilla extract
- 1 teaspoon baking soda
- ¼ teaspoon salt
- 2 cups old-fashioned oats
- 1 cup all-purpose flour
- ¾ cup semi-sweet chocolate chips
- ¾ cup red and green M&M’s
- ¼ cup holiday sprinkles (optional, for extra fun)
Ingredient Notes
- Peanut Butter: I always use a creamy peanut butter like Jif or Skippy — it gives these cookies that smooth, rich texture. Natural peanut butter tends to make the dough too crumbly.
- Butter: Make sure it’s softened, not melted. It helps the dough come together perfectly and keeps the cookies thick and chewy.
- Oats: Old-fashioned oats add the perfect hearty texture. Don’t swap them for quick oats — they change the consistency completely.
- Chocolate Chips: Use semi-sweet for balance, but if you love extra sweetness, go for milk chocolate. I sometimes toss in both for fun.
- M&M’s: The red and green ones make these cookies festive and colorful — don’t skip them! They’re what make these holiday monster cookies sparkle.
- Sprinkles: Totally optional, but I love the added crunch and color. It makes the cookies look extra cheerful on the plate.
Kitchen Equipment Needed
- Mixing bowls: You’ll need one large and one medium — perfect for creaming butter and combining dry ingredients.
- Hand or stand mixer: Makes mixing the peanut butter and butter super easy and fluffy. I use my KitchenAid for smooth, even blending.
- Rubber spatula: Great for scraping down the sides and folding in those chocolate chips and M&M’s without overmixing.
- Cookie scoop: Keeps all your cookies the same size so they bake evenly — my 1½ tablespoon scoop is my go-to.
- Baking sheets: Line them with parchment paper for easy cleanup and perfectly baked bottoms.
- Cooling rack: Helps the cookies cool evenly while keeping that soft, chewy texture.
Instructions
Step 1 — Prep the oven and pans
- Preheat your oven to 350°F (175°C).
- Line two baking sheets with parchment paper or use silicone baking mats.
- Arrange a cooling rack nearby so you can move cookies off the hot sheet quickly.
Pro tip: If your oven runs hot or cold, use an oven thermometer — consistent temperature makes a huge difference in how these cookies spread.
Step 2 — Measure ingredients carefully
- Spoon flour into your measuring cup and level with the back of a knife (don’t scoop directly from the bag).
- Measure the oats, sugars, peanut butter, and chocolate chips into separate bowls so everything’s within reach.
Pro tip: Accurate flour measurement prevents dense cookies. A light hand here keeps them soft and chewy — just what you want for really good cookies.
Step 3 — Cream the butter, peanut butter, and sugars
- In a large bowl, add the softened butter, creamy peanut butter, brown sugar, and granulated sugar.
- Beat with a hand mixer or stand mixer on medium speed until the mixture is light and a little fluffy — about 2 minutes.
- Scrape down the bowl with a rubber spatula so no pockets of butter or sugar remain.
Pro tip: Don’t use melted butter. Softened (not warm) butter traps air when creamed, giving you that tender, slightly puffy texture.
Step 4 — Add the eggs and vanilla
- Add the eggs one at a time, beating briefly after each until incorporated.
- Mix in the vanilla extract until the batter looks smooth and glossy.
Pro tip: Use room-temperature eggs for a smoother emulsion — they incorporate more easily into the butter mixture.
Step 5 — Combine dry ingredients and form the dough
- In a separate bowl, whisk together the all-purpose flour, baking soda, and salt.
- Stir the oats into the dry mix so they’re evenly distributed.
- Add the dry mix to the wet ingredients in two additions, stirring gently after each until just combined.
- Fold in the chocolate chips and most of the M&M’s, leaving a few aside for topping.
Pro tip (key step): Stop mixing as soon as the flour disappears. Overworking the dough develops gluten and will make cookies tougher — you want tender chewiness instead.
Step 6 — Scoop and shape the cookies
- Use a 1½ tablespoon cookie scoop (or two spoons) to portion dough into even mounds.
- Place dough balls about 2 inches apart on the prepared baking sheets.
- Gently press a couple of reserved M&M’s into the top of each cookie for a pretty, festive look.
Pro tip: If you prefer thicker cookies, chill the scooped dough for 15–20 minutes before baking — it slows spreading and gives a chunkier center.
Step 7 — Bake until set
- Bake one sheet at a time on the center rack for 9–12 minutes. Start checking at 9 minutes.
- Look for edges that are set and lightly golden while the centers still look slightly soft — they’ll finish cooking on the hot sheet.
- If baking two sheets at once, rotate them halfway through for even browning.
Pro tip (key step): Resist the urge to overbake — cookies will firm up as they cool. Pull them when the centers still jiggle a little.
Step 8 — Cool and store
- Let the cookies rest on the baking sheet for 4–5 minutes so they set without breaking.
- Transfer them to a cooling rack to finish cooling completely.
- Store cooled cookies in an airtight container at room temperature for up to 4 days, or freeze for longer.
Pro tip: Place a slice of bread in the container with the cookies to help keep them soft — the cookies will absorb moisture from the bread and stay chewy.
Tips and Tricks for Success
- Slightly underbake for chewy perfection: Pull the cookies out when the centers still look soft — they’ll finish setting as they cool.
- Mix gently: Once you add the dry ingredients, stir just until combined to keep the cookies tender, not tough.
- Reserve a few candies for topping: Press extra M&M’s into the dough balls before baking for that bakery-style look.
- Use room temperature ingredients: Softened butter and room-temp eggs help everything blend smoothly and bake evenly.
- Let them cool on the sheet first: Moving them too soon can cause breakage — 4–5 minutes is the sweet spot.
- Double the batch for gifting: These cookies freeze beautifully and make such a fun, colorful addition to holiday treat boxes.
Ingredient Substitutions and Variations
- Nut-free version: Swap peanut butter for sunflower seed butter or cookie butter — they both give a rich, sweet flavor.
- Add-ins: Try white chocolate chips, crushed pretzels, or even chopped peppermint candies for a festive twist.
- Gluten-free option: Replace all-purpose flour with a 1:1 gluten-free baking blend and make sure your oats are certified gluten-free.
- Holiday color swaps: Make these for other occasions by switching out M&M colors — red and pink for Valentine’s Day, pastels for Easter, or bright tones for birthdays.
- Chunkier texture: Stir in an extra ¼ cup of oats if you like heartier cookies with more chew.
- Chocolate lovers’ upgrade: Use a mix of semi-sweet and dark chocolate chips for a deeper, more intense cocoa flavor.
Serving Suggestions
- Holiday dessert platters: Pile these cookies high on a festive plate alongside sugar cookies, chocolate thumbprint cookies, and gingerbread men — they make a colorful and irresistible spread.
- With hot cocoa or coffee: I love serving these warm with a big mug of cocoa topped with whipped cream — the chocolate chips get just a little melty again.
- Cookie gift boxes: Stack them in clear cellophane bags tied with red ribbon — they’re perfect for gifting to friends, neighbors, or teachers.
- After-dinner treat: Serve them slightly warm with a scoop of vanilla ice cream for a quick and cozy dessert.
- Movie night snack: Grab a few cookies and a glass of cold milk — it’s the perfect combo for a relaxed night in.
Storage and Reheating Instructions
- Room temperature: Store cooled cookies in an airtight container for up to 4 days. Add a slice of bread inside to keep them soft.
- Freezer storage: Freeze cookies in a single layer on a tray, then transfer to a freezer bag for up to 3 months.
- Reheating: Warm cookies in the microwave for 10–12 seconds to bring back that fresh-from-the-oven softness.
- Dough storage: You can freeze the unbaked dough balls too — just bake straight from frozen, adding 1–2 extra minutes to the bake time.
- Gifting tip: If you’re gifting these cookies, pack them in tins or boxes lined with parchment paper to keep them fresh and pretty.
Frequently Asked Questions
Can I make the dough ahead of time?
Yes! You can prepare the dough up to 2 days in advance. Just cover it tightly and refrigerate. When ready to bake, let it sit at room temperature for about 15–20 minutes so it’s easier to scoop.
How do I keep the cookies soft after baking?
Store them in an airtight container with a slice of bread — it keeps the cookies chewy and fresh by adding a little moisture. Replace the bread slice every couple of days if needed.
Can I use crunchy peanut butter instead of creamy?
You can! It’ll add a bit of texture and a nutty crunch. Just keep in mind the dough might be slightly thicker, so mix gently.
What if I don’t have M&M’s?
No problem — you can swap in chocolate chips, peanut butter chips, or chopped candy bars. The cookies will still be just as festive and delicious.
How can I make these cookies gluten-free?
Use a 1:1 gluten-free baking flour and certified gluten-free oats. The rest of the recipe stays exactly the same, and you’ll still get those chewy, flavorful results.
Can I double the recipe?
Absolutely! This recipe scales beautifully — just use a big enough mixing bowl and bake in batches. These cookies disappear fast, so doubling is always a good idea!
Did you try these Christmas monster cookies? Let me know in the comments how they turned out — I’d love to hear if they made it onto your holiday baking list!

Christmas Monster Cookies
Equipment
- Mixing Bowls
- Hand or Stand Mixer
- Rubber spatula
- Cookie scoop
- Baking sheets
- Cooling Rack
Ingredients
- 1 cup creamy peanut butter
- ½ cup unsalted butter softened
- 1 cup brown sugar packed
- ½ cup granulated sugar
- 2 large eggs
- 1 teaspoon vanilla extract
- 1 teaspoon baking soda
- ¼ teaspoon salt
- 2 cups old-fashioned oats
- 1 cup all-purpose flour
- ¾ cup semi-sweet chocolate chips
- ¾ cup red and green M&M’s
- ¼ cup holiday sprinkles optional, for extra fun
Instructions
Step 1 — Prep the oven and pans
- Preheat your oven to 350°F (175°C).
- Line two baking sheets with parchment paper or use silicone baking mats.
- Arrange a cooling rack nearby so you can move cookies off the hot sheet quickly.
- Pro tip: If your oven runs hot or cold, use an oven thermometer — consistent temperature makes a huge difference in how these cookies spread.
Step 2 — Measure ingredients carefully
- Spoon flour into your measuring cup and level with the back of a knife (don’t scoop directly from the bag).
- Measure the oats, sugars, peanut butter, and chocolate chips into separate bowls so everything’s within reach.
- Pro tip: Accurate flour measurement prevents dense cookies. A light hand here keeps them soft and chewy — just what you want for really good cookies.
Step 3 — Cream the butter, peanut butter, and sugars
- In a large bowl, add the softened butter, creamy peanut butter, brown sugar, and granulated sugar.
- Beat with a hand mixer or stand mixer on medium speed until the mixture is light and a little fluffy — about 2 minutes.
- Scrape down the bowl with a rubber spatula so no pockets of butter or sugar remain.
- Pro tip: Don’t use melted butter. Softened (not warm) butter traps air when creamed, giving you that tender, slightly puffy texture.
Step 4 — Add the eggs and vanilla
- Add the eggs one at a time, beating briefly after each until incorporated.
- Mix in the vanilla extract until the batter looks smooth and glossy.
- Pro tip: Use room-temperature eggs for a smoother emulsion — they incorporate more easily into the butter mixture.
Step 5 — Combine dry ingredients and form the dough
- In a separate bowl, whisk together the all-purpose flour, baking soda, and salt.
- Stir the oats into the dry mix so they’re evenly distributed.
- Add the dry mix to the wet ingredients in two additions, stirring gently after each until just combined.
- Fold in the chocolate chips and most of the M&M’s, leaving a few aside for topping.
- Pro tip (key step): Stop mixing as soon as the flour disappears. Overworking the dough develops gluten and will make cookies tougher — you want tender chewiness instead.
Step 6 — Scoop and shape the cookies
- Use a 1½ tablespoon cookie scoop (or two spoons) to portion dough into even mounds.
- Place dough balls about 2 inches apart on the prepared baking sheets.
- Gently press a couple of reserved M&M’s into the top of each cookie for a pretty, festive look.
- Pro tip: If you prefer thicker cookies, chill the scooped dough for 15–20 minutes before baking — it slows spreading and gives a chunkier center.
Step 7 — Bake until set
- Bake one sheet at a time on the center rack for 9–12 minutes. Start checking at 9 minutes.
- Look for edges that are set and lightly golden while the centers still look slightly soft — they’ll finish cooking on the hot sheet.
- If baking two sheets at once, rotate them halfway through for even browning.
- Pro tip (key step): Resist the urge to overbake — cookies will firm up as they cool. Pull them when the centers still jiggle a little.
Step 8 — Cool and store
- Let the cookies rest on the baking sheet for 4–5 minutes so they set without breaking.
- Transfer them to a cooling rack to finish cooling completely.
- Store cooled cookies in an airtight container at room temperature for up to 4 days, or freeze for longer.
- Pro tip: Place a slice of bread in the container with the cookies to help keep them soft — the cookies will absorb moisture from the bread and stay chewy.
Notes
Nutritional Value (per cookie, approximate):
- Calories: 220
- Fat: 12g
- Saturated Fat: 5g
- Carbohydrates: 26g
- Sugar: 16g
- Protein: 5g
- Fiber: 1g
- Sodium: 120mg