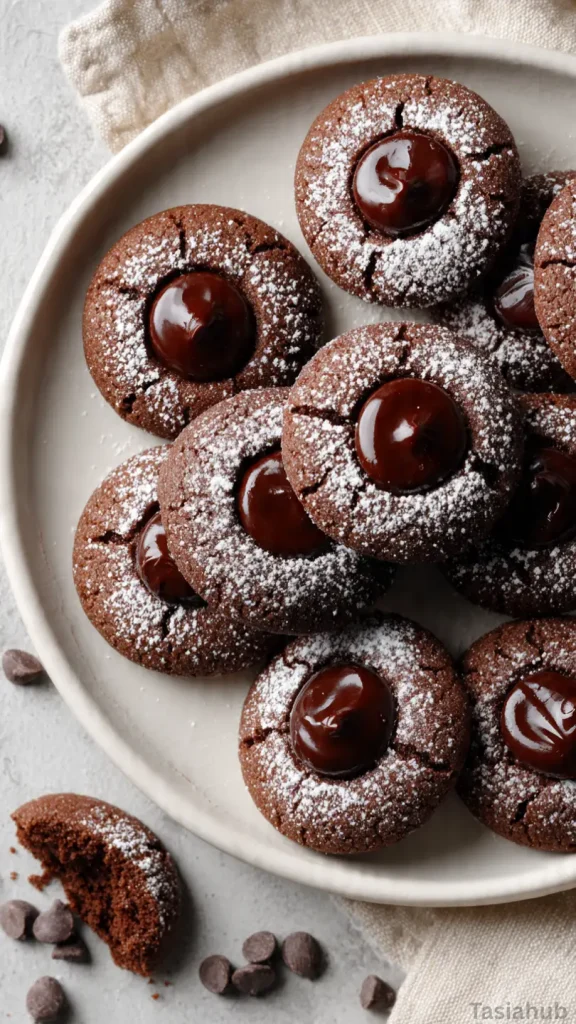
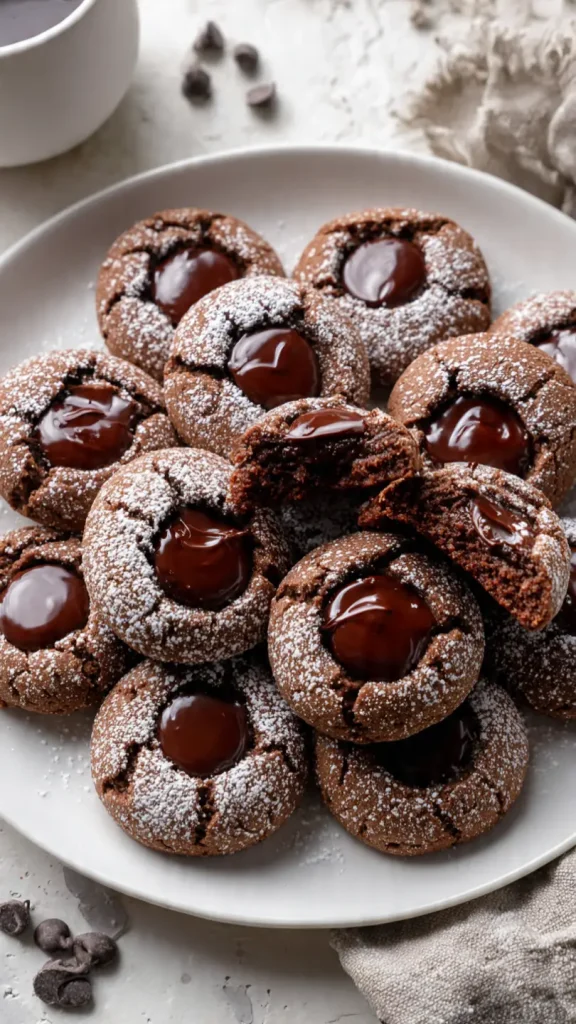
Chocolate Thumbprint Cookies

The holidays are the perfect excuse to fill your kitchen with the comforting aroma of freshly baked treats. One cookie that always seems to steal the spotlight is the chocolate thumbprint cookie. With its soft, buttery base and gooey chocolate center, this cookie is a festive favorite that appeals to both kids and adults alike.
Making chocolate thumbprint cookies is surprisingly simple, which is why they’re such a popular choice for holiday baking. You don’t need fancy ingredients or complicated techniques—just a few pantry staples and a little love for the process. These cookies come together quickly, making them a great option if you want to whip up a batch in between holiday parties or last-minute gift preparations.
What makes these cookies extra special is their versatility. While the classic version is filled with chocolate, you can experiment with different fillings like caramel, nut butter, or even jam. The combination of a tender, buttery cookie with a rich, melty center is irresistible and perfect for Christmas cookie platters, cookie exchanges, or just keeping a batch on hand to snack on throughout the season.
Whether you’re a seasoned baker or trying your hand at easy thumbprint cookies for the first time, this chocolate thumbprint cookie recipe will bring joy and warmth to your kitchen. The process is straightforward, the ingredients are simple, and the results are always impressive—rich, chocolatey centers nestled in soft, buttery cookies that practically melt in your mouth.
Why You’ll Love It
- Perfectly Chocolatey Centers – Every bite has a rich chocolate filling that melts just enough to make your taste buds sing, balancing perfectly with the buttery cookie base.
- Simple and Stress-Free – This recipe is straightforward, making it one of the easiest thumbprint cookies you can bake, even if you’re new to holiday cookie making.
- Festive and Fun – These Christmas thumbprint cookies are not just delicious—they’re fun to make, especially with kids who love pressing their little thumbs into the dough to create the classic indent.
- Versatile Treat – You can stick with chocolate or swap the filling for jam, caramel, or nut butter, making them a creative addition to any Christmas cookie platter.
- Great for Gifting – Soft, chocolate-filled cookies that look as good as they taste make perfect homemade gifts for friends, neighbors, or coworkers during the holiday season.
Ingredient List
For the Cookies:
- 1 cup unsalted butter, softened
- 2/3 cup granulated sugar
- 1 teaspoon vanilla extract
- 2 large egg yolks
- 2 cups all-purpose flour
- 1/4 cup cocoa powder
- 1/4 teaspoon salt
For the Chocolate Filling:
- 1/2 cup semi-sweet chocolate chips
- 2 teaspoons heavy cream
Ingredient Notes
- I always use unsalted butter for baking—it gives you better control over sweetness and flavor.
- Don’t skip the egg yolks! They make the cookies tender and soft.
- Using good-quality cocoa powder really makes the chocolate flavor pop. I love [Hershey’s or Ghirardelli] for a rich taste.
- The chocolate chips and cream are all you need for that melty, irresistible center—don’t substitute unless you’re feeling adventurous!
- A pinch of salt balances the sweetness beautifully. It’s a small detail that makes a big difference.
Kitchen Equipment Needed
- Mixing bowls – For combining your cookie dough and chocolate filling. I love using glass bowls because they’re easy to see into.
- Hand mixer or stand mixer – Makes creaming butter and sugar effortless. I use my [KitchenAid stand mixer] for smooth, fluffy dough.
- Measuring cups and spoons – For precise measurements; baking is all about accuracy!
- Baking sheet – To hold your cookies while they bake. I line mine with parchment paper for easy cleanup.
- Parchment paper or silicone baking mat – Prevents sticking and keeps cookies soft underneath.
- Small spoon or melon baller – Perfect for scooping cookie dough consistently.
- Fork or thumb – For making the signature thumbprint indent in each cookie.
- Microwave-safe bowl – For melting the chocolate filling quickly and easily.
Instructions
1. Prepare Your Ingredients and Equipment
- Preheat your oven to 350°F (175°C).
- Line a baking sheet with parchment paper or a silicone mat.
- Gather all your ingredients and equipment so everything is within reach—baking is easier when you’re organized!
Pro Tip: Softened butter is key here; if it’s too hard, the dough won’t cream properly, and your cookies might turn out dense.
2. Cream the Butter and Sugar
- In a large mixing bowl, beat the butter and sugar together until light and fluffy (about 2–3 minutes).
- Add the vanilla extract and continue mixing until incorporated.
Pro Tip: Use a hand mixer or stand mixer on medium speed. Scrape down the sides of the bowl once to ensure everything is mixed evenly.
3. Add Egg Yolks
- Add the two egg yolks to the butter-sugar mixture.
- Beat until fully combined and smooth.
Pro Tip: Egg yolks add richness and tenderness, so don’t skip this step.
4. Mix Dry Ingredients
- In a separate bowl, whisk together the flour, cocoa powder, and salt.
- Gradually add the dry mixture to the wet ingredients, mixing on low speed until just combined.
Pro Tip: Avoid overmixing here to keep your cookies soft and tender.
5. Shape the Cookies
- Scoop tablespoon-sized portions of dough and roll them into balls.
- Place them evenly on your prepared baking sheet, leaving about 2 inches between each cookie.
- Press your thumb (or the back of a spoon) gently into the center of each cookie to create an indent.
Pro Tip: If the dough sticks to your thumb, lightly flour your finger before pressing.
6. Bake the Cookies
- Bake in the preheated oven for 10–12 minutes.
- The edges should be set, but the centers may look slightly soft—that’s perfect.
- Allow cookies to cool on the sheet for 5 minutes before transferring to a wire rack.
Pro Tip: Don’t overbake! These cookies are meant to be soft and tender, not crisp.
7. Prepare the Chocolate Filling
- In a microwave-safe bowl, combine chocolate chips and heavy cream.
- Microwave in 20-second intervals, stirring between each, until smooth and melted.
Pro Tip: Whisk continuously to prevent lumps and ensure a glossy finish.
8. Fill the Thumbprints
- Spoon or pipe the melted chocolate into each cookie’s indent.
- Allow the chocolate to set at room temperature or place cookies in the fridge for 10–15 minutes for faster results.
Tips and Tricks for Success
- Use room-temperature butter – This ensures the dough creams properly and gives soft, tender cookies.
- Don’t overmix the dough – Overworking the flour can make cookies tough. Mix just until combined.
- Uniform cookie size – Use a small cookie scoop or tablespoon to make each cookie the same size for even baking.
- Press gently for the thumbprint – Too much pressure can flatten the cookies; too little won’t hold the filling.
- Cool before filling – Let cookies cool slightly so the chocolate doesn’t melt too much and run off.
- Store properly – Keep in an airtight container at room temperature for up to a week, or freeze for longer storage.
Ingredient Substitutions and Variations
- Butter – Can substitute with margarine or coconut oil, but cookies may be slightly less rich.
- Chocolate filling – Swap semi-sweet chocolate for milk chocolate, dark chocolate, or even white chocolate for variety.
- Egg yolks – Can replace with 2 tablespoons of applesauce for an egg-free version.
- Flour – Use a gluten-free all-purpose blend to make these cookies gluten-free.
- Cocoa powder – Dark cocoa adds a deeper chocolate flavor, while regular cocoa keeps it lighter.
- Add-ins – Sprinkle crushed nuts, peppermint, or sprinkles on the chocolate before it sets for festive flair.
Serving Suggestions
- I love serving chocolate thumbprint cookies with a cup of hot cocoa on a chilly winter evening—it’s the ultimate cozy treat.
- Arrange them on a festive holiday platter alongside other Christmas cookies for parties or cookie exchanges.
- Pair them with vanilla ice cream for a quick and indulgent dessert.
- Wrap a few in a cute holiday tin to give as homemade gifts to friends, neighbors, or coworkers.
- Enjoy them as an afternoon snack with tea or coffee—they’re the perfect pick-me-up while baking or decorating the tree.
Storage and Reheating Instructions
- Room temperature: Store in an airtight container for up to 1 week.
- Refrigerator: Keep in an airtight container for up to 2 weeks; allow to come to room temperature before serving.
- Freezer: Freeze cookies (without chocolate filling) in a single layer, then transfer to a freezer-safe bag for up to 3 months. Add chocolate after thawing.
- Reheating: Warm cookies in the microwave for 10–15 seconds or in a preheated oven at 300°F (150°C) for 5 minutes to bring back softness.
Frequently Asked Questions
How many cookies does this recipe make?
This recipe makes about 24 medium-sized chocolate thumbprint cookies—perfect for sharing or keeping a few for yourself!
Can I make these cookies ahead of time?
Absolutely! You can prepare the dough and refrigerate it for up to 2 days before baking. You can also freeze baked cookies (without chocolate) for later.
Can I use a different filling instead of chocolate?
Yes! Try caramel, peanut butter, jam, or even a white chocolate ganache for a fun twist on classic Christmas thumbprint cookies.
Are these cookies soft or crispy?
They’re soft and tender with a slightly chewy edge—just the way thumbprint cookies should be.
Can I make these cookies gluten-free?
Definitely! Substitute the all-purpose flour with a gluten-free blend, and they’ll turn out just as delicious.
What’s the best way to store leftover cookies?
Keep them in an airtight container at room temperature for up to a week, or freeze them for longer storage.
Did you try this recipe? Let me know in the comments how it turned out—I’d love to hear your chocolate thumbprint cookie success stories!

Chocolate Thumbprint Cookies
Equipment
- Mixing Bowls
- Hand mixer or stand mixer
- Measuring cups and spoons
- Baking Sheet
- Parchment paper or silicone baking mat
- Small spoon or melon baller
- Fork or thumb
- Microwave-safe bowl
Ingredients
For the Cookies:
- 1 cup unsalted butter softened
- 2/3 cup granulated sugar
- 1 teaspoon vanilla extract
- 2 large egg yolks
- 2 cups all-purpose flour
- 1/4 cup cocoa powder
- 1/4 teaspoon salt
For the Chocolate Filling:
- 1/2 cup semi-sweet chocolate chips
- 2 teaspoons heavy cream
Instructions
Prepare Your Ingredients and Equipment
- Preheat your oven to 350°F (175°C).
- Line a baking sheet with parchment paper or a silicone mat.
- Gather all your ingredients and equipment so everything is within reach—baking is easier when you’re organized!
- Pro Tip: Softened butter is key here; if it’s too hard, the dough won’t cream properly, and your cookies might turn out dense.
Cream the Butter and Sugar
- In a large mixing bowl, beat the butter and sugar together until light and fluffy (about 2–3 minutes).
- Add the vanilla extract and continue mixing until incorporated.
- Pro Tip: Use a hand mixer or stand mixer on medium speed. Scrape down the sides of the bowl once to ensure everything is mixed evenly.
Add Egg Yolks
- Add the two egg yolks to the butter-sugar mixture.
- Beat until fully combined and smooth.
- Pro Tip: Egg yolks add richness and tenderness, so don’t skip this step.
Mix Dry Ingredients
- In a separate bowl, whisk together the flour, cocoa powder, and salt.
- Gradually add the dry mixture to the wet ingredients, mixing on low speed until just combined.
- Pro Tip: Avoid overmixing here to keep your cookies soft and tender.
Shape the Cookies
- Scoop tablespoon-sized portions of dough and roll them into balls.
- Place them evenly on your prepared baking sheet, leaving about 2 inches between each cookie.
- Press your thumb (or the back of a spoon) gently into the center of each cookie to create an indent.
- Pro Tip: If the dough sticks to your thumb, lightly flour your finger before pressing.
Bake the Cookies
- Bake in the preheated oven for 10–12 minutes.
- The edges should be set, but the centers may look slightly soft—that’s perfect.
- Allow cookies to cool on the sheet for 5 minutes before transferring to a wire rack.
- Pro Tip: Don’t overbake! These cookies are meant to be soft and tender, not crisp.
Prepare the Chocolate Filling
- In a microwave-safe bowl, combine chocolate chips and heavy cream.
- Microwave in 20-second intervals, stirring between each, until smooth and melted.
- Pro Tip: Whisk continuously to prevent lumps and ensure a glossy finish.
Fill the Thumbprints
- Spoon or pipe the melted chocolate into each cookie’s indent.
- Allow the chocolate to set at room temperature or place cookies in the fridge for 10–15 minutes for faster results.
Notes
Nutritional Value (per cookie):
- Calories: ~120 kcal
- Total Fat: 6 g
- Saturated Fat: 3.5 g
- Cholesterol: 25 mg
- Sodium: 50 mg
- Total Carbohydrates: 16 g
- Dietary Fiber: 1 g
- Sugars: 10 g
- Protein: 2 g