Chocolate Chip Peppermint Cookies

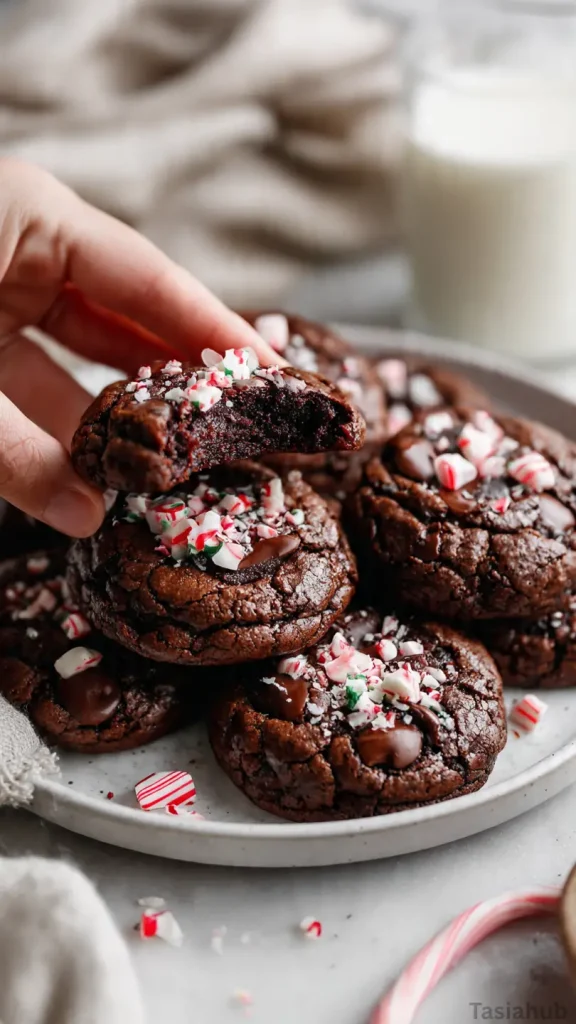
There’s nothing quite like the aroma of freshly baked cookies filling the kitchen during the holidays. These chocolate chip peppermint cookies capture all the cozy, festive vibes that make baking in December so special. They’re soft, chewy, and bursting with bits of melted chocolate and crushed peppermint—each bite feels like Christmas cheer wrapped in cookie form.
I love baking these during the holiday season because they’re a perfect blend of nostalgic flavor and winter freshness. The chocolate chips bring that classic cookie comfort, while the peppermint pieces add a cool, refreshing twist that instantly makes them feel like true Christmas baked goods. It’s the kind of recipe that brings everyone to the kitchen—friends, kids, or anyone drawn by the smell of chocolate and mint mingling in the oven.
When I think of holiday treats that never fail to impress, this recipe always comes to mind. They look festive, taste incredible, and make beautiful gifts for neighbors, coworkers, or anyone who appreciates homemade Christmas cookies. I like to package them in little tins lined with red tissue paper—simple, sweet, and full of holiday warmth.
If you’re planning your baking lineup this year, add these to the list of your go-to peppermint dessert recipes. Whether for a cookie exchange, Christmas party, or just a cozy night in with hot cocoa, these chocolate chip Christmas cookies recipes bring a delightful balance of sweetness and seasonal flavor. Bake a batch (or two!) and enjoy the magic of Christmas peppermint cookies straight from your oven.
Why You’ll Love It
- Perfect balance of flavors: The sweetness of chocolate chips pairs beautifully with the cool, minty kick of peppermint—creating a cookie that’s both cozy and refreshing.
- Festive and fun to make: Crushing candy canes and sprinkling peppermint pieces on top makes these cookies a joyful kitchen project, especially around the holidays.
- Soft, chewy texture: Each bite melts in your mouth, with gooey chocolate and slightly crisp edges that make it impossible to eat just one.
- Ideal for gifting: These cookies look beautiful in a holiday tin or wrapped in cellophane with a ribbon—an easy way to spread cheer with homemade Christmas baked goods.
- A new holiday classic: While traditional chocolate chip cookies are always a hit, this peppermint twist turns them into a must-have on your list of Christmas cookies every single year.
Ingredient List
For the Cookies:
- 2 cups all-purpose flour
- ¼ cup cocoa powder
- 1 teaspoon baking soda
- ½ teaspoon salt
- ½ cup unsalted butter, softened
- ½ cup granulated sugar
- ½ cup brown sugar, packed
- 1 large egg
- 1 teaspoon pure vanilla extract
- ½ teaspoon peppermint extract
- 1 cup semisweet chocolate chips
- ½ cup crushed candy canes or peppermint candies
Optional Topping:
- Extra chocolate chips (for pressing on top before baking)
- Crushed peppermint (for garnish)
Ingredient Notes
- Butter: Use unsalted butter so you can control the salt level. I always let mine sit at room temperature—it creams so much better that way.
- Peppermint extract: Don’t skip it! It gives that signature peppermint flavor that balances the sweetness of the chocolate.
- Chocolate chips: I love using Ghirardelli semisweet chips—they melt beautifully and have a rich flavor that stands out in peppermint desserts.
- Candy canes: Go for classic red-and-white peppermint candy canes for that festive look and extra crunch.
- Brown sugar: Adds depth and chewiness—don’t skip it; it makes a big difference in the cookie’s texture!
Kitchen Equipment Needed
- Mixing bowls: You’ll need one for dry ingredients and another for wet—makes mixing cleaner and easier.
- Electric hand mixer or stand mixer: Perfect for creaming the butter and sugars until light and fluffy. (I use my stand mixer—it saves time and effort!)
- Measuring cups and spoons: Accuracy matters in baking, especially for flour and extracts.
- Rubber spatula: Ideal for scraping down the sides of the bowl so nothing goes to waste.
- Baking sheets: Go for sturdy, nonstick ones—they help the cookies bake evenly.
- Parchment paper or silicone baking mats: Keeps cookies from sticking and makes cleanup a breeze.
- Cooling rack: Essential for letting the cookies firm up without overbaking on the hot pan.
Instructions
Step 1 — Prep the oven & pans
- Preheat your oven to 350°F (175°C) and position a rack in the center.
- Line two baking sheets with parchment paper or silicone baking mats.
- Have a cooling rack ready nearby so you can move cookies off the hot sheet quickly.
Pro tip: If you plan to bake multiple sheets, rotate pans halfway through the bake for even coloring.
Step 2 — Mix the dry ingredients
- In a medium bowl, whisk together 2 ¼ cups all-purpose flour, 1 teaspoon baking soda, ¼ cup cocoa powder, and ½ teaspoon salt until evenly combined.
- Set this bowl aside while you do the wet ingredients.
Step 3 — Cream the butter and sugars
- In a large bowl (or the bowl of a stand mixer), add ½ cup softened unsalted butter, ½ cup granulated sugar, and ½ cup packed brown sugar.
- Beat on medium speed until the mixture is pale and fluffy, about 2–3 minutes. Scrape down the bowl once or twice with a rubber spatula.
Pro tip (key step): Proper creaming traps air and gives you those soft, chewy cookies. If the butter isn’t soft enough, unplug the mixer and press it gently to check — overworking cold butter creates lumps.
Step 4 — Add egg and extracts
- Beat in 1 large egg until fully incorporated.
- Mix in 1 teaspoon pure vanilla extract and ½ teaspoon peppermint extract until evenly distributed.
Pro tip: Add the peppermint extract sparingly and taste the dough if you’re unsure — peppermint extract is concentrated and a little goes a long way.
Step 5 — Combine wet and dry
- With the mixer on low, gradually add the dry ingredient mixture to the wet mixture in two additions.
- Stop and scrape the bowl as needed, mixing just until there are no flour streaks. Avoid overmixing.
Step 6 — Fold in chocolate and peppermint
- Fold in 1 cup semisweet chocolate chips and ½ cup crushed candy canes using a rubber spatula until evenly distributed.
- Reserve a tablespoon or two of crushed peppermint and a few chocolate chips to press on top of each dough ball before baking for a prettier finish.
Pro tip (key step): If you want bright, crunchy peppermint on top, save some crushed candy to press on after scooping — peppermint mixed fully into the dough will soften and blend more with the cookie.
Step 7 — Portion the dough (and chill if you want thicker cookies)
- Scoop dough using a medium cookie scoop (about 1.5 tablespoons per cookie) or roll into roughly 1.5-inch balls.
- Place them 2 inches apart on the prepared baking sheets.
- For thicker, chewier cookies: chill the scooped dough in the fridge for 30–60 minutes (or up to 24 hours). If you’re short on time, you can bake immediately.
Pro tip (key step): Chilling helps control spread and develops the flavor — if your cookies tend to flatten too much, try chilling for at least 30 minutes.
Step 8 — Bake
- Bake on the center rack at 350°F (175°C) for 9–12 minutes, until the edges are set and lightly golden but the centers still look a touch soft.
- If using chilled dough, add 1–2 minutes to the bake time.
- If desired, gently press reserved chocolate chips and crushed peppermint onto the warm tops as soon as cookies come out of the oven.
Pro tip (key step): Cookies continue to set as they cool. Pull them when the centers still look slightly underbaked for the best chew.
Step 9 — Cool & finish
- Let cookies sit on the baking sheet for 4–5 minutes, then transfer to a cooling rack to cool completely.
- Once cool, store in an airtight container at room temperature for up to 5 days, or freeze baked cookies (or scoop-and-freeze the dough) for up to 3 months.

Tips and Tricks for Success
- Room temperature ingredients matter: Softened butter and a room-temp egg help the dough mix evenly and give your cookies that soft, chewy texture.
- Don’t overbake: The cookies should look slightly underdone in the center when you pull them out. They’ll firm up as they cool, keeping them tender.
- Crush candy canes carefully: Place them in a zip-top bag and tap gently with a rolling pin. You want small chunks, not powder.
- Rotate pans halfway: If you’re baking more than one sheet at a time, rotate them between the top and bottom racks halfway through for even browning.
- Let them rest on the baking sheet: Those few minutes after baking help the centers finish setting without turning crispy.
Ingredient Substitutions and Variations
- Flour: Swap half the all-purpose flour for white whole wheat flour for a slightly nuttier flavor and a bit more structure.
- Butter: If you’re dairy-free, use plant-based butter sticks that mimic real butter for the same texture.
- Chocolate chips: Try dark chocolate for a richer flavor or white chocolate chips for a candy cane-inspired look.
- Peppermint extract: If you don’t have it, a few extra tablespoons of crushed candy canes can still give you a light minty taste.
- Festive add-ins: Mix in mini marshmallows, red and green M&Ms, or drizzle cooled cookies with melted white chocolate for extra Christmas flair.
- Gluten-free option: Use a 1:1 gluten-free baking flour blend—these cookies turn out just as chewy and delicious.
Serving Suggestions
- With hot cocoa: These cookies taste amazing with a warm mug of hot chocolate—the peppermint and cocoa combo is pure holiday comfort.
- Alongside coffee or espresso: I love enjoying one (or two!) with my morning coffee during December—it’s the sweetest way to start the day.
- On a dessert platter: Pair them with other Christmas baked goods like sugar cookies, gingerbread, or fudge for a festive dessert spread.
- As a gift treat: Stack a few in a cellophane bag, tie with a ribbon, and add a little note—perfect for neighbors, teachers, or coworkers.
- Crumbled over ice cream: Sprinkle a few broken pieces over vanilla or peppermint ice cream for a simple yet indulgent peppermint dessert recipe.
Storage and Reheating Instructions
- Room temperature: Store in an airtight container for up to 5 days. Add a slice of bread inside to keep them soft.
- Freezing baked cookies: Let them cool completely, then freeze in layers separated by parchment paper for up to 3 months.
- Freezing the dough: Scoop and freeze unbaked dough balls on a tray, then transfer to a freezer bag—bake straight from frozen (add 2 minutes to bake time).
- Reheating: Warm cookies in the microwave for 10–15 seconds or pop them in a 300°F oven for 3–4 minutes to revive that just-baked texture.
- Tip: Always let reheated cookies cool for a minute before biting in—the chocolate chips get molten hot!
Frequently Asked Questions
Can I use peppermint bark instead of candy canes?
Yes! Peppermint bark works beautifully here. Just chop it into small pieces and mix it in like you would with chocolate chips or crushed candy canes—it adds extra chocolatey goodness.
How do I keep my cookies soft after baking?
Store them in an airtight container with a slice of bread or a few marshmallows. They’ll help retain moisture so your cookies stay soft and chewy for days.
Can I make the dough ahead of time?
Absolutely! You can refrigerate the dough for up to 3 days or freeze it for longer storage. Just let it sit at room temperature for 15 minutes before baking if it’s too firm.
What if I don’t have peppermint extract?
No worries—just use extra crushed candy canes or a few drops of vanilla extract for a milder, sweet flavor. The cookies will still taste festive and delicious.
How do I prevent the candy pieces from melting too much?
Use crushed candy canes rather than powder and press some on top after baking for that pretty peppermint sparkle without the sticky melt.
Can I double the recipe?
Yes, this recipe doubles beautifully. It’s perfect if you’re baking for a cookie exchange or preparing extra Christmas baked goods for gifting.
Did you try these chocolate chip peppermint cookies? Let me know in the comments how they turned out—I’d love to hear how you’re sharing these holiday treats this season!

Chocolate Chip Peppermint Cookies
Equipment
- Mixing Bowls
- Electric hand mixer or stand mixer
- Measuring cups and spoons
- Rubber spatula
- Baking sheets
- Parchment paper or silicone baking mats
- Cooling Rack
Ingredients
For the Cookies:
- 2 cups all-purpose flour
- ¼ cup cocoa powder
- 1 teaspoon baking soda
- ½ teaspoon salt
- ½ cup unsalted butter softened
- ½ cup granulated sugar
- ½ cup brown sugar packed
- 1 large egg
- 1 teaspoon pure vanilla extract
- ½ teaspoon peppermint extract
- 1 cup semisweet chocolate chips
- ½ cup crushed candy canes or peppermint candies
Optional Topping:
- Extra chocolate chips for pressing on top before baking
- Crushed peppermint for garnish
Instructions
Step 1 — Prep the oven & pans
- Preheat your oven to 350°F (175°C) and position a rack in the center.
- Line two baking sheets with parchment paper or silicone baking mats.
- Have a cooling rack ready nearby so you can move cookies off the hot sheet quickly.
- Pro tip: If you plan to bake multiple sheets, rotate pans halfway through the bake for even coloring.
Step 2 — Mix the dry ingredients
- In a medium bowl, whisk together 2 ¼ cups all-purpose flour, 1 teaspoon baking soda, ¼ cup cocoa powder, and ½ teaspoon salt until evenly combined.
- Set this bowl aside while you do the wet ingredients.
Step 3 — Cream the butter and sugars
- In a large bowl (or the bowl of a stand mixer), add ½ cup softened unsalted butter, ½ cup granulated sugar, and ½ cup packed brown sugar.
- Beat on medium speed until the mixture is pale and fluffy, about 2–3 minutes. Scrape down the bowl once or twice with a rubber spatula.
- Pro tip (key step): Proper creaming traps air and gives you those soft, chewy cookies. If the butter isn’t soft enough, unplug the mixer and press it gently to check — overworking cold butter creates lumps.
Step 4 — Add egg and extracts
- Beat in 1 large egg until fully incorporated.
- Mix in 1 teaspoon pure vanilla extract and ½ teaspoon peppermint extract until evenly distributed.
- Pro tip: Add the peppermint extract sparingly and taste the dough if you’re unsure — peppermint extract is concentrated and a little goes a long way.
Step 5 — Combine wet and dry
- With the mixer on low, gradually add the dry ingredient mixture to the wet mixture in two additions.
- Stop and scrape the bowl as needed, mixing just until there are no flour streaks. Avoid overmixing.
Step 6 — Fold in chocolate and peppermint
- Fold in 1 cup semisweet chocolate chips and ½ cup crushed candy canes using a rubber spatula until evenly distributed.
- Reserve a tablespoon or two of crushed peppermint and a few chocolate chips to press on top of each dough ball before baking for a prettier finish.
- Pro tip (key step): If you want bright, crunchy peppermint on top, save some crushed candy to press on after scooping — peppermint mixed fully into the dough will soften and blend more with the cookie.
Step 7 — Portion the dough (and chill if you want thicker cookies)
- Scoop dough using a medium cookie scoop (about 1.5 tablespoons per cookie) or roll into roughly 1.5-inch balls.
- Place them 2 inches apart on the prepared baking sheets.
- For thicker, chewier cookies: chill the scooped dough in the fridge for 30–60 minutes (or up to 24 hours). If you’re short on time, you can bake immediately.
- Pro tip (key step): Chilling helps control spread and develops the flavor — if your cookies tend to flatten too much, try chilling for at least 30 minutes.
Step 8 — Bake
- Bake on the center rack at 350°F (175°C) for 9–12 minutes, until the edges are set and lightly golden but the centers still look a touch soft.
- If using chilled dough, add 1–2 minutes to the bake time.
- If desired, gently press reserved chocolate chips and crushed peppermint onto the warm tops as soon as cookies come out of the oven.
- Pro tip (key step): Cookies continue to set as they cool. Pull them when the centers still look slightly underbaked for the best chew.
Step 9 — Cool & finish
- Let cookies sit on the baking sheet for 4–5 minutes, then transfer to a cooling rack to cool completely.
- Once cool, store in an airtight container at room temperature for up to 5 days, or freeze baked cookies (or scoop-and-freeze the dough) for up to 3 months.
Notes
Nutritional Value (per cookie, approximate)
- Calories: 160
- Total Fat: 7g
- Saturated Fat: 4g
- Cholesterol: 20mg
- Sodium: 100mg
- Total Carbohydrates: 23g
- Sugars: 15g
- Protein: 2g