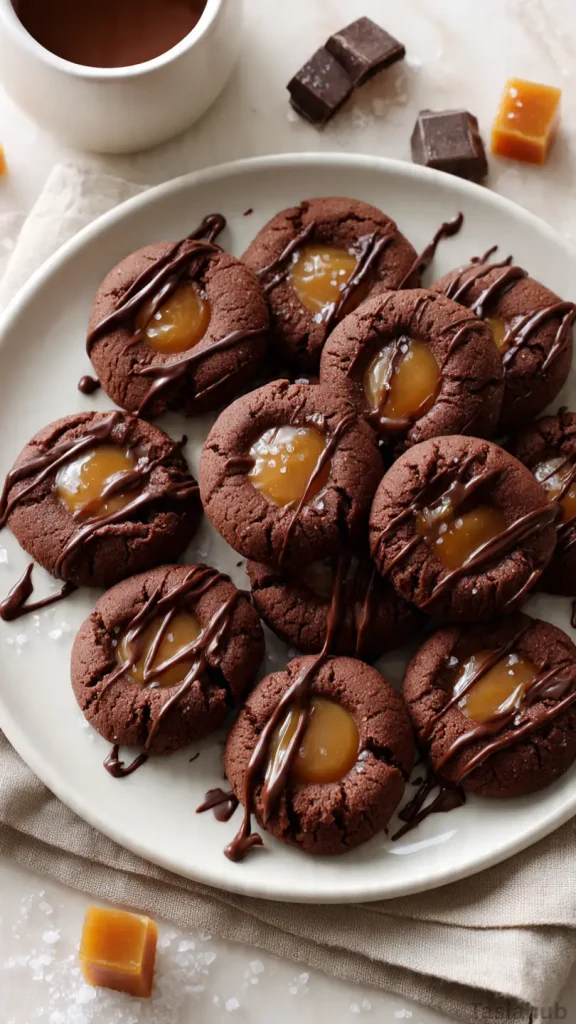
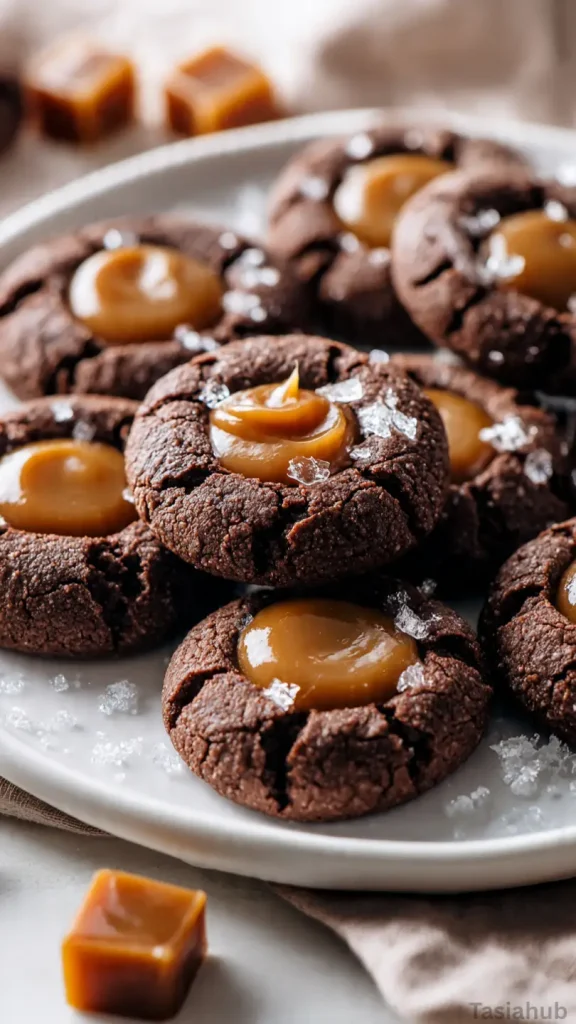
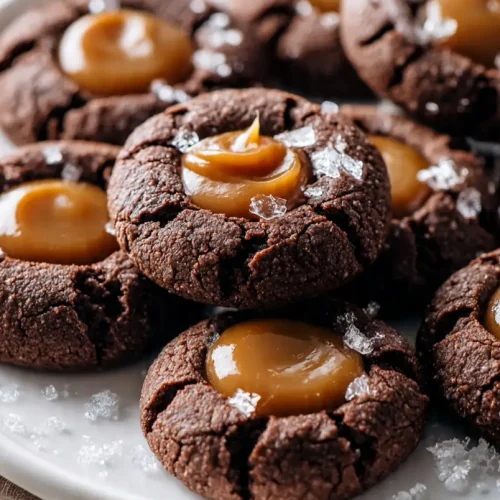
Chocolate Caramel Thumbprint Cookies

These chocolate caramel thumbprint cookies are a dreamy mix of chewy chocolate goodness and smooth, golden caramel — the kind of treat that instantly makes the holidays feel cozy. Each bite has that rich chocolate base you love in classic Christmas cookies, with a little pool of silky caramel right in the center that melts perfectly on your tongue.
I love how easy these cookies are to make, even though they look like something straight from a bakery display. You don’t need fancy tools or complicated steps — just a few pantry staples, some good cocoa powder, and soft caramels (or homemade caramel if you’re feeling extra festive). The result is a batch of easy thumbprint cookies that look elegant enough for a cookie exchange but simple enough to bake on a quiet weekend afternoon.
What makes these Christmas thumbprint cookies so irresistible is the balance of textures. The edges are slightly crisp, the centers are soft and fudgy, and the caramel topping adds that luxurious touch of sweetness. A sprinkle of flaky sea salt on top makes them even better — that little bit of salt brings out the chocolate flavor beautifully.
These chocolate thumbprint cookies are perfect for gifting, too. Stack a few in a cellophane bag, tie them with a red ribbon, and you’ve got a thoughtful, homemade holiday treat that never fails to impress. Whether you’re baking for family, friends, or your own sweet cravings, these cookies capture everything wonderful about holiday baking — comfort, warmth, and pure chocolate joy.
Why You’ll Love It
- Rich, fudgy flavor: The chocolate base is deep and decadent, perfectly balanced with the buttery caramel filling — a true match made in cookie heaven.
- Easy to make: Despite their fancy appearance, these are truly easy thumbprint cookies that come together with simple ingredients and no complicated steps.
- Holiday-ready beauty: With their glossy caramel centers and optional drizzle of melted chocolate or sea salt flakes, these make stunning Christmas cookies for parties or gifts.
- Soft and chewy texture: Each bite delivers that perfect combination — crisp edges with a tender, melt-in-your-mouth center.
- Customizable and fun: You can top them with caramel, ganache, or even peanut butter filling for a twist — making these chocolate thumbprint cookies perfect for experimenting all season long.
Ingredient List
For the Cookies:
- 1 cup unsalted butter, softened
- ¾ cup granulated sugar
- 1 large egg yolk
- 1 teaspoon vanilla extract
- 1 ½ cups all-purpose flour
- ½ cup unsweetened cocoa powder
- ¼ teaspoon salt
For the Caramel Filling:
- 20 soft caramels, unwrapped
- 2 tablespoons heavy cream
Optional Topping:
- Flaky sea salt (for sprinkling)
- Melted chocolate (for drizzling)
Ingredient Notes
- Butter: Use real unsalted butter — it gives the cookies their rich, tender texture. I always let it soften at room temperature for easy mixing.
- Cocoa powder: Go for a good-quality unsweetened cocoa powder (like Ghirardelli or Hershey’s Special Dark). It makes all the difference in achieving that deep, chocolatey flavor.
- Egg yolk: Just the yolk adds richness and chewiness — don’t skip it!
- Caramels: I usually use Kraft or Werther’s soft caramels because they melt into a smooth, creamy filling that sets beautifully in the thumbprint centers.
- Sea salt: That little sprinkle on top balances the sweetness and gives the cookies a bakery-style finish — it’s the secret to making them truly irresistible.
Kitchen Equipment Needed
- Mixing bowls: You’ll need one for the dry ingredients and another for the wet — I love using my glass nesting bowls so I can see everything mixing evenly.
- Hand or stand mixer: Helps cream the butter and sugar until light and fluffy — a key step for that perfect cookie texture.
- Baking sheet: Line it with parchment paper or a silicone baking mat for easy cleanup and evenly baked cookies.
- Measuring cups and spoons: Accuracy matters here — especially with cocoa powder and flour.
- Small saucepan or microwave-safe bowl: For melting the caramels and cream into that silky, golden filling.
- Teaspoon or thumb: To make the “thumbprints” in the cookie centers — I usually use the back of a small measuring spoon for uniform shapes.
- Cooling rack: Keeps the cookies from overbaking on the hot pan and helps them cool evenly before filling.
Instructions
1. Prep & Preheat
- Preheat your oven to 350°F (175°C) and position a rack in the center.
- Line a baking sheet with parchment paper or a silicone baking mat.
- Measure your ingredients (especially flour and cocoa) so you’re ready to go.
Pro tip: Spoon the flour into your measuring cup and level it off with the back of a knife—packing flour can make cookies dense.
2. Make the Dough
- In a medium bowl, whisk together 1 ½ cups all-purpose flour, ½ cup unsweetened cocoa powder, and ¼ teaspoon salt. If your cocoa has lumps, sift it or press through a fine mesh.
- In a large bowl (or the bowl of a stand mixer), beat 1 cup softened unsalted butter and ¾ cup granulated sugar on medium-high until pale and fluffy, about 2–3 minutes.
- Add 1 large egg yolk and 1 teaspoon vanilla extract, beating until combined.
- Lower the speed and add the dry ingredients in two additions, mixing just until no streaks of flour remain. Scrape the bowl and finish folding the last bit by hand if needed — don’t overmix.
Pro tip: Creaming the butter and sugar until light and fluffy traps tiny air bubbles that give the cookies lift and a tender crumb — don’t rush this step.
3. Shape & Make the Thumbprints
- Use a small cookie scoop or a tablespoon to portion the dough (about 1 tbsp per cookie). Roll each portion into a smooth ball.
- Place the balls on the prepared baking sheet about 1½–2 inches apart.
- Using the back of a teaspoon or your thumb, press a shallow indentation (about ½ inch deep) into the center of each ball. If the dough cracks around the edges, chill the tray for 10–15 minutes and try again, or gently press the edges to smooth them.
Pro tip: Using the back of a slightly wet teaspoon helps make a smooth, even well without sticking.
4. Bake
- Bake one tray at a time in the preheated oven for 10–12 minutes, until the edges are set but the centers still look a touch soft.
- If the indentations puff up while baking, press them gently again with the back of the teaspoon as soon as the cookies come out of the oven.
- Transfer the cookies to a cooling rack and let them cool completely before filling (about 20–30 minutes).
Pro tip: The cookies will firm up as they cool — pull them when the edges are set but the center still jiggles slightly for that soft, fudgy texture.
5. Make the Caramel Filling
- In a small saucepan over low heat, combine 20 soft caramels (unwrapped) and 2 tablespoons heavy cream. Stir constantly until the caramels melt into a smooth, glossy sauce.
- OR microwave in a microwave-safe bowl in 20–30 second bursts, stirring between bursts, until smooth.
- If the caramel is too thick to pipe or spoon, stir in an extra teaspoon of cream at a time until it reaches a thick but pourable consistency.
Pro tip: Whisk or stir continuously and keep the heat low — caramels scorch quickly and can become grainy if overheated.
6. Fill & Finish
- Spoon or pipe a small amount of warm caramel into each cooled cookie indentation. Don’t overfill — leave a little room if you plan to drizzle chocolate.
- Optional: Melt a small handful (about ¼ cup) of chocolate chips in the microwave in 15–20 second bursts and drizzle over the caramel-filled cookies.
- While the caramel is still warm, sprinkle a pinch of flaky sea salt on top for a delicious sweet-salty pop.
- Let the cookies sit at room temperature until the caramel sets (about 30 minutes). To speed this up, place the tray in the fridge for 10–15 minutes.
Pro tip: Add the sea salt while the caramel is warm so it adheres and dissolves slightly into the caramel for maximum flavor.
Tips and Tricks for Success
- Chill the dough if it’s too soft: If your kitchen is warm, pop the dough in the fridge for 15–20 minutes before shaping. It helps prevent spreading and keeps the thumbprints neat.
- Re-shape after baking: Don’t be afraid to gently press the centers again right after baking if they puff up — just do it while the cookies are still warm.
- Use soft, fresh caramels: Older or harder caramels won’t melt smoothly and can make the filling grainy.
- Don’t overbake: The cookies should look slightly soft in the center when you pull them out. They’ll finish setting as they cool, keeping that fudgy texture.
- Add toppings while warm: Whether it’s sea salt or chocolate drizzle, do it while the caramel is still glossy so it sticks beautifully.
Ingredient Substitutions and Variations
- Salted caramel: Use salted caramels or sprinkle extra sea salt for a bolder sweet-salty combo.
- Chocolate ganache filling: Swap the caramel for a simple mix of melted chocolate and cream for double-chocolate thumbprint cookies.
- Nutty twist: Roll the cookie dough balls in finely chopped pecans, hazelnuts, or almonds before baking for a crunchy edge.
- Dairy-free version: Substitute the butter with plant-based butter and the heavy cream with coconut cream — the flavor is still rich and delicious.
- Festive flair: Add red or green sprinkles on top for a fun Christmas cookie platter that stands out.
- Espresso kick: Mix a teaspoon of instant espresso powder into the dough to deepen the chocolate flavor — it makes them extra indulgent.
Serving Suggestions
- I love serving these chocolate caramel thumbprint cookies with a warm cup of coffee or hot chocolate — the caramel melts just slightly, and it’s pure bliss.
- Pair them with a scoop of vanilla or salted caramel ice cream for an easy dessert that feels restaurant-worthy.
- Add them to your Christmas cookie tray alongside peppermint bark and sugar cookies for a gorgeous holiday assortment.
- Wrap a few in cellophane bags with a red ribbon for a thoughtful edible gift — they look just as good as they taste.
- Serve them slightly warmed with a drizzle of extra melted chocolate and a sprinkle of sea salt when you want to impress guests (or just treat yourself).
Storage and Reheating Instructions
- Room temperature: Store cookies in an airtight container for up to 4 days. Layer with parchment paper so they don’t stick together.
- Refrigerator: If it’s warm where you are, keep them chilled for up to 1 week. Let them come to room temperature before serving.
- Freezer: Freeze unfilled cookies for up to 3 months. Thaw at room temperature, then fill with fresh caramel before serving.
- Reheating: To soften the caramel centers, microwave one cookie for about 6–8 seconds — just enough to make them gooey again without melting.
- Avoid moisture: Always store them in a cool, dry place — humidity can make the caramel sticky and the cookie base lose its crisp edges.
Frequently Asked Questions
Can I make the dough ahead of time?
Yes! You can prepare the dough up to 2 days ahead. Just wrap it tightly in plastic wrap and keep it in the fridge. When you’re ready to bake, let it soften for about 10–15 minutes before shaping and baking.
What’s the best caramel to use?
Soft, chewy caramels like Werther’s Originals or Kraft melt the smoothest. Avoid hard caramels — they can turn grainy or too sticky once melted.
My cookies spread too much — what went wrong?
If your cookies spread, the dough was likely too warm. Try chilling it for 20–30 minutes before baking. Also, make sure you’re measuring flour correctly — a little too little can cause spreading.
Can I use homemade caramel sauce instead?
Absolutely! Just make sure it’s thick enough to hold its shape when spooned into the cookies. If it’s too runny, let it cool a bit before filling.
How do I keep the caramel from getting too hard?
Add enough cream when melting the caramels — it keeps the filling soft and chewy even after cooling. Also, don’t overheat the caramel, or it’ll firm up too much once it sets.
Can I make these gluten-free?
Yes, swap the all-purpose flour for a good 1:1 gluten-free baking blend. The cookies stay rich, soft, and just as delicious.
Did you try this recipe? Let me know in the comments how it turned out — I’d love to hear if these chocolate caramel thumbprint cookies made it onto your holiday cookie tray this year!
Chocolate Caramel Thumbprint Cookies
Equipment
- Mixing Bowls
- Hand or Stand Mixer
- Baking Sheet
- Measuring cups and spoons
- Small saucepan or microwave-safe bowl
- Teaspoon or thumb
- Cooling Rack
Ingredients
For the Cookies:
- 1 cup unsalted butter softened
- ¾ cup granulated sugar
- 1 large egg yolk
- 1 teaspoon vanilla extract
- 1 ½ cups all-purpose flour
- ½ cup unsweetened cocoa powder
- ¼ teaspoon salt
For the Caramel Filling:
- 20 soft caramels unwrapped
- 2 tablespoons heavy cream
Optional Topping:
- Flaky sea salt for sprinkling
- Melted chocolate for drizzling
Instructions
Prep & Preheat
- Preheat your oven to 350°F (175°C) and position a rack in the center.
- Line a baking sheet with parchment paper or a silicone baking mat.
- Measure your ingredients (especially flour and cocoa) so you’re ready to go.
- Pro tip: Spoon the flour into your measuring cup and level it off with the back of a knife—packing flour can make cookies dense.
Make the Dough
- In a medium bowl, whisk together 1 ½ cups all-purpose flour, ½ cup unsweetened cocoa powder, and ¼ teaspoon salt. If your cocoa has lumps, sift it or press through a fine mesh.
- In a large bowl (or the bowl of a stand mixer), beat 1 cup softened unsalted butter and ¾ cup granulated sugar on medium-high until pale and fluffy, about 2–3 minutes.
- Add 1 large egg yolk and 1 teaspoon vanilla extract, beating until combined.
- Lower the speed and add the dry ingredients in two additions, mixing just until no streaks of flour remain. Scrape the bowl and finish folding the last bit by hand if needed — don’t overmix.
- Pro tip: Creaming the butter and sugar until light and fluffy traps tiny air bubbles that give the cookies lift and a tender crumb — don’t rush this step.
Shape & Make the Thumbprints
- Use a small cookie scoop or a tablespoon to portion the dough (about 1 tbsp per cookie). Roll each portion into a smooth ball.
- Place the balls on the prepared baking sheet about 1½–2 inches apart.
- Using the back of a teaspoon or your thumb, press a shallow indentation (about ½ inch deep) into the center of each ball. If the dough cracks around the edges, chill the tray for 10–15 minutes and try again, or gently press the edges to smooth them.
- Pro tip: Using the back of a slightly wet teaspoon helps make a smooth, even well without sticking.
Bake
- Bake one tray at a time in the preheated oven for 10–12 minutes, until the edges are set but the centers still look a touch soft.
- If the indentations puff up while baking, press them gently again with the back of the teaspoon as soon as the cookies come out of the oven.
- Transfer the cookies to a cooling rack and let them cool completely before filling (about 20–30 minutes).
- Pro tip: The cookies will firm up as they cool — pull them when the edges are set but the center still jiggles slightly for that soft, fudgy texture.
Make the Caramel Filling
- In a small saucepan over low heat, combine 20 soft caramels (unwrapped) and 2 tablespoons heavy cream. Stir constantly until the caramels melt into a smooth, glossy sauce.
- OR microwave in a microwave-safe bowl in 20–30 second bursts, stirring between bursts, until smooth.
- If the caramel is too thick to pipe or spoon, stir in an extra teaspoon of cream at a time until it reaches a thick but pourable consistency.
- Pro tip: Whisk or stir continuously and keep the heat low — caramels scorch quickly and can become grainy if overheated.
Fill & Finish
- Spoon or pipe a small amount of warm caramel into each cooled cookie indentation. Don’t overfill — leave a little room if you plan to drizzle chocolate.
- Optional: Melt a small handful (about ¼ cup) of chocolate chips in the microwave in 15–20 second bursts and drizzle over the caramel-filled cookies.
- While the caramel is still warm, sprinkle a pinch of flaky sea salt on top for a delicious sweet-salty pop.
- Let the cookies sit at room temperature until the caramel sets (about 30 minutes). To speed this up, place the tray in the fridge for 10–15 minutes.
- Pro tip: Add the sea salt while the caramel is warm so it adheres and dissolves slightly into the caramel for maximum flavor.
Storage & Freezing
- Store cookies in an airtight container at room temperature for up to 4 days. Layer with parchment paper to prevent sticking.
- For longer storage, freeze baked unfilled cookies in a single layer on a tray until solid, then transfer to a freezer bag for up to 3 months. Thaw, then warm and fill with caramel just before serving.
- To revive slightly firm caramel, microwave an individual cookie for 6–8 seconds to soften the center before serving.
Notes
Nutritional Value (per cookie, approximate):
- Calories: 150 kcal
- Total Fat: 8 g
- Saturated Fat: 5 g
- Cholesterol: 20 mg
- Sodium: 55 mg
- Total Carbohydrates: 19 g
- Sugars: 14 g
- Protein: 1 g
- Fiber: 1 g