Cheesy Pull-Apart Christmas Bread
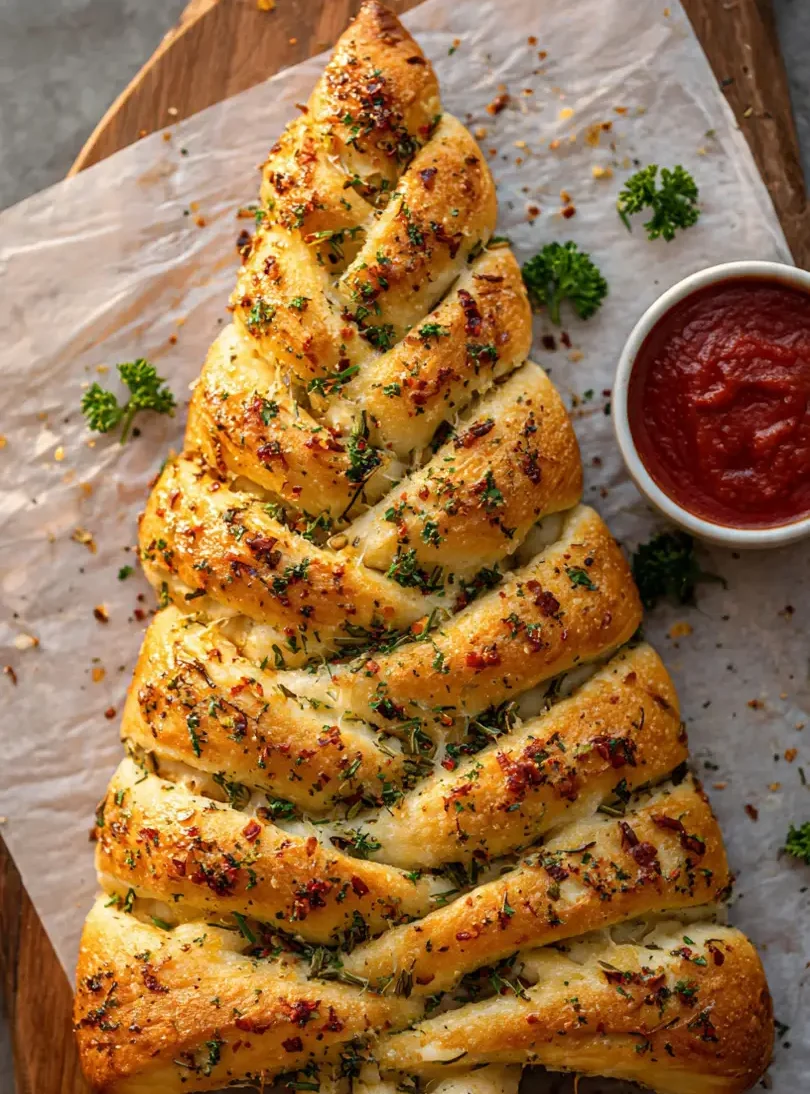
The aroma of melted cheese and warm, freshly baked bread has a way of bringing everyone to the kitchen, and this Cheesy Pull-Apart Christmas Bread is the ultimate holiday treat to do just that. Perfect for sharing with friends and family, this bread is as fun to make as it is to eat. Imagine pulling apart gooey, cheesy layers that reveal a festive, tree-shaped masterpiece—it’s a showstopper for any holiday gathering.
This pull apart bread recipe takes classic comfort food to a festive level. Soft, fluffy bread stuffed with savory cheeses and herbs comes together in a way that’s both visually striking and irresistibly tasty. Kids love it, adults can’t get enough, and it’s a perfect centerpiece for a holiday appetizer spread. If you’ve been searching for cute holiday appetizers that are easy to serve and even easier to enjoy, this is it.
One of the best things about this Cheesy Christmas Tree Bread is how interactive it is. Guests can pull off a piece of bread and cheese at a time, making it not just a snack, but an experience. Whether served as part of a Christmas brunch or alongside a holiday dinner, it adds a festive touch that elevates your table without requiring hours in the kitchen.
And the flavor—oh, the flavor! Every bite combines the comforting warmth of bread with gooey cheese and just the right touch of herbs. The cheesy layers melt perfectly, creating a soft, indulgent pull apart bread that will have everyone coming back for seconds. This is truly one of those pull apart bread recipes that balances fun presentation with incredible taste.
This Christmas tree cheese bread isn’t just a treat; it’s a way to make your holiday celebrations a little brighter, a little cheesier, and a lot more festive. Whether you’re serving it as part of your Christmas appetizers or presenting it as a cute holiday appetizer on its own, it’s guaranteed to steal the spotlight.
Why You’ll Love It
- Festive and Fun to Serve – This Christmas tree bread instantly becomes the centerpiece of any holiday table. Watching everyone pull apart cheesy layers is as entertaining as it is delicious.
- Perfect for Sharing – Soft, gooey, and loaded with cheese, this bread is designed for communal enjoyment. It’s ideal for gatherings, potlucks, or casual family dinners.
- Easy to Customize – You can mix in your favorite cheeses, sprinkle in some herbs, or even add a touch of garlic for extra flavor. It’s a versatile pull apart bread recipe that adapts to your taste.
- Interactive Eating Experience – There’s something magical about tearing into each cheesy segment. It turns a simple snack into an experience that guests will remember.
- Cute Holiday Appeal – Shaped like a Christmas tree, this cheesy Christmas tree bread doubles as decoration and appetizer. It adds a festive touch to your table while satisfying everyone’s cravings.
Ingredient List
For the Bread
- 3 ½ cups all-purpose flour (plus extra for kneading)
- 1 packet (2¼ tsp) active dry yeast
- 1 tbsp sugar
- ¾ tsp salt
- ¾ cup warm milk (about 105–110°F)
- 3 tbsp unsalted butter, melted
- 1 large egg
For the Garlic Cheese Filling
- 1 cup shredded mozzarella cheese
- 1 cup shredded cheddar cheese
- ¼ cup grated Parmesan cheese
- 4 tbsp unsalted butter, melted
- 2–3 cloves garlic, minced (or 1 tsp garlic powder)
- 1 tsp Italian seasoning
- ¼ tsp crushed red pepper flakes (optional, for a mild kick)
For Garnish (Optional)
- 2 tbsp melted butter (for brushing after baking)
- 2 tbsp chopped fresh parsley or rosemary
- Extra shredded cheese for topping
Ingredient Notes
- I always use whole milk for the bread—it makes it soft and fluffy every time.
- Don’t skip the yeast proofing step! It really gives the bread that perfect pull-apart texture.
- For the cheese, I like using a mix of mozzarella and cheddar—it’s melty, flavorful, and gives the best gooey pull-apart effect.
- Garlic powder and Italian herbs are optional, but trust me, they take this cheesy Christmas tree bread to the next level.
- Extra cheese on top isn’t just for looks—it creates those irresistible cheesy peaks everyone loves.
Kitchen Equipment Needed
- Mixing Bowl – For combining and proofing the dough. I love using a large glass bowl so you can see the dough rise.
- Measuring Cups & Spoons – Accurate measurements make all the difference for bread.
- Wooden Spoon or Silicone Spatula – Perfect for mixing dough without scratching your bowl.
- Baking Sheet or Pan – To shape and bake the Christmas tree bread. A rimmed baking sheet works great for catching any melted cheese.
- Parchment Paper – Keeps the bread from sticking and makes cleanup easy.
- Sharp Knife or Kitchen Scissors – For cutting the bread into tree segments. I prefer scissors for precision and ease.
- Pastry Brush – To brush melted butter on top for a golden finish.
- Cooling Rack – Lets the bread cool slightly before serving so the cheese stays gooey but not messy.
Instructions
Step 1: Prepare the Dough
- In a small bowl, combine ¾ cup warm milk, 1 tablespoon sugar, and 2¼ teaspoons (1 packet) active dry yeast.
Let it sit for 5–10 minutes until the mixture turns foamy.
Pro Tip: The milk should be warm, not hot — around 105–110°F — to activate the yeast without killing it. - In a large mixing bowl, combine 2½ cups all-purpose flour and ½ teaspoon salt.
- Add the melted butter (2 tablespoons), 1 egg, and the yeast mixture to the flour.
Stir with a wooden spoon or silicone spatula until a sticky dough forms.
Step 2: Knead the Dough
- Transfer the dough to a lightly floured surface.
- Knead for 8–10 minutes, until it becomes smooth, soft, and elastic.
Pro Tip: If the dough feels sticky, sprinkle in a little flour at a time — but avoid adding too much or the bread will turn dense. - Place the dough in a greased bowl, cover it with a clean kitchen towel, and let it rise in a warm spot for 1–1½ hours, or until doubled in size.
Step 3: Divide and Roll Out the Dough
- Once risen, gently punch down the dough to release air.
- Divide it into two equal halves.
- On a floured surface, roll out the first half into a large rectangle (about 12×18 inches).
This will be your bottom layer — transfer it carefully onto a parchment-lined baking sheet. - Roll out the second half into the same size and set it aside, covered with a clean towel to prevent drying.
Pro Tip: Use a ruler or straight edge to keep both rectangles the same size — this helps them line up perfectly later.
Step 4: Make the Garlic Cheese Filling
- In a small bowl, mix together:
- 4 tablespoons melted butter
- 2–3 cloves minced garlic
- 1 teaspoon Italian seasoning
- 1 cup shredded mozzarella cheese
- ¼ cup grated Parmesan cheese
- Stir until evenly combined.
- Spread this mixture evenly over the first rolled-out dough layer, covering it from edge to edge.
Pro Tip: For even coverage, use an offset spatula or the back of a spoon.
Step 5: Add the Top Dough Layer
- Carefully place the second sheet of dough over the cheese-covered base.
- Gently press along the edges and smooth out the surface to remove air pockets.
- Make sure both layers line up neatly.
Pro Tip: If the edges don’t match, trim them slightly so the layers align before cutting.
Step 6: Shape the Christmas Tree
- Using a sharp knife or pizza cutter, cut out a large triangle (the tree shape) from the layered dough — wide at the bottom and pointed at the top.
- Remove the extra dough from around the edges (you can bake these scraps separately).
- Lightly score a line down the middle of the triangle — this is your tree trunk and should remain uncut.
Pro Tip: Keep the center intact — that’s what holds your tree together!
Step 7: Cut and Twist the Branches
- Starting from the center line, cut horizontal strips about 1 inch apart on both sides of the trunk.
Stop just before reaching the center each time. - Twist each strip 2–3 times to form spiral “branches.”
- Repeat until all the strips are twisted neatly.
Pro Tip: If cheese starts oozing out while twisting, press it gently back into the dough — it’ll melt perfectly during baking.
Step 8: Brush and Rest
- Brush the entire tree with melted butter.
- Sprinkle with extra herbs, cheese, or chili flakes for added flavor.
- Let the shaped tree rest for 10–15 minutes before baking.
Pro Tip: This short rest helps the dough puff slightly, giving the bread a soft, pull-apart texture.
Step 9: Bake the Bread
- Preheat your oven to 375°F (190°C).
- Bake for 20–25 minutes, or until the bread turns golden brown and the cheese inside is melted.
- If it browns too quickly, loosely cover the top with foil during the last few minutes.
Pro Tip: For a glossy finish, brush the hot bread with more melted butter right after removing it from the oven.
Step 10: Garnish and Serve
- Let it cool for 5 minutes before moving it.
- Sprinkle with fresh parsley or rosemary for a festive look.
- Serve warm with marinara sauce, garlic butter, or cheese dip for dipping.
Pro Tip: Place your dip bowl beside the bread or near the base of the “tree” for a beautiful presentation.

Tips and Tricks for Success
- Make sure your yeast is fresh—expired yeast can prevent the dough from rising properly.
- Don’t rush the rising process; letting the dough double in size ensures a soft, fluffy texture.
- Use a sharp knife or kitchen scissors to cut the dough into strips—clean cuts make pulling apart easier.
- Brush the dough with melted butter before baking to get a golden, shiny crust.
- Serve warm—cheese pull apart bread is at its gooey, melty best straight from the oven.
- If your bread browns too fast, cover it loosely with foil to prevent burning while the inside finishes baking.
Ingredient Substitutions and Variations
- Cheese Mix: Swap cheddar or mozzarella for Gruyère, Fontina, or Monterey Jack for different flavors.
- Herbs: Fresh herbs like thyme, rosemary, or basil can replace dried Italian herbs for a fresher taste.
- Bread Base: For a richer flavor, try using half whole wheat flour or adding a bit of garlic-infused olive oil.
- Add-Ins: Sprinkle cooked bacon bits, sun-dried tomatoes, or caramelized onions into the cheese for extra flavor.
- Spicy Twist: Add a pinch of red pepper flakes or chopped jalapeños to the cheese for a little kick.
Serving Suggestions
- I love serving this cheesy Christmas tree bread alongside a hot bowl of tomato soup—it’s the perfect cozy combo!
- Pair it with a fresh holiday salad with cranberries and walnuts to balance the richness of the cheese.
- It makes a fun addition to a Christmas appetizer spread, surrounded by cute holiday appetizers like stuffed mushrooms or mini quiches.
- Serve it warm as a side for brunch—guests love tearing off pieces and dipping them in marinara or garlic butter.
- Great for gifting too! Wrap a warm loaf in parchment paper and ribbon for a festive treat that everyone will love.

Storage and Reheating Instructions
- Room Temperature: Store in an airtight container or wrapped in foil for up to 2 days.
- Refrigerator: Keep in an airtight container for up to 5 days. Reheat in the oven for 5–10 minutes at 350°F to restore freshness.
- Freezer: Wrap tightly in plastic wrap and foil, freeze for up to 2 months. Thaw overnight in the fridge before reheating.
- Reheating Tip: Warm in the oven rather than the microwave to keep the bread soft and the cheese gooey.
- Quick Serve: Slice and pop individual pieces in the toaster oven for a fast, melty snack.
Frequently Asked Questions
Can I make this bread ahead of time?
Absolutely! You can prepare the dough and shape the bread a day in advance. Just cover it tightly and refrigerate overnight, then bake when ready.
Can I use different cheeses?
Yes! Mozzarella and cheddar work well, but feel free to experiment with Gruyère, Fontina, or even a spicy pepper jack for a fun twist.
How do I keep the bread soft after baking?
Store it in an airtight container and reheat gently in the oven. Avoid the microwave if possible—it can make the bread chewy.
Can I freeze this bread?
Definitely. Wrap tightly in plastic and foil, then freeze for up to 2 months. Thaw in the fridge overnight before reheating.
Is this recipe kid-friendly?
Yes! Kids love pulling apart the cheesy layers, and it’s mild in flavor. You can even let them help assemble the tree for extra fun.
Can I make it gluten-free?
You can try a gluten-free all-purpose flour blend, but results may vary. Make sure to follow the flour blend’s instructions for best texture.
Did you try this recipe? Let me know in the comments how it turned out!

Cheesy Pull-Apart Christmas Bread
Equipment
- Mixing Bowl
- Measuring Cups & Spoons
- Wooden Spoon or Silicone Spatula
- Baking Sheet or Pan
- Parchment paper
- Sharp Knife or Kitchen Scissors
- Pastry Brush
- Cooling Rack
Ingredients
For the Bread
- 3 ½ cups all-purpose flour plus extra for kneading
- 1 packet 2¼ tsp active dry yeast
- 1 tbsp sugar
- ¾ tsp salt
- ¾ cup warm milk about 105–110°F
- 3 tbsp unsalted butter melted
- 1 large egg
For the Garlic Cheese Filling
- 1 cup shredded mozzarella cheese
- 1 cup shredded cheddar cheese
- ¼ cup grated Parmesan cheese
- 4 tbsp unsalted butter melted
- 2 –3 cloves garlic minced (or 1 tsp garlic powder)
- 1 tsp Italian seasoning
- ¼ tsp crushed red pepper flakes optional, for a mild kick
For Garnish (Optional)
- 2 tbsp melted butter for brushing after baking
- 2 tbsp chopped fresh parsley or rosemary
- Extra shredded cheese for topping
Instructions
Step 1: Prepare the Dough
- In a small bowl, combine ¾ cup warm milk, 1 tablespoon sugar, and 2¼ teaspoons (1 packet) active dry yeast.
- Let it sit for 5–10 minutes until the mixture turns foamy.
- Pro Tip: The milk should be warm, not hot — around 105–110°F — to activate the yeast without killing it.
- In a large mixing bowl, combine 2½ cups all-purpose flour and ½ teaspoon salt.
- Add the melted butter (2 tablespoons), 1 egg, and the yeast mixture to the flour.
- Stir with a wooden spoon or silicone spatula until a sticky dough forms.
Step 2: Knead the Dough
- Transfer the dough to a lightly floured surface.
- Knead for 8–10 minutes, until it becomes smooth, soft, and elastic.
- Pro Tip: If the dough feels sticky, sprinkle in a little flour at a time — but avoid adding too much or the bread will turn dense.
- Place the dough in a greased bowl, cover it with a clean kitchen towel, and let it rise in a warm spot for 1–1½ hours, or until doubled in size.
Step 3: Divide and Roll Out the Dough
- Once risen, gently punch down the dough to release air.
- Divide it into two equal halves.
- On a floured surface, roll out the first half into a large rectangle (about 12×18 inches).
- This will be your bottom layer — transfer it carefully onto a parchment-lined baking sheet.
- Roll out the second half into the same size and set it aside, covered with a clean towel to prevent drying.
- Pro Tip: Use a ruler or straight edge to keep both rectangles the same size — this helps them line up perfectly later.
Step 4: Make the Garlic Cheese Filling
- In a small bowl, mix together:
- 4 tablespoons melted butter
- 2–3 cloves minced garlic
- 1 teaspoon Italian seasoning
- 1 cup shredded mozzarella cheese
- ¼ cup grated Parmesan cheese
- Stir until evenly combined.
- Spread this mixture evenly over the first rolled-out dough layer, covering it from edge to edge.
- Pro Tip: For even coverage, use an offset spatula or the back of a spoon.
Step 5: Add the Top Dough Layer
- Carefully place the second sheet of dough over the cheese-covered base.
- Gently press along the edges and smooth out the surface to remove air pockets.
- Make sure both layers line up neatly.
- Pro Tip: If the edges don’t match, trim them slightly so the layers align before cutting.
Step 6: Shape the Christmas Tree
- Using a sharp knife or pizza cutter, cut out a large triangle (the tree shape) from the layered dough — wide at the bottom and pointed at the top.
- Remove the extra dough from around the edges (you can bake these scraps separately).
- Lightly score a line down the middle of the triangle — this is your tree trunk and should remain uncut.
- Pro Tip: Keep the center intact — that’s what holds your tree together!
Step 7: Cut and Twist the Branches
- Starting from the center line, cut horizontal strips about 1 inch apart on both sides of the trunk.
- Stop just before reaching the center each time.
- Twist each strip 2–3 times to form spiral “branches.”
- Repeat until all the strips are twisted neatly.
- Pro Tip: If cheese starts oozing out while twisting, press it gently back into the dough — it’ll melt perfectly during baking.
Step 8: Brush and Rest
- Brush the entire tree with melted butter.
- Sprinkle with extra herbs, cheese, or chili flakes for added flavor.
- Let the shaped tree rest for 10–15 minutes before baking.
- Pro Tip: This short rest helps the dough puff slightly, giving the bread a soft, pull-apart texture.
Step 9: Bake the Bread
- Preheat your oven to 375°F (190°C).
- Bake for 20–25 minutes, or until the bread turns golden brown and the cheese inside is melted.
- If it browns too quickly, loosely cover the top with foil during the last few minutes.
- Pro Tip: For a glossy finish, brush the hot bread with more melted butter right after removing it from the oven.
Step 10: Garnish and Serve
- Let it cool for 5 minutes before moving it.
- Sprinkle with fresh parsley or rosemary for a festive look.
- Serve warm with marinara sauce, garlic butter, or cheese dip for dipping.
- Pro Tip: Place your dip bowl beside the bread or near the base of the “tree” for a beautiful presentation.
Notes
Nutritional Value (Per Serving)
- Calories: ~230
- Protein: 8g
- Carbohydrates: 24g
- Fat: 11g
- Saturated Fat: 6g
- Cholesterol: 35mg
- Sodium: 300mg
- Fiber: 1g
- Sugars: 2g
- Calcium: 150mg