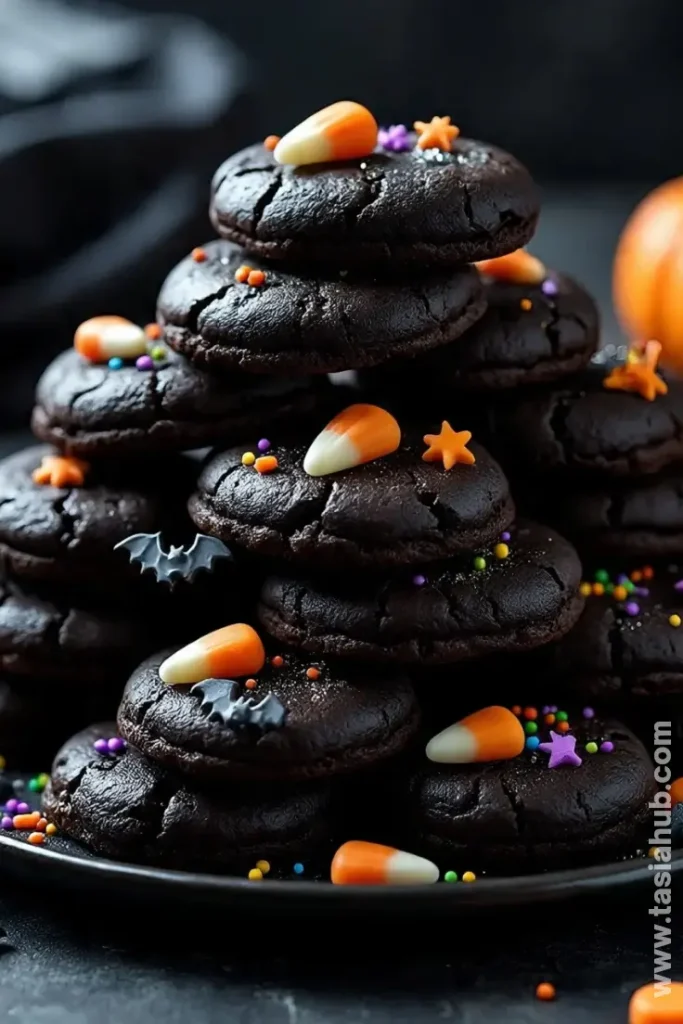
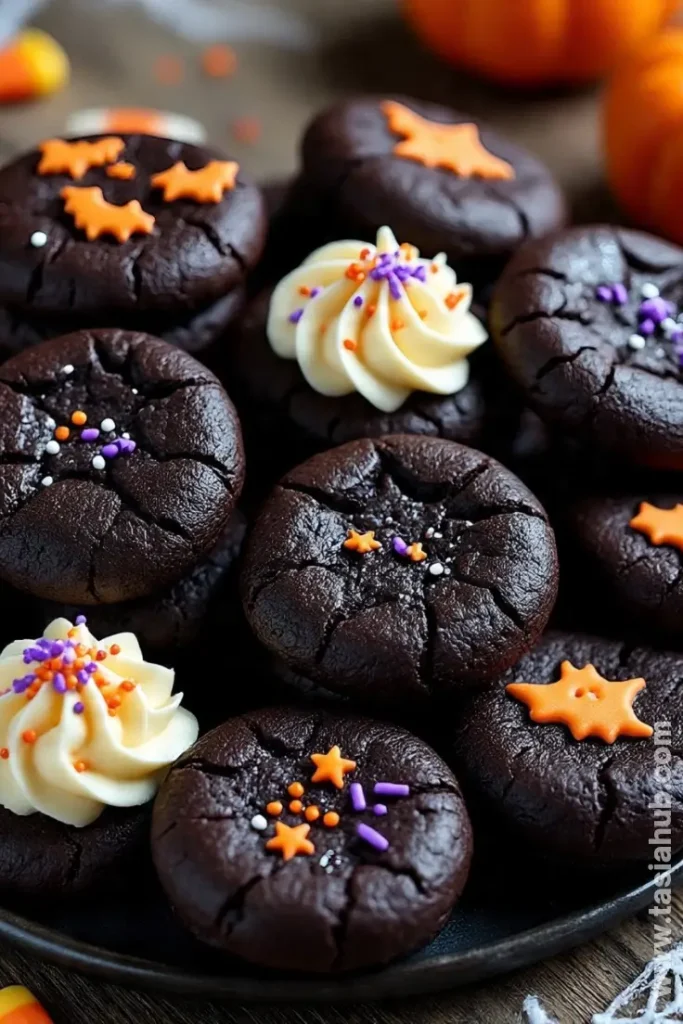
Black Velvet Halloween Cookies

Halloween is the perfect time to get a little creative in the kitchen, and these black velvet Halloween cookies are a total showstopper. Deep, rich, and slightly decadent, they bring a dramatic twist to your usual cookie spread. The dark color gives them a mysterious, almost magical vibe, making them a fun addition to any spooky season dessert table. I love how they look paired with a drizzle of white chocolate or some sprinkles shaped like bats or ghosts—suddenly, your dessert table is instantly festive.
These cookies aren’t just about looks, though. Each bite is soft, moist, and melts in your mouth, with just the right amount of sweetness. The black velvet base gives them a delicate cocoa flavor, while the texture stays light and fluffy. They’re perfect for pairing with a cup of hot cocoa or your favorite fall-themed coffee drink. I like to serve them alongside other fall themed appetizers for a little variety—think pumpkin spice muffins or caramel apple bites.
What I love most is how versatile these cookies are. You can dress them up with frosting, sprinkles, or even edible glitter for a more playful look, or leave them simple for a sleek, elegant presentation. Kids absolutely love them because they’re both spooky and fun, while adults can appreciate the subtle chocolate richness. Honestly, they’re a crowd-pleaser all around.
If you’re planning your Halloween menu, these cookies are a great way to add a bold statement without spending hours in the kitchen. They bring a little spooky charm to your dessert spread while still being easy enough to make on a weekday evening. Plus, they’re perfect for sharing at a Halloween party or even gifting in cute treat bags. When it comes to Halloween dessert ideas, these black velvet cookies definitely make the top of the list.
Why You’ll Love It
- Perfectly spooky without being scary to eat – These cookies have all the drama of a Halloween treat with their deep black velvet color, but the flavor is soft, chocolatey, and utterly irresistible. No tricks here, just treats!
- Versatile for decorating – You can keep them simple for a sleek, elegant look, or go all out with white chocolate drizzles, Halloween sprinkles, or edible glitter. They’re a blank canvas for your spooky season dessert creativity.
- Soft, melt-in-your-mouth texture – Unlike some Halloween cookies that are too hard or dry, these stay light and fluffy while still holding their shape perfectly. Every bite feels indulgent without being heavy.
- Great for parties and gifts – These cookies look stunning on a dessert table, as part of a fall-themed appetizers spread, or tucked into treat bags for friends, neighbors, or coworkers.
- Easy enough to whip up on a whim – Even though they look fancy, these cookies are simple to make with basic ingredients you probably already have in your pantry. They’re ideal for last-minute Halloween dessert ideas.
Ingredients
For the Cookies:
- 2 ½ cups all-purpose flour
- ½ cup unsweetened cocoa powder
- 1 tsp baking soda
- ½ tsp salt
- 1 cup unsalted butter, softened
- 1 ½ cups granulated sugar
- 2 large eggs
- 2 tsp vanilla extract
- ½ cup buttermilk
- 1 tsp black food coloring
For the Frosting (Optional):
- 1 cup unsalted butter, softened
- 3–4 cups powdered sugar
- 2–3 tbsp heavy cream or milk
- 1 tsp vanilla extract
- Halloween sprinkles or edible glitter for decorating
Ingredient Notes
- Unsweetened cocoa powder: I always use Dutch-processed cocoa for that extra deep, rich black color—it really makes these cookies pop.
- Butter: Room temperature is key! It helps the cookies stay soft and gives that melt-in-your-mouth texture.
- Buttermilk: Don’t skip this! It keeps the cookies tender and adds a subtle tang that balances the sweetness perfectly.
- Black food coloring: Gel-based works best for that dramatic dark color without adding too much liquid.
- Vanilla extract: A good-quality vanilla makes a huge difference—it adds warmth to the chocolate flavor.
- Optional frosting: I love a simple buttercream for decorating, but even a light dusting of powdered sugar can look spooky and chic.
Kitchen Equipment Needed
- Mixing bowls (medium and large): For combining your dry and wet ingredients separately—I like using glass bowls so I can see everything clearly.
- Electric mixer or stand mixer: Makes creaming butter and sugar a breeze and ensures smooth, fluffy dough.
- Measuring cups and spoons: Accurate measurements are key for perfect cookies every time.
- Rubber spatula: Perfect for scraping down the sides of the bowl—I always keep one handy.
- Baking sheets: Non-stick or lined with parchment paper for easy cleanup.
- Parchment paper or silicone baking mats: Prevents sticking and keeps cookies from spreading too much.
- Cooling rack: Helps cookies cool evenly without getting soggy.
- Sifter or fine mesh strainer: Great for sifting cocoa and flour to avoid lumps and ensure a smooth dough.
Instructions
Step 1: Prep Your Ingredients
- Measure out all your ingredients before you start baking. It makes the process smoother and stress-free.
- Soften the butter at room temperature for at least 30 minutes—it should be soft enough to press with your finger but not melted.
- Preheat your oven to 350°F (175°C) and line your baking sheets with parchment paper or silicone mats.
Pro Tip: Sifting the flour and cocoa powder together ensures there are no lumps and gives your cookies that extra soft texture.
Step 2: Mix the Dry Ingredients
- In a medium bowl, whisk together flour, cocoa powder, baking soda, and salt until evenly combined.
- Set aside while you work on the wet ingredients.
Pro Tip: Whisk continuously to prevent any cocoa clumps—this keeps the black velvet color consistent throughout the cookie.
Step 3: Cream the Butter and Sugar
- In a large bowl, use an electric mixer to beat the softened butter and sugar together on medium speed until light and fluffy (about 3–4 minutes).
- Scrape down the sides of the bowl with a spatula to ensure everything is evenly mixed.
Step 4: Add Eggs and Vanilla
- Beat in the eggs, one at a time, followed by the vanilla extract.
- Mix until fully incorporated, smooth, and slightly glossy.
Step 5: Combine Wet and Dry Ingredients
- Gradually add the dry ingredients to the butter mixture, alternating with the buttermilk. Start and end with the dry ingredients.
- Add the black food coloring and mix until the dough is evenly dark and glossy.
Pro Tip: Don’t overmix! Stop as soon as everything is combined to keep your cookies soft and tender.
Step 6: Portion the Dough
- Use a cookie scoop or tablespoon to drop dough onto prepared baking sheets, spacing them about 2 inches apart.
- For a uniform shape, gently roll each scoop into a ball with your hands.
Step 7: Bake the Cookies
- Bake in the preheated oven for 10–12 minutes, or until the edges are set but the centers still look slightly soft.
- Remove from oven and let cookies sit on the baking sheet for 5 minutes before transferring to a cooling rack.
Pro Tip: The cookies will continue to firm up as they cool—don’t overbake or they’ll lose their soft, melt-in-your-mouth texture.
Step 8: Decorate (Optional)
- Once cooled, frost or drizzle with buttercream, add sprinkles, or leave plain for a sleek, spooky look.
- Arrange on a platter for a stunning Halloween dessert display.
Pro Tip: If using frosting, let the cookies cool completely first to prevent it from melting.
Tips and Tricks for Success
- Room temperature ingredients matter: Make sure butter and eggs are at room temp for smooth, even mixing.
- Sift your cocoa and flour: Prevents lumps and keeps the cookies silky soft.
- Don’t overmix the dough: Overmixing can make cookies dense instead of light and tender.
- Use parchment or silicone mats: Keeps cookies from sticking and makes cleanup a breeze.
- Cool before decorating: This prevents frosting or drizzles from melting and keeps decorations intact.
- Space cookies properly: Leave at least 2 inches apart so they don’t merge while baking.
Ingredient Substitutions and Variations
- Butter: You can substitute with coconut oil for a slight coconut flavor or dairy-free option.
- Buttermilk: Mix ½ cup milk with 1 tsp lemon juice or vinegar as a simple substitute.
- Cocoa powder: Natural or Dutch-processed cocoa works, though Dutch gives a deeper black color.
- Black food coloring: Gel or paste coloring works best—liquid can change dough consistency.
- Frosting variations: Try cream cheese frosting or chocolate ganache instead of buttercream.
- Extra flavor twist: Add a pinch of espresso powder to intensify the chocolate flavor or orange zest for a subtle Halloween vibe.
Serving Suggestions
- I love serving these black velvet Halloween cookies alongside a warm mug of spiced pumpkin latte—it’s the ultimate cozy fall combo.
- Arrange them on a platter with other Halloween desserts like caramel apples and ghost-shaped meringues for a fun spooky season dessert spread.
- Pair with a simple scoop of vanilla or salted caramel ice cream for an indulgent treat that’s perfect for a Halloween night in.
- Pack a few in small treat bags with other fall themed appetizers like mini pumpkin muffins for gifting to friends or neighbors—it always gets compliments!
- Serve them with hot chocolate and a dash of whipped cream for a simple, comforting way to enjoy the flavors of fall.
Storage and Reheating Instructions
- Room temperature: Store cookies in an airtight container for up to 5 days to keep them soft and fresh.
- Refrigerator: Keep in an airtight container for up to 1 week; let them come to room temperature before serving.
- Freezer: Freeze in a single layer on a baking sheet, then transfer to a freezer-safe bag or container for up to 3 months.
- Reheating: Warm in the microwave for 10–15 seconds to revive that soft, melt-in-your-mouth texture.
- Frosted cookies: If decorated, store in the fridge and bring to room temperature before serving to maintain frosting consistency.
Frequently Asked Questions
Can I make these cookies vegan?
Yes! You can substitute butter with a vegan alternative and use a flax or chia egg instead of regular eggs. The texture will still be soft and delicious.
Can I use regular cocoa instead of Dutch-processed?
Absolutely! Regular cocoa works fine, though the color may be slightly less dark. The cookies will still taste amazing.
How do I prevent the cookies from spreading too much?
Chill the dough for 15–30 minutes before baking. This helps the cookies hold their shape and keeps them soft inside.
Can I freeze the cookies?
Yes! Freeze them in a single layer on a baking sheet first, then transfer to a freezer-safe bag. They can last up to 3 months.
What’s the best way to decorate them for Halloween?
Try white chocolate drizzles, spooky sprinkles, or edible glitter. For a simple, elegant look, a light dusting of powdered sugar works beautifully.
Are these cookies kid-friendly?
Definitely! They’re soft, sweet, and fun to decorate, making them a hit for kids and adults alike.
Did you try this recipe? Let me know in the comments how it turned out!
Black Velvet Halloween Cookies
Equipment
- Mixing bowls (medium and large)
- Electric mixer or stand mixer
- Measuring cups and spoons
- Rubber spatula
- Baking sheets
- Parchment paper or silicone baking mats
- Cooling Rack
- Sifter or fine mesh strainer
Ingredients
For the Cookies:
- 2 ½ cups all-purpose flour
- ½ cup unsweetened cocoa powder
- 1 tsp baking soda
- ½ tsp salt
- 1 cup unsalted butter softened
- 1 ½ cups granulated sugar
- 2 large eggs
- 2 tsp vanilla extract
- ½ cup buttermilk
- 1 tsp black food coloring
For the Frosting (Optional):
- 1 cup unsalted butter softened
- 3 –4 cups powdered sugar
- 2 –3 tbsp heavy cream or milk
- 1 tsp vanilla extract
- Halloween sprinkles or edible glitter for decorating
Instructions
Step 1: Prep Your Ingredients
- Measure out all your ingredients before you start baking. It makes the process smoother and stress-free.
- Soften the butter at room temperature for at least 30 minutes—it should be soft enough to press with your finger but not melted.
- Preheat your oven to 350°F (175°C) and line your baking sheets with parchment paper or silicone mats.
- Pro Tip: Sifting the flour and cocoa powder together ensures there are no lumps and gives your cookies that extra soft texture.
Step 2: Mix the Dry Ingredients
- In a medium bowl, whisk together flour, cocoa powder, baking soda, and salt until evenly combined.
- Set aside while you work on the wet ingredients.
- Pro Tip: Whisk continuously to prevent any cocoa clumps—this keeps the black velvet color consistent throughout the cookie.
Step 3: Cream the Butter and Sugar
- In a large bowl, use an electric mixer to beat the softened butter and sugar together on medium speed until light and fluffy (about 3–4 minutes).
- Scrape down the sides of the bowl with a spatula to ensure everything is evenly mixed.
Step 4: Add Eggs and Vanilla
- Beat in the eggs, one at a time, followed by the vanilla extract.
- Mix until fully incorporated, smooth, and slightly glossy.
Step 5: Combine Wet and Dry Ingredients
- Gradually add the dry ingredients to the butter mixture, alternating with the buttermilk. Start and end with the dry ingredients.
- Add the black food coloring and mix until the dough is evenly dark and glossy.
- Pro Tip: Don’t overmix! Stop as soon as everything is combined to keep your cookies soft and tender.
Step 6: Portion the Dough
- Use a cookie scoop or tablespoon to drop dough onto prepared baking sheets, spacing them about 2 inches apart.
- For a uniform shape, gently roll each scoop into a ball with your hands.
Step 7: Bake the Cookies
- Bake in the preheated oven for 10–12 minutes, or until the edges are set but the centers still look slightly soft.
- Remove from oven and let cookies sit on the baking sheet for 5 minutes before transferring to a cooling rack.
- Pro Tip: The cookies will continue to firm up as they cool—don’t overbake or they’ll lose their soft, melt-in-your-mouth texture.
Step 8: Decorate (Optional)
- Once cooled, frost or drizzle with buttercream, add sprinkles, or leave plain for a sleek, spooky look.
- Arrange on a platter for a stunning Halloween dessert display.
- Pro Tip: If using frosting, let the cookies cool completely first to prevent it from melting.
Notes
Nutritional Value (per cookie, unfrosted)
- Calories: 145 kcal
- Carbohydrates: 18 g
- Protein: 2 g
- Fat: 7 g
- Cholesterol: 27 mg
- Sodium: 95 mg
- Fiber: 1 g
- Sugar: 11 g