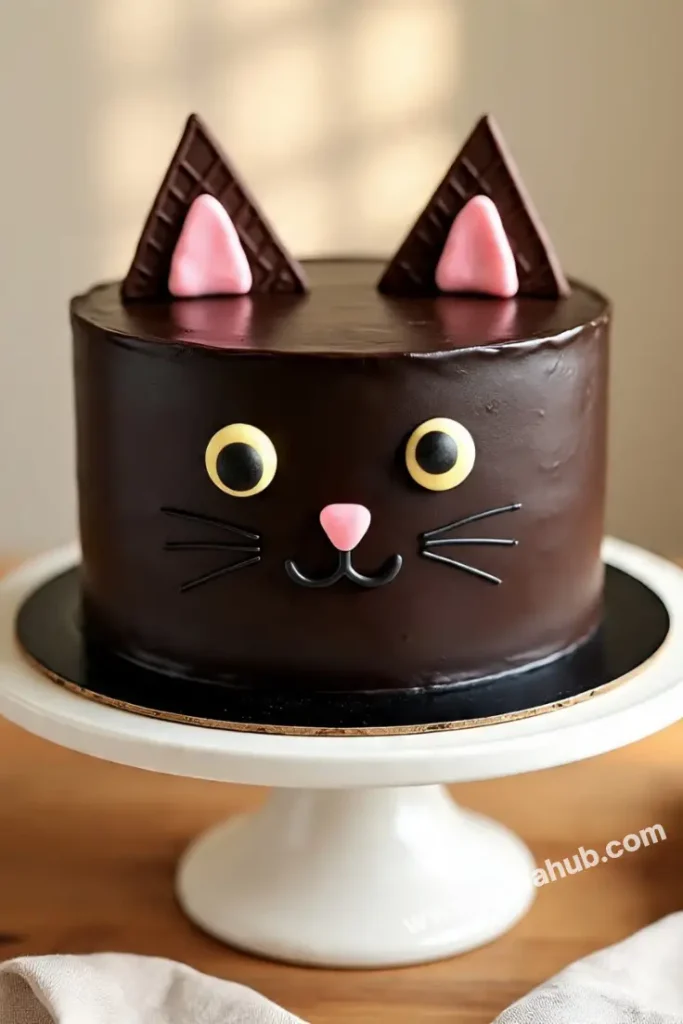
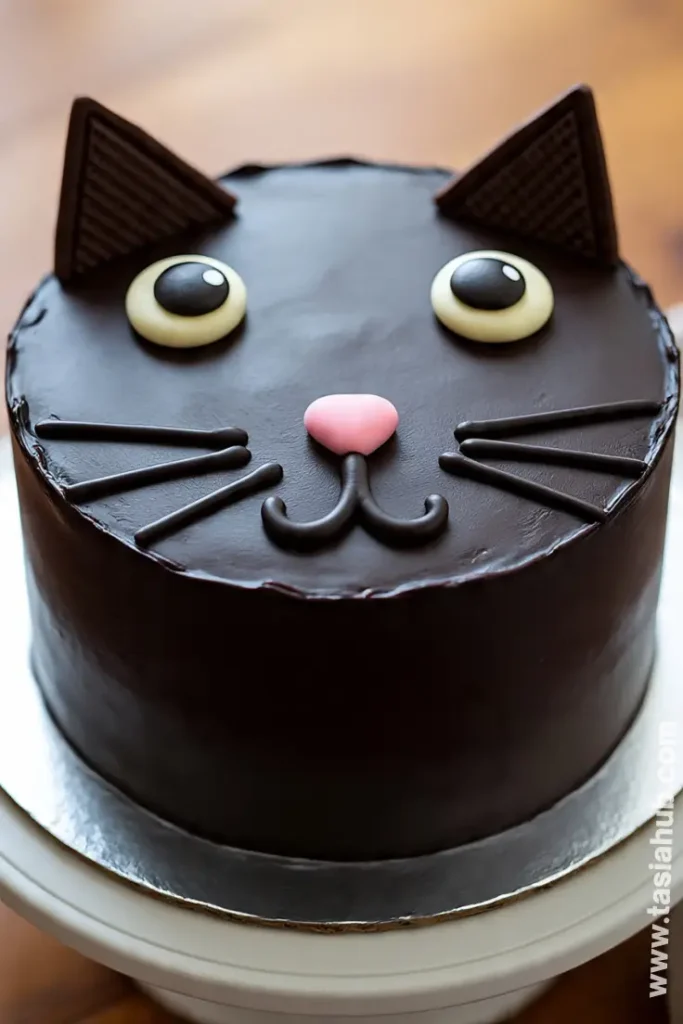
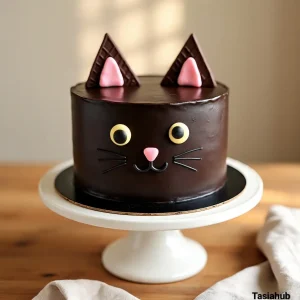
Black Cat Chocolate Cake

Halloween isn’t just about costumes and spooky decorations—it’s also the perfect excuse to get creative in the kitchen. One of my favorite ways to celebrate the season is by baking something that’s both fun and irresistibly delicious, and that’s exactly what this black cat chocolate cake delivers. Rich, moist chocolate layers meet a playful Halloween twist, making it the kind of dessert that steals the show at any party—or even just on your kitchen counter while you sneak a slice for yourself.
I remember the first time I made a black cat cake—I wanted something that felt festive but wasn’t too complicated. That’s how I discovered the magic of easy cat cake designs. With just a few simple decorations—think chocolate ears, candy eyes, and a little frosting whiskers—you can turn a standard chocolate cake into a Halloween centerpiece that’s both adorable and slightly mischievous. The best part? You don’t need to be a professional baker to pull it off.
This cake is perfect for anyone who loves combining creativity with a touch of holiday fun. From cute Halloween cakes for kids’ parties to a spooky treat for adult gatherings, a black cat cake fits the bill. Plus, it’s a conversation starter. People can’t resist snapping a photo before they dig in, especially when it’s styled with those signature little cat features.
And if you’re hunting for black cat cake ideas, I’ve got you covered. I’ll show you a simple approach to decorating that still leaves room for personalization. You can stick to a classic black frosting look, or get playful with edible glitter, colorful candy eyes, or even little fondant pumpkins around the base. The possibilities are endless—and fun!
Why You’ll Love It
- Adorably festive without the stress – This cake looks like it took hours to decorate, but it’s actually an easy cat cake anyone can make. Perfect for last-minute Halloween fun!
- Rich, chocolatey goodness – Every bite is moist, decadent, and perfectly chocolatey. The flavor is the real star, even beyond the cute cat design.
- Endless creative options – Whether you want a classic black cat or try more playful black cat cake ideas with colorful candies and sprinkles, this cake is a canvas for your imagination.
- Perfect for all ages – Kids will love the whimsical cute Halloween cakes vibe, and adults will secretly enjoy the chocolate indulgence just as much.
- Memorable centerpiece – It’s not just a dessert; it’s a conversation starter. This cake is guaranteed to be the highlight of your Halloween table.
Ingredient List
For the Chocolate Cake:
- 2 cups all-purpose flour
- 2 cups granulated sugar
- ¾ cup unsweetened cocoa powder
- 2 tsp baking powder
- 1½ tsp baking soda
- 1 tsp salt
- 1 cup buttermilk
- ½ cup vegetable oil
- 2 large eggs
- 2 tsp vanilla extract
- 1 cup hot water
For the Frosting:
- 1 cup unsalted butter, softened
- 3–4 cups powdered sugar
- ½ cup unsweetened cocoa powder
- ¼ cup heavy cream (more if needed)
- 2 tsp vanilla extract
- Black gel food coloring
For Decorating:
- Candy eyes or chocolate chips
- Chocolate wafer cookies or fondant for ears
- Mini chocolate chips or licorice for whiskers
Ingredient Notes
- I always use Duncan Hines cocoa powder—it adds such a rich chocolate flavor.
- Don’t skip the buttermilk! It keeps the cake incredibly moist and tender.
- For frosting, black gel food coloring works way better than liquid—it gives a deep, even black without changing the texture.
- Candy eyes are optional but they make your black cat extra cute!
- Using wafer cookies for ears is my little shortcut—it’s so easy and keeps them perfectly upright.
Kitchen Equipment Needed
- 9-inch round cake pans (2) – For baking the cake layers evenly. I love using Wilton pans; they never stick.
- Mixing bowls – For combining dry and wet ingredients separately. I always grab my Pyrex glass bowls.
- Electric mixer or hand whisk – Makes batter smooth and fluffy. My KitchenAid mixer is a lifesaver here.
- Measuring cups and spoons – Accuracy is key! I keep a full set of stainless steel ones.
- Spatula – For folding and scraping the bowl. I prefer a silicone spatula; it’s flexible and easy to clean.
- Cooling rack – Helps the cake layers cool evenly. My favorite is foldable metal racks.
- Piping bag or zip-top bag – For decorating whiskers and details. I usually just snip a corner of a disposable bag.
- Offset spatula or butter knife – For spreading frosting smoothly. I love a small offset spatula; it gives a polished look fast.
Instructions
Step 1: Preheat and Prepare Pans
- Preheat your oven to 350°F (175°C).
- Grease two 9-inch round cake pans with butter or nonstick spray, then lightly dust with flour.
- Line the bottom with parchment paper circles for easy removal.
Pro Tip: Make sure the parchment sits flat against the pan so your cakes come out perfectly smooth.
Step 2: Mix Dry Ingredients
- In a large bowl, sift together flour, cocoa powder, baking powder, baking soda, and salt.
- Whisk until everything is evenly combined.
Pro Tip: Sifting prevents lumps and ensures your cake texture stays soft and fluffy.
Step 3: Mix Wet Ingredients
- In a separate bowl, whisk together buttermilk, vegetable oil, eggs, and vanilla extract until smooth.
- Gradually pour the wet mixture into the dry ingredients, stirring until fully incorporated.
Pro Tip: Don’t overmix here—you want the batter smooth but still light.
Step 4: Add Hot Water
- Slowly add hot water to the batter, whisking gently until smooth.
- The batter will be thin—this is normal and helps make the cake extra moist.
Step 5: Bake the Cake
- Divide the batter evenly between the two prepared pans.
- Bake for 30–35 minutes or until a toothpick inserted in the center comes out clean.
- Let the cakes cool in the pans for 10 minutes, then turn them out onto a cooling rack.
Step 6: Make the Frosting
- Beat unsalted butter until creamy.
- Gradually add powdered sugar and cocoa powder, alternating with heavy cream until you reach your desired consistency.
- Add vanilla extract and black gel food coloring, mixing until the frosting is a smooth, deep black.
Pro Tip: Beat frosting for at least 3–4 minutes for a light, fluffy texture—it makes spreading and piping so much easier.
Step 7: Assemble the Cake
- Place one cake layer on your serving plate and spread a layer of frosting evenly on top.
- Add the second layer and coat the top and sides with a thin crumb coat to lock in crumbs. Chill for 10 minutes if needed.
- Apply a final, smooth layer of frosting over the cake.
Step 8: Decorate Your Black Cat
- Use wafer cookies or fondant for the ears, pressing them gently into the top of the cake.
- Place candy eyes or chocolate chips for the cat’s eyes.
- Pipe whiskers with mini chocolate chips or licorice.
- Optional: Add a little edible glitter or tiny candy pumpkins around the base for a festive touch.
Pro Tip: Press decorations gently so the frosting doesn’t tear, and step back to check symmetry—it helps your cat look perfectly cute.
Tips and Tricks for Success
- Room temperature ingredients – Make sure your eggs and butter are at room temperature; it helps the batter mix evenly.
- Don’t skip the parchment – It’s the easiest way to prevent the cake from sticking and tearing.
- Level your layers – Trim the tops if needed so your black cat cake sits evenly.
- Chill before decorating – A slightly chilled cake makes frosting and placing decorations much easier.
- Use a light hand with decorations – Press gently so your cute Halloween details stay perfect.
- Practice piping on parchment first – It helps if you’re new to whiskers or fine lines.
Ingredient Substitutions and Variations
- Buttermilk – Can substitute with 1 cup milk + 1 tbsp lemon juice or vinegar.
- Vegetable oil – Can use melted coconut oil or unsalted butter for a richer flavor.
- Black food coloring – Dark cocoa + a tiny bit of blue gel can deepen the black if you don’t have gel coloring.
- Candy eyes – Use white chocolate chips with a dot of melted chocolate if needed.
- Chocolate cake base – Try a chocolate fudge or devil’s food cake mix for a quicker version.
- Decorations – Fondant, modeling chocolate, or even cookies can replace wafer ears for more creative cat cake ideas.
Serving Suggestions
- I love serving a slice of this black cat cake with a scoop of vanilla ice cream—it’s a cozy, indulgent combo that everyone loves.
- Pair it with a cup of hot chocolate or coffee for a perfect Halloween movie night treat.
- For kids’ parties, place the cake alongside mini pumpkin cupcakes for a fun, festive dessert spread.
- Add fresh berries or a drizzle of caramel sauce to elevate the presentation for adult gatherings.
- Slice small pieces and serve on cute Halloween-themed plates—sometimes I even let the kids decorate their own mini slices for extra fun!
Storage and Reheating Instructions
- Room temperature: Keep covered for up to 2 days; frosting stays soft and moist.
- Refrigerator: Store in an airtight container for up to 5 days. Let it sit at room temp for 30 minutes before serving.
- Freezer: Wrap individual slices in plastic wrap, then foil; freeze up to 2 months. Thaw overnight in the fridge.
- Reheating: Warm slices in the microwave for 10–15 seconds to bring back that soft, chocolatey goodness.
Frequently Asked Questions
Can I make this cake gluten-free?
Yes! Substitute the all-purpose flour with a 1:1 gluten-free flour blend. The texture might be slightly different, but it’s still delicious.
Can I use a cake mix instead of making it from scratch?
Absolutely! A chocolate cake mix works perfectly—just follow the box instructions and add your own flair with frosting and decorations.
How do I keep the frosting from cracking?
Make sure your cake layers are completely cooled before frosting. Applying frosting on a slightly warm cake can cause it to melt or crack.
Can I make this cake ahead of time?
Yes! Bake the layers a day ahead and store them wrapped in plastic wrap. Frost and decorate the next day for the freshest look.
Can I use different decorations instead of candy eyes?
Definitely! Chocolate chips, fondant, or even piped frosting dots can all be used for the eyes and whiskers—get creative with your black cat cake ideas.
How do I get a deep black frosting without changing the flavor?
Use black gel food coloring instead of liquid. It gives a rich black color without altering the taste or texture of the frosting.
Did you try this black cat cake? Let me know in the comments how it turned out! I love seeing your creative spins on cute Halloween cakes and sharing tips to make them even better.
Black Cat Chocolate Cake
Equipment
- 9-inch round cake pans (2)
- Mixing Bowls
- Electric Mixer (or Hand Whisk)
- Measuring cups and spoons
- Spatula
- Cooling Rack
- Piping bag or zip-top bag
- Offset spatula or butter knife
Ingredients
For the Chocolate Cake:
- 2 cups all-purpose flour
- 2 cups granulated sugar
- ¾ cup unsweetened cocoa powder
- 2 tsp baking powder
- 1½ tsp baking soda
- 1 tsp salt
- 1 cup buttermilk
- ½ cup vegetable oil
- 2 large eggs
- 2 tsp vanilla extract
- 1 cup hot water
For the Frosting:
- 1 cup unsalted butter softened
- 3 –4 cups powdered sugar
- ½ cup unsweetened cocoa powder
- ¼ cup heavy cream more if needed
- 2 tsp vanilla extract
- Black gel food coloring
For Decorating:
- Candy eyes or chocolate chips
- Chocolate wafer cookies or fondant for ears
- Mini chocolate chips or licorice for whiskers
Instructions
Step 1: Preheat and Prepare Pans
- Preheat your oven to 350°F (175°C).
- Grease two 9-inch round cake pans with butter or nonstick spray, then lightly dust with flour.
- Line the bottom with parchment paper circles for easy removal.
- Pro Tip: Make sure the parchment sits flat against the pan so your cakes come out perfectly smooth.
Step 2: Mix Dry Ingredients
- In a large bowl, sift together flour, cocoa powder, baking powder, baking soda, and salt.
- Whisk until everything is evenly combined.
- Pro Tip: Sifting prevents lumps and ensures your cake texture stays soft and fluffy.
Step 3: Mix Wet Ingredients
- In a separate bowl, whisk together buttermilk, vegetable oil, eggs, and vanilla extract until smooth.
- Gradually pour the wet mixture into the dry ingredients, stirring until fully incorporated.
- Pro Tip: Don’t overmix here—you want the batter smooth but still light.
Step 4: Add Hot Water
- Slowly add hot water to the batter, whisking gently until smooth.
- The batter will be thin—this is normal and helps make the cake extra moist.
Step 5: Bake the Cake
- Divide the batter evenly between the two prepared pans.
- Bake for 30–35 minutes or until a toothpick inserted in the center comes out clean.
- Let the cakes cool in the pans for 10 minutes, then turn them out onto a cooling rack.
Step 6: Make the Frosting
- Beat unsalted butter until creamy.
- Gradually add powdered sugar and cocoa powder, alternating with heavy cream until you reach your desired consistency.
- Add vanilla extract and black gel food coloring, mixing until the frosting is a smooth, deep black.
- Pro Tip: Beat frosting for at least 3–4 minutes for a light, fluffy texture—it makes spreading and piping so much easier.
Step 7: Assemble the Cake
- Place one cake layer on your serving plate and spread a layer of frosting evenly on top.
- Add the second layer and coat the top and sides with a thin crumb coat to lock in crumbs. Chill for 10 minutes if needed.
- Apply a final, smooth layer of frosting over the cake.
Step 8: Decorate Your Black Cat
- Use wafer cookies or fondant for the ears, pressing them gently into the top of the cake.
- Place candy eyes or chocolate chips for the cat’s eyes.
- Pipe whiskers with mini chocolate chips or licorice.
- Optional: Add a little edible glitter or tiny candy pumpkins around the base for a festive touch.
- Pro Tip: Press decorations gently so the frosting doesn’t tear, and step back to check symmetry—it helps your cat look perfectly cute.
Notes
Nutritional Value (per slice, approximate):
- Calories: 350–400 kcal
- Fat: 18–20 g
- Saturated Fat: 10–12 g
- Carbohydrates: 48–52 g
- Sugar: 35–38 g
- Protein: 4–5 g
- Fiber: 2–3 g