Baked Chicken with Apples

This dish came together on a chilly evening when I was craving something comforting, but not too heavy. I had chicken in the fridge and a few apples that were starting to go soft on the counter — the kind of odds and ends that usually don’t seem like they belong in the same recipe. But I decided to give it a go, and it completely surprised me. The apples added a soft, caramelized sweetness, and the chicken turned out tender and juicy with golden, crispy edges. Now, it’s one of those meals I come back to when I want something cozy but easy to pull off.
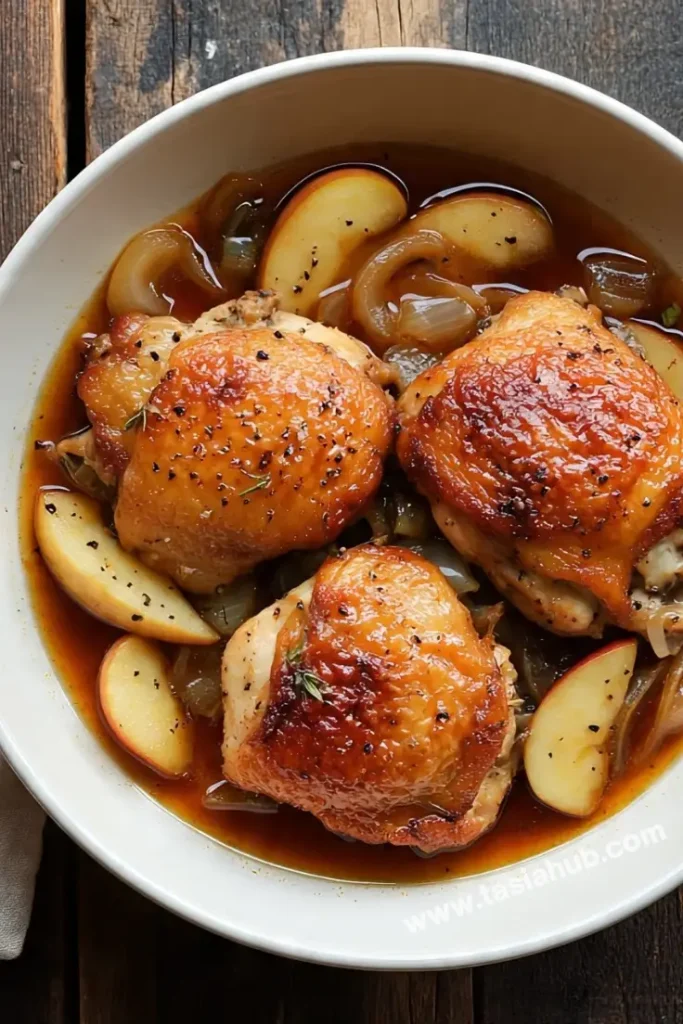
Baked chicken with apples is that sweet spot between savory and sweet — the kind of flavor pairing that feels more intentional than it is. The apples cook down and release their juices, mingling with the seasoning, garlic, and herbs to create a light, flavorful sauce that coats everything. I usually throw in a bit of Dijon mustard or a splash of apple cider vinegar to balance the sweetness with a little tang, and the result is this warm, homey, oven-baked meal that feels way fancier than the effort it takes.
What’s nice is that it’s totally customizable. You can use thighs or breasts, bone-in or boneless. Add onions for depth, a few sprigs of thyme or rosemary if you have them, or a pinch of cinnamon for extra warmth. It’s forgiving and flexible, which makes it perfect for weeknights or last-minute dinners when you just want to use what you have. Plus, it makes your kitchen smell amazing — like you’ve been cooking all day.
I’ve served it with rice, mashed potatoes, roasted veggies, or even just crusty bread to mop up the sauce. It’s one of those dishes that can be rustic or refined depending on how you plate it, and everyone always seems impressed — even though it took less than an hour from start to finish.
Why You’ll Love It
- Sweet and Savory Perfection – The combination of juicy chicken and tender, slightly caramelized apples creates a beautiful balance of flavors that feels both comforting and a little unexpected.
- Simple Ingredients, Big Flavor – You don’t need anything fancy — just chicken, apples, a few pantry staples, and some herbs. It’s amazing how much depth you can get from such a short ingredient list.
- One Pan Wonder – Everything bakes together in one dish, which means less mess, less cleanup, and more time to enjoy your meal (or put your feet up after dinner).
- Versatile and Adaptable – You can use any kind of apple or chicken cut, add in extras like onions or garlic, and adjust the seasoning to suit your taste. It’s a great base recipe you can customize easily.
- Cozy Comfort Food – Whether it’s a crisp fall evening or just a regular Tuesday, this meal feels like a warm hug in dinner form. Perfect for family dinners or casual entertaining.
Ingredient List
For the Chicken and Apples
- 4 bone-in, skin-on chicken thighs (or boneless if preferred)
- 2 apples, sliced (Honeycrisp, Fuji, or Gala work well)
- 1 small onion, thinly sliced
- 3 garlic cloves, minced
- 1 tablespoon Dijon mustard
- 1 tablespoon olive oil
- 1 tablespoon apple cider vinegar
- ½ cup chicken broth
- 1 tablespoon fresh thyme leaves (or 1 teaspoon dried)
- Salt and black pepper, to taste
- Optional: 1 tablespoon brown sugar or maple syrup (for added sweetness)
Ingredient Notes
- Apples: I like using slightly firm, sweet varieties like Honeycrisp or Fuji. They hold their shape while softening beautifully in the oven. Avoid super tart or mealy apples.
- Chicken: Bone-in thighs give you extra flavor and juiciness, but boneless thighs or even breasts work fine — just keep an eye on the baking time so they don’t dry out.
- Dijon Mustard: Adds that subtle tang that balances the sweetness of the apples. Don’t skip it!
- Apple Cider Vinegar: Just a splash brightens the whole dish. You can substitute white wine or lemon juice in a pinch.
- Thyme: Fresh thyme gives that earthy, herby finish, but dried thyme or even rosemary works too.
- Brown Sugar or Maple Syrup (optional): Adds a cozy sweetness — great if your apples are more tart or you just want a touch more richness.
Kitchen Equipment Needed
- Large Oven-Safe Skillet or Baking Dish – For browning the chicken and baking everything in one pan. I love using a cast iron skillet because it holds heat well and goes straight from stovetop to oven.
- Sharp Knife – For slicing apples and onions cleanly and evenly.
- Cutting Board – A sturdy surface for prepping all your ingredients.
- Tongs – Super handy for flipping chicken while searing and transferring it without losing the crispy skin.
- Measuring Spoons and Cups – To make sure your mustard, vinegar, and broth ratios are just right. Keeps the flavor balanced.
Instructions
Step 1: Prep the Oven and Ingredients
- Preheat your oven to 400°F (200°C). This gives the chicken a chance to get nice and golden while the apples soften and release their juices.
- Pat your chicken thighs dry with paper towels. This helps the skin crisp up better during searing.
- Season both sides of the chicken generously with salt and black pepper.
- Slice the apples into ½-inch wedges (no need to peel unless you prefer it).
- Thinly slice the onion and mince the garlic cloves. Set everything aside, ready to go.
Pro Tip: Patting the chicken dry helps it brown instead of steaming in the pan.
Step 2: Sear the Chicken
- Heat 1 tablespoon olive oil in a large oven-safe skillet or pan over medium-high heat.
- Once hot, place the chicken skin-side down and let it sear undisturbed for 4–5 minutes, or until the skin is deep golden brown.
- Flip and cook the other side for 2–3 minutes.
- Remove the chicken from the pan and set it on a plate (it’ll finish cooking in the oven later).
Pro Tip: Resist the urge to move the chicken too early — it’ll release easily from the pan when it’s properly seared.
Step 3: Sauté the Aromatics
- In the same pan (don’t wipe it out!), reduce the heat to medium.
- Add the sliced onions and cook for 2–3 minutes until they start to soften.
- Stir in the garlic and cook for another 30 seconds until fragrant — don’t let it burn.
Step 4: Build the Sauce
- Stir in 1 tablespoon Dijon mustard and 1 tablespoon apple cider vinegar, scraping up any browned bits from the bottom of the pan.
- Pour in ½ cup chicken broth and stir to combine. Let it simmer for about 2 minutes to blend the flavors.
- Add the sliced apples and optional brown sugar or maple syrup, and toss gently to coat.
Pro Tip: Scraping the browned bits (called fond) into the sauce adds tons of flavor without extra ingredients.
Step 5: Bake It All Together
- Nestle the seared chicken thighs on top of the apples and onions. Skin side up for best texture.
- Sprinkle with fresh thyme leaves.
- Carefully transfer the skillet or baking dish to the preheated oven.
- Bake for 25–30 minutes, or until the chicken reaches an internal temperature of 165°F (74°C) and the apples are soft and slightly caramelized.
Step 6: Rest and Serve
- Remove the pan from the oven and let the chicken rest for 5 minutes before serving.
- Spoon some of the apple-onion mixture and pan sauce over the top.
- Serve with mashed potatoes, crusty bread, or rice to soak up that flavorful sauce.
Pro Tip: Letting it rest helps the juices redistribute in the chicken so every bite stays juicy and tender.

Tips and Tricks for Success
- Dry the chicken well before searing – Moisture on the surface can prevent a nice golden crust.
- Use a heavy-bottomed skillet like cast iron – It gives you even heat and a beautiful sear.
- Don’t overcrowd the pan – If your skillet is small, sear the chicken in batches to avoid steaming.
- Check for doneness with a thermometer – Chicken should hit 165°F (74°C) at the thickest part for safe eating.
- Let it rest before serving – Just 5 minutes of resting keeps your chicken juicy and flavorful.
Ingredient Substitutions and Variations
- Chicken: Swap thighs for boneless chicken breasts — just reduce baking time slightly so they don’t dry out.
- Apples: Try Pears instead for a softer, more delicate sweetness.
- Herbs: Use rosemary or sage instead of thyme for a deeper, earthy flavor.
- Vinegar: No apple cider vinegar? Use white wine vinegar or a squeeze of lemon juice for acidity.
- Dijon Mustard: Regular yellow mustard can work, but Dijon adds more depth.
- Sweetener: Add maple syrup or honey in place of brown sugar for a slightly different flavor twist.
- Add-ins: Toss in a handful of cranberries or sliced carrots for a festive or veggie-loaded version.
Serving Suggestions
- Mashed Potatoes – Creamy mashed potatoes soak up the sweet and savory pan sauce beautifully.
- Crusty Bread – I love serving this with a warm, crusty baguette—perfect for mopping up all the juices.
- Steamed Rice or Wild Rice – A simple rice side keeps things easy and helps stretch the meal for more servings.
- Roasted Veggies – Try roasted Brussels sprouts, carrots, or green beans for a colorful, balanced plate.
- Green Salad – I usually toss together a crisp green salad with a tangy vinaigrette to balance the richness of the chicken and apples.
Storage and Reheating Instructions
- Storage: Store any leftovers in an airtight container in the fridge for up to 3–4 days.
- Freezing: You can freeze this dish for up to 2 months. Let it cool completely before transferring to a freezer-safe container.
- Reheating (Oven): Reheat in a baking dish at 350°F (175°C) for about 15–20 minutes, or until warmed through. Cover loosely with foil to prevent drying.
- Reheating (Microwave): Place a portion in a microwave-safe dish, cover, and heat on medium power in 1-minute bursts until hot.
- Pro Tip: Add a splash of broth or water when reheating to keep the chicken moist and revive the sauce.
Frequently Asked Questions
Can I use boneless chicken instead of bone-in?
Absolutely! Boneless thighs or breasts work just fine—just reduce the baking time by about 5–8 minutes to prevent overcooking since they cook faster than bone-in pieces.
What kind of apples work best for this recipe?
Go for firmer, sweet varieties like Honeycrisp, Fuji, or Gala. They hold their shape during baking and balance the savory flavors without turning to mush.
Can I make this ahead of time?
Yes! You can prep everything a few hours ahead and keep it covered in the fridge. When you’re ready to cook, bring it to room temp and bake as directed. Leftovers also reheat beautifully.
Is this dish gluten-free?
It is! As long as you’re using gluten-free chicken broth and mustard, this recipe is naturally gluten-free.
Can I make this in a baking dish instead of a skillet?
Totally. Just sear the chicken and sauté the aromatics in a skillet first, then transfer everything to a baking dish before popping it in the oven.
What can I do with leftovers?
Leftover chicken and apples make an amazing sandwich filling or can be shredded and tossed into a grain bowl with some greens and a drizzle of vinaigrette.
Did you try this recipe? Let me know in the comments how it turned out!
Don’t forget to share your photos on Instagram and tag me @tasiahub_ or use the hashtag #tasiahub — I’d love to see your creations!

Baked Chicken with Apples
Equipment
- Large Oven-Safe Skillet or Baking Dish
- Sharp Knife
- Cutting board
- Tongs
- Measuring Spoons and Cups
Ingredients
For the Chicken and Apples
- 4 bone-in skin-on chicken thighs (or boneless if preferred)
- 2 apples sliced (Honeycrisp, Fuji, or Gala work well)
- 1 small onion thinly sliced
- 3 garlic cloves minced
- 1 tablespoon Dijon mustard
- 1 tablespoon olive oil
- 1 tablespoon apple cider vinegar
- ½ cup chicken broth
- 1 tablespoon fresh thyme leaves or 1 teaspoon dried
- Salt and black pepper to taste
- Optional: 1 tablespoon brown sugar or maple syrup for added sweetness
Instructions
Step 1: Prep the Oven and Ingredients
- Preheat your oven to 400°F (200°C). This gives the chicken a chance to get nice and golden while the apples soften and release their juices.
- Pat your chicken thighs dry with paper towels. This helps the skin crisp up better during searing.
- Season both sides of the chicken generously with salt and black pepper.
- Slice the apples into ½-inch wedges (no need to peel unless you prefer it).
- Thinly slice the onion and mince the garlic cloves. Set everything aside, ready to go.
- Pro Tip: Patting the chicken dry helps it brown instead of steaming in the pan.
Step 2: Sear the Chicken
- Heat 1 tablespoon olive oil in a large oven-safe skillet or pan over medium-high heat.
- Once hot, place the chicken skin-side down and let it sear undisturbed for 4–5 minutes, or until the skin is deep golden brown.
- Flip and cook the other side for 2–3 minutes.
- Remove the chicken from the pan and set it on a plate (it’ll finish cooking in the oven later).
- Pro Tip: Resist the urge to move the chicken too early — it’ll release easily from the pan when it’s properly seared.
Step 3: Sauté the Aromatics
- In the same pan (don’t wipe it out!), reduce the heat to medium.
- Add the sliced onions and cook for 2–3 minutes until they start to soften.
- Stir in the garlic and cook for another 30 seconds until fragrant — don’t let it burn.
Step 4: Build the Sauce
- Stir in 1 tablespoon Dijon mustard and 1 tablespoon apple cider vinegar, scraping up any browned bits from the bottom of the pan.
- Pour in ½ cup chicken broth and stir to combine. Let it simmer for about 2 minutes to blend the flavors.
- Add the sliced apples and optional brown sugar or maple syrup, and toss gently to coat.
- Pro Tip: Scraping the browned bits (called fond) into the sauce adds tons of flavor without extra ingredients.
Step 5: Bake It All Together
- Nestle the seared chicken thighs on top of the apples and onions. Skin side up for best texture.
- Sprinkle with fresh thyme leaves.
- Carefully transfer the skillet or baking dish to the preheated oven.
- Bake for 25–30 minutes, or until the chicken reaches an internal temperature of 165°F (74°C) and the apples are soft and slightly caramelized.
Step 6: Rest and Serve
- Remove the pan from the oven and let the chicken rest for 5 minutes before serving.
- Spoon some of the apple-onion mixture and pan sauce over the top.
- Serve with mashed potatoes, crusty bread, or rice to soak up that flavorful sauce.
- Pro Tip: Letting it rest helps the juices redistribute in the chicken so every bite stays juicy and tender.
Notes
Estimated Nutritional Value (Per Serving)
- Calories: ~340–400 kcal
- Protein: ~25–30g
- Fat: ~20–25g
- Carbohydrates: ~15–18g
- Fiber: ~2g
- Sugar: ~10g
- Sodium: ~450–550mg