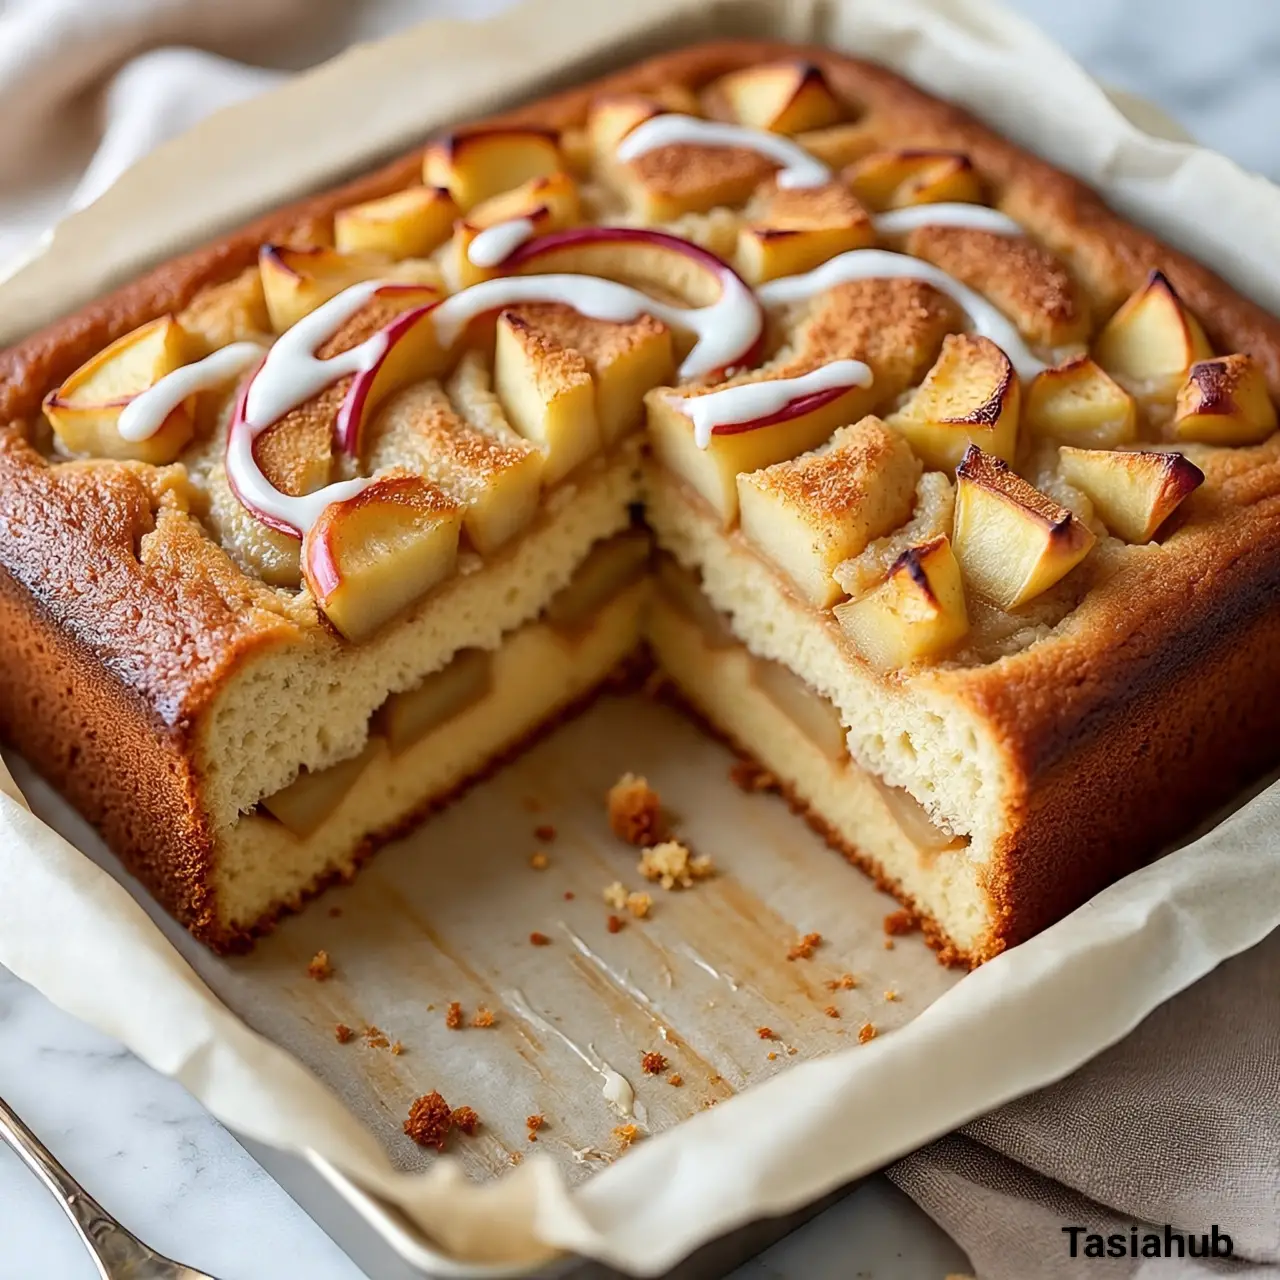
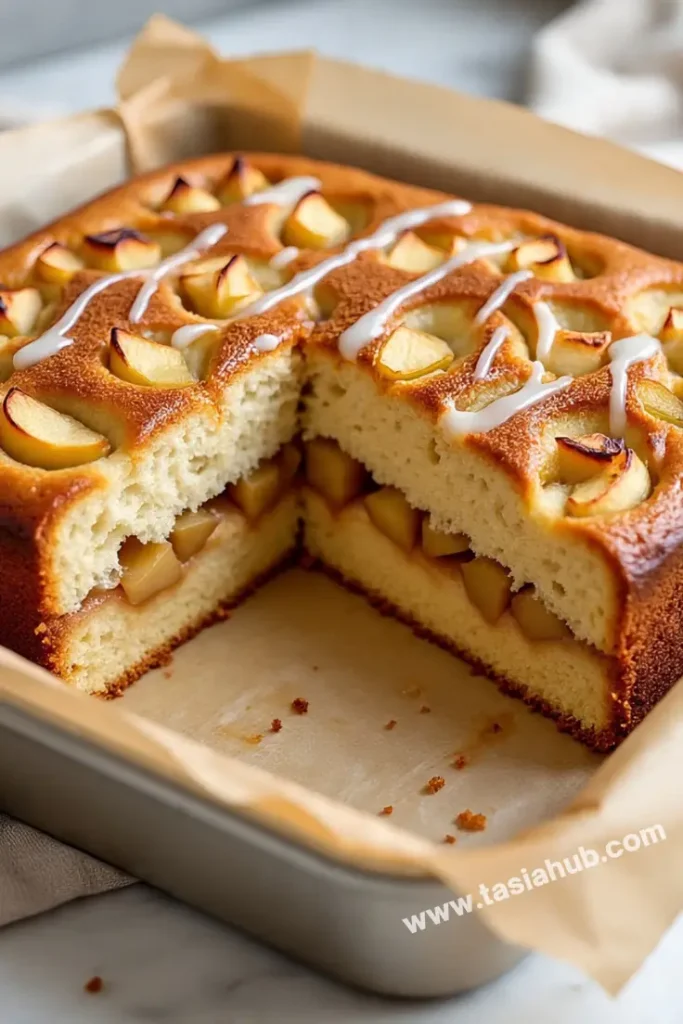
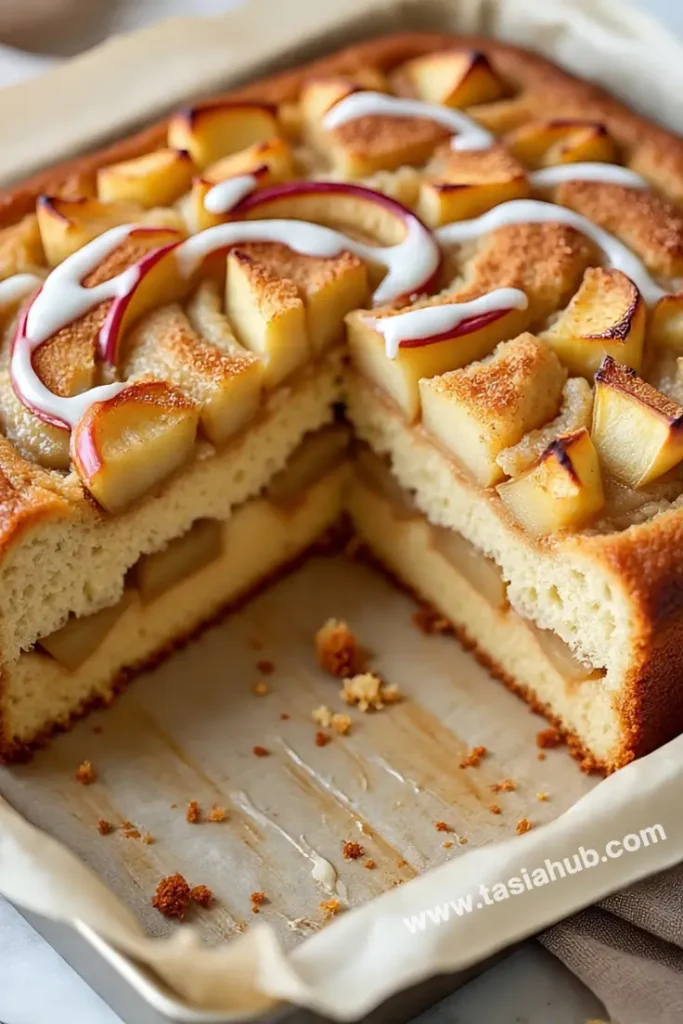
Apple Fritter Cake
There’s just something about a dessert that brings together soft cake layers, juicy apples, and a cinnamon-sugar swirl that makes it impossible to resist. Apple fritter cake is that kind of treat — cozy, comforting, and perfect for any time of year. Think of it as your favorite apple fritter donut reimagined as a sliceable, shareable cake. Whether you’re baking it for a Sunday brunch, a casual get-together, or just to enjoy with your afternoon coffee, this cake is guaranteed to be a hit.
What makes apple fritter cake special is how it combines the best textures and flavors — you get the soft, moist crumb of a well-made coffee cake, a gooey layer of cinnamon apples tucked in the middle, and a golden brown top drizzled with a simple glaze. It’s indulgent without being too rich, sweet but not overly sugary, and loaded with that warm apple-cinnamon flavor that feels like a hug in dessert form.
And here’s the best part — it’s surprisingly easy to make. You don’t need any fancy tools or baking skills. Just a handful of pantry ingredients, a couple of apples, and a love for fall-inspired baking. The batter comes together quickly, the apples are tossed in a little cinnamon and sugar, and it all bakes into a cake that smells amazing as it cooks. Seriously, your kitchen will smell like a bakery.
If you’ve ever stood in line at a bakery, eyeing those glossy apple fritters in the case and wondering how to recreate that magic at home — this cake is your answer. It’s a crowd-pleaser, a comfort food classic, and totally worth making from scratch.
Why You’ll Love It
- All the flavors of a bakery-style apple fritter – but in a soft, fluffy cake form that’s perfect for slicing and sharing.
- Easy to make with simple ingredients – no need for special equipment or hard-to-find items; just basic pantry staples and fresh apples.
- Perfect balance of sweet and spice – the cinnamon-sugar swirl and apple filling add just the right amount of warmth and flavor without overwhelming the cake.
- Great for any occasion – serve it for brunch, dessert, holidays, or even as a sweet snack with coffee or tea.
- Tastes even better the next day – the flavors deepen, and the cake stays moist, making it a great make-ahead option.
Ingredient List
For the Apple Filling:
- 2 cups peeled, diced apples (about 2 medium apples)
- 2 tablespoons granulated sugar
- 1 teaspoon ground cinnamon
For the Cake Batter:
- 1/3 cup light brown sugar, packed
- 1 teaspoon ground cinnamon
- 1/2 cup (1 stick) unsalted butter, softened
- 2/3 cup granulated sugar
- 2 large eggs
- 1 1/2 teaspoons vanilla extract
- 1 1/2 cups all-purpose flour
- 1 3/4 teaspoons baking powder
- 1/2 cup milk
For the Glaze:
- 1/2 cup powdered sugar
- 1–2 tablespoons milk
- Splash of vanilla extract (optional)
Ingredient Notes
- Apples: I like using Honeycrisp or Fuji for their sweetness and firmness — they don’t turn mushy while baking.
- Brown Sugar + Cinnamon Swirl: This layer gives that iconic apple fritter taste, so don’t skip it!
- Butter: Use unsalted so you can control the salt level in the recipe. Make sure it’s softened for easier mixing.
- Flour: Stick with all-purpose for the best texture; too much flour can make the cake dense, so measure carefully.
- Glaze: Add the milk slowly to get the consistency you like — thick enough to drizzle, but not runny.
Kitchen Equipment Needed
- Mixing bowls – For prepping the apples, batter, and cinnamon-sugar swirl separately. I like using glass bowls so I can see everything clearly.
- Electric hand mixer or stand mixer – Makes creaming the butter and sugar a breeze. I use my hand mixer when I don’t feel like pulling out the big one.
- 8×8 or 9×9 inch baking pan – The perfect size for thick, fluffy cake layers. I usually use a ceramic or glass pan for even baking.
- Spatula or wooden spoon – To fold everything together without overmixing. A silicone spatula is my go-to.
- Small saucepan (optional) – If you like to slightly cook the apples before layering, this helps soften them just a bit.
- Whisk – Handy for mixing the glaze smooth and lump-free.
Instructions
Step 1: Prep Your Apples
- Peel, core, and dice your apples into small chunks (about ½-inch pieces).
- In a small bowl, toss them with 2 tablespoons of sugar and 1 teaspoon of cinnamon until evenly coated.
- Set aside while you prep the rest. This lets the cinnamon and sugar soak in a bit.
Pro Tip: If your apples seem a little dry or underripe, you can briefly sauté them in a pan with a tiny pat of butter to soften slightly before using.
Step 2: Mix the Cinnamon-Sugar Swirl
- In a small bowl, stir together 1/3 cup brown sugar and 1 teaspoon cinnamon.
- Set it aside. You’ll layer this into the batter later for that delicious swirl.
Step 3: Make the Cake Batter
- In a large mixing bowl, cream together 1/2 cup softened butter and 2/3 cup granulated sugar using a hand mixer or stand mixer on medium speed. Mix for about 2–3 minutes until light and fluffy.
- Add the eggs one at a time, mixing well after each.
- Stir in the vanilla extract.
- In a separate bowl, whisk together the flour and baking powder.
- Add the dry ingredients to the wet in two parts, alternating with the milk. Start with flour, then half the milk, the rest of the flour, and finish with the remaining milk.
- Mix just until everything is combined — don’t overmix.
Pro Tip: Overmixing can make the cake tough instead of tender. Stop as soon as the flour disappears!
Step 4: Layer the Cake
- Grease your 8×8 or 9×9 inch baking pan (or line with parchment paper for easier cleanup).
- Spread half the batter evenly into the pan. Use a spatula to smooth it out.
- Sprinkle half the cinnamon-sugar mixture on top of the batter.
- Add half the apple mixture over that, spreading it out evenly.
- Repeat the layers: remaining batter, cinnamon-sugar, and apples on top.
- Gently press the top apple pieces down just a bit so they sink slightly into the batter.
Step 5: Bake
- Preheat your oven to 350°F (175°C) if you haven’t already.
- Bake the cake for 40–45 minutes, or until a toothpick inserted into the center comes out clean.
- Let the cake cool in the pan for 10–15 minutes before adding the glaze.
Pro Tip: If the top starts browning too quickly before the center is done, loosely cover it with foil for the last 10 minutes.
Step 6: Glaze and Serve
- In a small bowl, whisk together the powdered sugar with 1 tablespoon of milk. Add more milk as needed, a few drops at a time, until it’s pourable but not watery.
- Drizzle the glaze over the slightly warm cake using a spoon or fork.
Pro Tip: Glazing while the cake is still warm helps it soak into the top a little for extra flavor.
Let the cake cool completely if you want cleaner slices — or dig in warm for that gooey apple fritter feel!
Tips and Tricks for Success
- Room temperature ingredients work best – Especially butter, eggs, and milk. They mix more evenly and help the batter bake up fluffier.
- Don’t skip the layering – It may be tempting to just mix everything in, but layering gives you that classic swirl and bursts of apple in every bite.
- Use the right pan size – An 8×8 or 9×9 inch pan gives the perfect thickness. Anything larger will make the cake thinner and may bake faster.
- Cool before slicing (if you can wait!) – This helps the cake set and makes cleaner cuts. It’s totally worth it.
- Store it properly – Keep leftovers covered at room temperature for up to 2 days, or refrigerate for longer freshness.
Ingredient Substitutions and Variations
- Apples: Swap in pears for a milder twist or use tart Granny Smith apples for more bite.
- Milk: Use buttermilk for extra tang and moisture, or go dairy-free with almond or oat milk.
- Flour: A 1:1 gluten-free baking flour blend works well here if you’re avoiding gluten.
- Add nuts: Chopped pecans or walnuts can be mixed into the apple layer for a little crunch.
- Make it a loaf: Pour the batter into a loaf pan and bake longer (around 50–60 minutes), checking for doneness with a toothpick.
- Warm spices: Add a pinch of nutmeg or cloves to the cinnamon-sugar mix for more fall flavor.
Serving Suggestions
- Warm with coffee or tea: This cake is made for cozy mornings. I love having a slice with a hot cup of chai or a strong coffee—total comfort combo.
- Add a scoop of vanilla ice cream: Serve it slightly warm with a scoop on top for a dessert that feels bakery-level indulgent.
- With whipped cream and caramel drizzle: Fancy it up for guests by topping each slice with a swirl of whipped cream and a little drizzle of caramel sauce.
- As a brunch centerpiece: Set it out next to fruit, eggs, and mimosas—it’s the perfect sweet addition that everyone will reach for.
- Just as it is, late at night: Honestly, a thick slice straight from the pan in your PJs hits differently—especially when it’s still a little warm.
Storage and Reheating Instructions
- Room temperature: Store the cake covered on the counter for up to 2 days. Use foil or a cake dome to keep it soft.
- Refrigerator: Wrap leftovers tightly or place in an airtight container and refrigerate for up to 5 days.
- Freezer: You can freeze individual slices (wrapped in plastic wrap and foil) for up to 2 months. Thaw overnight in the fridge or at room temp.
- Reheating: Microwave slices for 10–15 seconds to warm them up. If you like a crispier top, pop it in a toaster oven for a few minutes instead.
- Glaze touch-up: If the glaze looks dull after storing, whisk a tiny bit of milk into extra powdered sugar and drizzle a fresh layer on top!
Frequently Asked Questions
Can I make this apple fritter cake ahead of time?
Absolutely! It actually tastes even better the next day as the flavors settle in. Just keep it tightly covered at room temp or in the fridge and glaze it fresh if you want that just-made look.
What kind of apples work best?
I recommend Honeycrisp, Fuji, or Gala for a naturally sweet and crisp texture. Granny Smith is great too if you prefer something more tart to balance the sweetness.
Can I double the recipe?
Yes! You can double it and bake in a 9×13 inch pan. Just watch the baking time—it may need a few extra minutes to bake through evenly.
Is this cake freezer-friendly?
Definitely. Wrap individual slices in plastic wrap and foil, then freeze for up to 2 months. When you’re ready to enjoy, just thaw and warm it up for that soft, fresh-baked texture.
Can I reduce the sugar?
You can reduce the granulated sugar in the batter slightly (try 1/2 cup instead of 2/3), but I don’t recommend cutting it too much—it helps with texture and moisture.
How do I know when it’s done baking?
Insert a toothpick into the center—if it comes out clean or with a few moist crumbs, it’s ready. The top should also be golden and slightly springy to the touch.
Did you try this recipe? Let me know in the comments how it turned out!
Don’t forget to share your photos on Instagram and tag me @tasiahub_ or use the hashtag #tasiahub. I’d love to see your creations!

Apple Fritter Cake
Equipment
- Mixing Bowls
- Electric hand mixer or stand mixer
- 8×8 or 9×9 inch baking pan
- Spatula or wooden spoon
- Small Saucepan (Optional)
- Whisk
Ingredients
For the Apple Filling:
- 2 cups peeled diced apples (about 2 medium apples)
- 2 tablespoons granulated sugar
- 1 teaspoon ground cinnamon
For the Cake Batter:
- 1/3 cup light brown sugar packed
- 1 teaspoon ground cinnamon
- 1/2 cup 1 stick unsalted butter, softened
- 2/3 cup granulated sugar
- 2 large eggs
- 1 1/2 teaspoons vanilla extract
- 1 1/2 cups all-purpose flour
- 1 3/4 teaspoons baking powder
- 1/2 cup milk
For the Glaze:
- 1/2 cup powdered sugar
- 1 –2 tablespoons milk
- Splash of vanilla extract optional
Instructions
Step 1: Prep Your Apples
- Peel, core, and dice your apples into small chunks (about ½-inch pieces).
- In a small bowl, toss them with 2 tablespoons of sugar and 1 teaspoon of cinnamon until evenly coated.
- Set aside while you prep the rest. This lets the cinnamon and sugar soak in a bit.
- Pro Tip: If your apples seem a little dry or underripe, you can briefly sauté them in a pan with a tiny pat of butter to soften slightly before using.
Step 2: Mix the Cinnamon-Sugar Swirl
- In a small bowl, stir together 1/3 cup brown sugar and 1 teaspoon cinnamon.
- Set it aside. You’ll layer this into the batter later for that delicious swirl.
Step 3: Make the Cake Batter
- In a large mixing bowl, cream together 1/2 cup softened butter and 2/3 cup granulated sugar using a hand mixer or stand mixer on medium speed. Mix for about 2–3 minutes until light and fluffy.
- Add the eggs one at a time, mixing well after each.
- Stir in the vanilla extract.
- In a separate bowl, whisk together the flour and baking powder.
- Add the dry ingredients to the wet in two parts, alternating with the milk. Start with flour, then half the milk, the rest of the flour, and finish with the remaining milk.
- Mix just until everything is combined — don’t overmix.
- Pro Tip: Overmixing can make the cake tough instead of tender. Stop as soon as the flour disappears!
Step 4: Layer the Cake
- Grease your 8×8 or 9×9 inch baking pan (or line with parchment paper for easier cleanup).
- Spread half the batter evenly into the pan. Use a spatula to smooth it out.
- Sprinkle half the cinnamon-sugar mixture on top of the batter.
- Add half the apple mixture over that, spreading it out evenly.
- Repeat the layers: remaining batter, cinnamon-sugar, and apples on top.
- Gently press the top apple pieces down just a bit so they sink slightly into the batter.
Step 5: Bake
- Preheat your oven to 350°F (175°C) if you haven’t already.
- Bake the cake for 40–45 minutes, or until a toothpick inserted into the center comes out clean.
- Let the cake cool in the pan for 10–15 minutes before adding the glaze.
- Pro Tip: If the top starts browning too quickly before the center is done, loosely cover it with foil for the last 10 minutes.
Step 6: Glaze and Serve
- In a small bowl, whisk together the powdered sugar with 1 tablespoon of milk. Add more milk as needed, a few drops at a time, until it’s pourable but not watery.
- Drizzle the glaze over the slightly warm cake using a spoon or fork.
Notes
Nutritional Value (Per Serving
- Calories: ~310
- Fat: ~14g
- Saturated Fat: ~8g
- Carbohydrates: ~45g
- Sugar: ~28g
- Protein: ~3g
- Fiber: ~1g
- Sodium: ~115mg