Apple Crumble Cheesecake
When the weather starts to cool down and the leaves begin to turn, I find myself craving cozy bakes that feel like a warm hug. This apple crumble cheesecake is one of those recipes that always makes its way into my kitchen when autumn rolls around. It’s creamy, spiced, and layered with all the flavors you’d expect from a classic apple dessert—but with a rich cheesecake twist that makes it unforgettable.
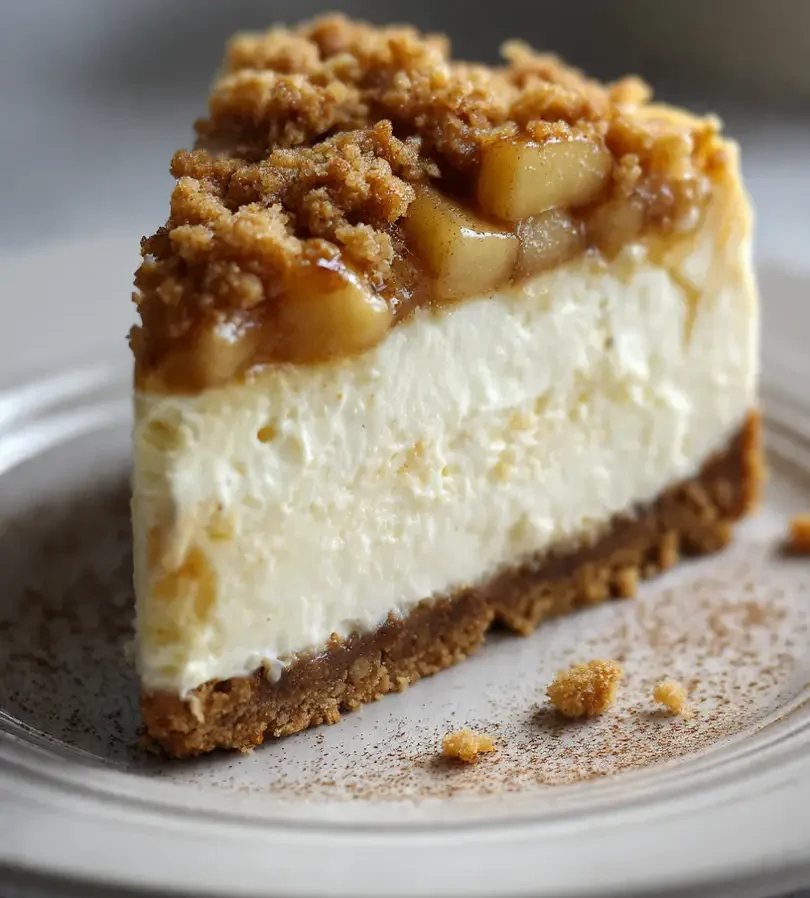
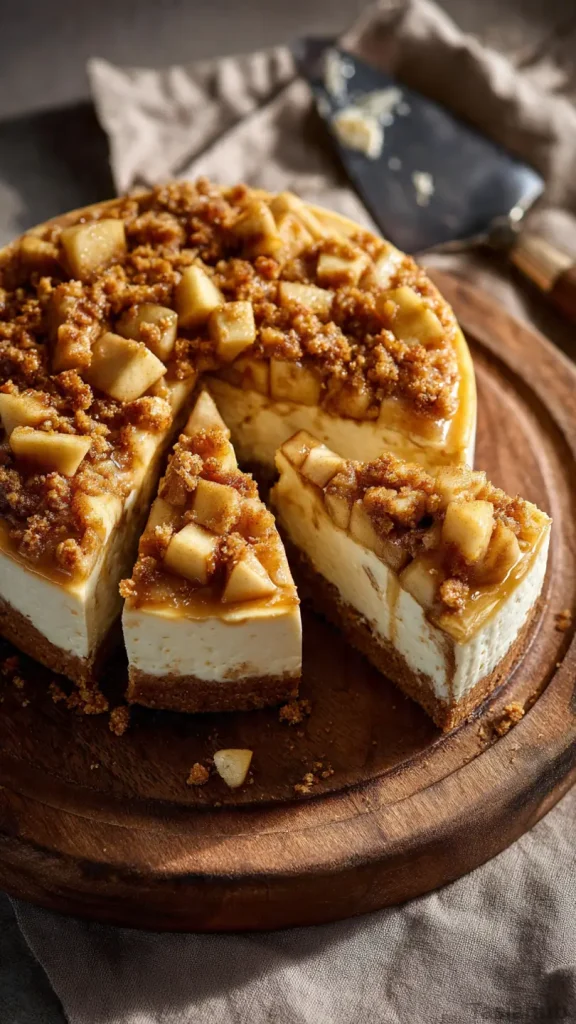
The base is smooth and velvety, just like a traditional cheesecake, but what takes it to the next level is the topping. Imagine a buttery apple crumble piled high over a creamy cheesecake filling. It’s sweet, a little tangy, and full of warm cinnamon notes that instantly remind you of family gatherings and festive evenings. Whether you’re a cheesecake lover or a crumble enthusiast, this dessert brings the best of both worlds together.
I especially love making this for family holidays because it feels both familiar and unique. Everyone knows and loves apple desserts, but turning it into a cheesecake makes it feel extra special. It’s one of those fall cheesecake recipes that doesn’t just taste amazing—it looks beautiful on the table, too. You get that golden, crumbly top with caramelized apples peeking through, and the first slice always gets a few gasps of excitement.
If you’re planning your Thanksgiving desserts lineup this year, this one is worth adding. A Thanksgiving cheesecake like this checks all the boxes: it’s comforting, seasonal, and just different enough to stand out among pies and cobblers. Plus, it’s easy to make ahead, so you can enjoy the holiday without stressing about dessert last minute. This apple crumble cheesecake really is the kind of recipe that earns a permanent spot in your fall baking traditions.
Why You’ll Love It
- It’s two desserts in one. You get the rich creaminess of cheesecake and the cozy crunch of an apple crumble topping recipe, all layered together in every bite.
- Perfect for fall gatherings. Whether it’s a casual dinner with friends or part of your Thanksgiving desserts spread, this cheesecake feels festive without being overcomplicated.
- Make-ahead friendly. Cheesecake actually tastes better after it chills overnight, so you can prep this in advance and cross dessert off your to-do list early.
- Crowd-pleasing flavors. From the buttery crumble to the cinnamon-spiced apples, it’s a dessert that both cheesecake lovers and apple dessert fans will reach for first.
- A gorgeous centerpiece. With its golden crumble topping and creamy layers, this Thanksgiving cheesecake doubles as a show-stopper for your holiday table.
Ingredients
For the Crust
- 1 ½ cups graham cracker crumbs
- ¼ cup granulated sugar
- ½ cup unsalted butter, melted
For the Cheesecake Filling
- 24 oz cream cheese, softened
- 1 cup granulated sugar
- 3 large eggs
- 1 cup sour cream
- 1 tsp vanilla extract
- 1 tsp ground cinnamon
For the Apple Layer
- 3 medium apples, peeled and diced
- 2 tbsp unsalted butter
- 2 tbsp brown sugar
- 1 tsp ground cinnamon
- ¼ tsp nutmeg
For the Crumble Topping
- 1 cup all-purpose flour
- ½ cup brown sugar
- ½ cup unsalted butter, cold and cubed
- ½ tsp ground cinnamon
Ingredient Notes
- Cream cheese – Use full-fat cream cheese for the creamiest, most indulgent texture. (I always stick with Philadelphia—it never lets me down.)
- Apples – I recommend Granny Smith or Honeycrisp. The tartness balances the sweetness of the cheesecake perfectly.
- Brown sugar – Don’t skip this in the apple and crumble layers—it adds that deep caramel-like flavor that makes this cheesecake taste like fall.
- Cinnamon + nutmeg – These warm spices bring out the apple flavor. A pinch of nutmeg goes a long way, so don’t overdo it.
- Graham crackers – Classic for the crust, but you can also use gingersnap cookies if you want a spicier holiday vibe.
Kitchen Equipment Needed
- 9-inch springform pan – A must for cheesecakes so you can release the sides cleanly without ruining that beautiful crust.
- Mixing bowls – You’ll need a few for the crust, filling, and crumble topping. I like using glass bowls so I can see everything mixing together.
- Hand mixer or stand mixer – Helps get the cream cheese silky smooth without lumps. My stand mixer is my go-to because it saves me so much arm work.
- Rubber spatula – Perfect for scraping down the sides of the bowl and making sure every bit of batter gets used.
- Small skillet – For softening the apples with butter and sugar before layering them into the cheesecake.
- Measuring cups + spoons – Baking is all about precision, so these are non-negotiable.
- Cooling rack – Essential for letting the cheesecake cool evenly before it goes into the fridge to chill.
Instructions
Step 1 — Preheat, prep the pan & bake the crust
- Preheat your oven to 325°F (160°C) and position a rack in the center.
- Wrap the outside bottom and sides of your 9-inch springform pan with two layers of heavy-duty foil (this helps if you decide to use a water bath).
- Mix the graham cracker crumbs and ¼ cup granulated sugar in a bowl, then stir in the melted butter until the crumbs are evenly moistened.
- Press the crumb mixture firmly into the bottom (and slightly up the sides if you like) of the prepared pan — use the bottom of a measuring cup for an even, compact crust.
- Bake the crust 8–10 minutes until set and slightly golden. Let it cool on a rack while you make the filling and apple layer.
Pro tip: Press the crust firmly so it holds together when you slice. A loose crust = crumbly slices.
Step 2 — Cook the apple layer (don’t skip this)
- Heat 2 tablespoons butter in a small skillet over medium heat.
- Add the diced apples, 2 tablespoons brown sugar, 1 teaspoon cinnamon and ¼ teaspoon nutmeg.
- Cook, stirring occasionally, until the apples are tender and syrupy — about 5–8 minutes. If the apples release a lot of liquid, keep cooking a bit longer so they’re not watery.
- Remove from heat and let the apple mixture cool completely before using.
Pro tip: The apples should be soft but not mushy. Cooking them first concentrates the flavor and prevents excess juice from making the cheesecake soggy.
Step 3 — Make the crumble topping
- In a bowl, combine 1 cup flour, ½ cup brown sugar and ½ teaspoon cinnamon.
- Add the cold, cubed butter and use a pastry cutter, two forks, or your fingertips to work the butter into the dry ingredients until the mixture resembles coarse crumbs with some pea-sized bits.
- Chill the crumble in the fridge while you make the filling so the butter stays cold.
Pro tip: Cold butter = flakier, more crumbly topping. If your kitchen is warm, pop the crumble in the freezer for a few minutes before using.
Step 4 — Make the cheesecake filling (be gentle)
- In a large bowl, beat the softened cream cheese on medium speed until smooth and lump-free (about 2–3 minutes).
- Add 1 cup granulated sugar and beat just until combined and silky. Scrape the bowl down with a rubber spatula.
- Add the eggs one at a time, mixing on low speed and stopping as soon as each egg is incorporated.
- Mix in the sour cream, vanilla extract and 1 teaspoon ground cinnamon until everything is uniform. Give the bowl one last scrape to ensure no pockets of cream cheese remain.
Pro tip: Over-beating after adding eggs incorporates extra air and can cause cracks while baking—low speed and short mix times are your friends here.
Step 5 — Assemble and bake (water bath method for a smooth finish)
- Pour the cheesecake filling over the cooled crust and smooth the top with a spatula.
- Spoon the cooled apple mixture evenly across the filling — a gentle, even layer is perfect.
- Place the springform pan inside a larger roasting pan. If using a water bath (recommended), pour hot — not boiling — water into the roasting pan until it reaches about halfway up the sides of the springform. Be careful not to splash water onto the cheesecake.
- Bake the cheesecake 40–50 minutes at 325°F (160°C). The edges should be set; the center should still have a slight jiggle.
- Carefully remove the roasting pan from the oven and, using oven mitts, pull the springform out slightly just enough to sprinkle the chilled crumble evenly over the apples. Return the pan to the oven (no water added or removed) and bake another 12–15 minutes until the crumble is golden and the center is only slightly jiggly.
(Alternate method: If you prefer to place the crumble on top before the first bake, you can bake everything together for 55–70 minutes, but keep an eye so the crumble doesn’t over-brown.)
Pro tip: Wrapping your springform well with foil prevents leaks. A water bath keeps the oven environment moist and reduces cracking — it’s the secret to that silky surface.
Step 6 — Cool slowly, then chill
- When the crumble is golden and the center is set but still slightly wobbly, turn the oven off. Crack the oven door open slightly and let the cheesecake cool in the oven for 45–60 minutes. This slow cooldown helps prevent sudden temperature changes that cause cracks.
- Remove the cheesecake from the water bath and place it on a cooling rack to come the rest of the way to room temperature (another 30–60 minutes).
- Once at room temp, cover loosely with plastic wrap and chill in the refrigerator for at least 6 hours, preferably overnight. Cheesecake slices cleanly and gains flavor after chilling.
Pro tip: If you spot a small crack, don’t panic—cover it with extra crumble or a drizzle of caramel when serving.
Step 7 — Release, slice and store
- Run a thin knife around the edge of the springform to loosen, then release the sides. Transfer to a serving plate if you like.
- For tidy slices, let the cheesecake sit at room temperature for 15–20 minutes before cutting. Use a hot, clean knife (wipe between cuts) for neat edges.
- Store leftovers tightly wrapped in the fridge for up to 4 days. To freeze, cut into slices, wrap each slice in plastic and foil, and freeze up to 2 months — thaw in the fridge overnight.
Pro tip: Warm the knife under hot tap water and dry it before each slice—smooth, glossy cuts every time.
Tips and Tricks for Success
- Room temp cream cheese = no lumps. Always let your cream cheese soften on the counter before mixing—cold blocks will give you a clumpy filling.
- Don’t rush the cooling. Sudden temperature changes are the #1 reason cheesecakes crack. Let it cool in the oven first, then move it to the counter, then the fridge.
- Chill overnight for best flavor. A few hours works, but overnight chilling lets the flavors develop and makes slicing easier.
- Protect your crust. Double-wrap your springform with foil if you’re using a water bath. Leaks can make a soggy crust.
- Use the right apples. Firm and tart varieties like Granny Smith or Honeycrisp hold up better when baked and balance out the sweetness.
- Don’t overbake. Pull it from the oven when the center still has a little jiggle—it’ll set fully as it cools.
Ingredient Substitutions and Variations
- Crust swap: Use gingersnaps or shortbread cookies instead of graham crackers for a holiday twist.
- Apple upgrade: Try mixing apple varieties—like Granny Smith for tartness and Fuji for sweetness—for more depth of flavor.
- Crumble twist: Add a handful of chopped pecans or walnuts to the topping for extra crunch and nuttiness.
- Spice it up: Swap the cinnamon + nutmeg for apple pie spice or pumpkin pie spice if you want a warmer, spicier flavor.
- Caramel lovers: Drizzle warm caramel sauce over each slice before serving—makes it taste like a caramel apple cheesecake hybrid.
- Mini versions: Bake in a muffin tin with liners for individual apple crumble cheesecakes (reduce bake time).
Serving Suggestions
- I love serving this apple crumble cheesecake slightly chilled with a drizzle of warm caramel sauce—it feels like the ultimate fall indulgence.
- Add a dollop of fresh whipped cream on top for a light, airy contrast to the dense, creamy cheesecake.
- Pair each slice with a scoop of vanilla ice cream—because warm apples and cold ice cream are a timeless duo.
- Serve alongside a mug of spiced chai or hot apple cider for the coziest dessert pairing.
- For a Thanksgiving cheesecake moment, I like garnishing with thin apple slices and a sprinkle of cinnamon right before bringing it to the table.

Storage and Reheating Instructions
- Refrigerator: Store covered with plastic wrap or foil in the fridge for up to 4 days.
- Freezer: Freeze individual slices by wrapping in plastic, then foil. Store up to 2 months. Thaw overnight in the fridge.
- Reheating: Cheesecake doesn’t really need reheating, but if you want a warm crumble, heat a slice in the microwave for 10–15 seconds (just enough to take the chill off).
- Make-ahead: Bake the cheesecake a day ahead for the best flavor and easiest slicing—it actually improves with time.
Frequently Asked Questions
Can I make this cheesecake without a water bath?
Yes! A water bath helps prevent cracks, but if you don’t want to bother, just place a pan of hot water on the rack below your cheesecake while it bakes. The steam still helps with a smooth texture.
What are the best apples to use?
Granny Smith and Honeycrisp are my favorites—they hold their shape and give that perfect tart-sweet balance. Avoid softer apples like Red Delicious, which can turn mushy.
Can I make this ahead of time?
Absolutely! Cheesecake actually tastes better after chilling overnight. You can make it 1–2 days ahead and keep it refrigerated until serving.
How do I keep the crumble topping crunchy?
Bake it until golden, then let the cheesecake cool properly before covering. Cover it loosely so moisture doesn’t soften the crumble.
Can I freeze apple crumble cheesecake?
Yes, it freezes really well. Slice it, wrap each piece tightly, and freeze for up to 2 months. Thaw overnight in the fridge before serving.
What if my cheesecake cracks?
No worries—just cover it with extra crumble or a drizzle of caramel. It’ll still taste just as amazing.
Did you try this recipe? Let me know in the comments how it turned out! I’d love to hear if you served it as part of your apple desserts lineup or saved it for your Thanksgiving table.
Apple Crumble Cheesecake
Equipment
- 9-inch springform pan
- Mixing Bowls
- Hand mixer or stand mixer
- Rubber spatula
- Small skillet
- Measuring Cups & Spoons
- Cooling Rack
Ingredients
For the Crust
- 1 ½ cups graham cracker crumbs
- ¼ cup granulated sugar
- ½ cup unsalted butter melted
For the Cheesecake Filling
- 24 oz cream cheese softened
- 1 cup granulated sugar
- 3 large eggs
- 1 cup sour cream
- 1 tsp vanilla extract
- 1 tsp ground cinnamon
For the Apple Layer
- 3 medium apples peeled and diced
- 2 tbsp unsalted butter
- 2 tbsp brown sugar
- 1 tsp ground cinnamon
- ¼ tsp nutmeg
For the Crumble Topping
- 1 cup all-purpose flour
- ½ cup brown sugar
- ½ cup unsalted butter cold and cubed
- ½ tsp ground cinnamon
Instructions
Step 1 — Preheat, prep the pan & bake the crust
- Preheat your oven to 325°F (160°C) and position a rack in the center.
- Wrap the outside bottom and sides of your 9-inch springform pan with two layers of heavy-duty foil (this helps if you decide to use a water bath).
- Mix the graham cracker crumbs and ¼ cup granulated sugar in a bowl, then stir in the melted butter until the crumbs are evenly moistened.
- Press the crumb mixture firmly into the bottom (and slightly up the sides if you like) of the prepared pan — use the bottom of a measuring cup for an even, compact crust.
- Bake the crust 8–10 minutes until set and slightly golden. Let it cool on a rack while you make the filling and apple layer.
- Pro tip: Press the crust firmly so it holds together when you slice. A loose crust = crumbly slices.
Step 2 — Cook the apple layer (don’t skip this)
- Heat 2 tablespoons butter in a small skillet over medium heat.
- Add the diced apples, 2 tablespoons brown sugar, 1 teaspoon cinnamon and ¼ teaspoon nutmeg.
- Cook, stirring occasionally, until the apples are tender and syrupy — about 5–8 minutes. If the apples release a lot of liquid, keep cooking a bit longer so they’re not watery.
- Remove from heat and let the apple mixture cool completely before using.
- Pro tip: The apples should be soft but not mushy. Cooking them first concentrates the flavor and prevents excess juice from making the cheesecake soggy.
Step 3 — Make the crumble topping
- In a bowl, combine 1 cup flour, ½ cup brown sugar and ½ teaspoon cinnamon.
- Add the cold, cubed butter and use a pastry cutter, two forks, or your fingertips to work the butter into the dry ingredients until the mixture resembles coarse crumbs with some pea-sized bits.
- Chill the crumble in the fridge while you make the filling so the butter stays cold.
- Pro tip: Cold butter = flakier, more crumbly topping. If your kitchen is warm, pop the crumble in the freezer for a few minutes before using.
Step 4 — Make the cheesecake filling (be gentle)
- In a large bowl, beat the softened cream cheese on medium speed until smooth and lump-free (about 2–3 minutes).
- Add 1 cup granulated sugar and beat just until combined and silky. Scrape the bowl down with a rubber spatula.
- Add the eggs one at a time, mixing on low speed and stopping as soon as each egg is incorporated.
- Mix in the sour cream, vanilla extract and 1 teaspoon ground cinnamon until everything is uniform. Give the bowl one last scrape to ensure no pockets of cream cheese remain.
- Pro tip: Over-beating after adding eggs incorporates extra air and can cause cracks while baking—low speed and short mix times are your friends here.
Step 5 — Assemble and bake (water bath method for a smooth finish)
- Pour the cheesecake filling over the cooled crust and smooth the top with a spatula.
- Spoon the cooled apple mixture evenly across the filling — a gentle, even layer is perfect.
- Place the springform pan inside a larger roasting pan. If using a water bath (recommended), pour hot — not boiling — water into the roasting pan until it reaches about halfway up the sides of the springform. Be careful not to splash water onto the cheesecake.
- Bake the cheesecake 40–50 minutes at 325°F (160°C). The edges should be set; the center should still have a slight jiggle.
- Carefully remove the roasting pan from the oven and, using oven mitts, pull the springform out slightly just enough to sprinkle the chilled crumble evenly over the apples. Return the pan to the oven (no water added or removed) and bake another 12–15 minutes until the crumble is golden and the center is only slightly jiggly.
- (Alternate method: If you prefer to place the crumble on top before the first bake, you can bake everything together for 55–70 minutes, but keep an eye so the crumble doesn’t over-brown.)
- Pro tip: Wrapping your springform well with foil prevents leaks. A water bath keeps the oven environment moist and reduces cracking — it’s the secret to that silky surface.
Step 6 — Cool slowly, then chill
- When the crumble is golden and the center is set but still slightly wobbly, turn the oven off. Crack the oven door open slightly and let the cheesecake cool in the oven for 45–60 minutes. This slow cooldown helps prevent sudden temperature changes that cause cracks.
- Remove the cheesecake from the water bath and place it on a cooling rack to come the rest of the way to room temperature (another 30–60 minutes).
- Once at room temp, cover loosely with plastic wrap and chill in the refrigerator for at least 6 hours, preferably overnight. Cheesecake slices cleanly and gains flavor after chilling.
- Pro tip: If you spot a small crack, don’t panic—cover it with extra crumble or a drizzle of caramel when serving.
Step 7 — Release, slice and store
- Run a thin knife around the edge of the springform to loosen, then release the sides. Transfer to a serving plate if you like.
- For tidy slices, let the cheesecake sit at room temperature for 15–20 minutes before cutting. Use a hot, clean knife (wipe between cuts) for neat edges.
- Store leftovers tightly wrapped in the fridge for up to 4 days. To freeze, cut into slices, wrap each slice in plastic and foil, and freeze up to 2 months — thaw in the fridge overnight.
- Pro tip: Warm the knife under hot tap water and dry it before each slice—smooth, glossy cuts every time.
Notes
Nutritional Value (per serving)
- Calories: ~450–480
- Fat: ~28g
- Saturated Fat: ~16g
- Carbohydrates: ~45g
- Sugar: ~32g
- Protein: ~6g
- Fiber: ~2g
- Sodium: ~220mg