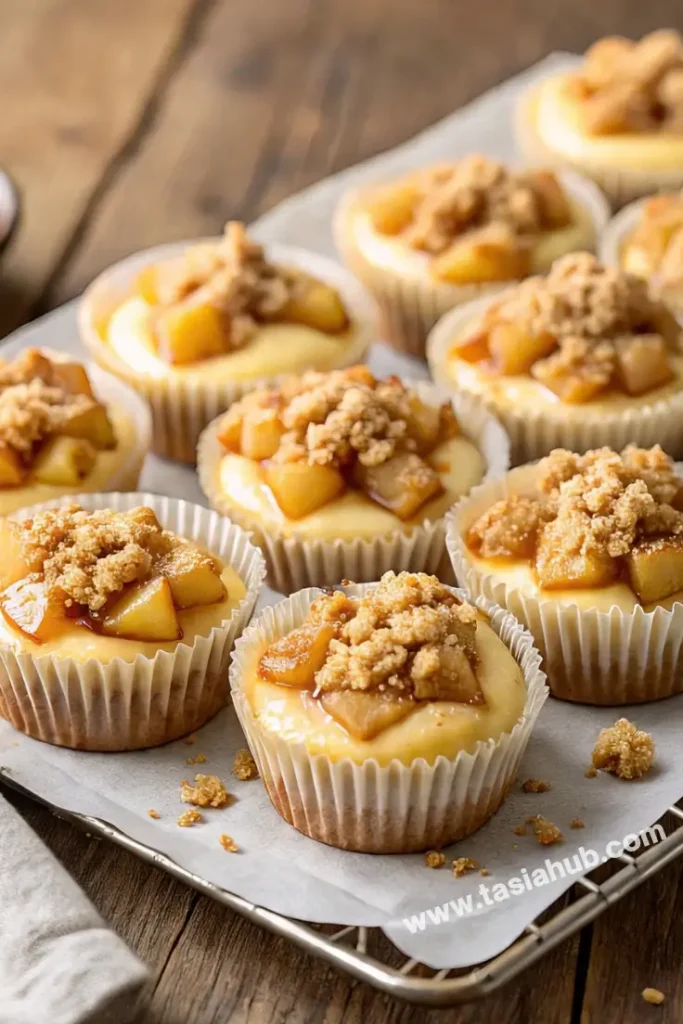
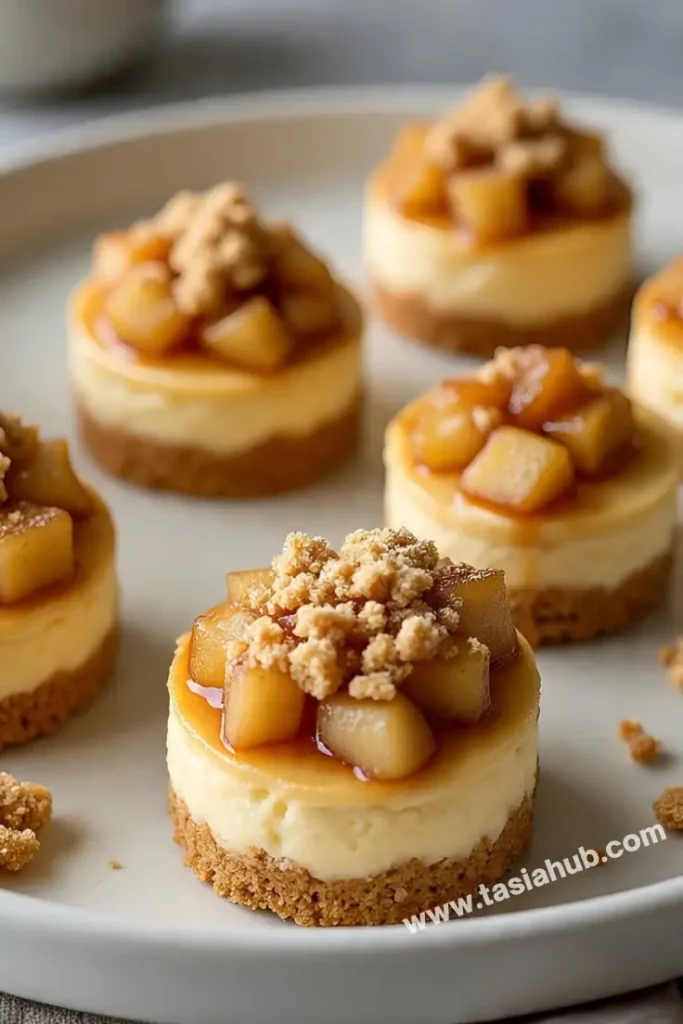
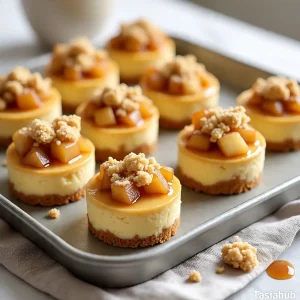
Apple Crisp Mini Cheesecakes

Imagine a cozy fall dessert that combines creamy cheesecake, tender spiced apples, and a buttery oat crumble—all in a handheld bite. These apple crisp mini cheesecakes are just that. They’re rich yet refreshing, warm with cinnamon and brown sugar, and perfectly portioned so you don’t feel like you’ve overindulged. They also look pretty impressive for how easy they are to put together!
What makes these minis extra special is the layering. You start with a graham cracker crust that gives each bite a satisfying crunch, then a smooth cheesecake filling that melts in your mouth. But the real magic happens on top: a soft apple crisp layer made with diced apples tossed in warm spices and topped with a buttery oat crumble. It’s like two desserts in one—cheesecake meets apple crisp in the most delicious way.
This recipe is great whether you’re hosting friends, bringing a dessert to a fall potluck, or just want a treat for the week. They’re made in muffin tins, which means no springform pan, no water bath, no fuss. Plus, they chill beautifully, so you can prep them a day or two ahead and still wow your guests.
The best part? They’re incredibly versatile. Swap the apples for pears if you like, or add chopped pecans to the crumble for a nutty crunch. Whether you’re a cheesecake lover, an apple dessert enthusiast, or just someone who appreciates a good seasonal bake, these mini cheesecakes are going to be your new favorite.
Why You’ll Love It
- Perfectly Portioned – These minis are just the right size for individual servings, making them great for parties, gatherings, or anytime you want a sweet treat without overdoing it.
- Two Desserts in One – You get the best of both worlds: creamy cheesecake and cozy apple crisp layered into one delicious bite.
- Easy to Make – No fancy equipment needed! They come together in a standard muffin tin and don’t require a water bath or complicated steps.
- Make-Ahead Friendly – These cheesecakes hold up well in the fridge, so you can prep them the day before and have dessert ready when you need it.
- Customizable – Use different apples, switch up the spices, or toss in some chopped nuts or caramel drizzle—there are endless ways to make them your own.
Ingredient List
For the Crust
- 1 cup graham cracker crumbs
- 2 tablespoons brown sugar
- 4 tablespoons unsalted butter, melted
For the Cheesecake Filling
- 16 oz (2 blocks) cream cheese, softened
- 1/2 cup granulated sugar
- 1 teaspoon vanilla extract
- 2 large eggs
- 1/4 cup sour cream
For the Apple Crisp Topping
- 2 medium apples, peeled and finely diced
- 2 tablespoons granulated sugar
- 1/2 teaspoon ground cinnamon
- 1/4 teaspoon ground nutmeg
- 1 teaspoon lemon juice
For the Oat Crumble
- 1/2 cup old-fashioned oats
- 1/4 cup all-purpose flour
- 1/4 cup brown sugar
- 1/2 teaspoon ground cinnamon
- 3 tablespoons unsalted butter, cold and cubed
Ingredient Notes
- Graham cracker crumbs – You can crush whole crackers yourself or buy the pre-crushed kind for convenience.
- Cream cheese – Use full-fat blocks (not the spreadable tubs) for the creamiest texture.
- Sour cream – Adds a slight tang and helps create a smooth, velvety filling.
- Apples – Honeycrisp, Gala, or Fuji are great for this recipe because they hold their shape and stay sweet.
- Oats – Stick with old-fashioned rolled oats, not quick oats, for the best crisp topping.
- Butter – Cold butter in the crumble gives you that perfect, crumbly texture—don’t use melted.
Kitchen Equipment Needed
- 12-cup muffin tin – For baking the mini cheesecakes in perfect individual portions.
- Cupcake liners – Makes removal easy and keeps the cheesecakes intact. I love using silicone muffin liners for this—they peel right off and look cute too!
- Mixing bowls (various sizes) – For mixing crust, filling, apple topping, and crumble separately.
- Hand mixer or stand mixer – Helps get the cheesecake filling ultra-smooth and creamy.
- Rubber spatula – Great for scraping down the sides of the bowl without wasting any batter.
- Small saucepan – To lightly cook the apples before topping the cheesecakes.
- Cookie scoop or spoon – Makes portioning out the crust and filling easier and more even.
- Cooling rack – To let the cheesecakes cool evenly before chilling.
Instructions
1. Preheat and Prep
- Preheat your oven to 325°F (163°C).
- Line a 12-cup muffin tin with paper or silicone cupcake liners. Set aside.
Pro Tip: Paper liners are easiest to remove after chilling, but silicone ones give a super clean edge if you’re serving them unwrapped.
2. Make the Crust
- In a small bowl, combine 1 cup graham cracker crumbs and 2 tablespoons brown sugar.
- Stir in 4 tablespoons of melted butter until the mixture resembles wet sand.
- Scoop about 1 tablespoon of the crust mixture into each lined muffin cup.
- Use the bottom of a small glass or spoon to press the crust down firmly and evenly.
Pro Tip: Pack the crust well—it helps the mini cheesecakes hold together when removed from the liners.
- Bake the crusts for 5 minutes, then remove and let cool while you make the filling.
3. Prepare the Cheesecake Filling
- In a large mixing bowl, beat 16 oz of softened cream cheese until smooth (about 1 minute).
- Add 1/2 cup granulated sugar and beat again until creamy and well combined.
- Mix in 1 teaspoon vanilla extract and 1/4 cup sour cream.
- Add the eggs one at a time, mixing on low speed until just combined after each addition.
Pro Tip: Don’t overmix once the eggs are in—it can cause the cheesecakes to puff too much and crack.
- Divide the cheesecake batter evenly among the crusts, filling each cup about 3/4 full.
4. Cook the Apple Topping
- In a small saucepan over medium heat, combine the diced apples, 2 tablespoons sugar, 1/2 teaspoon cinnamon, 1/4 teaspoon nutmeg, and 1 teaspoon lemon juice.
- Stir frequently and cook for about 5–7 minutes until the apples are tender but not mushy.
- Remove from heat and let cool slightly.
5. Make the Oat Crumble
- In a medium bowl, mix 1/2 cup oats, 1/4 cup flour, 1/4 cup brown sugar, and 1/2 teaspoon cinnamon.
- Add the cold, cubed butter. Use your fingers or a pastry cutter to work it into the mixture until it forms coarse crumbs.
Pro Tip: The crumble should clump slightly when you squeeze it in your hand. If it’s too dry, add 1 more tablespoon of cold butter.
6. Assemble Before Baking
- Spoon about 1 tablespoon of the cooked apples on top of each cheesecake.
- Sprinkle a generous amount of the oat crumble over the apples, pressing lightly so it sticks.
7. Bake the Mini Cheesecakes
- Bake at 325°F for 18–22 minutes, or until the centers look set and no longer jiggly.
- Remove from the oven and cool in the pan for 20–30 minutes.
Pro Tip: Don’t worry if they puff up a bit—they’ll settle as they cool.
- Once mostly cooled, transfer to the fridge and chill for at least 3 hours (overnight is best!).
8. Serve and Enjoy
- Carefully remove the liners from each cheesecake before serving (if desired).
- Optional: top with whipped cream, a drizzle of caramel, or an extra sprinkle of cinnamon.
These are best enjoyed cold, but they’re still delicious at room temperature!
Tips and Tricks for Success
- Use room temperature ingredients – Especially for the cream cheese and eggs. This helps the filling blend smoothly without lumps.
- Chill thoroughly before serving – At least 3 hours in the fridge helps the cheesecakes set completely and enhances the flavor.
- Don’t overfill the cups – Filling them just 3/4 of the way gives the toppings room to sit without spilling over.
- Let the apple topping cool slightly – Adding it while too hot can make the cheesecake filling runny before baking.
- Use a muffin scoop for even portions – It makes assembling the layers quick, neat, and consistent.
Ingredient Substitutions and Variations
- Use digestive biscuits or vanilla wafers – Instead of graham crackers for the crust.
- Swap the apples for pears or peaches – Just dice them the same way and follow the same steps.
- Add chopped nuts to the crumble – Pecans or walnuts add a great crunch and nutty flavor.
- Make it gluten-free – Use gluten-free graham crackers and oat flour for the crust and crumble.
- Try a spice blend – Use apple pie spice or chai spice in place of just cinnamon for extra warmth.
Serving Suggestions
- Top with whipped cream and a drizzle of caramel – This adds a creamy, sweet finish that pairs beautifully with the tart apples.
- Serve on a dessert platter for parties – These minis make a gorgeous addition to any fall or holiday dessert spread.
- Add a scoop of vanilla ice cream on the side – For an extra-indulgent treat that melts into the warm spiced flavors.
- Sprinkle with a pinch of cinnamon or powdered sugar – Right before serving, for a pretty, bakery-style touch.
- I love enjoying one chilled straight from the fridge with a hot cup of coffee—it’s the perfect cozy afternoon break!
Storage and Reheating Instructions
- Store in an airtight container in the fridge – They’ll stay fresh for up to 4–5 days.
- Place a sheet of parchment between layers – If stacking, to prevent sticking or smudging the toppings.
- Freeze for longer storage – Wrap each one tightly in plastic wrap and store in a freezer-safe container for up to 1 month.
- Thaw overnight in the fridge – Before serving, for best texture and flavor.
- Not ideal for reheating – These are best served chilled or at room temp, as reheating can affect the texture of the cheesecake and crumble.
Frequently Asked Questions
Can I make these ahead of time?
Yes! These mini cheesecakes are perfect for making a day or two ahead. In fact, they taste even better after chilling overnight.
What kind of apples work best?
I recommend Honeycrisp, Gala, or Fuji—they hold their shape while baking and have a naturally sweet flavor that pairs well with the spiced crumble.
Can I freeze them?
Absolutely. Wrap them individually and freeze in a container for up to a month. Just thaw in the fridge overnight before serving.
My cheesecakes cracked—what went wrong?
Cracking usually happens when the batter is overmixed or baked too long. Don’t worry, though! The crumble topping will hide any cracks beautifully.
Do I have to cook the apples first?
Yes, a quick stovetop cook softens them and brings out their flavor. Raw apples won’t break down properly in the oven alone.
Can I make these without cupcake liners?
You can, but they’re harder to remove cleanly. If you skip the liners, use a well-greased nonstick muffin tin and be extra careful during removal.
Did you try this recipe? Let me know in the comments how it turned out!
Don’t forget to share your photos on Instagram and tag me @tasiahub_ or use the hashtag #tasiahub. I’d love to see your creations!
Apple Crisp Mini Cheesecakes
Equipment
- 12-Cup Muffin Tin
- Cupcake liners
- Mixing bowls (various sizes)
- Hand mixer or stand mixer
- Rubber spatula
- Small saucepan
- Cookie scoop or spoon
- Cooling Rack
Ingredients
For the Crust
- 1 cup graham cracker crumbs
- 2 tablespoons brown sugar
- 4 tablespoons unsalted butter melted
For the Cheesecake Filling
- 16 oz 2 blocks cream cheese, softened
- 1/2 cup granulated sugar
- 1 teaspoon vanilla extract
- 2 large eggs
- 1/4 cup sour cream
For the Apple Crisp Topping
- 2 medium apples peeled and finely diced
- 2 tablespoons granulated sugar
- 1/2 teaspoon ground cinnamon
- 1/4 teaspoon ground nutmeg
- 1 teaspoon lemon juice
For the Oat Crumble
- 1/2 cup old-fashioned oats
- 1/4 cup all-purpose flour
- 1/4 cup brown sugar
- 1/2 teaspoon ground cinnamon
- 3 tablespoons unsalted butter cold and cubed
Instructions
Preheat and Prep
- Preheat your oven to 325°F (163°C).
- Line a 12-cup muffin tin with paper or silicone cupcake liners. Set aside.
- Pro Tip: Paper liners are easiest to remove after chilling, but silicone ones give a super clean edge if you’re serving them unwrapped.
Make the Crust
- In a small bowl, combine 1 cup graham cracker crumbs and 2 tablespoons brown sugar.
- Stir in 4 tablespoons of melted butter until the mixture resembles wet sand.
- Scoop about 1 tablespoon of the crust mixture into each lined muffin cup.
- Use the bottom of a small glass or spoon to press the crust down firmly and evenly.
- Pro Tip: Pack the crust well—it helps the mini cheesecakes hold together when removed from the liners.
- Bake the crusts for 5 minutes, then remove and let cool while you make the filling.
Prepare the Cheesecake Filling
- In a large mixing bowl, beat 16 oz of softened cream cheese until smooth (about 1 minute).
- Add 1/2 cup granulated sugar and beat again until creamy and well combined.
- Mix in 1 teaspoon vanilla extract and 1/4 cup sour cream.
- Add the eggs one at a time, mixing on low speed until just combined after each addition.
- Pro Tip: Don’t overmix once the eggs are in—it can cause the cheesecakes to puff too much and crack.
- Divide the cheesecake batter evenly among the crusts, filling each cup about 3/4 full.
Cook the Apple Topping
- In a small saucepan over medium heat, combine the diced apples, 2 tablespoons sugar, 1/2 teaspoon cinnamon, 1/4 teaspoon nutmeg, and 1 teaspoon lemon juice.
- Stir frequently and cook for about 5–7 minutes until the apples are tender but not mushy.
- Remove from heat and let cool slightly.
Make the Oat Crumble
- In a medium bowl, mix 1/2 cup oats, 1/4 cup flour, 1/4 cup brown sugar, and 1/2 teaspoon cinnamon.
- Add the cold, cubed butter. Use your fingers or a pastry cutter to work it into the mixture until it forms coarse crumbs.
- Pro Tip: The crumble should clump slightly when you squeeze it in your hand. If it’s too dry, add 1 more tablespoon of cold butter.
Assemble Before Baking
- Spoon about 1 tablespoon of the cooked apples on top of each cheesecake.
- Sprinkle a generous amount of the oat crumble over the apples, pressing lightly so it sticks.
Bake the Mini Cheesecakes
- Bake at 325°F for 18–22 minutes, or until the centers look set and no longer jiggly.
- Remove from the oven and cool in the pan for 20–30 minutes.
- Pro Tip: Don’t worry if they puff up a bit—they’ll settle as they cool.
- Once mostly cooled, transfer to the fridge and chill for at least 3 hours (overnight is best!).
Serve and Enjoy
- Carefully remove the liners from each cheesecake before serving (if desired).
- Optional: top with whipped cream, a drizzle of caramel, or an extra sprinkle of cinnamon.
- These are best enjoyed cold, but they’re still delicious at room temperature!
Notes
Nutritional Value (approximate per mini cheesecake):
- Calories: ~280–320
- Fat: 18–22 g
- Carbohydrates: 25–30 g
- Protein: 4–5 g
- Sugar: 15–18 g