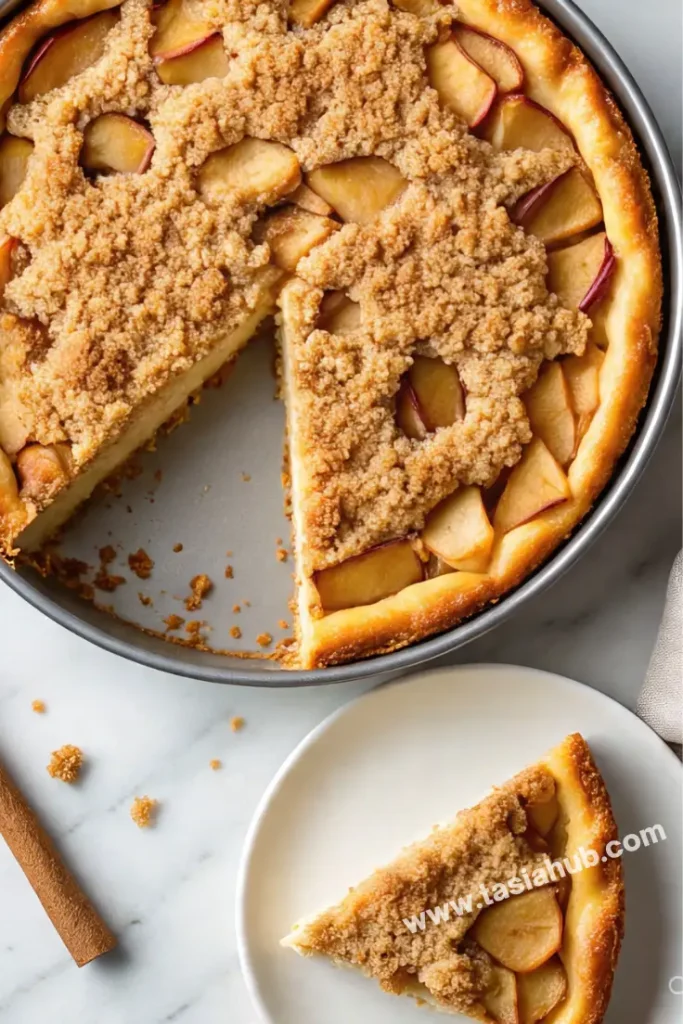
Apple Crisp Cheesecake

If you’ve ever found yourself torn between a rich, creamy cheesecake and a cozy, cinnamon-kissed apple crisp, then this dessert might just be your new favorite indulgence. Apple Crisp Cheesecake is what happens when the best of fall meets the elegance of a classic dessert — it’s sweet, creamy, spiced just right, and topped with a golden, buttery crumble. Basically, it’s all the comfort of a homemade apple dessert tucked into a dreamy cheesecake base.
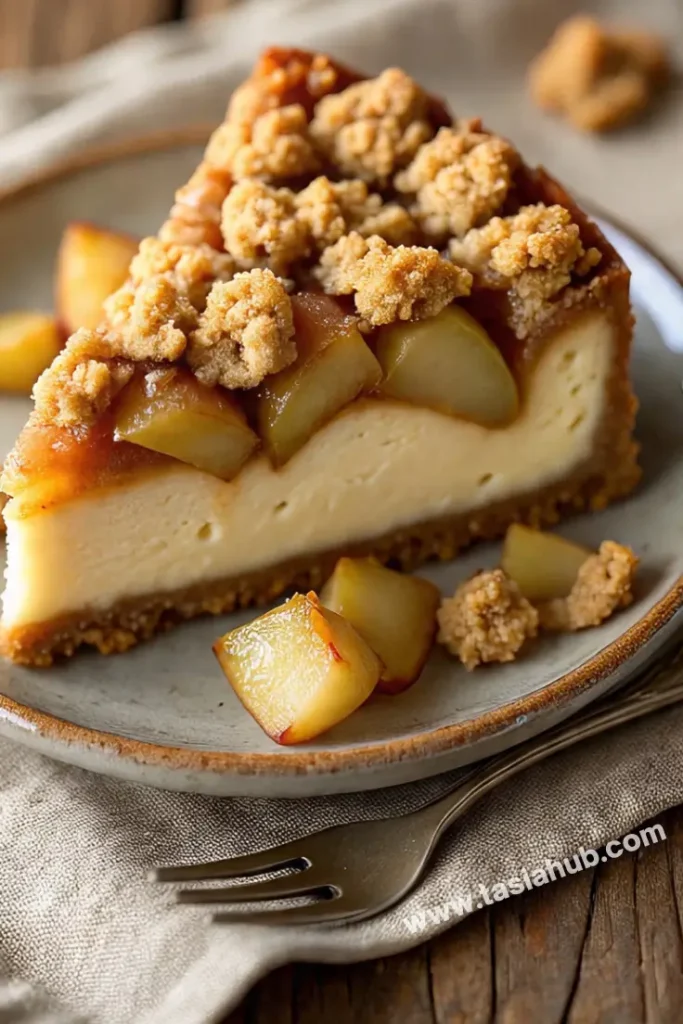
This recipe is perfect for when you want something impressive without going overboard. It looks like something you’d find in a bakery window, but it’s surprisingly easy to make at home. The base is a graham cracker crust, the cheesecake filling is smooth with a hint of cinnamon and vanilla, and then comes the star — tender spiced apples layered right on top and finished with a crunchy oat streusel that bakes up golden and irresistible.
What I love most about this Apple Crisp Cheesecake is how it blends textures and flavors so seamlessly. The creaminess of the cheesecake contrasts beautifully with the slightly tart apples and crispy topping. Every bite feels like a little celebration of fall, though honestly, I make it year-round because it’s just that good.
Whether you’re baking for a cozy family dinner, a holiday gathering, or simply because you want to treat yourself to something special, this dessert delivers. It’s the kind of recipe that gets requested again and again — and always disappears way too quickly.
Why You’ll Love It
- Two Desserts in One – You get the silky richness of cheesecake and the warm, spiced flavor of apple crisp in every bite. It’s the ultimate fusion dessert.
- Perfect Texture Combo – Creamy filling, tender baked apples, and a buttery oat crumble topping — it’s a flavor and texture experience that keeps you going back for more.
- Great for Any Occasion – Whether it’s Thanksgiving, a fall dinner party, or just a weekend baking project, this cheesecake fits the vibe without being too fussy.
- Make-Ahead Friendly – It actually tastes even better the next day after chilling, so it’s perfect if you like to prep desserts in advance.
- Crowd-Pleaser – Everyone loves a good apple dessert and a good cheesecake — this one blends both and always gets rave reviews.
Ingredient List
For the Crust:
- 1 ½ cups graham cracker crumbs
- 2 tablespoons granulated sugar
- ½ teaspoon cinnamon
- 6 tablespoons unsalted butter, melted
For the Cheesecake Filling:
- 24 oz (3 blocks) cream cheese, softened
- ¾ cup granulated sugar
- ½ cup sour cream
- 1 teaspoon vanilla extract
- ½ teaspoon ground cinnamon
- 3 large eggs
For the Apple Layer:
- 2 cups peeled and diced apples (about 2 medium apples)
- 2 tablespoons brown sugar
- 1 teaspoon ground cinnamon
- ½ teaspoon nutmeg
- 1 teaspoon lemon juice
For the Crisp Topping:
- ½ cup old-fashioned oats
- ⅓ cup all-purpose flour
- ⅓ cup brown sugar
- ½ teaspoon cinnamon
- ¼ cup unsalted butter, cold and cubed
Ingredient Notes
- Cream cheese – Use full-fat, brick-style cream cheese for the richest texture. I avoid the spreadable kind in tubs — it won’t set up the same.
- Apples – I like Honeycrisp or Granny Smith for a good balance of tartness and sweetness, but use what you have!
- Oats – Old-fashioned oats give the topping a nice chewy texture. Quick oats will work but the topping won’t be quite as hearty.
- Sour cream – This adds creaminess and a subtle tang to balance the sweetness. Don’t skip it!
- Butter – For the topping, make sure your butter is cold and cubed so you get those classic streusel crumbles.
Kitchen Equipment Needed
- 9-inch Springform Pan – Essential for easy cheesecake removal. I use a non-stick one with a tight seal to prevent leaks.
- Mixing Bowls – You’ll need a few for the crust, filling, apple layer, and topping.
- Electric Mixer or Stand Mixer – Makes beating the cream cheese smooth and lump-free. A hand mixer works perfectly if that’s what you have.
- Rubber Spatula – Great for scraping down the sides of the bowl and smoothing out the filling.
- Peeler + Paring Knife – To easily peel and dice the apples.
- Small Saucepan (optional) – If you want to pre-soften the apples slightly before layering.
- Cooling Rack – Helps the cheesecake cool evenly after baking.
- Aluminum Foil – I wrap the bottom of the pan to catch any potential leaks in the oven (especially helpful if baking in a water bath).
Instructions
1. Preheat and Prep Your Pan
- Preheat your oven to 325°F (163°C).
- Lightly grease a 9-inch springform pan and line the bottom with parchment paper for easy removal.
- Optional: Wrap the bottom and sides of the pan in a double layer of foil if you plan to bake in a water bath — this helps prevent cracks.
Pro Tip: A water bath creates a steamy environment and prevents your cheesecake from drying out or cracking.
2. Make the Crust
- In a medium bowl, combine graham cracker crumbs, sugar, and cinnamon.
- Pour in the melted butter and stir until the mixture resembles wet sand.
- Press the crust mixture firmly into the bottom of your springform pan using the bottom of a glass or measuring cup.
- Bake for 10 minutes, then let it cool while you prep the filling.
Pro Tip: Press the crust evenly and firmly so it doesn’t crumble when slicing.
3. Prepare the Cheesecake Filling
- In a large mixing bowl, beat the softened cream cheese on medium speed until smooth and fluffy (1–2 minutes).
- Add the sugar, sour cream, vanilla, and cinnamon. Mix until fully combined and creamy.
- Crack in the eggs one at a time, mixing on low speed after each just until blended. Don’t overmix.
- Scrape down the sides of the bowl to make sure everything is evenly incorporated.
Pro Tip: Mix gently once the eggs are added to avoid incorporating too much air — this helps prevent cracks.
4. Make the Apple Layer
- Peel, core, and dice your apples into small cubes.
- In a bowl, toss the apples with brown sugar, cinnamon, nutmeg, and lemon juice until well coated.
- Set aside to let the flavors blend while you make the topping.
5. Prepare the Crisp Topping
- In another bowl, mix together oats, flour, brown sugar, and cinnamon.
- Add the cold cubed butter and use a pastry cutter or your fingers to work it in until the mixture is crumbly and clumps form.
Pro Tip: Don’t overwork the butter — you want small pea-sized bits for that perfect crisp texture.
6. Assemble the Cheesecake
- Pour the cheesecake filling over the pre-baked crust and smooth out the top with a spatula.
- Spoon the apple mixture evenly over the cheesecake filling.
- Sprinkle the crisp topping all over the apples, pressing gently so it sticks.
7. Bake the Cheesecake
- Place the pan on a baking sheet and bake for 55–65 minutes, or until the center is just set and slightly jiggly.
- Turn off the oven, crack the door slightly, and let the cheesecake cool inside for 1 hour.
Pro Tip: Letting it cool gradually in the oven helps prevent sudden temperature changes that can cause cracking.
8. Chill and Serve
- Remove the cheesecake from the oven and let it cool completely at room temperature.
- Transfer it to the fridge and chill for at least 4 hours, preferably overnight, before slicing.
Pro Tip: For clean slices, use a sharp knife dipped in hot water and wipe between cuts.
Tips and Tricks for Success
- Room temp ingredients are key – Make sure your cream cheese, eggs, and sour cream are all at room temperature. This helps everything blend smoothly and prevents lumps in the filling.
- Don’t overmix after adding eggs – Too much mixing adds air to the batter, which can cause the cheesecake to puff up and crack while baking.
- Use a water bath if you’re nervous about cracks – It’s not required, but it’s helpful for even baking and a silky texture. Just be sure to wrap your pan tightly in foil to prevent leaks.
- Chill overnight for best flavor – The cheesecake firms up beautifully and the flavors develop even more with a good overnight rest in the fridge.
- Store leftovers properly – Cover the cheesecake tightly with plastic wrap or place in an airtight container in the fridge. It keeps well for up to 4–5 days.
Ingredient Substitutions and Variations
- No graham crackers? – Use crushed digestive biscuits, vanilla wafers, or gingersnaps for a flavorful crust twist.
- Want it gluten-free? – Swap in gluten-free graham crackers and oat flour or almond flour for the crisp topping.
- Apple swap – Pears work beautifully in place of apples for a softer, sweeter variation.
- Add some nuts – Toss in a handful of chopped pecans or walnuts to the crumble topping for extra crunch.
- Caramel drizzle, anyone? – A light drizzle of salted caramel sauce on top before serving takes it to dessert heaven.
Serving Suggestions
- Top with whipped cream – A generous dollop of fresh whipped cream adds lightness and looks gorgeous on each slice.
- Drizzle with caramel sauce – Warm salted caramel over the top makes it feel like something straight from a bakery.
- Add a scoop of vanilla ice cream – Especially if you serve it slightly warm (just the topping part), it melts right into the apples and crumble—so good.
- Sprinkle with toasted nuts – A little chopped pecan or walnut topping adds crunch and a nutty finish.
- My favorite way? – I love serving a slice chilled with hot coffee on the side. That warm-cold combo is comforting and perfect for slow evenings.
Storage and Reheating Instructions
- Fridge – Store leftover cheesecake tightly wrapped or in an airtight container in the fridge for up to 4–5 days.
- Freezer – You can freeze the whole cheesecake or individual slices for up to 2 months. Wrap tightly in plastic wrap, then foil, and place in a freezer-safe bag or container.
- To thaw – Let it defrost in the fridge overnight. If frozen by the slice, you can thaw one piece at a time!
- To reheat – Not necessary for the whole thing, but if you want that cozy crisp topping warmed up, pop a slice in the microwave for 10–15 seconds. The apples get soft and aromatic again without melting the whole cheesecake.
Frequently Asked Questions
Can I make this ahead of time?
Yes! This cheesecake is even better after it’s chilled overnight. You can make it up to 2 days in advance and just keep it refrigerated until you’re ready to serve.
What kind of apples work best?
I like using Honeycrisp or Granny Smith—they hold up well when baked and add a nice balance of sweet and tart. Fuji and Braeburn are great options too.
Do I have to use a water bath?
Not at all. It helps prevent cracks, but it’s optional. If you skip it, just bake the cheesecake on a baking sheet and don’t open the oven while it’s baking.
Can I use store-bought crust?
Yes! A pre-made graham cracker crust will work in a pinch, but be aware it might not be tall enough to hold all the filling. Consider halving the filling if using a shallow crust.
How do I keep the topping crunchy?
To keep that crisp topping crunchy, avoid covering the cheesecake with plastic wrap until it’s fully chilled. If it does soften, you can pop slices in the oven for a few minutes to refresh the texture.
Can I make it gluten-free?
Absolutely! Use gluten-free graham crackers for the crust and swap the all-purpose flour in the crumble topping with a 1:1 gluten-free flour or almond flour.
Did you try this recipe? Let me know in the comments how it turned out!
Don’t forget to share your photos on Instagram and tag me @tasiahub_ or use the hashtag #tasiahub. I’d love to see your creations!
Apple Crisp Cheesecake
Equipment
- 9-inch springform pan
- Mixing Bowls
- Electric mixer or stand mixer
- Rubber spatula
- Peeler + Paring Knife
- Small Saucepan (Optional)
- Cooling Rack
- Aluminum Foil
Ingredients
For the Crust:
- 1 ½ cups graham cracker crumbs
- 2 tablespoons granulated sugar
- ½ teaspoon cinnamon
- 6 tablespoons unsalted butter melted
For the Cheesecake Filling:
- 24 oz 3 blocks cream cheese, softened
- ¾ cup granulated sugar
- ½ cup sour cream
- 1 teaspoon vanilla extract
- ½ teaspoon ground cinnamon
- 3 large eggs
For the Apple Layer:
- 2 cups peeled and diced apples about 2 medium apples
- 2 tablespoons brown sugar
- 1 teaspoon ground cinnamon
- ½ teaspoon nutmeg
- 1 teaspoon lemon juice
For the Crisp Topping:
- ½ cup old-fashioned oats
- ⅓ cup all-purpose flour
- ⅓ cup brown sugar
- ½ teaspoon cinnamon
- ¼ cup unsalted butter cold and cubed
Instructions
Preheat and Prep Your Pan
- Preheat your oven to 325°F (163°C).
- Lightly grease a 9-inch springform pan and line the bottom with parchment paper for easy removal.
- Optional: Wrap the bottom and sides of the pan in a double layer of foil if you plan to bake in a water bath — this helps prevent cracks.
- Pro Tip: A water bath creates a steamy environment and prevents your cheesecake from drying out or cracking.
Make the Crust
- In a medium bowl, combine graham cracker crumbs, sugar, and cinnamon.
- Pour in the melted butter and stir until the mixture resembles wet sand.
- Press the crust mixture firmly into the bottom of your springform pan using the bottom of a glass or measuring cup.
- Bake for 10 minutes, then let it cool while you prep the filling.
- Pro Tip: Press the crust evenly and firmly so it doesn’t crumble when slicing.
Prepare the Cheesecake Filling
- In a large mixing bowl, beat the softened cream cheese on medium speed until smooth and fluffy (1–2 minutes).
- Add the sugar, sour cream, vanilla, and cinnamon. Mix until fully combined and creamy.
- Crack in the eggs one at a time, mixing on low speed after each just until blended. Don’t overmix.
- Scrape down the sides of the bowl to make sure everything is evenly incorporated.
- Pro Tip: Mix gently once the eggs are added to avoid incorporating too much air — this helps prevent cracks.
Make the Apple Layer
- Peel, core, and dice your apples into small cubes.
- In a bowl, toss the apples with brown sugar, cinnamon, nutmeg, and lemon juice until well coated.
- Set aside to let the flavors blend while you make the topping.
Prepare the Crisp Topping
- In another bowl, mix together oats, flour, brown sugar, and cinnamon.
- Add the cold cubed butter and use a pastry cutter or your fingers to work it in until the mixture is crumbly and clumps form.
- Pro Tip: Don’t overwork the butter — you want small pea-sized bits for that perfect crisp texture.
Assemble the Cheesecake
- Pour the cheesecake filling over the pre-baked crust and smooth out the top with a spatula.
- Spoon the apple mixture evenly over the cheesecake filling.
- Sprinkle the crisp topping all over the apples, pressing gently so it sticks.
Bake the Cheesecake
- Place the pan on a baking sheet and bake for 55–65 minutes, or until the center is just set and slightly jiggly.
- Turn off the oven, crack the door slightly, and let the cheesecake cool inside for 1 hour.
- Pro Tip: Letting it cool gradually in the oven helps prevent sudden temperature changes that can cause cracking.
Chill and Serve
- Remove the cheesecake from the oven and let it cool completely at room temperature.
- Transfer it to the fridge and chill for at least 4 hours, preferably overnight, before slicing.
Notes
Estimated Nutritional Value (Per Slice)
- Calories: ~420–480 kcal
- Carbohydrates: ~38g
- Sugar: ~26g
- Fat: ~30g
- Saturated Fat: ~17g
- Protein: ~6g
- Fiber: ~2g
- Cholesterol: ~110mg
- Sodium: ~220mg