Sweet Chili Chicken
There’s just something about sweet chili chicken that makes it a go-to comfort food, especially on busy weeknights or when you’re craving something that feels a little indulgent without requiring hours in the kitchen. It’s that perfect combination of sweet, savory, and just the right kick of spice that wakes up your taste buds. Whether you’re serving it over rice, wrapping it in lettuce, or tossing it with noodles, this dish always delivers a satisfying punch of flavor.
What I love most about sweet chili chicken is how easy it is to customize. Want it a little spicier? Add some extra red pepper flakes. Prefer it a bit sweeter? A drizzle of honey will do the trick. It’s also one of those dishes that feels restaurant-level good but is shockingly simple to whip up at home. No complicated ingredients or fancy techniques—just pantry staples and about 30 minutes of your time.
This recipe is perfect for anyone who loves a balance of flavors in their meals. The chicken gets beautifully caramelized, the sauce is sticky and glossy, and when it all comes together, it’s the kind of dish that might just earn a regular spot in your weekly rotation. I’ve served this to guests before, and every single time, someone asks for the recipe before they’ve even finished their plate.
So, if you’re looking for something quick, flavorful, and completely crave-worthy, sweet chili chicken is where it’s at. Let’s get into how to make it—you’re going to love how effortlessly delicious this one is!
Why You’ll Love It
- Quick and easy – This recipe comes together in about 30 minutes, making it perfect for weeknight dinners or last-minute cravings.
- Big flavor, minimal effort – The sauce is packed with bold sweet and spicy flavors, but it only takes a handful of ingredients to create that magic.
- Versatile serving options – Serve it over steamed rice, noodles, in wraps, or even as a party appetizer—there are endless ways to enjoy it.
- Great for meal prep – It reheats beautifully, so you can make a big batch and enjoy flavorful leftovers throughout the week.
- Family-friendly – Even picky eaters tend to love the balance of sweet and spicy in this dish (and you can always adjust the heat level).
Ingredient List
For the Chicken:
- 1 ½ lbs boneless, skinless chicken thighs or breasts, cut into bite-sized pieces
- 2 tablespoons cornstarch
- ½ teaspoon salt
- ½ teaspoon black pepper
- 2 tablespoons vegetable oil (for frying)
For the Sweet Chili Sauce:
- ½ cup Thai sweet chili sauce
- 2 tablespoons soy sauce
- 1 tablespoon rice vinegar
- 1 tablespoon honey
- 2 cloves garlic, minced
- 1 teaspoon grated fresh ginger (optional but recommended)
- ½ teaspoon red pepper flakes (optional, for extra heat)
For Garnish/Serving:
- Sliced green onions
- Toasted sesame seeds
- Steamed rice, noodles, or lettuce wraps
Ingredient Notes
- Chicken thighs are preferred for their juiciness and flavor, but breasts work fine if that’s what you have.
- Cornstarch helps create a light, crispy coating when frying—don’t skip it!
- I always use Mae Ploy sweet chili sauce—it’s not too spicy and has the perfect sticky texture.
- A touch of honey balances the sauce and gives it that glossy finish.
- Fresh ginger adds depth and warmth—highly recommended if you have it on hand.
Kitchen Equipment Needed
- Large skillet or wok – For searing the chicken and tossing everything together. I love using my nonstick wok for even cooking.
- Mixing bowls – For coating the chicken and mixing the sauce.
- Tongs or spatula – Helps flip and stir the chicken without breaking the pieces.
- Measuring cups and spoons – Essential for getting the sauce ingredients just right.
- Grater or microplane – Perfect for finely grating fresh ginger and garlic.
Instructions
Step 1: Prep the Chicken
- Pat the chicken pieces dry with paper towels—this helps them sear better.
- In a medium mixing bowl, toss the chicken with cornstarch, salt, and pepper until evenly coated.
- Set it aside while you heat the pan.
Pro Tip: Coating with cornstarch gives the chicken a light crispiness and helps the sauce stick better.
Step 2: Cook the Chicken
- Heat 2 tablespoons of vegetable oil in a large skillet or wok over medium-high heat.
- Once hot, add the chicken in a single layer (work in batches if needed to avoid overcrowding).
- Let it cook undisturbed for 2–3 minutes to get a nice golden sear, then flip and cook for another 3–4 minutes until cooked through.
- Remove chicken from the skillet and set aside on a plate.
Pro Tip: Don’t move the chicken too early—letting it sit helps develop that crispy, caramelized edge.
Step 3: Make the Sweet Chili Sauce
- In a small bowl, whisk together the sweet chili sauce, soy sauce, rice vinegar, honey, garlic, ginger, and red pepper flakes (if using).
- Pour the sauce into the same skillet (don’t wipe it out—you want those tasty browned bits).
- Bring it to a simmer over medium heat, stirring often. Let it bubble gently for 2–3 minutes to thicken slightly.
Pro Tip: Whisk the sauce before adding it to the pan so everything is evenly mixed and the honey doesn’t clump.
Step 4: Combine and Coat
- Return the cooked chicken to the skillet with the simmering sauce.
- Toss everything together until the chicken is fully coated and glossy.
- Let it cook for 1–2 more minutes so the sauce sticks well and clings to every piece.
Pro Tip: If the sauce looks too thick, you can loosen it with 1–2 tablespoons of water.
Step 5: Serve and Garnish
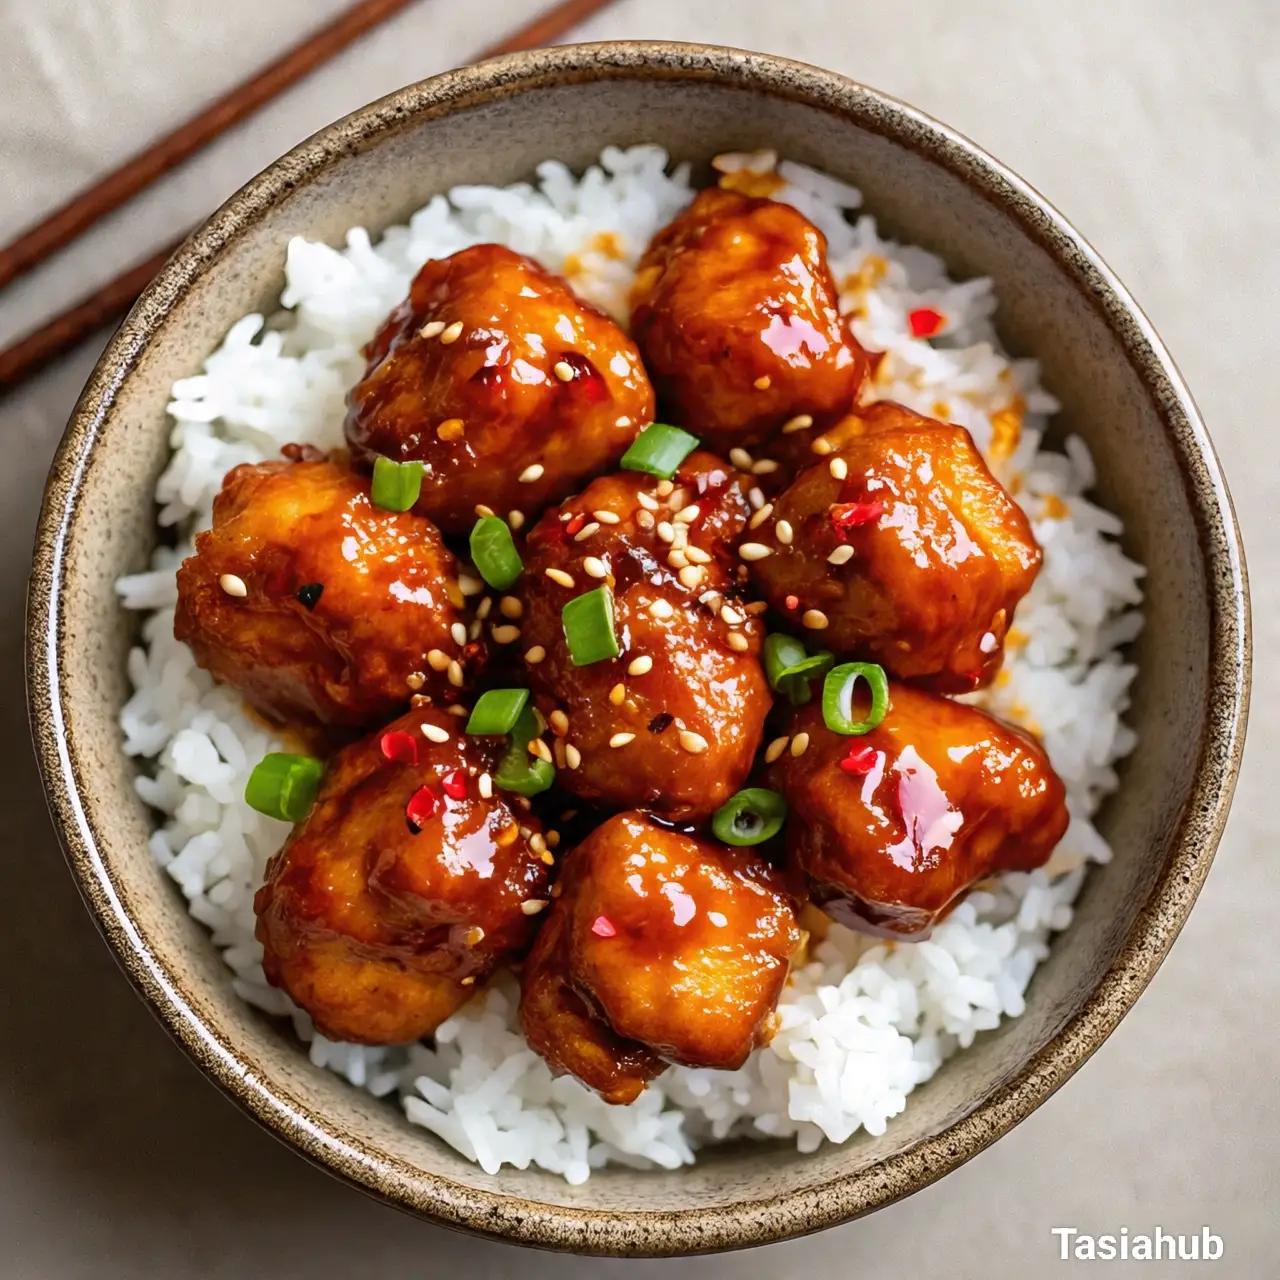
- Transfer the sweet chili chicken to a serving bowl or plate.
- Sprinkle with sliced green onions and toasted sesame seeds for a pop of flavor and crunch.
- Serve hot over steamed rice, noodles, or inside lettuce wraps for a lighter option.
Pro Tip: Want extra crunch? Add a handful of chopped peanuts or crushed cashews on top just before serving.

Tips and Tricks for Success
- Cut chicken evenly – Try to keep all the chicken pieces the same size so they cook evenly and stay juicy.
- Don’t skip the sear – Letting the chicken brown properly adds extra flavor and texture.
- Simmer the sauce, don’t boil – A gentle simmer helps thicken the sauce without burning the sugars.
- Prep everything ahead – This dish moves fast once you start cooking, so have your ingredients measured and ready to go.
- Double the sauce – If you love saucy dishes or plan to serve it over noodles, make extra sauce for tossing!
Ingredient Substitutions and Variations
- Chicken thighs → Chicken breasts – Breasts work well too, just keep an eye to avoid overcooking.
- Sweet chili sauce → Homemade – Mix ketchup, honey, vinegar, garlic, and red pepper flakes for a quick DIY version.
- Soy sauce → Tamari or coconut aminos – Great swaps if you’re gluten-free or avoiding soy.
- Add veggies – Toss in bell peppers, snap peas, or broccoli during the final stir for extra crunch and color.
- Make it spicy – Add sriracha or a chopped Thai chili to kick up the heat level.
Serving Suggestions
- Over jasmine or basmati rice – A classic combo that soaks up all that sticky-sweet sauce beautifully.
- With stir-fried noodles – Toss the chicken and sauce with lo mein or rice noodles for a quick noodle bowl.
- In lettuce wraps – I love using butter lettuce or romaine leaves for a lighter, low-carb option.
- With steamed or roasted veggies – Think broccoli, bok choy, or snap peas for a fresh, crunchy side.
- On a grain bowl – I sometimes layer it over quinoa or brown rice with shredded carrots and cucumber—it’s super satisfying and fresh!

Storage and Reheating Instructions
- Refrigerate leftovers – Store in an airtight container for up to 4 days.
- Reheat on the stovetop – Warm in a skillet over medium heat with a splash of water to loosen the sauce.
- Microwave option – Heat in 30-second intervals, stirring in between, until hot.
- Freeze for later – Freeze cooled chicken in a freezer-safe bag or container for up to 2 months. Thaw overnight in the fridge before reheating.
- Avoid overcooking when reheating – This helps keep the chicken tender and the sauce from drying out.
Frequently Asked Questions
Can I make this ahead of time?
Yes! You can prep the sauce and cut the chicken a day ahead. Cook it fresh when you’re ready to serve—it tastes best that way!
What if I don’t have sweet chili sauce?
No worries! You can make a quick version with ketchup, honey, vinegar, garlic, and a pinch of chili flakes. It won’t be identical, but it still hits the sweet-spicy notes.
Is this recipe spicy?
It’s mild with just a hint of heat from the sweet chili sauce. Want more kick? Add red pepper flakes or a drizzle of sriracha to dial it up.
Can I bake the chicken instead of frying?
Absolutely. Toss the chicken in oil and cornstarch, then bake at 400°F (200°C) for 20–25 minutes, flipping halfway through. You’ll still get great texture!
What’s the best way to make it gluten-free?
Use gluten-free soy sauce (like tamari) and double-check your sweet chili sauce label—some have hidden gluten. Easy swaps, same delicious result!
Can I use tofu instead of chicken?
Yes! Firm tofu works great. Just press out the moisture, cut into cubes, and pan-fry until golden before adding the sauce.
Did you try this recipe? Let me know in the comments how it turned out!
Don’t forget to share your photos on Instagram and tag me @tasiahub_ or use the hashtag #tasiahub. I’d love to see your creations!

Sweet Chili Chicken
Equipment
- Large Skillet or Wok
- Mixing Bowls
- Tongs or Spatula
- Measuring cups and spoons
- Grater or Microplane
Ingredients
For the Chicken:
- 1 ½ lbs boneless skinless chicken thighs or breasts, cut into bite-sized pieces
- 2 tablespoons cornstarch
- ½ teaspoon salt
- ½ teaspoon black pepper
- 2 tablespoons vegetable oil for frying
For the Sweet Chili Sauce:
- ½ cup Thai sweet chili sauce
- 2 tablespoons soy sauce
- 1 tablespoon rice vinegar
- 1 tablespoon honey
- 2 cloves garlic minced
- 1 teaspoon grated fresh ginger optional but recommended
- ½ teaspoon red pepper flakes optional, for extra heat
For Garnish/Serving:
- Sliced green onions
- Toasted sesame seeds
- Steamed rice noodles, or lettuce wrap
Instructions
Step 1: Prep the Chicken
- Pat the chicken pieces dry with paper towels—this helps them sear better.
- In a medium mixing bowl, toss the chicken with cornstarch, salt, and pepper until evenly coated.
- Set it aside while you heat the pan.
- Pro Tip: Coating with cornstarch gives the chicken a light crispiness and helps the sauce stick better.
Step 2: Cook the Chicken
- Heat 2 tablespoons of vegetable oil in a large skillet or wok over medium-high heat.
- Once hot, add the chicken in a single layer (work in batches if needed to avoid overcrowding).
- Let it cook undisturbed for 2–3 minutes to get a nice golden sear, then flip and cook for another 3–4 minutes until cooked through.
- Remove chicken from the skillet and set aside on a plate.
- Pro Tip: Don’t move the chicken too early—letting it sit helps develop that crispy, caramelized edge.
Step 3: Make the Sweet Chili Sauce
- In a small bowl, whisk together the sweet chili sauce, soy sauce, rice vinegar, honey, garlic, ginger, and red pepper flakes (if using).
- Pour the sauce into the same skillet (don’t wipe it out—you want those tasty browned bits).
- Bring it to a simmer over medium heat, stirring often. Let it bubble gently for 2–3 minutes to thicken slightly.
- Pro Tip: Whisk the sauce before adding it to the pan so everything is evenly mixed and the honey doesn’t clump.
Step 4: Combine and Coat
- Return the cooked chicken to the skillet with the simmering sauce.
- Toss everything together until the chicken is fully coated and glossy.
- Let it cook for 1–2 more minutes so the sauce sticks well and clings to every piece.
- Pro Tip: If the sauce looks too thick, you can loosen it with 1–2 tablespoons of water.
Step 5: Serve and Garnish
- Transfer the sweet chili chicken to a serving bowl or plate.
- Sprinkle with sliced green onions and toasted sesame seeds for a pop of flavor and crunch.
- Serve hot over steamed rice, noodles, or inside lettuce wraps for a lighter option.
- Pro Tip: Want extra crunch? Add a handful of chopped peanuts or crushed cashews on top just before serving.
Notes
Nutritional Value (Per Serving)
- Calories: ~380–420 kcal
- Protein: 28–32g
- Fat: 15–18g
- Carbohydrates: 30–35g
- Sugar: 16–20g
- Sodium: 700–850mg