Grilled Corn on the Cob
There’s just something magical about grilled corn on the cob that screams summer, sunshine, and outdoor vibes. Whether it’s a backyard barbecue, a beachside picnic, or a casual weeknight dinner, grilled corn never fails to steal the show. The smoky char, the juicy kernels, the irresistible aroma—it’s comfort food in its simplest, happiest form.
I remember the first time I made grilled corn on my own. I’d always had it at family cookouts or seen it sizzling on street vendor grills, but doing it myself brought a whole new appreciation. It’s ridiculously easy, and the results? Absolutely mouthwatering.
What’s great is that you can customize it however you like—stick with butter and salt, or go bold with spicy seasonings, cheese, lime juice, or even garlic aioli. It’s a blank canvas just waiting to be made your own.
The beauty of grilled corn is that it works whether you have a fancy grill or just a simple stovetop grill pan. Plus, it only takes a few minutes to prep and cook, making it perfect for those busy evenings when you want something satisfying without spending hours in the kitchen. And if you’ve never tried corn grilled with the husk on or off—trust me, we’ll talk about that. Both methods have their charm!
So, if you’re looking for a fun, flavorful side dish that’s as easy to make as it is to devour, this grilled corn on the cob recipe is your new go-to. Whether you’re serving it with burgers, grilled chicken, or even just enjoying it on its own, this is one of those dishes that instantly makes any meal feel a little more festive. Let’s fire up the grill!
Why You’ll Love It
- Easy and Quick: With just a few ingredients and under 20 minutes of cook time, this recipe is perfect for weeknights or last-minute gatherings.
- Incredibly Flavorful: Grilling brings out the natural sweetness of the corn while adding a smoky, slightly charred taste that’s downright addictive.
- Totally Customizable: You can dress it up with butter, spices, herbs, cheese, or sauces—make it as simple or as loaded as you like.
- Perfect for Entertaining: It’s a crowd-pleaser that looks great on the table and pairs well with almost any main dish.
- Great for Outdoor Cooking: Whether you’re using a charcoal grill, gas grill, or even a grill pan indoors, this recipe gives off those summery, cookout vibes all year long.
Ingredient List
- 4 ears of fresh corn on the cob, husks removed
- 2 tablespoons melted butter (plus more for serving)
- ½ teaspoon salt
- ¼ teaspoon black pepper
- Optional toppings:
- Lime wedges
- Crumbled cotija or feta cheese
- Chopped cilantro
- Smoked paprika or chili powder
- Garlic aioli or mayonnaise
Ingredient Notes
- Fresh corn is key! Look for bright green husks and plump kernels—sweet corn works best for grilling.
- Melted butter gives that classic flavor, but you can also use olive oil or a garlic butter mix if you prefer.
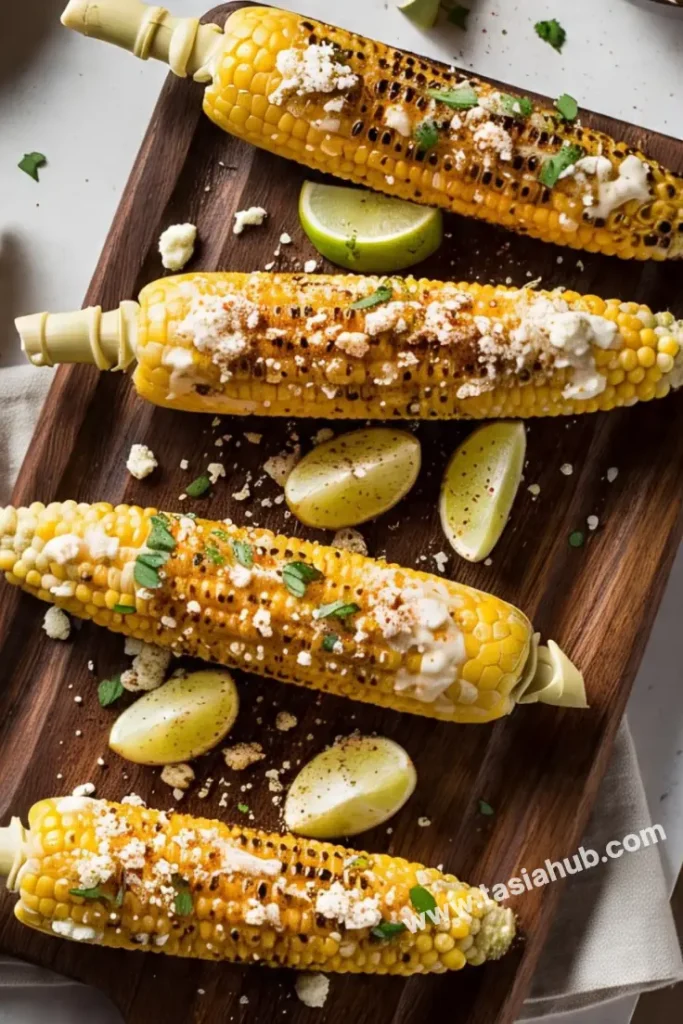
- Cotija cheese (or even feta) adds a delicious salty contrast—perfect if you’re going for a Mexican street corn vibe.
- Chili powder or smoked paprika gives the corn a warm, smoky kick. A light sprinkle goes a long way.
- Don’t skip the lime! A quick squeeze brightens the whole flavor and balances the richness of butter and cheese.
Kitchen Equipment Needed
- Grill or Grill Pan – For that signature char and smoky flavor. I love using a cast iron grill pan when I’m cooking indoors.
- Tongs – Essential for turning the corn evenly without burning your fingers.
- Basting Brush – Perfect for brushing on melted butter or any seasoning mix.
- Sharp Knife (optional) – If you want to slice the kernels off the cob after grilling for salads or bowls.
- Serving Platter – Makes it easy to load up all the grilled corn and toppings for everyone to dig in.
Instructions
Step 1: Prep the Corn
- Remove the husks and silks from each ear of corn. If you prefer a more rustic flavor, you can leave a few layers of husk on—but for this recipe, we’re going husk-free for maximum char.
- Rinse the corn under cold water to get rid of any remaining silk strands.
- Pat dry with a clean kitchen towel to help it grill better.
Pro Tip: If your corn is super fresh, you don’t need to soak it. But if it’s been sitting for a few days, soaking it in cold water for 10–15 minutes before grilling can help keep it juicy.
Step 2: Preheat the Grill
- Heat your grill (or grill pan) to medium-high heat. You want it hot enough to sear the corn but not burn it.
- Lightly oil the grill grates to prevent sticking. If you’re using a grill pan, brush or spray a little oil directly onto the pan.
Pro Tip: A quick way to oil grill grates is to dip a folded paper towel in oil and use tongs to rub it over the grates.
Step 3: Brush and Season
- Use a basting brush to coat each ear of corn with melted butter. Get into all the nooks and crannies between the kernels.
- Sprinkle evenly with salt and black pepper. You can also add chili powder or paprika now if you want a little spice during grilling.
Step 4: Grill the Corn
- Place the corn directly on the grill grates (or grill pan), turning every 2–3 minutes so each side gets a nice char.
- Grill for about 10–12 minutes total, or until the corn is golden with some deep char marks and the kernels are tender.
Pro Tip: Don’t walk away—corn grills fast! Keep turning it for even cooking and no burnt spots.
Step 5: Add Finishing Touches
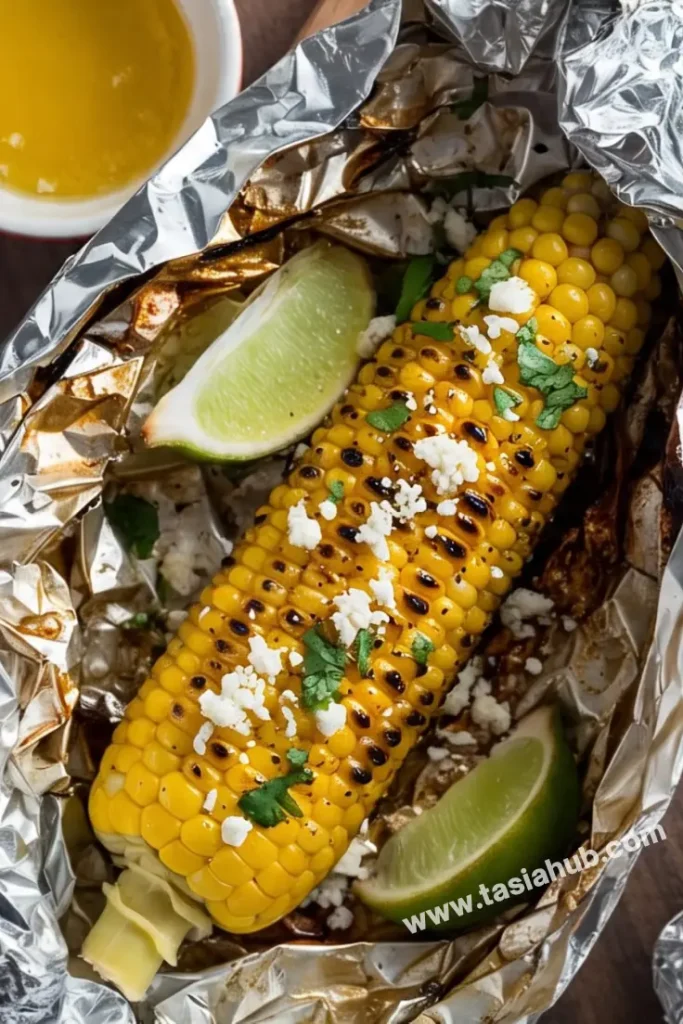
- Once off the grill, brush with more melted butter while it’s still hot.
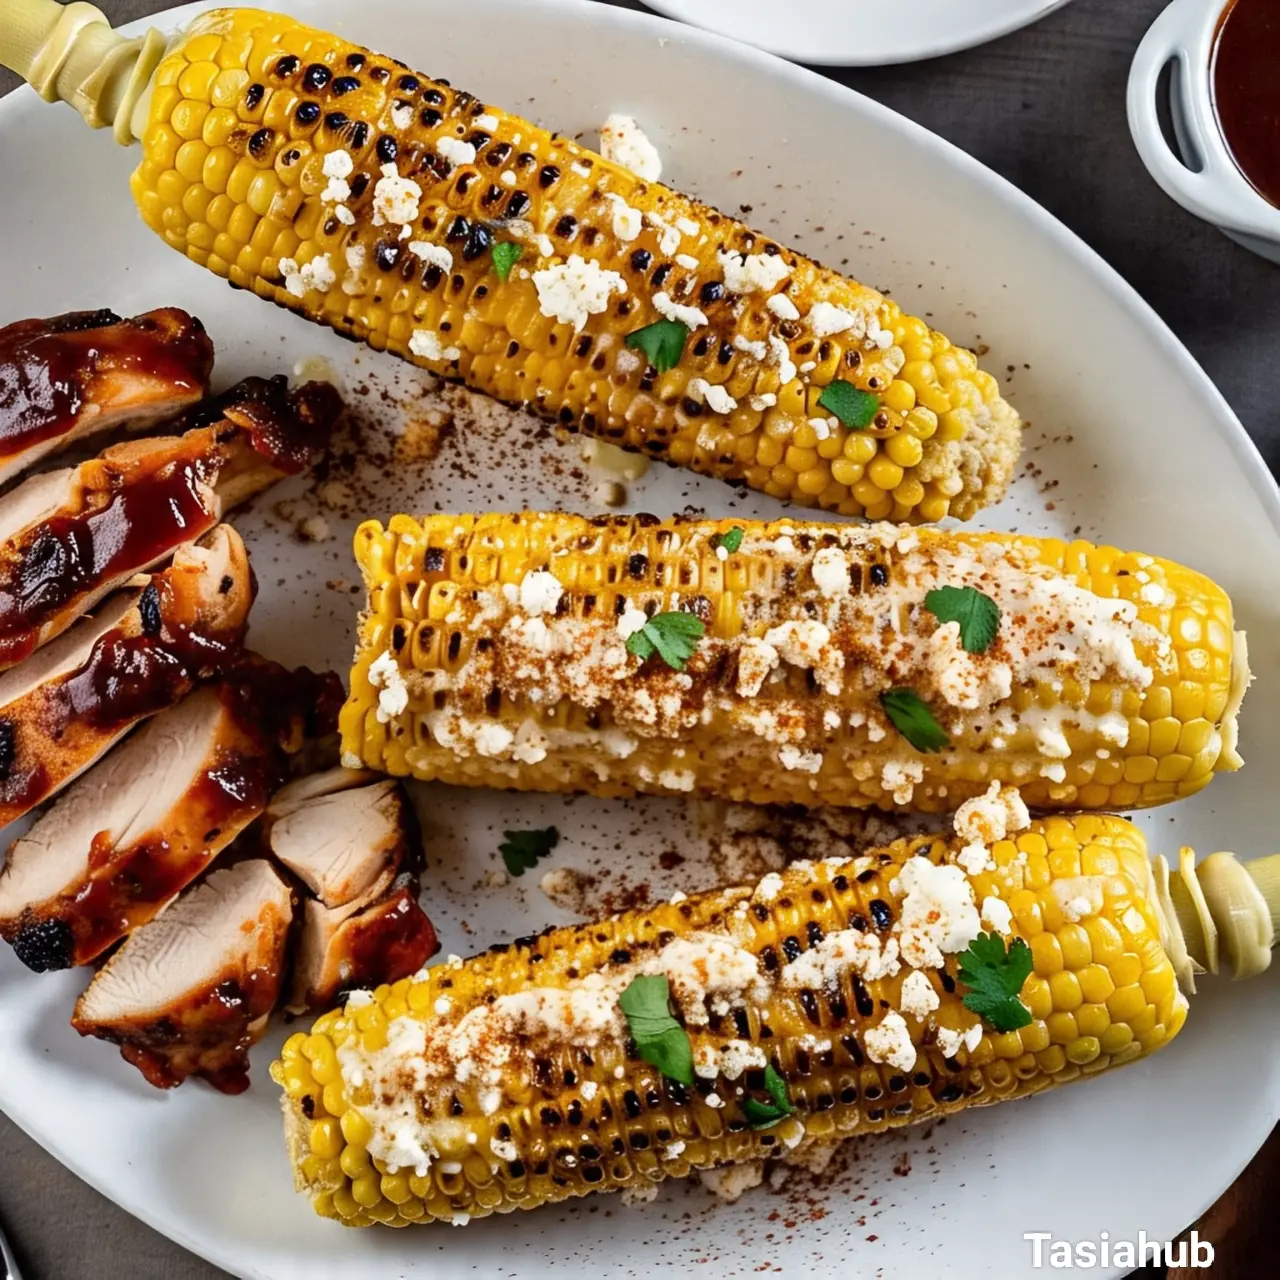
- Squeeze fresh lime juice over the top and sprinkle with your favorite toppings: cotija cheese, cilantro, extra spices—whatever you love.
- Serve immediately while it’s warm and juicy.
Pro Tip: Want to level it up? Mix mayonnaise, lime juice, a dash of chili powder, and garlic powder to brush on for an easy elote-style finish.
Tips and Tricks for Success
- Use fresh corn whenever possible – It has the best natural sweetness and tenderness.
- Rotate frequently – Turning the corn every 2–3 minutes helps it cook evenly and prevents burning.
- Don’t skip the butter – It not only adds flavor but also helps toppings stick better.
- Keep a close eye on the heat – Too hot and the kernels will burn before they cook through; aim for medium-high.
- Serve immediately – Grilled corn is best enjoyed hot off the grill when it’s juicy and full of flavor.
Ingredient Substitutions and Variations
- Olive oil instead of butter – Great for a lighter or dairy-free option.
- Parmesan cheese – A tasty alternative to cotija or feta if you want a nuttier flavor.
- Vegan mayo – Perfect for an elote-style version without dairy.
- Tajin or Cajun seasoning – Adds a zesty, spicy twist instead of traditional chili powder.
- Herb butter – Mix softened butter with garlic, parsley, or basil for an extra flavor boost.
Serving Suggestions
- With grilled meats: Serve alongside burgers, steak, or barbecue chicken for a classic backyard cookout vibe.
- In tacos: Slice the kernels off the cob and toss them into tacos for a sweet, smoky crunch.
- As a side for summer salads: I love pairing grilled corn with a fresh tomato cucumber salad or a tangy coleslaw—it adds the perfect warm touch.
- Topped with flavored butter: Try serving with garlic herb butter or chili lime butter for a flavor upgrade without much effort.
- With a Mexican-inspired meal: I often serve it with rice, black beans, and guacamole when we’re having a taco night—it completes the spread beautifully!
Storage and Reheating Instructions
- To store: Let the corn cool completely, then wrap each cob in foil or place them in an airtight container. Store in the fridge for up to 3 days.
- To reheat (microwave): Wrap in a damp paper towel and microwave for 30–60 seconds until heated through.
- To reheat (grill or pan): Rewarm on a grill or skillet over medium heat for 3–5 minutes, turning occasionally.
- To reheat (oven): Wrap in foil and bake at 350°F (175°C) for about 10 minutes.
- Use leftovers creatively: Slice the kernels off and add them to salads, quesadillas, or even scrambled eggs!
Frequently Asked Questions
Can I grill corn with the husks on?
Yes! Grilling with the husks on helps steam the corn and gives it a more subtle smoky flavor. Just soak the corn in water for about 15 minutes first so the husks don’t catch fire.
What if I don’t have an outdoor grill?
No worries! A stovetop grill pan works great. You can even use a regular skillet—just be aware you won’t get the same char, but the flavor will still be delicious.
How do I know when the corn is done?
The kernels will be tender, bright yellow, and slightly charred. You’ll also hear a light sizzling sound and see some browning—usually around the 10-12 minute mark.
Can I make grilled corn ahead of time?
You can grill it in advance and reheat it when needed, but it’s definitely best fresh. If making ahead, store it in foil and reheat on the grill or in the oven before serving.
What’s the best way to cut corn off the cob?
Stand the cob upright on a cutting board and slice downward with a sharp knife. A bundt pan works great too—just stick the cob in the center hole and let the kernels fall into the bowl!
Can I use frozen corn cobs?
Yes, but let them thaw completely and pat dry before grilling. They might not get as crisp or sweet as fresh, but they’ll still work in a pinch.
Did you try this recipe? Let me know in the comments how it turned out!
Don’t forget to share your photos on Instagram and tag me @tasiahub_ or use the hashtag #tasiahub. I’d love to see your creations!
Grilled Corn on the Cob
Equipment
- Grill or Grill Pan
- Tongs
- Basting Brush
- Sharp Knife (optional)
- Serving Platter
Ingredients
- 4 ears of fresh corn on the cob husks removed
- 2 tablespoons melted butter plus more for serving
- ½ teaspoon salt
- ¼ teaspoon black pepper
- Optional toppings:
- Lime wedges
- Crumbled cotija or feta cheese
- Chopped cilantro
- Smoked paprika or chili powder
- Garlic aioli or mayonnaise
Instructions
Step 1: Prep the Corn
- Remove the husks and silks from each ear of corn. If you prefer a more rustic flavor, you can leave a few layers of husk on—but for this recipe, we’re going husk-free for maximum char.
- Rinse the corn under cold water to get rid of any remaining silk strands.
- Pat dry with a clean kitchen towel to help it grill better.
- Pro Tip: If your corn is super fresh, you don’t need to soak it. But if it’s been sitting for a few days, soaking it in cold water for 10–15 minutes before grilling can help keep it juicy.
Step 2: Preheat the Grill
- Heat your grill (or grill pan) to medium-high heat. You want it hot enough to sear the corn but not burn it.
- Lightly oil the grill grates to prevent sticking. If you’re using a grill pan, brush or spray a little oil directly onto the pan.
- Pro Tip: A quick way to oil grill grates is to dip a folded paper towel in oil and use tongs to rub it over the grates.
Step 3: Brush and Season
- Use a basting brush to coat each ear of corn with melted butter. Get into all the nooks and crannies between the kernels.
- Sprinkle evenly with salt and black pepper. You can also add chili powder or paprika now if you want a little spice during grilling.
Step 4: Grill the Corn
- Place the corn directly on the grill grates (or grill pan), turning every 2–3 minutes so each side gets a nice char.
- Grill for about 10–12 minutes total, or until the corn is golden with some deep char marks and the kernels are tender.
- Pro Tip: Don’t walk away—corn grills fast! Keep turning it for even cooking and no burnt spots.
Step 5: Add Finishing Touches
- Once off the grill, brush with more melted butter while it’s still hot.
- Squeeze fresh lime juice over the top and sprinkle with your favorite toppings: cotija cheese, cilantro, extra spices—whatever you love.
- Serve immediately while it’s warm and juicy.
- Pro Tip: Want to level it up? Mix mayonnaise, lime juice, a dash of chili powder, and garlic powder to brush on for an easy elote-style finish.
Notes
Nutritional Value (Per Serving – plain with butter and salt)
- Calories: ~130
- Carbohydrates: ~18g
- Protein: ~2g
- Fat: ~6g
- Fiber: ~2g
- Sugar: ~6g
- Sodium: ~180mg