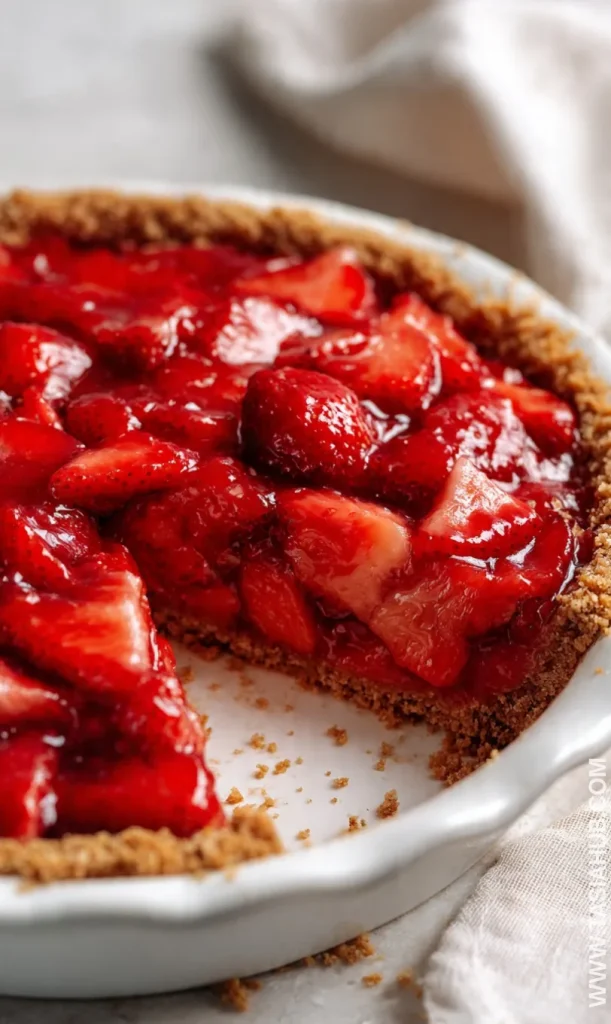
Easy Strawberry Pie

Fresh strawberries are one of those ingredients that make dessert feel instantly cheerful. When they’re in season—juicy, sweet, and bright—it becomes the perfect moment to turn them into something special. This easy strawberry pie is one of my favorite ways to showcase them. It’s simple, no bake, and bursting with flavor in every slice.
I love making this pie when I have more berries than I know what to do with. Whenever I’m thinking about what to make with fresh strawberries that doesn’t feel complicated, this recipe always comes to the rescue. The filling sets beautifully, the crust stays crisp, and the whole dessert looks like you spent much more time on it than you actually did.
This fresh strawberry pie leans into everything wonderful about ripe berries—no heavy cooking, no fussy steps, just a glossy strawberry pie filling dessert that tastes as vibrant as it looks. It’s also the perfect addition to warm-weather gatherings because it feels refreshing and light.
Whether you need ideas for no bake strawberry desserts or you simply want a homemade strawberry pie that comes together quickly, this version checks every box. It’s the kind of recipe you save because it works every single time, and you’ll want to make it all season long.
Why You’ll Love It
- It’s truly effortless. This easy strawberry pie doesn’t require baking, complicated steps, or special skills—just a handful of fresh berries and a few pantry staples.
- The flavor is bright and naturally sweet. Fresh strawberries shine here, giving the pie that juicy, sun-kissed taste you can’t get from anything store-bought.
- Perfect for warm weather. When it’s too hot to turn on the oven, no bake recipes feel like a gift—and this one is cool, refreshing, and always a crowd-pleaser.
- Gorgeous without trying. The glossy strawberry topping makes the pie look stunning with almost zero effort, making it ideal for potlucks, family dinners, or last-minute entertaining.
- A great use for fresh berries. If you’ve stocked up on strawberries or found a great deal, this homemade strawberry pie is the most delicious way to enjoy them.
Ingredient List
For the Crust
- 1 ½ cups graham cracker crumbs
- ¼ cup granulated sugar
- 6 tablespoons unsalted butter, melted
For the Filling
- 1 cup water
- 1 cup granulated sugar
- 3 tablespoons cornstarch
- 1 (3 oz) package strawberry gelatin
- 4 cups fresh strawberries, hulled and sliced
For Serving
- Whipped cream (optional)
Ingredient Notes
- Graham cracker crumbs: I usually grab the pre-crushed box because it’s quick and consistent, but crushing your own works too if you like a more rustic texture.
- Cornstarch: Don’t skip this—it’s what thickens the strawberry glaze and helps the filling set beautifully.
- Strawberry gelatin: This gives the pie its signature glossy color and boosts the fresh berry flavor. I always use the classic store-brand version and it never disappoints.
- Fresh strawberries: Super sweet, ripe berries make all the difference here. If they’re a little too soft for snacking, they’re perfect for this pie.
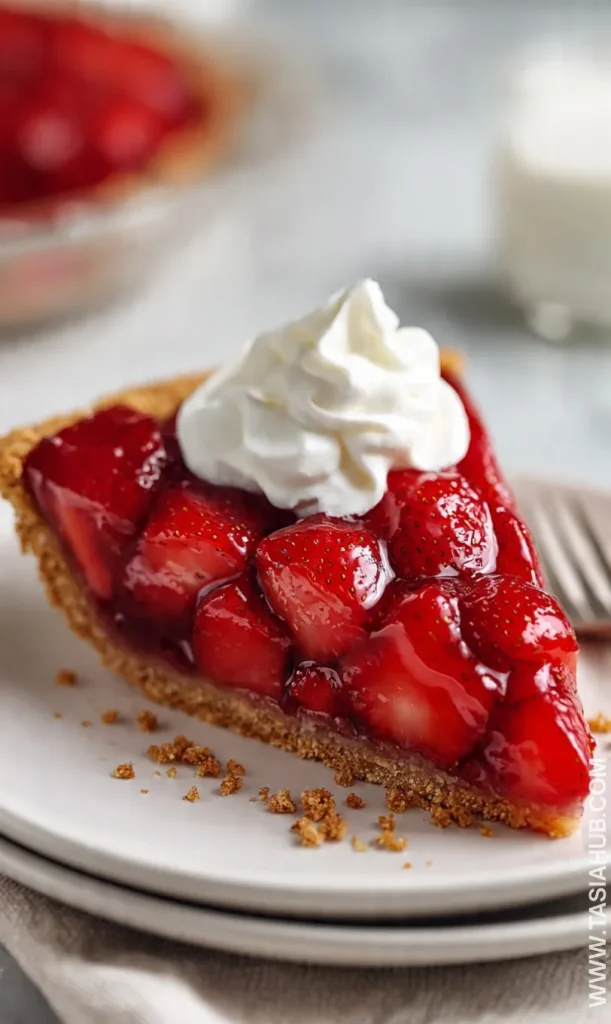
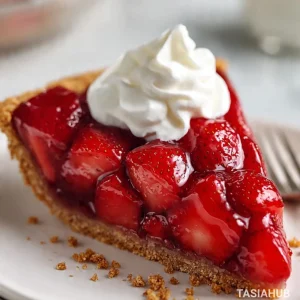
- Whipped cream: Completely optional, but a light swirl on top makes each slice feel extra special.
Kitchen Equipment Needed
- 9-inch pie dish: A standard pie dish works perfectly. I like using a glass one so I can see how well the crust is setting.
- Medium saucepan: For cooking the strawberry glaze. Nothing fancy—just a sturdy pan that heats evenly.
- Mixing bowl: To combine the crust ingredients. A medium-sized bowl is all you need.
- Whisk: Helps keep the glaze smooth and lump-free. My silicone whisk is my go-to since it doesn’t scratch the pan.
- Rubber spatula: Great for stirring, scraping the bowl, and mixing sliced strawberries into the glaze gently.
- Measuring cups and spoons: Accurate measurements make the filling set just right.
- Refrigerator (obviously): This pie needs a good chill to firm up—overnight is even better if you can wait!
Instructions
1. Prepare the Crust
- Preheat nothing—this is a no-bake pie, so skip the oven.
- In a mixing bowl, combine 1½ cups graham cracker crumbs and ¼ cup granulated sugar.
- Pour in 6 tablespoons melted unsalted butter and stir until the crumbs are evenly moistened and hold together when pressed.
- Press the mixture firmly and evenly into the bottom and up the sides of a 9-inch pie dish.
- Use the bottom of a measuring cup to compact the crumbs for an even, firm crust.
- Chill the crust in the refrigerator while you make the filling (at least 15–20 minutes).
Pro tip: Press the crust tightly and evenly—this prevents a crumbly edge when you slice the pie.
2. Make the Strawberry Glaze
- In a medium saucepan, whisk together 3 tablespoons cornstarch and 1 cup granulated sugar until well combined.
- Slowly add 1 cup water while whisking to create a smooth slurry with no lumps.
- Pro tip: Whisk continuously during this step to prevent lumps from forming.
- Place the pan over medium heat and cook, whisking constantly, until the mixture thickens and becomes translucent (about 3–5 minutes).
- Remove from heat and immediately whisk in the (3 oz) package of strawberry gelatin until fully dissolved.
- Let the glaze cool for 5–8 minutes so it’s warm but not piping hot.
Pro tip: If the glaze is too hot when you add the sliced strawberries they can break down; let it cool slightly so it coats the berries without cooking them.
3. Combine Strawberries and Filling
- Hull and slice 4 cups fresh strawberries. Place about 1 cup of the nicest-looking slices aside for the top decoration.
- Pour the warm (not hot) glaze over the remaining sliced strawberries in a large bowl. Gently fold to coat each piece.
- Use a rubber spatula and fold slowly so the berries keep their shape.
- Taste one to check sweetness—if your strawberries are super tart, you can stir in an extra tablespoon of sugar while the glaze is warm.
4. Assemble the Pie
- Remove the chilled crust from the refrigerator.
- Spoon the glazed strawberry mixture into the crust, spreading it evenly.
- Arrange the reserved strawberry slices on top in a fan or circular pattern for a pretty finish.
- If you like an extra glossy finish, spoon any remaining glaze over the top slices.
Pro tip: Gently tap the pie dish on the counter once to settle the filling and remove any air pockets before chilling.
5. Chill and Serve
- Cover the pie loosely with plastic wrap and refrigerate for at least 3 hours, or until fully set. Overnight chilling yields the cleanest slices.
- When ready to serve, slice with a sharp knife dipped in hot water and wiped dry between cuts for smooth edges.
- Serve plain or with a dollop of whipped cream.
Pro tip: For the cleanest slices, chill overnight and warm the knife blade under hot water (then dry) before cutting each slice.
Tips and Tricks for Success
- Use the sweetest strawberries you can find. Since the recipe is simple, the flavor depends heavily on the berries—ripe, deep-red ones make the pie shine.
- Chill the crust well. A cold crust holds its shape better once the filling is added and helps keep every slice neat.
- Let the glaze cool slightly before mixing. Warm is fine, but piping hot glaze can soften or cook the strawberries, making the filling watery.
- Fold gently, don’t stir aggressively. This keeps the berries intact and gives the pie that gorgeous, chunky strawberry look.
- Chill long enough for clean slices. The longer it chills, the firmer (and prettier) the slices will be—overnight is ideal.
Ingredient Substitutions and Variations
- Use a baked pie crust instead of graham cracker. A classic flaky crust gives the pie a more traditional feel if that’s what you prefer.
- Swap graham crackers for vanilla wafers or digestive biscuits. Both add a sweeter, more cookie-like flavor to the base.
- Try mixed berries. Replace part of the strawberries with raspberries or blueberries for a fun twist.
- Make it sugar-free. Use sugar-free strawberry gelatin and your preferred sweetener in place of sugar.
- Add cream cheese for a creamy layer. Spread a thin layer of sweetened cream cheese on the bottom of the crust before adding the filling for a strawberries-and-cream vibe.
- Top with fresh mint. A few leaves brighten the flavor and make the pie look extra polished.
Serving Suggestions
- Add a dollop of whipped cream. The light, fluffy cream pairs beautifully with the glossy strawberry filling and adds a touch of elegance.
- Serve with vanilla ice cream. The cold, creamy scoop melts slightly over each slice—perfect for warm days.
- Top with fresh mint or lemon zest. A little brightness on top makes each serving feel fresh and restaurant-worthy.
- Pair with iced tea or lemonade. I love enjoying a slice with a tall glass of cold lemonade—it makes the whole dessert feel even more refreshing.
- Turn leftovers into parfaits. If the pie gets a little soft after a day or two, layer chunks with whipped cream for an easy, delicious treat.
Storage and Reheating Instructions
- Refrigerate leftovers: Keep the pie covered and store in the fridge for up to 3–4 days.
- Avoid freezing: Fresh strawberry pie doesn’t freeze well—the berries lose their texture and the filling becomes watery.
- Chill before serving again: If the pie has been out for a while, pop it back in the fridge for 20–30 minutes before slicing to firm it up.
- No reheating needed: This is a no-bake dessert, so it’s meant to be enjoyed cold straight from the fridge.
Frequently Asked Questions
Can I use frozen strawberries instead of fresh?
Frozen strawberries tend to release too much liquid as they thaw, which can make the filling watery. Fresh strawberries give the best texture and flavor for this pie.
How do I keep the pie from getting soggy?
Make sure the glaze thickens fully and that the crust is well-chilled before adding the filling. A firm crust and properly cooked glaze help the pie hold up beautifully.
Can I make this pie the day before?
Absolutely! In fact, letting it chill overnight helps the filling set even better and makes slicing easier.
What can I use instead of strawberry gelatin?
If you prefer not to use gelatin, you can thicken the glaze with more cornstarch and a splash of lemon juice, though the texture will be softer and less glossy.
How do I get clean slices?
Use a sharp knife dipped in hot water, then wiped dry before each cut. This keeps the glaze and berries from dragging.
Can I use a different type of crust?
Yes! A baked pie crust, vanilla wafer crust, or even an Oreo crust works well depending on the flavor you want.
Did you try this easy strawberry pie? Let me know in the comments how it turned out—I’d love to hear!
Easy Strawberry Pie
Equipment
- 9-inch pie dish
- Medium saucepan
- Mixing Bowl
- Whisk
- Rubber spatula
- Measuring cups and spoons
- Refrigerator (obviously)
Ingredients
For the Crust
- 1 ½ cups graham cracker crumbs
- ¼ cup granulated sugar
- 6 tablespoons unsalted butter melted
For the Filling
- 1 cup water
- 1 cup granulated sugar
- 3 tablespoons cornstarch
- 1 3 oz package strawberry gelatin
- 4 cups fresh strawberries hulled and sliced
For Serving
- Whipped cream optional
Instructions
Prepare the Crust
- Preheat nothing—this is a no-bake pie, so skip the oven.
- In a mixing bowl, combine 1½ cups graham cracker crumbs and ¼ cup granulated sugar.
- Pour in 6 tablespoons melted unsalted butter and stir until the crumbs are evenly moistened and hold together when pressed.
- Press the mixture firmly and evenly into the bottom and up the sides of a 9-inch pie dish.
- Use the bottom of a measuring cup to compact the crumbs for an even, firm crust.
- Chill the crust in the refrigerator while you make the filling (at least 15–20 minutes).
- Pro tip: Press the crust tightly and evenly—this prevents a crumbly edge when you slice the pie.
Make the Strawberry Glaze
- In a medium saucepan, whisk together 3 tablespoons cornstarch and 1 cup granulated sugar until well combined.
- Slowly add 1 cup water while whisking to create a smooth slurry with no lumps.
- Pro tip: Whisk continuously during this step to prevent lumps from forming.
- Place the pan over medium heat and cook, whisking constantly, until the mixture thickens and becomes translucent (about 3–5 minutes).
- Remove from heat and immediately whisk in the (3 oz) package of strawberry gelatin until fully dissolved.
- Let the glaze cool for 5–8 minutes so it’s warm but not piping hot.
- Pro tip: If the glaze is too hot when you add the sliced strawberries they can break down; let it cool slightly so it coats the berries without cooking them.
Combine Strawberries and Filling
- Hull and slice 4 cups fresh strawberries. Place about 1 cup of the nicest-looking slices aside for the top decoration.
- Pour the warm (not hot) glaze over the remaining sliced strawberries in a large bowl. Gently fold to coat each piece.
- Use a rubber spatula and fold slowly so the berries keep their shape.
- Taste one to check sweetness—if your strawberries are super tart, you can stir in an extra tablespoon of sugar while the glaze is warm.
Assemble the Pie
- Remove the chilled crust from the refrigerator.
- Spoon the glazed strawberry mixture into the crust, spreading it evenly.
- Arrange the reserved strawberry slices on top in a fan or circular pattern for a pretty finish.
- If you like an extra glossy finish, spoon any remaining glaze over the top slices.
- Pro tip: Gently tap the pie dish on the counter once to settle the filling and remove any air pockets before chilling.
Chill and Serve
- Cover the pie loosely with plastic wrap and refrigerate for at least 3 hours, or until fully set. Overnight chilling yields the cleanest slices.
- When ready to serve, slice with a sharp knife dipped in hot water and wiped dry between cuts for smooth edges.
- Serve plain or with a dollop of whipped cream.
- Pro tip: For the cleanest slices, chill overnight and warm the knife blade under hot water (then dry) before cutting each slice.
Notes
Nutritional Value (Per Serving – Approximate):
- Calories: 285
- Total Fat: 11g
- Saturated Fat: 6g
- Cholesterol: 20mg
- Sodium: 160mg
- Total Carbohydrates: 45g
- Dietary Fiber: 2g
- Sugars: 31g
- Protein: 2g