Christmas Rice Crispy Treats
There’s nothing quite like the smell of sweet marshmallows melting on the stove during the holidays. It instantly takes you back to childhood—sticky fingers, laughter in the kitchen, and plates piled high with festive snacks. These Christmas Rice Crispy Treats are everything you want in a holiday dessert: easy, colorful, and so irresistibly chewy that they disappear within minutes of being served.
When December rolls around, I always find myself searching for fun Christmas dessert ideas that don’t require hours in the kitchen. Between decorating, wrapping gifts, and baking all the other treats, I love having a few simple recipes that still feel special. These holiday rice Krispie treats fit the bill perfectly. They come together in under 20 minutes, use ingredients you probably already have in your pantry, and are a total crowd-pleaser at parties, bake sales, or cozy nights at home.
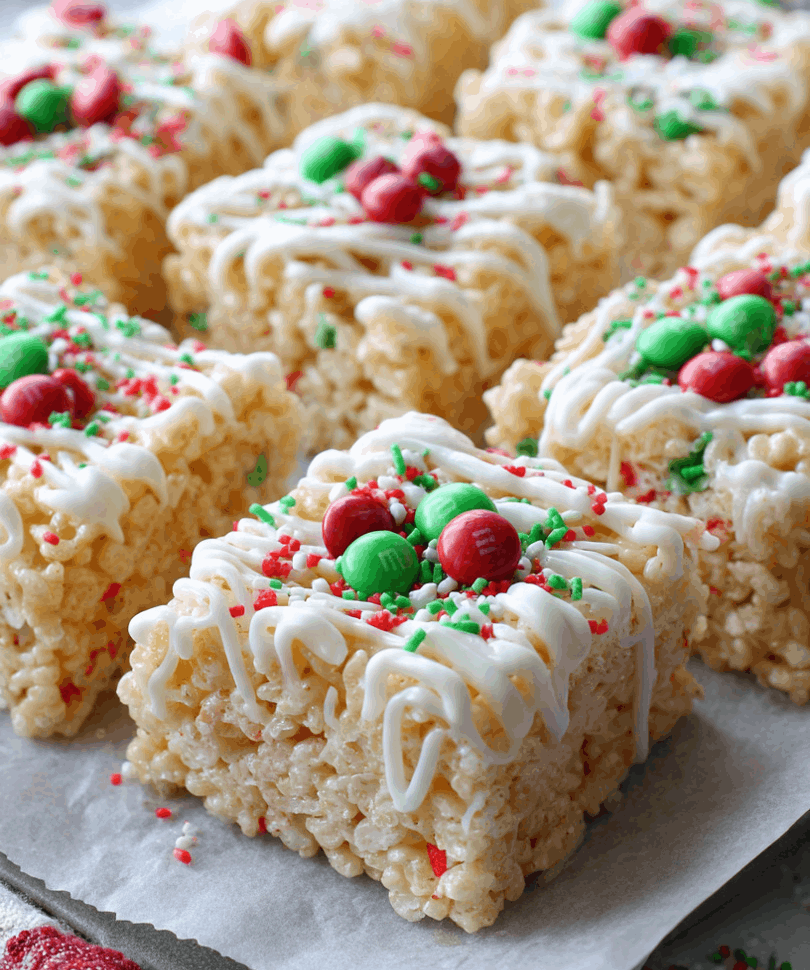
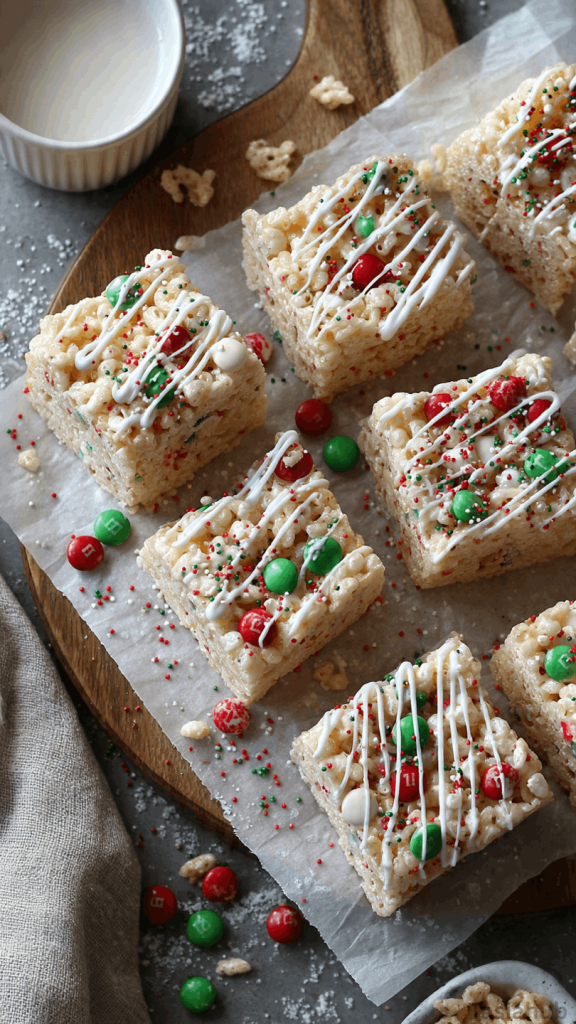
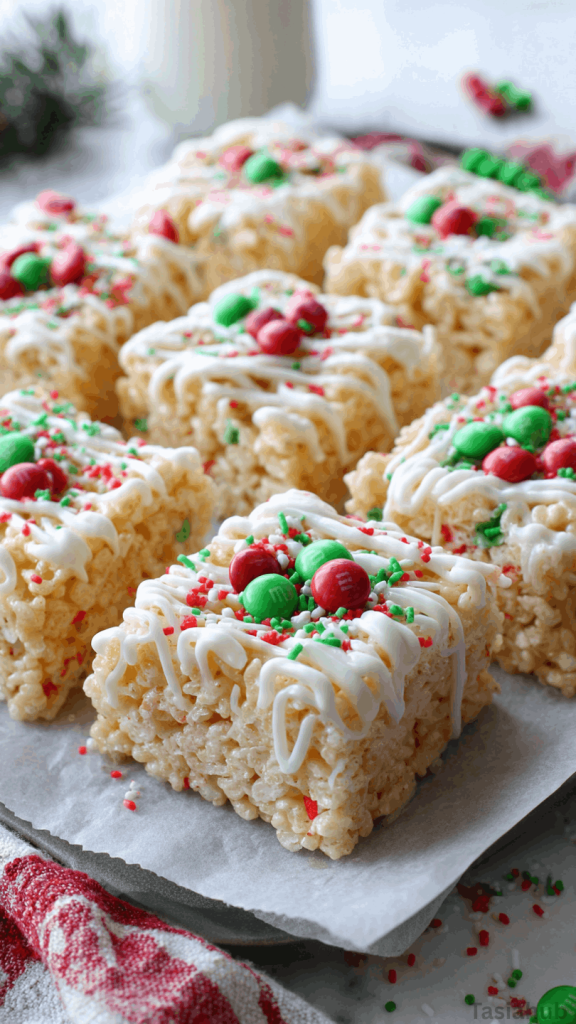
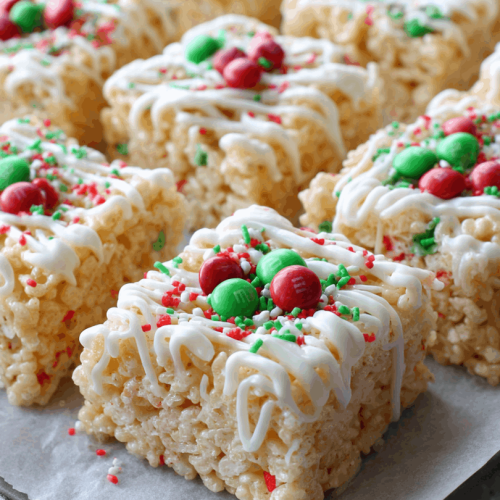
What makes these so festive is how easy it is to get creative with them. You can mix in red and green sprinkles, mini M&Ms, or even drizzle white chocolate over the top for that snowy holiday look. Kids absolutely adore helping with this recipe too—it’s one of my favorite Christmas snacks for kids because they can help stir, press, and decorate. Plus, it’s nearly impossible to mess up!
If you’re looking for Christmas treats for kids that are both fun and delicious, this is one of the best rice crispy treats recipes to keep on hand. They’re soft, gooey, and packed with holiday cheer—perfect for gifting, dessert tables, or as a sweet little reward after a day of decorating the tree. Once you make a batch, you’ll see why these Christmas rice krispies have a permanent spot on my holiday baking list.
Why You’ll Love It
- Festive and fun to make: These treats are like edible Christmas crafts—colorful, easy to shape, and perfect for decorating with sprinkles or candy. Kids and adults both love getting creative with them.
- Quick and no-bake: When holiday baking lists get long, this is the ultimate time-saver. You only need about 20 minutes and a single saucepan—no oven required!
- Perfect for parties and gifts: Wrap them up in cellophane with a ribbon, and you’ve got the cutest homemade Christmas goodie. They also make a great addition to cookie trays or dessert tables.
- Soft, chewy, and buttery: Each bite has that perfect gooey texture—crispy on the outside and melt-in-your-mouth soft inside. It’s a true comfort treat during the chilly holiday season.
- Crowd-pleaser for all ages: Whether it’s a classroom party, office gathering, or family movie night, everyone reaches for these first. They’re nostalgic, festive, and impossible to resist.
Ingredient List
For the Rice Crispy Base:
- 6 cups Rice Krispies cereal
- 1 (10 oz) bag mini marshmallows
- 3 tablespoons unsalted butter
- ½ teaspoon vanilla extract
- Pinch of salt
For Decorating:
- ½ cup white chocolate chips (for melting and drizzling)
- Red and green sprinkles
- Mini holiday M&Ms (optional)
Ingredient Notes
- Mini marshmallows: I always go for the mini ones because they melt faster and more evenly. Plus, you can sneak a few while cooking—no judgment!
- Butter: Use real unsalted butter for the best flavor and texture. Margarine just doesn’t give that rich, buttery taste we love in the best rice crispy treats recipe.
- Vanilla extract: Don’t skip the vanilla! It adds a warm, cozy note that pairs perfectly with the marshmallows.
- Rice Krispies cereal: Any crisped rice cereal works, but the original Rice Krispies give that classic flavor and crunch.
- White chocolate chips: I love melting Ghirardelli or Nestlé white chocolate chips—they drizzle beautifully and harden with a nice glossy finish.
- Sprinkles: Go wild here! Red, green, gold, or even snowflake-shaped sprinkles instantly turn your treats into festive Christmas rice krispies.
Kitchen Equipment Needed
- Large saucepan or pot: For melting the butter and marshmallows together—make sure it’s big enough to handle the cereal mix later.
- Wooden spoon or heatproof spatula: Perfect for stirring the gooey mixture without it sticking too much. I love using a silicone spatula—it makes cleanup so much easier.
- 9×13-inch baking dish: The ideal size for thick, chewy bars. If you want thinner treats, go for a larger pan.
- Parchment paper: A total lifesaver when it’s time to lift the treats out—no sticky mess!
- Measuring cups and spoons: To get that perfect butter-to-marshmallow ratio every time.
- Microwave-safe bowl (optional): For melting the white chocolate if you’re adding a festive drizzle.
Instructions
Step 1 — Prep everything first
- Line a 9×13-inch baking dish with parchment paper, leaving a small overhang on two sides for easy removal. Lightly grease the parchment with a little butter or nonstick spray.
- Measure out the Rice Krispies into a large bowl so they’re ready to go.
- Stack your marshmallows, butter, and vanilla near the stove. Once marshmallows are melting, things move fast.
Pro tip: Having everything prepped (mise en place) keeps the marshmallow from setting up before you add the cereal.
Step 2 — Melt the butter and marshmallows
- Place the large saucepan over low–medium heat and add the butter. Let it melt completely, swirling the pan occasionally.
- Add the mini marshmallows to the melted butter. Stir constantly with a wooden spoon or heatproof spatula until the marshmallows are mostly melted and smooth.
- Remove the pan from heat and stir in the vanilla extract and a pinch of salt.
Pro tip (key step): Keep the heat low and stir continuously — marshmallows scorch easily. If they start to brown, reduce the heat immediately.
Step 3 — Fold in the cereal
- Pour the measured Rice Krispies into the big bowl.
- Immediately pour the melted marshmallow mixture over the cereal.
- Using a lightly buttered spatula or spoon, fold the cereal and marshmallow together with gentle but thorough strokes until every piece is coated. Work quickly — you want the marshmallow to remain tacky and binding.
Pro tip (key step): Don’t over-stir. Vigorous stirring can crush the cereal and make the treats dense. Gentle folding keeps them light and crispy.
Step 4 — Press into the pan and shape
- Transfer the mixture into the prepared baking dish. Use a piece of parchment or a lightly buttered piece of wax paper on top of the mixture to press it down evenly — this prevents sticking and leaves a smooth surface.
- Press firmly but don’t pack the mixture too tightly; you want soft, chewy bars, not a compacted slab. Aim for even thickness.
Pro tip: If you prefer thicker, chewier bars, press less and use a smaller pan; for thinner, crispier squares, spread into a larger pan.
Step 5 — Cool, decorate, and cut
- Let the pan sit at room temperature for at least 30 minutes to set. You can speed this up by chilling in the fridge for 15–20 minutes, but don’t over-chill or they’ll become hard.
- If using white chocolate drizzle: melt white chocolate chips in a microwave-safe bowl in 20-second bursts, stirring between bursts until smooth. Drizzle over the top and immediately add sprinkles or mini M&Ms so they stick.
- Lift the cooled slab out using the parchment overhang and place on a cutting board. Use a sharp knife (warm it under hot water and dry between cuts for cleaner slices) to cut into squares or festive shapes.
Pro tip (key step): Warm the knife for clean edges — wiping the blade between cuts prevents ragged lines and sticky buildup.
Step 6 — Store and serve
- Store in an airtight container at room temperature for up to 3 days. If you’ve decorated with chocolate, keep the container in a cool spot to avoid melting.
- For gifting, stack squares between pieces of parchment and wrap in cellophane tied with a ribbon — instant holiday-ready treats.
Note: These are great as Christmas snacks for kids and a fun addition to any holiday spread. Enjoy the sticky, sweet chaos!
Tips and Tricks for Success
- Use fresh marshmallows: Old or stale ones don’t melt as smoothly and can make your treats dry or crumbly.
- Keep the heat low: High heat can cause the marshmallow-butter mixture to harden too quickly, making it difficult to mix with the cereal.
- Butter your spatula: Lightly coat your spoon or spatula with butter or nonstick spray so the sticky mixture doesn’t cling.
- Don’t press too hard: Gently pressing the mixture into the pan keeps your Christmas rice krispies soft and chewy rather than dense.
- Add decorations fast: Sprinkles and M&Ms stick best when the mixture is still slightly warm.
- Slice with a warm knife: Run your knife under hot water, wipe dry, then cut—this gives you neat, bakery-style edges.
Ingredient Substitutions and Variations
- Use colored marshmallows: For a more playful, festive look, use red and green mini marshmallows instead of plain white ones.
- Add candy canes: Crushed candy canes add a peppermint crunch that makes these treats even more Christmasy.
- Try chocolate drizzle: Swap white chocolate for milk or dark chocolate for a richer flavor.
- Add peanut butter: Stir in ¼ cup of creamy peanut butter with the melted marshmallows for a nutty twist.
- Use flavored extracts: Replace vanilla with almond or peppermint extract for a different holiday vibe.
- Shape them into fun forms: Use cookie cutters to make stars, trees, or wreaths—perfect for Christmas treats for kids and parties.
- Mix in colorful cereal: Replace some of the Rice Krispies with Fruity Pebbles or Cocoa Krispies for a flavor boost and extra holiday color.
Serving Suggestions
- Christmas movie night: I love cutting these into fun shapes and serving them with mugs of hot cocoa—it makes movie marathons even cozier.
- Holiday dessert platters: Mix these treats in with cookies, fudge, and brownies for a colorful, chewy addition that always stands out.
- Festive classroom or office snacks: Wrap them individually in clear bags with red ribbons for a quick, cheerful gift everyone loves.
- After-dinner sweet bite: Serve small squares alongside coffee or tea to end a holiday meal on a light, nostalgic note.
- Christmas party centerpiece: Stack the squares into a pyramid or “Christmas tree” shape, drizzle with melted chocolate, and sprinkle powdered sugar for a showstopping table treat.
Storage and Reheating Instructions
- Room temperature: Store in an airtight container for up to 3 days. They stay soft and chewy when kept away from moisture or heat.
- Layer with parchment: If stacking, place parchment or wax paper between layers to prevent sticking.
- Refrigeration (optional): If your kitchen is warm or you’ve added chocolate drizzle, store in the fridge for up to 5 days—just bring them to room temp before serving for the best texture.
- Freezing: You can freeze undecorated rice crispy treats for up to 6 weeks. Wrap tightly in plastic wrap, then seal in a freezer bag. Thaw on the counter before enjoying.
- To refresh slightly hardened treats: Pop them in the microwave for 5–10 seconds to bring back that soft, marshmallowy goodness.
Frequently Asked Questions
Can I make these Christmas rice crispy treats ahead of time?
Yes! You can make them 1–2 days in advance. Just store them in an airtight container at room temperature so they stay soft and fresh.
Why are my rice crispy treats hard?
This usually happens when the marshmallows are melted over high heat. Always use low heat and stir gently—it keeps them soft and chewy.
Can I use jumbo marshmallows instead of mini ones?
Absolutely! Just make sure to measure the same weight (about 10 ounces) and cut or tear them into smaller pieces so they melt more evenly.
How do I keep the treats from sticking to my hands?
Lightly butter your hands or use a piece of parchment paper to press the mixture into the pan. No more sticky fingers!
Can I add mix-ins like chocolate chips or pretzels?
Definitely! Just make sure to let the marshmallow mixture cool for a minute before adding chocolate chips so they don’t melt. Pretzel bits, candy pieces, or even mini marshmallows are great add-ins.
Are these safe for school parties?
Yes, they’re nut-free as written! Just double-check any decorations or mix-ins you add if you’re making them for a classroom or group event.
Did you try this recipe? Let me know in the comments how it turned out—or share your favorite festive twist! I’d love to see your creations.
Christmas Rice Crispy Treats
Equipment
- Large saucepan or pot
- Wooden spoon or heatproof spatula
- 9×13-inch baking dish
- Parchment paper
- Measuring cups and spoons
- Microwave-safe bowl (optional)
Ingredients
For the Rice Crispy Base:
- 6 cups Rice Krispies cereal
- 1 10 oz bag mini marshmallows
- 3 tablespoons unsalted butter
- ½ teaspoon vanilla extract
- Pinch of salt
For Decorating:
- ½ cup white chocolate chips for melting and drizzling
- Red and green sprinkles
- Mini holiday M&Ms optional
Instructions
Step 1 — Prep everything first
- Line a 9×13-inch baking dish with parchment paper, leaving a small overhang on two sides for easy removal. Lightly grease the parchment with a little butter or nonstick spray.
- Measure out the Rice Krispies into a large bowl so they’re ready to go.
- Stack your marshmallows, butter, and vanilla near the stove. Once marshmallows are melting, things move fast.
- Pro tip: Having everything prepped (mise en place) keeps the marshmallow from setting up before you add the cereal.
Step 2 — Melt the butter and marshmallows
- Place the large saucepan over low–medium heat and add the butter. Let it melt completely, swirling the pan occasionally.
- Add the mini marshmallows to the melted butter. Stir constantly with a wooden spoon or heatproof spatula until the marshmallows are mostly melted and smooth.
- Remove the pan from heat and stir in the vanilla extract and a pinch of salt.
- Pro tip (key step): Keep the heat low and stir continuously — marshmallows scorch easily. If they start to brown, reduce the heat immediately.
Step 3 — Fold in the cereal
- Pour the measured Rice Krispies into the big bowl.
- Immediately pour the melted marshmallow mixture over the cereal.
- Using a lightly buttered spatula or spoon, fold the cereal and marshmallow together with gentle but thorough strokes until every piece is coated. Work quickly — you want the marshmallow to remain tacky and binding.
- Pro tip (key step): Don’t over-stir. Vigorous stirring can crush the cereal and make the treats dense. Gentle folding keeps them light and crispy.
Step 4 — Press into the pan and shape
- Transfer the mixture into the prepared baking dish. Use a piece of parchment or a lightly buttered piece of wax paper on top of the mixture to press it down evenly — this prevents sticking and leaves a smooth surface.
- Press firmly but don’t pack the mixture too tightly; you want soft, chewy bars, not a compacted slab. Aim for even thickness.
- Pro tip: If you prefer thicker, chewier bars, press less and use a smaller pan; for thinner, crispier squares, spread into a larger pan.
Step 5 — Cool, decorate, and cut
- Let the pan sit at room temperature for at least 30 minutes to set. You can speed this up by chilling in the fridge for 15–20 minutes, but don’t over-chill or they’ll become hard.
- If using white chocolate drizzle: melt white chocolate chips in a microwave-safe bowl in 20-second bursts, stirring between bursts until smooth. Drizzle over the top and immediately add sprinkles or mini M&Ms so they stick.
- Lift the cooled slab out using the parchment overhang and place on a cutting board. Use a sharp knife (warm it under hot water and dry between cuts for cleaner slices) to cut into squares or festive shapes.
- Pro tip (key step): Warm the knife for clean edges — wiping the blade between cuts prevents ragged lines and sticky buildup.
Step 6 — Store and serve
- Store in an airtight container at room temperature for up to 3 days. If you’ve decorated with chocolate, keep the container in a cool spot to avoid melting.
- For gifting, stack squares between pieces of parchment and wrap in cellophane tied with a ribbon — instant holiday-ready treats.
Notes
Nutritional Value (per serving, approx.)
- Calories: 160
- Carbohydrates: 30g
- Protein: 1g
- Fat: 4g
- Saturated Fat: 2.5g
- Cholesterol: 10mg
- Sodium: 100mg
- Sugar: 18g
- Fiber: 0g