Apple Pie in a Cup

Apple pie feels even more comforting when it’s made in a cute, personal serving, and that’s exactly what this apple pie in a cup delivers. It’s warm, cozy, and so easy that you can whip up a batch any time the craving hits. Instead of baking a full pie, you get all the flavor and nostalgia packaged neatly into a single cup—perfect for quick treats, portion control, or satisfying that sweet tooth without committing to an entire dessert.
What makes these little cups extra fun is how customizable they are. You can adjust the sweetness, play with spice levels, or swap different toppings depending on who you’re serving. Kids especially love pie in a cup because they get their own special portion, and you get the joy of watching them dig into something that feels homemade and thoughtful. It’s also a great way to introduce little ones to simple kitchen tasks—they can sprinkle toppings, layer ingredients, or help stir the filling.
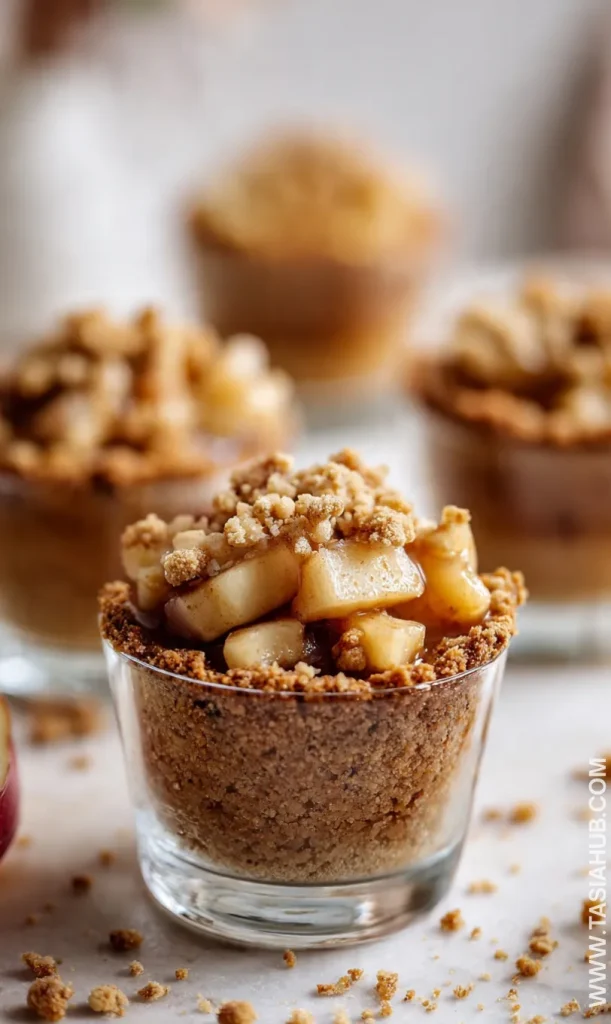
These small apple pies are also a lifesaver when you need individual desserts in a cup for parties, gatherings, or weeknight cravings. They come together quickly, and you don’t need fancy equipment—just cups, jars, or ramekins. The combination of warm cinnamon apples, a buttery crumble, and the soft crunch of crushed cookies or pie crust hits every note of classic fall flavor in a much easier format.
Whether you want apple treats for kids, a fun after-school snack, or an easy holiday dessert, these apple pie snack cups fit right in. They’re especially handy when you want apple pie in a cup for kids who may not finish a whole slice or when you want something simple yet delicious for adults, too. This pie in a cup recipe truly brings convenience, comfort, and flavor together in the sweetest way.
Why You’ll Love It
- Perfect single-serve treat: These little cups give you all the cozy apple pie flavor without committing to a full pie—ideal for quick cravings, parties, or after-school snacks.
- Kid-friendly and fun: Whether you’re making pie in a cup for kids or letting them assemble their own layers, it turns into a mini activity they’ll remember.
- No-fuss dessert: No rolling dough, no long bake times—just simple ingredients layered into individual desserts in a cup that come together fast.
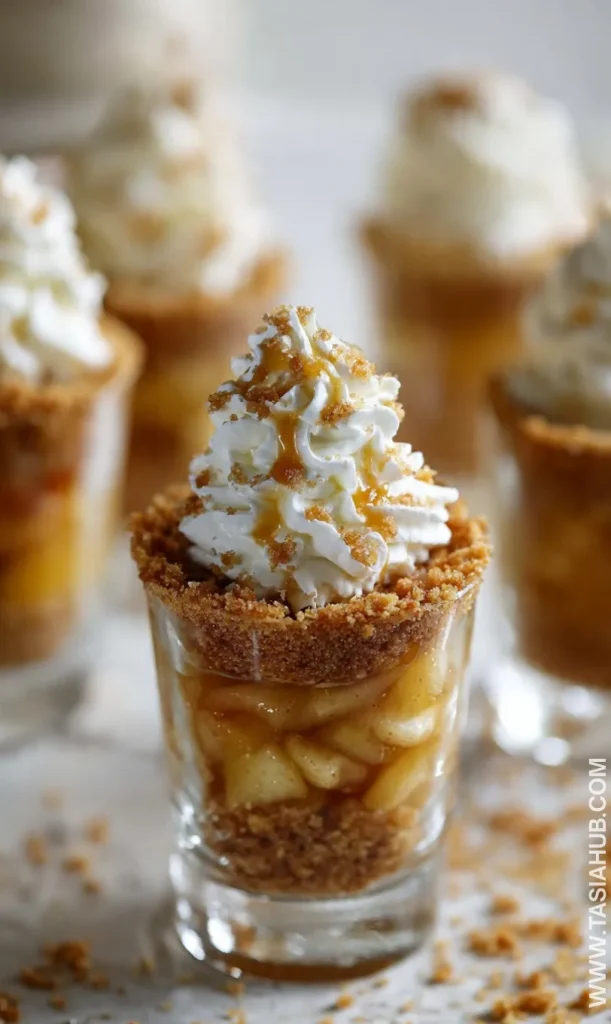
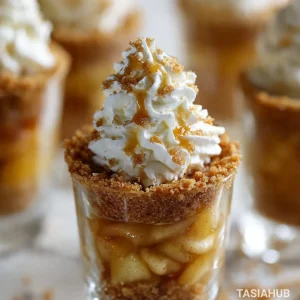
- Easily customizable: Add whipped cream, caramel drizzle, granola, or crushed cookies to match the mood, season, or who you’re serving.
- Light, portable, and mess-free: These small apple pies travel well, making them great for school snacks, picnics, or quick apple treats for kids on busy days.
Ingredient List
For the Apple Filling
- 2 cups diced apples (peeled)
- 2 tablespoons butter
- 2 tablespoons brown sugar
- 1 tablespoon granulated sugar
- 1 teaspoon cinnamon
- 1 tablespoon cornstarch
- 2 tablespoons water
- Pinch of salt
For the Crumble/Crust Layer
- 1 cup crushed graham crackers or shortbread cookies
- 2 tablespoons melted butter
Optional Toppings
- Whipped cream
- Caramel sauce
- A sprinkle of cinnamon
Ingredient Notes
- Apples: I love using Honeycrisp or Fuji because they stay juicy and slightly firm after cooking. They give these apple pie snack cups the best texture.
- Butter: Don’t skip the butter—it creates that buttery, caramel-like sauce that makes these little apple treats irresistible.
- Brown sugar: Adds depth and warmth that plain sugar can’t match. I almost always use light brown sugar here for a balanced sweetness.
- Cornstarch: Just a tiny bit thickens the filling so it layers nicely in the cup without turning watery. It makes a big difference!
- Crushed cookies: Graham crackers give a classic pie-like flavor, but shortbread cookies make it richer. I switch between them depending on my mood.
Kitchen Equipment Needed
- Small saucepan: For cooking down the apples until they’re soft and saucy. I use my little nonstick pan because it heats evenly and makes cleanup easy.
- Mixing bowl: Useful for combining your crushed cookies with melted butter (and resisting the urge to snack on them).
- Heat-safe cups, jars, or ramekins: These hold your layers. Clear cups are my favorite because you can actually see the pretty apple and crumble layers.
- Wooden spoon or silicone spatula: Helps stir the apples without breaking them into mush.
- Measuring cups and spoons: Keeps the sweetness and spices just right every time.
Instructions
Step 1 — Prep the apples
- Wash, peel, and dice the apples into roughly 1/2-inch pieces so they cook evenly.
- Toss the diced apples with the granulated sugar, cinnamon, and a pinch of salt in a small bowl. This lets the sugar start drawing out juices.
- Measure out the cornstarch and water into a tiny ramekin and whisk until smooth — this slurry will thicken the filling later.
Pro tip: If your apples are very tart, add an extra tablespoon of brown sugar here so the final cups taste balanced.
Step 2 — Cook the apple filling
- Heat the 2 tablespoons of butter in a small saucepan over medium heat until melted and foamy.
- Add the sugared apples and cook, stirring gently, for 4–6 minutes until they begin to soften and release juices.
- Sprinkle in the brown sugar and continue to cook, stirring occasionally, until the sugar dissolves and the apples look glossy.
- Give the cornstarch slurry one more stir and pour it into the pan. Stir gently and cook for another 1–2 minutes until the mixture thickens and clings to the apples.
- Remove from heat and let the filling cool for 8–10 minutes — it will thicken a little more as it cools.
Pro tip: Whisk the cornstarch slurry right before adding and stir continuously for the first 30–45 seconds to prevent lumps.
Step 3 — Make the crumble/crust layer
- Place the graham crackers or shortbread cookies in a zip-top bag and crush them with a rolling pin until you have mostly fine crumbs with a few larger bits for texture.
- Transfer crumbs to a mixing bowl and stir in the 2 tablespoons of melted butter until the mixture holds together when pressed between your fingers.
- Taste a tiny pinch — if it’s not buttery enough for your liking, add a half tablespoon more butter.
Pro tip: Press a little of the crumb mix into the bottom of each cup to create a compact base that keeps the filling from turning soggy.
Step 4 — Assemble the cups
- Spoon about 1–2 tablespoons of the crumb base into the bottom of each cup and gently press down.
- Add a generous scoop (about 1/4 to 1/3 cup) of the warm apple filling on top of the crust layer.
- Sprinkle another thin layer of crumbs over the apples for crunch and visual contrast. Repeat layers if your cups are taller, ending with crumbs or a small dollop of whipped cream.
- Add any optional toppings now: a drizzle of caramel, a dusting of cinnamon, or a small piece of apple for decoration.
Step 5 — Chill, serve, and store
- Serve warm right away for a cozy, pudding-like experience, or chill in the refrigerator for 30–60 minutes if you prefer a firmer set and cooler treat.
- If preparing ahead, cover each cup with plastic wrap and refrigerate for up to 3 days. Add whipped cream or caramel only right before serving.
- To reheat, remove topping and microwave the cup for 20–30 seconds, then add fresh whipped cream.
Pro tip: If serving to kids, warm cups are often more comforting; for take-to-school snack cups, chill them and pack the topping separately to keep things tidy.
Final quick checks
- Make sure the filling is thick, not soupy, before assembling — it should cling to the spoon.
- Taste as you go (especially the crumb and filling balance) so each cup ends up perfectly sweet and spiced for your crowd.
Tips and Tricks for Success
- Cut the apples evenly so they cook at the same pace and don’t leave you with a mix of mushy and crunchy pieces.
- Let the filling cool slightly before assembling — warm is fine, but piping hot will melt your crumb layer.
- Pack the bottom crust firmly so it creates a stable base that doesn’t crumble as you scoop.
- Taste the filling before assembling and adjust the sweetness or cinnamon if needed. Every batch of apples is different!
- Use clear cups or jars for that pretty layered look, especially if you’re serving these at gatherings or parties.
Ingredient Substitutions and Variations
- Use pears instead of apples for a softer, slightly floral twist — perfect in fall and winter.
- Swap the graham crackers with Biscoff cookies for a spiced, caramel-like flavor.
- Add nuts like chopped pecans or walnuts to the crumb layer for crunch and richer flavor.
- Stir in a splash of vanilla or a pinch of nutmeg to the apple filling for extra depth.
- Make it dairy-free by using plant-based butter and topping with coconut whipped cream.
- Turn it into a breakfast cup by replacing the cookie crumbs with granola and reducing the sugar in the filling.
- Use store-bought mini pie crust shells broken into pieces for a more traditional pie texture.
Serving Suggestions
- I love serving these apple pie in a cup for kids straight from the fridge with a small dollop of whipped cream—it makes snack time feel extra special.
- Warmed up slightly and drizzled with caramel sauce, these small apple pies turn into a cozy dessert after dinner.
- Pair a cup with a hot mug of chai or coffee for a comforting afternoon treat for adults—it balances sweetness with spice beautifully.
- Serve at a kids’ party with mini spoons—everyone gets their own personal dessert, and it’s less messy than a full pie.
- Add a sprinkle of cinnamon sugar or crushed nuts on top for a pretty finishing touch that makes each cup feel fancy and homemade.
Storage and Reheating Instructions
- Refrigerate: Cover individual cups with plastic wrap or lids; store for up to 3 days.
- Freeze: For longer storage, freeze without toppings for up to 1 month; thaw in the fridge before serving.
- Reheat: Microwave for 20–30 seconds until warm, then add whipped cream or caramel topping.
- Serving cold: These cups are also delicious chilled—especially for after-school snacks or a summer treat.
- Toppings: Always add whipped cream, caramel, or nuts right before serving to keep them fresh and crunchy.
Frequently Asked Questions
Can I use frozen apples for this recipe?
Yes! Just thaw them completely and drain any excess liquid before cooking so your filling doesn’t get watery.
How many servings does this recipe make?
It makes about 4–6 individual desserts in a cup, depending on the size of your cups. Perfect for small gatherings or after-school snacks.
Can I make these ahead of time?
Absolutely! You can assemble the cups and refrigerate for up to 3 days. Add whipped cream or caramel topping right before serving.
Can I use a different type of sweetener?
Yes, maple syrup or coconut sugar works well instead of brown sugar. Adjust to taste, since sweetness levels vary.
Can I freeze these apple pie snack cups?
Yes! Freeze without toppings for up to a month. Thaw in the fridge and add toppings before serving.
Are these suitable for kids?
Definitely! They’re a fun, portion-controlled dessert, and you can control the sugar and spice to make them kid-friendly.
Did you try this recipe? Let me know in the comments how it turned out!
Apple Pie in a Cup
Equipment
- Small saucepan
- Mixing Bowl
- Heat-safe cups, jars, or ramekins
- Wooden Spoon or Silicone Spatula
- Measuring cups and spoons
Ingredients
For the Apple Filling
- 2 cups diced apples peeled
- 2 tablespoons butter
- 2 tablespoons brown sugar
- 1 tablespoon granulated sugar
- 1 teaspoon cinnamon
- 1 tablespoon cornstarch
- 2 tablespoons water
- Pinch of salt
For the Crumble/Crust Layer
- 1 cup crushed graham crackers or shortbread cookies
- 2 tablespoons melted butter
Optional Toppings
- Whipped cream
- Caramel sauce
- A sprinkle of cinnamon
Instructions
Step 1 — Prep the apples
- Wash, peel, and dice the apples into roughly 1/2-inch pieces so they cook evenly.
- Toss the diced apples with the granulated sugar, cinnamon, and a pinch of salt in a small bowl. This lets the sugar start drawing out juices.
- Measure out the cornstarch and water into a tiny ramekin and whisk until smooth — this slurry will thicken the filling later.
- Pro tip: If your apples are very tart, add an extra tablespoon of brown sugar here so the final cups taste balanced.
Step 2 — Cook the apple filling
- Heat the 2 tablespoons of butter in a small saucepan over medium heat until melted and foamy.
- Add the sugared apples and cook, stirring gently, for 4–6 minutes until they begin to soften and release juices.
- Sprinkle in the brown sugar and continue to cook, stirring occasionally, until the sugar dissolves and the apples look glossy.
- Give the cornstarch slurry one more stir and pour it into the pan. Stir gently and cook for another 1–2 minutes until the mixture thickens and clings to the apples.
- Remove from heat and let the filling cool for 8–10 minutes — it will thicken a little more as it cools.
- Pro tip: Whisk the cornstarch slurry right before adding and stir continuously for the first 30–45 seconds to prevent lumps.
Step 3 — Make the crumble/crust layer
- Place the graham crackers or shortbread cookies in a zip-top bag and crush them with a rolling pin until you have mostly fine crumbs with a few larger bits for texture.
- Transfer crumbs to a mixing bowl and stir in the 2 tablespoons of melted butter until the mixture holds together when pressed between your fingers.
- Taste a tiny pinch — if it’s not buttery enough for your liking, add a half tablespoon more butter.
- Pro tip: Press a little of the crumb mix into the bottom of each cup to create a compact base that keeps the filling from turning soggy.
Step 4 — Assemble the cups
- Spoon about 1–2 tablespoons of the crumb base into the bottom of each cup and gently press down.
- Add a generous scoop (about 1/4 to 1/3 cup) of the warm apple filling on top of the crust layer.
- Sprinkle another thin layer of crumbs over the apples for crunch and visual contrast. Repeat layers if your cups are taller, ending with crumbs or a small dollop of whipped cream.
- Add any optional toppings now: a drizzle of caramel, a dusting of cinnamon, or a small piece of apple for decoration.
Step 5 — Chill, serve, and store
- Serve warm right away for a cozy, pudding-like experience, or chill in the refrigerator for 30–60 minutes if you prefer a firmer set and cooler treat.
- If preparing ahead, cover each cup with plastic wrap and refrigerate for up to 3 days. Add whipped cream or caramel only right before serving.
- To reheat, remove topping and microwave the cup for 20–30 seconds, then add fresh whipped cream.
- Pro tip: If serving to kids, warm cups are often more comforting; for take-to-school snack cups, chill them and pack the topping separately to keep things tidy.
Final quick checks
- Make sure the filling is thick, not soupy, before assembling — it should cling to the spoon.
- Taste as you go (especially the crumb and filling balance) so each cup ends up perfectly sweet and spiced for your crowd.
Notes
Nutritional Value (per serving — approximate):
- Calories: 220–260
- Carbohydrates: 32g
- Protein: 1g
- Fat: 10g
- Saturated Fat: 5g
- Fiber: 2–3g
- Sugar: 24g
- Sodium: 60mg
The nutritional information provided on this website is an estimate only and is intended for general guidance. We cannot guarantee its accuracy and recommend consulting a qualified healthcare professional or registered dietitian for personalized nutrition advice.